


THE DO'S AND DON'TS OF MAPPING PART 7
Adding to a Map
 Archeia_Nessiah
- 07/12/2011 04:24 AM
- 4452 views
Even when the Engine is Rm2003 it can still be applied to every level design related.
Table of contents:
1 The basics
a the 'yeses'
b the 'noes'
2 The specific Basics:
a Mountains
b Forests
c Towns
d Deserts
e Plains
f World Map Tips
3 Adding to a map
a Eventing
b Overlapping
c Effects
d Overlays
*****************************************************************************
Adding On
Alright, I’m going to start the adding on section. Also, I’ll be doing an interior design to houses and castles, as well as caves soon enough.
Shadowing and Fading
This is just one small add on that I want people to see. A lot of people have boring maps like this:
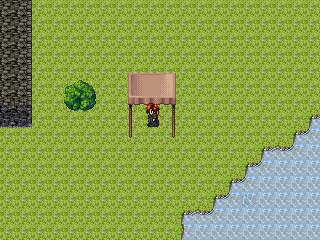
This makes me cry people. With only a few extra seconds of work, you can make it look a million times better. Let’s start with the most basic of add-ons, Shadowing and Fading. By adding a darker grass to places, you can make a shadow effect. By adding sand to the water there, you can add a water fading to land effect. See here:
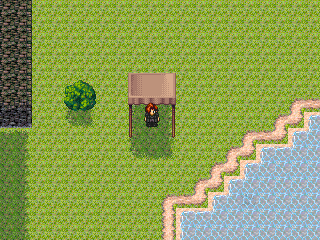
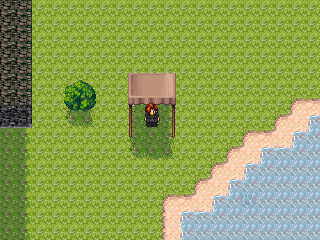
However, you will easily notice a bit of a problem there. The fact that the shadows and fading don’t line up. This is where a key that not some many people know about comes in. It’s called THE SHIFT KEY. By holding down the shift key and placing the tile where you want it to be, the ground tile you selected will take up the whole square. Example:

OH NOES! They don’t fade in now. That, however, is a solvable problem. Simply by going back over the tiles next to the places where you want the tiles to fade in, you can create the fading effect that you want. Example:
Now, you’ve got a much nicer looking map. It’s not nearly as boring as it was, even though it’s still pretty boring. Now, we can add more to it.
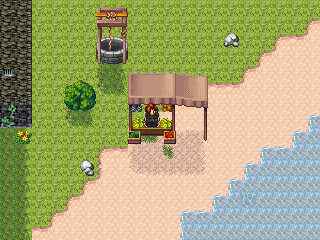
Objects are the second layer of a map, and are very important. Simply be placing a few random objects on a map, you can make it looks loads better. Example:
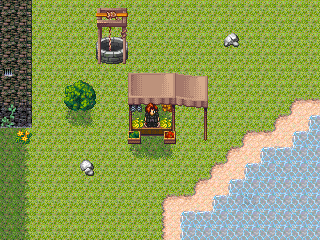
As you can, the map is beginning to look a lot nicer. Now, what you’ve got to do is link the objects together somehow. By reshadowing, drawing paths, and refading, you can achieve this. Example:
By adding more and more objects and changing the map some to suit the object placement, your small area can begin to take a new shape, much like this:
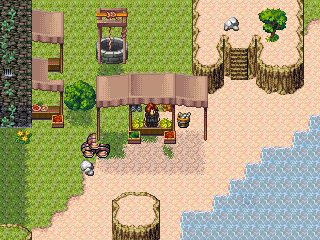
However, if you’re like me, you’ll notice a few problems. First, because objects can’t overlap, there’s some spots that are missing things. Also, a few rules have been broken, like the squaring of land and the crowding of space. Some things will still have to be changed, but this is all we can do with just objects. Now we need… EVENTS!
Eventing is the most important part of all. By adding second layer events over objects, you can get the image of two objects. By adding birds and animals, you can give life to your maps. By adding people, you can purpose. Check out this fully changed and evented map.

As you should be able to see, the change from beginning to end was drastic. That’s all it really takes, and isn’t that hard to do at all.
*****************************************************************************
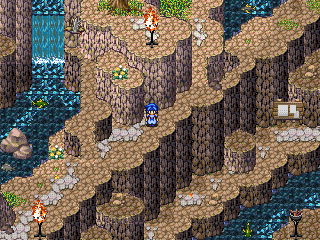
Here's the map that I did:

Now, there are some different things object wise and eventing wise I did here. The highlight of this though will be TRANSPARENCY.
Transparency is not all that important, but it adds a realistic feeling to the maps. If you look above, I put anything and everything (aka the rocks) nearby the water at a transparent lvl to make them look like they are under the water. If you don't do that, it still looks ok, but not as good. Example:

If you compare the two, you should notice that one looks more realistic then the other because of having transparent events rather then normal objects.
It is also important to make any charas and etc in the water transparent was well. You can do this two ways, either going into the database and seting it to make events 1/3, 1/2 or 1/1 transparent. Or, you can just make the event itself transparent. This is most important with fish. Example, in the two pictures above the fish are transparent, but in the one below, they are not:
Now they stand out a bit clearer, but in real life you wouldn't be able to see a fully illusive fish, so make them transparent one way or another.
Lastly (this has nothing to do with transparency) you should always try to find something to put at the bottom of a water fall to ensure that it doesn't look like it's just there. For example, in all the pictures above, the water fall has water splashing where it ends to add a realistic effect. However, if it doesn't, it will look choppy and crappy, like this:
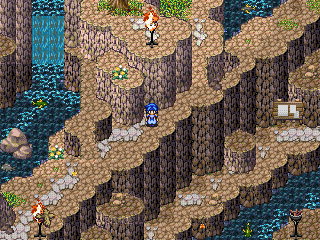
Table of contents:
1 The basics
a the 'yeses'
b the 'noes'
2 The specific Basics:
a Mountains
b Forests
c Towns
d Deserts
e Plains
f World Map Tips
3 Adding to a map
a Eventing
b Overlapping
c Effects
d Overlays
*****************************************************************************
Adding On
Alright, I’m going to start the adding on section. Also, I’ll be doing an interior design to houses and castles, as well as caves soon enough.
Shadowing and Fading
This is just one small add on that I want people to see. A lot of people have boring maps like this:
This makes me cry people. With only a few extra seconds of work, you can make it look a million times better. Let’s start with the most basic of add-ons, Shadowing and Fading. By adding a darker grass to places, you can make a shadow effect. By adding sand to the water there, you can add a water fading to land effect. See here:
However, you will easily notice a bit of a problem there. The fact that the shadows and fading don’t line up. This is where a key that not some many people know about comes in. It’s called THE SHIFT KEY. By holding down the shift key and placing the tile where you want it to be, the ground tile you selected will take up the whole square. Example:
OH NOES! They don’t fade in now. That, however, is a solvable problem. Simply by going back over the tiles next to the places where you want the tiles to fade in, you can create the fading effect that you want. Example:
Now, you’ve got a much nicer looking map. It’s not nearly as boring as it was, even though it’s still pretty boring. Now, we can add more to it.
Objects are the second layer of a map, and are very important. Simply be placing a few random objects on a map, you can make it looks loads better. Example:
As you can, the map is beginning to look a lot nicer. Now, what you’ve got to do is link the objects together somehow. By reshadowing, drawing paths, and refading, you can achieve this. Example:
By adding more and more objects and changing the map some to suit the object placement, your small area can begin to take a new shape, much like this:
However, if you’re like me, you’ll notice a few problems. First, because objects can’t overlap, there’s some spots that are missing things. Also, a few rules have been broken, like the squaring of land and the crowding of space. Some things will still have to be changed, but this is all we can do with just objects. Now we need… EVENTS!
Eventing is the most important part of all. By adding second layer events over objects, you can get the image of two objects. By adding birds and animals, you can give life to your maps. By adding people, you can purpose. Check out this fully changed and evented map.
As you should be able to see, the change from beginning to end was drastic. That’s all it really takes, and isn’t that hard to do at all.
*****************************************************************************
Here's the map that I did:
Now, there are some different things object wise and eventing wise I did here. The highlight of this though will be TRANSPARENCY.
Transparency is not all that important, but it adds a realistic feeling to the maps. If you look above, I put anything and everything (aka the rocks) nearby the water at a transparent lvl to make them look like they are under the water. If you don't do that, it still looks ok, but not as good. Example:
If you compare the two, you should notice that one looks more realistic then the other because of having transparent events rather then normal objects.
It is also important to make any charas and etc in the water transparent was well. You can do this two ways, either going into the database and seting it to make events 1/3, 1/2 or 1/1 transparent. Or, you can just make the event itself transparent. This is most important with fish. Example, in the two pictures above the fish are transparent, but in the one below, they are not:
Now they stand out a bit clearer, but in real life you wouldn't be able to see a fully illusive fish, so make them transparent one way or another.
Lastly (this has nothing to do with transparency) you should always try to find something to put at the bottom of a water fall to ensure that it doesn't look like it's just there. For example, in all the pictures above, the water fall has water splashing where it ends to add a realistic effect. However, if it doesn't, it will look choppy and crappy, like this:

Pages:
1

