


PIXEL FACESET/TALKSPRITE TUTORIAL
A brief overview of my process and some tips.
 Ebeth
Ebeth- 11/05/2015 09:46 PM
- 2958 views
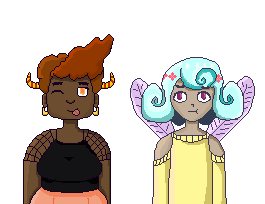
Here's a quick guide to how I made my facesets/talksprites! I made them for 2k3 but you can use this for any engine or project. It’s a fairly simple process.

First off: This method can be used in basically any computer art program, though using something more advanced than windows paint can make your life easier.
I use paint.net which is more advanced than paint but without all the bells and whistles of photoshop. I use photoshop for my art but for pixel stuff i prefer to keep my work-space simple and uncluttered.
Whatever program you decided to use make sure you have anti-aliasing disabled and you are using a pencil or binary tool for your lines! You want the edges of your pixels to be sharp and not blurry.

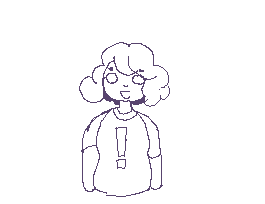
I start with a super super rough sketch. Unfortunately I no longer have that one. I like to do a basic geometric sketch before I start just so i have a general idea of what I’m going for. Then I do my rough sketch (thats the pic above). At this point I’m not worrying too much about neatness but I’m also not going all over the place.
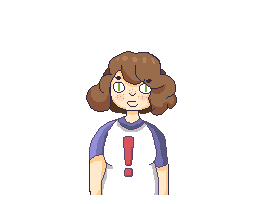
Next I put in my basic colors using the paint bucket tool (I do all of this on one layer). Again make sure anti-aliasing is disabled. Don’t worry about anything beyond the base colors at this point.

Next: CLEAN UP! Make sure your lines look nice! Try to avoid jagged edges at all costs. This will really make your lines look a lot nicer.

It’s a pain and it takes a while to catch all of them but its worth it! Put in the effort.

Shade and add the final details!
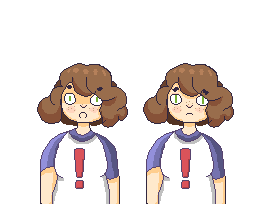
To do different facial expressions just edit the face + body! Make sure to save a back up of the base!

And thats it! Hope this helps and good luck!
This was crossposted from my Tumblr.
First off: This method can be used in basically any computer art program, though using something more advanced than windows paint can make your life easier.
I use paint.net which is more advanced than paint but without all the bells and whistles of photoshop. I use photoshop for my art but for pixel stuff i prefer to keep my work-space simple and uncluttered.
Whatever program you decided to use make sure you have anti-aliasing disabled and you are using a pencil or binary tool for your lines! You want the edges of your pixels to be sharp and not blurry.
I start with a super super rough sketch. Unfortunately I no longer have that one. I like to do a basic geometric sketch before I start just so i have a general idea of what I’m going for. Then I do my rough sketch (thats the pic above). At this point I’m not worrying too much about neatness but I’m also not going all over the place.
Next I put in my basic colors using the paint bucket tool (I do all of this on one layer). Again make sure anti-aliasing is disabled. Don’t worry about anything beyond the base colors at this point.
Next: CLEAN UP! Make sure your lines look nice! Try to avoid jagged edges at all costs. This will really make your lines look a lot nicer.
It’s a pain and it takes a while to catch all of them but its worth it! Put in the effort.
Shade and add the final details!
To do different facial expressions just edit the face + body! Make sure to save a back up of the base!
And thats it! Hope this helps and good luck!
This was crossposted from my Tumblr.

