


MARREND PLAYS HEROES OF MIGHT AND MAGIC 2!
Posts

Well, it's decided. I originally didn't think it was worth doing an LP of this particular game. However, as you can see, here I am again. This thread's game is quite possibly my favorite game of all time...
...Heroes of Might and Magic 2 - The Succession Wars. I first got this game new and for the DOS platform back in 1996. There was no question I would get it. My friends (at the time) were pretty avid about the original Heroes, and we played it over hot seat at my then-house quite a bit over the summer of '95. We did similarly with this game too, so, like the World of Xeen LP, a bit of a trip down memory lane here.
The original Heroes of Might and Magic - A Strategic Quest, while certainly a spin-off of the main-line series, was something of a spiritual successor of a game New World Computing released in 1990 called King's Bounty. NWC managed two Heroes games before being acquired by 3DO. Likewise, 3DO managed two games before the Might and Magic license was sold to Ubisoft, who still retain the rights to the license as of this writing. To date, Ubisoft has made three games in the Heroes series.
With Heroes 2, the graphics got a serious overhaul, which was desperately needed. The unit graphics in the original Heroes is what I would call "cartoony". Spriters-resource provides ample examples of what I'm talking about. The battlefield was expanded, though, heroes are still limited to having up to five unit stacks in their army. New to this game, and games in the series going forward (as far as I'm aware) are secondary skills. Some skills were created to emulate the benefit of having a certain type from the original game. Such as Leadership (morale bonus) for Knights, Pathfinding (terrain movement penalty reduction) for Barbarians, Navigation (extra movement on water) for Sorceresses, and Scouting (the visual range of the hero increases) for Warlocks. Two factions were also included into the mix as well, Wizards and Necromancers, making the roster of possible heroes to hire expand greatly.
The original game used various characters, usually NPCs, from the main-line series for it's heroes (hense the title!) and this game throws a few more familiar faces in our direction. However, there are, however, a few original characters thrown into the mix that have no such background, as it were.
This LP will go through the Archibald campaign first, then the cannonical Roland campaign. I'll probably do one map per session. Naturally, I will be using Jack Hartman's Universal Game Editor, and David Melason's quite exhaustive (if not as complete for my taste) module for the game.
Music-wise, I will pull tracks from this playlist, with the sub-note that the original Succession Wars town tracks will be pulled from this playlist. Though, I will also provide the town tracks from the expansion, Price of Loyalty because most of them are better in my opinion.
Table of Contents:
Session 2 - Secnario 2: Barbarian Wars
Session 3 - Scenario 3: Necromancers
Session 4 - Scenario 5: Turning Point
Session 5 - Scenario 6: Rebellion
Session 6 - Scenario 8: Country Lords
Session 7 - Scenario 10: Greater Glory
Session 8 - Scenario 11: Apocalypse
Session 10 - Scenario 2: Annexation
Session 11 - Scenario 4: Carator Mines
Session 12 - Scenario 5: Turning Point and Scenario 6: Defender
Session 13 - Scenario 7: The Gauntlet
Session 14 - Scenario 9: Corlagon's Defense
Session 15 - Scenario 10: Final Justice

...Heroes of Might and Magic 2 - The Succession Wars. I first got this game new and for the DOS platform back in 1996. There was no question I would get it. My friends (at the time) were pretty avid about the original Heroes, and we played it over hot seat at my then-house quite a bit over the summer of '95. We did similarly with this game too, so, like the World of Xeen LP, a bit of a trip down memory lane here.
The original Heroes of Might and Magic - A Strategic Quest, while certainly a spin-off of the main-line series, was something of a spiritual successor of a game New World Computing released in 1990 called King's Bounty. NWC managed two Heroes games before being acquired by 3DO. Likewise, 3DO managed two games before the Might and Magic license was sold to Ubisoft, who still retain the rights to the license as of this writing. To date, Ubisoft has made three games in the Heroes series.
With Heroes 2, the graphics got a serious overhaul, which was desperately needed. The unit graphics in the original Heroes is what I would call "cartoony". Spriters-resource provides ample examples of what I'm talking about. The battlefield was expanded, though, heroes are still limited to having up to five unit stacks in their army. New to this game, and games in the series going forward (as far as I'm aware) are secondary skills. Some skills were created to emulate the benefit of having a certain type from the original game. Such as Leadership (morale bonus) for Knights, Pathfinding (terrain movement penalty reduction) for Barbarians, Navigation (extra movement on water) for Sorceresses, and Scouting (the visual range of the hero increases) for Warlocks. Two factions were also included into the mix as well, Wizards and Necromancers, making the roster of possible heroes to hire expand greatly.
The original game used various characters, usually NPCs, from the main-line series for it's heroes (hense the title!) and this game throws a few more familiar faces in our direction. However, there are, however, a few original characters thrown into the mix that have no such background, as it were.
This LP will go through the Archibald campaign first, then the cannonical Roland campaign. I'll probably do one map per session. Naturally, I will be using Jack Hartman's Universal Game Editor, and David Melason's quite exhaustive (if not as complete for my taste) module for the game.
Music-wise, I will pull tracks from this playlist, with the sub-note that the original Succession Wars town tracks will be pulled from this playlist. Though, I will also provide the town tracks from the expansion, Price of Loyalty because most of them are better in my opinion.
Table of Contents:
- Archibald's Campaign
Session 2 - Secnario 2: Barbarian Wars
Session 3 - Scenario 3: Necromancers
Session 4 - Scenario 5: Turning Point
Session 5 - Scenario 6: Rebellion
Session 6 - Scenario 8: Country Lords
Session 7 - Scenario 10: Greater Glory
Session 8 - Scenario 11: Apocalypse
- Roland's Campaign
Session 10 - Scenario 2: Annexation
Session 11 - Scenario 4: Carator Mines
Session 12 - Scenario 5: Turning Point and Scenario 6: Defender
Session 13 - Scenario 7: The Gauntlet
Session 14 - Scenario 9: Corlagon's Defense
Session 15 - Scenario 10: Final Justice
There is one tidbit I want to note about this game before going forward, and it's something of an Easter Egg accessible from the main menu.
This is not the title screen, silly. It's the title screen music, though, and is good.
The main menu has a graphic of a barrel in the lower-left that houses the button to exit the game. Sitting on that barrel is a blade pointing to a barely open door, that has this pulsating aura behind it. If you click on it, you get something of a slide-show featuring Might and Magic 6. My memory is a little fuzzy on this point, but, I don't believe any of the pictures seen here are actually in MM6. I don't know what MM6 would have looked like if it was entirely under the auspices of NWC. However, I will note that by the time MM6 did come out, NWC was acquired by 3DO, and also the rights to the Might and Magic license. Which included the Heroes spin-offs. That aside, the MM6 that does exist uses still-screens like the ones featured in this slide-show to represent the interiors of houses, or the various throne rooms in that game.
That aside over with, let's refocus the Heroes spin-off! I may not remember all the nitty-gritty details of the the story behind Heroes of Might and Magic - A Strategic Quest. However, what I can recall is a case of all there in the manual. The game, itself, never touches upon it, but, the way I remember it, it's effectively an isekai. A character is mystically transported to the content of Enroth, and is tasked to learn how this new worldcomputing works. To not merely survive, but to thrive in it.
How this translates into actual gameplay is by taking the role of either Lord Ironfist (the Knight faction), Lord Slayer (the Barbarian faction), Lord Alamar (the Warlock faction), or Queen Lamanda (the Sorceress faction), to conquer the lands of the other factions, and unite Enroth under one banner. This game assumes Lord Ironfist won. I will allow the opening sequence to the campaign to say the rest, courtesy of Dave Seaman.
As you might suspect from this intro, Archibald's forces consist of the "evil" factions of the game: Warlock, Necromancer, and Barbarian. Both campaigns have a "campaign screen" section before going into a map, and outlines the particular scenario's story. They both contain their own music, and Archibald's...
...is pretty damn sweet. This screen also serves as a place to choose where the story can go for the next scenario, if/when the story branches.
For now, we hop into the shoes of one of Archibald's new lieutenants, and have been given a Necromancer town...
Succession Wars version
Price of Loyalty version
...and the hero, Ranloo, to lead an initial army of Skeletons and Zombies. Our task is pretty simple. We are to subjugate this area to serve Archibald's greater glory. Or, if you desire it in more gameplay terms, we win by conquering all enemy-controlled towns and defeat all enemy-controlled heroes.
As a general rule, you begin a map with a level 1 hero. The campaign may not necessarily work this way later. However, as this is the first scenario, we shouldn't expect anything too powerful. On the other hand, we don't want to level up either.
Wait. What? We don't want to level-up? No. We don't. We never want even the slightest chance of Spell Power to increase. If it does, we use UGE to set it to -128, and remove any extraneous artifacts. I mean, of course, I use UGE to set up Ranloo's stats and army to be...

...where we want them to be. I'm fairly confident I can win with this army. Well, okay, not this army, per say. This set-up. My army's gonna get stupid-huge. Not from the usual method of buying creature dwellings, and getting weekly growth, but by casting...
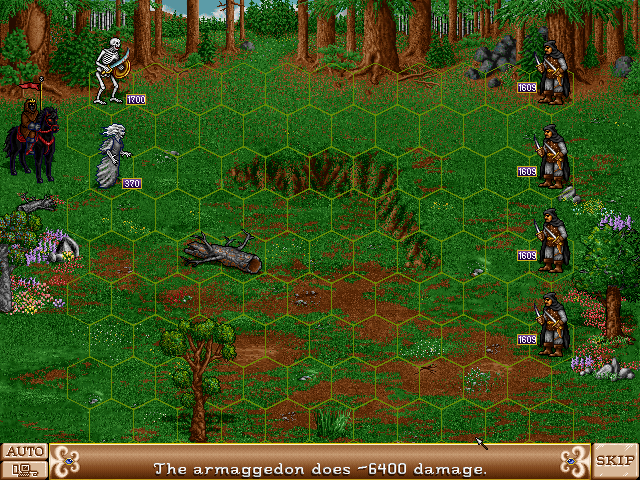
...Armageddon. When the battle concludes, my army consists of 4,910 Skeletons and 8,675 Ghosts.
I don't remember when I started using UGE. I know I used some kind of saved game editor for Heroes 1 at some point, and maybe Heroes 2 as well. I don't remember if those saved editors allowed specific inputs for stats, or if there was just a button, or key press, to "max" the stats to 99. However, UGE is a hex-editor at it's heart. If the variable for "Ranaloo's Experience" is stored as a four-byte signed integer, UGE will absolutely allow you to input -2,147,483,648, if the address is marked as such. How the game might react to variables being outside their "proper" bounds may differ, of course. However, in regards to Spell Power, it's a signed byte. So, it can fall anywhere between 127 and -128. It should be pretty damn obvious that we prefer the -128 value from the last two screenshots, and the report of what Ranloo's army looks like after-battle.
I mean, I know it's completely broken to play this way. Even if I was playing with a more "normal" Necromancer army, things would eventually escalate pretty quick. However, this unintentional bug is exactly why I got interested in making games. Well, it's more accurate to say that my understanding of data, and how it might be stored, was from this unintentional bug. This revelation that the 99 that a lot of RPGs use as a maximum for stats is merely a hard cap placed on the game. The actual limit is 255. In the case of Experience you might think that dropping 1 million EXP on a character's head would give you a huge boost. Usually, it does, don't get me wrong. However, while still a nice and round and large value, it is a drop in the bucket to the actual upper limit of the variable. That variable can actually go as high as 4,294,967,295!!!
This is also partially why I considered that LPing this game wasn't worth it. I can curb-stomp anything this game can throw at me. While this might be entertaining for me, would that be entertaining for those watching/reading? I'm still not sure. Either way, I will make the attempt.
Anyway, we've got quite an army at the moment. We'll go back to the castle and use these troops I just obtained to set up a garrison for it. I leave Ranloo with what he had before, so, the likelihood of that castle falling into enemy hands is, well, let's just say it's exceptionally low. We then aim for the lumber mill the Rouges were guarding, and ride. There's an ore mine a bit to the north. We can't make it this game-day. The next, certainly. To the south-east lies a sulfur mine, guarded by Halflings. Well, Ranloo could use the reinforcements...
Okay. Time to get another hero. We could absolutely let Ranloo do all the work. In theory, we could UGE his movement in such a way that he could travel the equivalent of three days in one, and make this even more one-sided than it already is. However, even I'm not crazy enough to do that.
Two heroes are available for hire at castles. They are randomized at the beginning of the game, and each week. Though, it's more correct to say that one hero is randomized that the offset of the game, while the other will be randomized, but be within the same faction as the one you started with. Perhaps this is to encourage players to use a particular factions heroes with it's associated units. However, it's totally possible to have a Knight lead an army of Necromancer units, or visa-versa. However, I will make the note here that units that are undead do not gain any benefits from high morale, making the Knight's Leadership not as valuable as it could be. On the other hand, undead don't get any penalties for low morale either.
That aside, we pick up Falagar, the Warlock. We UGE him in a similar fashion to Ranloo, only we give him Warlock units. Under normal circumstances, Black Dragons are among the best units in the game. However, since they resist magic altogether, and therefore would not receive damage from Armageddon, they loose a lot of their normally inherent value. So, we end up with Centaurs, Gargolyes, Griffins, Minotaur Kings, and Hyrdas. We have Falagar beat up Elves for an artifact (and for the army-buff), then a stack of Peasants that guard an alchemist lab. There's a lookout tower that can reveal more of the map that I have Falagar aim towards, and interact with the next game-day.
As a side-note, Ranloo going up against those Peasants might have been interesting. See, Ghosts in this game, and it's predecessor, have the ability to gain a number of units equal to the amount of units they slay from an attack. Compound that with the fact that Peasants only have 1 HP per unit, and the effect of Armageddon. Things could get even more out of hand then they already would be!
Of consideration here is that a unit stack is stored as a two-byte signed variable. So, it can be anywhere between -32768 and 32767. However, a negative number in this case is definitely not a good thing! I think I've seen units poof into nothingness after a fight if they reach into the negatives during a fight? It's been a while since I've allowed it to happen, so my memory might be a little fuzzy. However, just throwing that little tidbit out there to relay that while this style of play is still absolutely broken, we can also loop the counter in regards to a unit-stack, and end up with a disadvantage!
Day 5 is when my heroes first see sign of AI-controlled enemies. Falagar used a Dimension Door to finish off his movement, and the teleport put an enemy hero with his sight radius. It fled during it's turn, of course, and I think I spotted a hero within Ranloo's radius during an AI turn as well. However, I know the general direction they fled in before they vanished into unexplored territory. I will note now that this game does not use a shroud of war. Once a portion of the map is explored, it is visible to you at all times. It's not faded out if units are not in the area, keeping watch on it. So, we can have Falagar pursue the task of eliminating Yellow player. Ranloo should try to track down that other hero, and eventually eliminate that player too. There's still plenty of map to uncover, and I think there's three enemies to defeat on this map.
As a side-note about battles...
...there's some crunchy, but interesting stuff going on behind the scenes. I don't quite remember where I read about the exact formula for damage in HoMM/HoMM2/HoMM3, but, I know I saw it somewhere. In any event, attacking takes into account three variables. One is the damage range expected of the unit. The game likely uses an RNG to represent the entire stack rather than use an RNG for each individual unit within the stack. Though, I could be wrong about that. It also compares the Attack of the attacker and the Defense of the defender, like you might expect.
What makes it crunchy is the result of the comparison. If Attack is higher, the damage output is increased by 10% for each point of Attack exceeding Defense. If Defense is higher, the damage decreases by 5% per point of defense exceeding Attack. The absolute minimum value for damage is 1, and there is no "missing" in this game. HOMM1 had a damage cap of 32767 (which is the highest values for a signed two-byte variable, as it happens), but, I'm not sure if I've seen a damage cap for HOMM2. I'm pretty sure I've seen higher than 65536, which would take up at least three bytes of data.
I wanted to put attention to this because this kind a of damage formula has been the basis of the damage formula in my games since Nakaishi Wars. Though, the exact calculation for the damage multiplier may vary between games since the release of that game.
That aside, sure enough, Ranloo found both Green Player's castle, and maybe the hero I spotted earlier. He takes out the hero, but doesn't have the movement to take the castle on this Day. Meanwhile, Falagar chased down the Yellow hero we saw earlier, took it out, and the castle nearby. Yellow has been eliminated!
Ranloo eliminates Green Player the next day. One AI left, then. I notice some movement during the AI turn on Day 2 of Week 2. I had set the AI movement speed on the field map to be pretty high, so it was just a flash. So, I'm not 100% sure if it was nearer to Ranloo or Falagar, but, my instincts tell me Ranloo. My instincts proved right. The positioning of my heroes has Orange Player in something of a classic pincer maneuver. Ranloo engaged the hero, of course, and the enemy attacked first. They threw a Lightning Bolt at a stack of Ghosts (killing three of them), then fled. Not that I can entirely blame the AI for this, but, that army was stronger than the castle's garrison. Not that Orange Player stood much of a chance to begin with, but, they would stand a better chance if the hero retreated to the castle. Ah well! Ranloo can't get to the castle this turn, but Falagar can, and that ends the scenario.
The game makes a save-file for us before triggering the next cut-scene, and the campaign overview. That will be discussed next session, though!
This is not the title screen, silly. It's the title screen music, though, and is good.
The main menu has a graphic of a barrel in the lower-left that houses the button to exit the game. Sitting on that barrel is a blade pointing to a barely open door, that has this pulsating aura behind it. If you click on it, you get something of a slide-show featuring Might and Magic 6. My memory is a little fuzzy on this point, but, I don't believe any of the pictures seen here are actually in MM6. I don't know what MM6 would have looked like if it was entirely under the auspices of NWC. However, I will note that by the time MM6 did come out, NWC was acquired by 3DO, and also the rights to the Might and Magic license. Which included the Heroes spin-offs. That aside, the MM6 that does exist uses still-screens like the ones featured in this slide-show to represent the interiors of houses, or the various throne rooms in that game.
That aside over with, let's refocus the Heroes spin-off! I may not remember all the nitty-gritty details of the the story behind Heroes of Might and Magic - A Strategic Quest. However, what I can recall is a case of all there in the manual. The game, itself, never touches upon it, but, the way I remember it, it's effectively an isekai. A character is mystically transported to the content of Enroth, and is tasked to learn how this new world
How this translates into actual gameplay is by taking the role of either Lord Ironfist (the Knight faction), Lord Slayer (the Barbarian faction), Lord Alamar (the Warlock faction), or Queen Lamanda (the Sorceress faction), to conquer the lands of the other factions, and unite Enroth under one banner. This game assumes Lord Ironfist won. I will allow the opening sequence to the campaign to say the rest, courtesy of Dave Seaman.
As you might suspect from this intro, Archibald's forces consist of the "evil" factions of the game: Warlock, Necromancer, and Barbarian. Both campaigns have a "campaign screen" section before going into a map, and outlines the particular scenario's story. They both contain their own music, and Archibald's...
...is pretty damn sweet. This screen also serves as a place to choose where the story can go for the next scenario, if/when the story branches.
For now, we hop into the shoes of one of Archibald's new lieutenants, and have been given a Necromancer town...
Succession Wars version
Price of Loyalty version
...and the hero, Ranloo, to lead an initial army of Skeletons and Zombies. Our task is pretty simple. We are to subjugate this area to serve Archibald's greater glory. Or, if you desire it in more gameplay terms, we win by conquering all enemy-controlled towns and defeat all enemy-controlled heroes.
As a general rule, you begin a map with a level 1 hero. The campaign may not necessarily work this way later. However, as this is the first scenario, we shouldn't expect anything too powerful. On the other hand, we don't want to level up either.
Wait. What? We don't want to level-up? No. We don't. We never want even the slightest chance of Spell Power to increase. If it does, we use UGE to set it to -128, and remove any extraneous artifacts. I mean, of course, I use UGE to set up Ranloo's stats and army to be...
...where we want them to be. I'm fairly confident I can win with this army. Well, okay, not this army, per say. This set-up. My army's gonna get stupid-huge. Not from the usual method of buying creature dwellings, and getting weekly growth, but by casting...
...Armageddon. When the battle concludes, my army consists of 4,910 Skeletons and 8,675 Ghosts.
I don't remember when I started using UGE. I know I used some kind of saved game editor for Heroes 1 at some point, and maybe Heroes 2 as well. I don't remember if those saved editors allowed specific inputs for stats, or if there was just a button, or key press, to "max" the stats to 99. However, UGE is a hex-editor at it's heart. If the variable for "Ranaloo's Experience" is stored as a four-byte signed integer, UGE will absolutely allow you to input -2,147,483,648, if the address is marked as such. How the game might react to variables being outside their "proper" bounds may differ, of course. However, in regards to Spell Power, it's a signed byte. So, it can fall anywhere between 127 and -128. It should be pretty damn obvious that we prefer the -128 value from the last two screenshots, and the report of what Ranloo's army looks like after-battle.
I mean, I know it's completely broken to play this way. Even if I was playing with a more "normal" Necromancer army, things would eventually escalate pretty quick. However, this unintentional bug is exactly why I got interested in making games. Well, it's more accurate to say that my understanding of data, and how it might be stored, was from this unintentional bug. This revelation that the 99 that a lot of RPGs use as a maximum for stats is merely a hard cap placed on the game. The actual limit is 255. In the case of Experience you might think that dropping 1 million EXP on a character's head would give you a huge boost. Usually, it does, don't get me wrong. However, while still a nice and round and large value, it is a drop in the bucket to the actual upper limit of the variable. That variable can actually go as high as 4,294,967,295!!!
This is also partially why I considered that LPing this game wasn't worth it. I can curb-stomp anything this game can throw at me. While this might be entertaining for me, would that be entertaining for those watching/reading? I'm still not sure. Either way, I will make the attempt.
Anyway, we've got quite an army at the moment. We'll go back to the castle and use these troops I just obtained to set up a garrison for it. I leave Ranloo with what he had before, so, the likelihood of that castle falling into enemy hands is, well, let's just say it's exceptionally low. We then aim for the lumber mill the Rouges were guarding, and ride. There's an ore mine a bit to the north. We can't make it this game-day. The next, certainly. To the south-east lies a sulfur mine, guarded by Halflings. Well, Ranloo could use the reinforcements...
Okay. Time to get another hero. We could absolutely let Ranloo do all the work. In theory, we could UGE his movement in such a way that he could travel the equivalent of three days in one, and make this even more one-sided than it already is. However, even I'm not crazy enough to do that.
Two heroes are available for hire at castles. They are randomized at the beginning of the game, and each week. Though, it's more correct to say that one hero is randomized that the offset of the game, while the other will be randomized, but be within the same faction as the one you started with. Perhaps this is to encourage players to use a particular factions heroes with it's associated units. However, it's totally possible to have a Knight lead an army of Necromancer units, or visa-versa. However, I will make the note here that units that are undead do not gain any benefits from high morale, making the Knight's Leadership not as valuable as it could be. On the other hand, undead don't get any penalties for low morale either.
That aside, we pick up Falagar, the Warlock. We UGE him in a similar fashion to Ranloo, only we give him Warlock units. Under normal circumstances, Black Dragons are among the best units in the game. However, since they resist magic altogether, and therefore would not receive damage from Armageddon, they loose a lot of their normally inherent value. So, we end up with Centaurs, Gargolyes, Griffins, Minotaur Kings, and Hyrdas. We have Falagar beat up Elves for an artifact (and for the army-buff), then a stack of Peasants that guard an alchemist lab. There's a lookout tower that can reveal more of the map that I have Falagar aim towards, and interact with the next game-day.
As a side-note, Ranloo going up against those Peasants might have been interesting. See, Ghosts in this game, and it's predecessor, have the ability to gain a number of units equal to the amount of units they slay from an attack. Compound that with the fact that Peasants only have 1 HP per unit, and the effect of Armageddon. Things could get even more out of hand then they already would be!
Of consideration here is that a unit stack is stored as a two-byte signed variable. So, it can be anywhere between -32768 and 32767. However, a negative number in this case is definitely not a good thing! I think I've seen units poof into nothingness after a fight if they reach into the negatives during a fight? It's been a while since I've allowed it to happen, so my memory might be a little fuzzy. However, just throwing that little tidbit out there to relay that while this style of play is still absolutely broken, we can also loop the counter in regards to a unit-stack, and end up with a disadvantage!
Day 5 is when my heroes first see sign of AI-controlled enemies. Falagar used a Dimension Door to finish off his movement, and the teleport put an enemy hero with his sight radius. It fled during it's turn, of course, and I think I spotted a hero within Ranloo's radius during an AI turn as well. However, I know the general direction they fled in before they vanished into unexplored territory. I will note now that this game does not use a shroud of war. Once a portion of the map is explored, it is visible to you at all times. It's not faded out if units are not in the area, keeping watch on it. So, we can have Falagar pursue the task of eliminating Yellow player. Ranloo should try to track down that other hero, and eventually eliminate that player too. There's still plenty of map to uncover, and I think there's three enemies to defeat on this map.
As a side-note about battles...
...there's some crunchy, but interesting stuff going on behind the scenes. I don't quite remember where I read about the exact formula for damage in HoMM/HoMM2/HoMM3, but, I know I saw it somewhere. In any event, attacking takes into account three variables. One is the damage range expected of the unit. The game likely uses an RNG to represent the entire stack rather than use an RNG for each individual unit within the stack. Though, I could be wrong about that. It also compares the Attack of the attacker and the Defense of the defender, like you might expect.
What makes it crunchy is the result of the comparison. If Attack is higher, the damage output is increased by 10% for each point of Attack exceeding Defense. If Defense is higher, the damage decreases by 5% per point of defense exceeding Attack. The absolute minimum value for damage is 1, and there is no "missing" in this game. HOMM1 had a damage cap of 32767 (which is the highest values for a signed two-byte variable, as it happens), but, I'm not sure if I've seen a damage cap for HOMM2. I'm pretty sure I've seen higher than 65536, which would take up at least three bytes of data.
I wanted to put attention to this because this kind a of damage formula has been the basis of the damage formula in my games since Nakaishi Wars. Though, the exact calculation for the damage multiplier may vary between games since the release of that game.
That aside, sure enough, Ranloo found both Green Player's castle, and maybe the hero I spotted earlier. He takes out the hero, but doesn't have the movement to take the castle on this Day. Meanwhile, Falagar chased down the Yellow hero we saw earlier, took it out, and the castle nearby. Yellow has been eliminated!
Ranloo eliminates Green Player the next day. One AI left, then. I notice some movement during the AI turn on Day 2 of Week 2. I had set the AI movement speed on the field map to be pretty high, so it was just a flash. So, I'm not 100% sure if it was nearer to Ranloo or Falagar, but, my instincts tell me Ranloo. My instincts proved right. The positioning of my heroes has Orange Player in something of a classic pincer maneuver. Ranloo engaged the hero, of course, and the enemy attacked first. They threw a Lightning Bolt at a stack of Ghosts (killing three of them), then fled. Not that I can entirely blame the AI for this, but, that army was stronger than the castle's garrison. Not that Orange Player stood much of a chance to begin with, but, they would stand a better chance if the hero retreated to the castle. Ah well! Ranloo can't get to the castle this turn, but Falagar can, and that ends the scenario.
The game makes a save-file for us before triggering the next cut-scene, and the campaign overview. That will be discussed next session, though!
In today's scenario, we are sent to "unite" some Barbarian tribes under Archibald's iron grip banner. Gameplay-wise, this scenario will feel very similar to the last in that the victory condition is to defeat all enemy-controlled heroes and capture all enemy-controlled towns.
I sorta glazed over it last scenario, but, before entering the map proper, the game presents players with a three-way Show Choice that usually represents a bonus of some kind. Last map, the choice was between an extra 2000 gold, a Mage's Ring (increases Spell Power), or a Minor Scroll (increases Knowledge). With this scenario, our choice is between starting with a Necromancer hero/town combo, a Warlock hero/town combo, or a Barbarian hero/town combo. I chose Barbarian, and will show these upstarts how it's done. Or, perhaps I should say how it's UGEd.
Barbarian theme - Succession Wars edition
Barbarian theme - Price of Loyalty edition
There are a number of units in Heroes 2 that have upgraded versions. For example, with Necromancer units, Zombies can be upgraded into Mutant Zombies, Mummies can be upgraded into Royal Mummies, Vampires can be upgraded into Vampire Lords, and Liches can be upgraded into Power Liches. The units in this faction that do not get upgrades are Skeletons and Bone Dragons. The Knight faction gets the most upgrade-able units, with only one unit that cannot be upgraded (Peasants), whereas most other factions get three upgrades. The Warlock faction is an odd exception because while only two unique units can be upgraded, there are two upgrades for Green Dragons, Red Dragons and Black Dragons, that make the total number of upgrades to three.
That aside, our concern is mostly about any weird interactions with Armageddon. I already spoke about Black Dragons immune to it, and that's true for Red and Green Dragons as well. Iron Golems, and their upgrade, Steel Golems, of the Wizard faction have damage reduction, and is applied to Armageddon. Dwarves and Battle Dwarves of the Sorceress faction have a certain percent chance to be immune to spells, though I may not recall the exact percentage. Vampires and Vampire Lords of the Necromancer faction have an ability that allows them to heal based on how much damage they deal. It can, and does, trigger after an Armageddon, and this ability causes the stack to be reduced to their "starting" number.
The units of the Knight and Barbarian factions have no such interactions with "negative Armageddon". So, we can set up our initial army to be Orc Chieftains, Wolves, Ogre Lords, War Trolls, and Cyclopes.
This is a smaller map than the last one, so I might not even need two heroes to clear it. Eh, let's hire Vatawana, the Sorceress anyway.
I hire her day 3. Day 4, Vatawana defeats Purple Player's hero, and their castle in in her sights for the next day. Day 5 is also when Atlas took out Orange Player's hero, and their castle too. There's maybe a quarter of the map unexplored, but, with how small it is, there's only so many places the last enemy can hide.
At the end of Day 6, Yellow Player's castle is within Atlas' sight. The next day Atlas conquers the castle, with Vatawana finishing off Yellow Player's hero, thus making these lands no longer in contest.
The campaign branches here between two separate scenarios, even if they lead to the same scenario afterwards. One scenario has us assist the Necromancer's Guild against the Wizards. The starting bonus is between and 2000 gold, Mass Curse, or a Defender's Helm, with the victory condition being to capture a specific town. Story-wise, the said town would be the Necromancer Guild, but, gameplay-wise, would be a probably better-than-normal Necromancer town. In the other scenario, Roland has aligned himself with the Dwarves. Our task is to eliminate the Dwarves (ie: defeat all enemy-controlled heroes and towns), and remove that threat. The choice in that scenario is between being a Necromancer, Warlock, or Barbarian.
I'm pretty sure going to assist the Necromancers will allow us to have a unique Necromancer hero later. At the very least, we'd control him during the last scenario, but, perhaps, earlier as well. I don't know, or remember, if the other scenario has a similar effect.
The thing, though, is that I, personally, see no threat behind Roland's alliance with the Dwarves. Of course, a lot of that has to do with Armageddon. As stated previously, Dwarves and Battle Dwarves are sometimes are immune to it, and are therefore are considered "bad" units. Or, at least, units that I wouldn't necessarily want in my armies! While it may be tempting to teach Roland this lesson now, rather than later, I ultimately think it's more useful for Archibald's purpose to get the Necromancer's Guild loyal to his cause. However, that will be a separate session.
I know this was a stupid-quick scenario. The map size was the smallest it could have possibly been and the sheer power of these UGEd heroes made this much quicker than it probably should have been. I probably could do another scenario in this session. However, it's also about pacing myself, not getting overly stressed about having timely updates, wearing myself too thin, or other factors. Thank you for your understanding, and for your continued reading!
Let me take a brief aside to talk about modding Heroes of Might and Magic games. I made a mod to Heroes 3 that makes Armageddon "the Way it Was Meant To Be"TM (ie: deal negative damage) without relying on heroes having negative spell power. I wondered if there was something similar I could do for Price of Loyality. Or, at the very least, provide the Succession Wars version of the spell with even more power because why not.
I came upon this thread, which eventually concerns itself with finding various data-tables, and generally hex-editing the executable to compile a Heroes 2 balance mod. While their findings are pretty damn awesome, with this post of particular interest to me, I can't actually use any of this data. The thread's basis is Heroes 2 Gold, or a later implementation of the game that only runs on a Windows OS. Whereas my copy is a DOS-based executable.
Still, I've spend a non-zero amount of time trying to find the basic data tables for creatures in the EXE that the thread speaks of, just for the sake of reference. However, I haven't found anything that looks remotely like the data tables presented in that thread. Not yet. I feel like the data is there, but, maybe I just don't quite have the knowldge/skill to recognize it yet.
If nothing else, I have a copy of Heroes 2 Gold by way of owning the Heroes of Might and Magic Platinum Edition collection. I'm not going to lie, it's exceptionally tempting to use that copy instead, and see for myself what I can do. However, I will try to put that project aside for the sake of the LPand, perhaps, for the sake of my sanity.
I came upon this thread, which eventually concerns itself with finding various data-tables, and generally hex-editing the executable to compile a Heroes 2 balance mod. While their findings are pretty damn awesome, with this post of particular interest to me, I can't actually use any of this data. The thread's basis is Heroes 2 Gold, or a later implementation of the game that only runs on a Windows OS. Whereas my copy is a DOS-based executable.
Still, I've spend a non-zero amount of time trying to find the basic data tables for creatures in the EXE that the thread speaks of, just for the sake of reference. However, I haven't found anything that looks remotely like the data tables presented in that thread. Not yet. I feel like the data is there, but, maybe I just don't quite have the knowldge/skill to recognize it yet.
If nothing else, I have a copy of Heroes 2 Gold by way of owning the Heroes of Might and Magic Platinum Edition collection. I'm not going to lie, it's exceptionally tempting to use that copy instead, and see for myself what I can do. However, I will try to put that project aside for the sake of the LP
In this scenario, we start with a Warlock hero, but don't have a starting town with which to base our operations off of. Game-rules state that a player will loose if they control no towns over a period of 7 Days. Of course, this isn't an issue for us for two reasons. One reason is Armageddon, and our UGEd hero. The other is that there's a watchtower a few steps from our starting location. So, even if we didn't have Expert Scouting and a Spyglass to improve the hero's visual range by four tiles, we would still be able to see a town from that tower, and would only take us an extra day to get there.
It's Day 4, and I'm now looking at the mini-map. The window that represents the current screen makes me think this is at least a "large" map, making hiring multiple heroes a more viable strategy. We started with Crodo, and hired Arie and Rebecca.
Even with our Expert Scouting, it wasn't until Day 6 that Arie reached another watchtower that put an enemy castle in visual range. Not the one we're searching for, but, an enemy castle all the same. Rebecca finds another watchtower, and with it, another enemy castle. That one she takes down in due order, and Arie's set to take the castle he uncovered the next day.
Through UGE, I know there's only four castles on this map. Given that our starting position was in the upper-left, and the general direction my heroes have been moving I've a hunch the last one is in the lower-right corner of the map.
It's takes my heroes three or four days before the last town comes into view. The next day, we reclaim the town for the Necromancer's Guild, and proclaim victory!
Okay, I was wrong. There is a choice of scenario for the next map. We can either continue to serve Archibald, or...
...switch sides to serve Roland instead. The map that we'd be playing either way would be effectively the same map. The main difference would be your personal position in this map. If you choose to stick with Archibald, you're surrounded on all sides. The AI players, being allied front this time, would be gunning for you. They would not fight among themselves, as they could/did most maps before this. Switching to Roland's side here is pretty much the exact opposite, where you have the enemy surrounded. I don't 100% remember if you control all the castles and heroes, or if you have AI allies. Either way, there would be only one enemy to defeat, and they would be quite cornered, and vastly overwhelmed.
Naturally, we can get out of being under the gun with UGE, so we could continue serving Archibald. Of course, we can absolutely still use UGE after switching to Roland, but, the promise of the thread was to go through both campaigns. So, I will refrain from doing so lest I hear otherwise before next session.
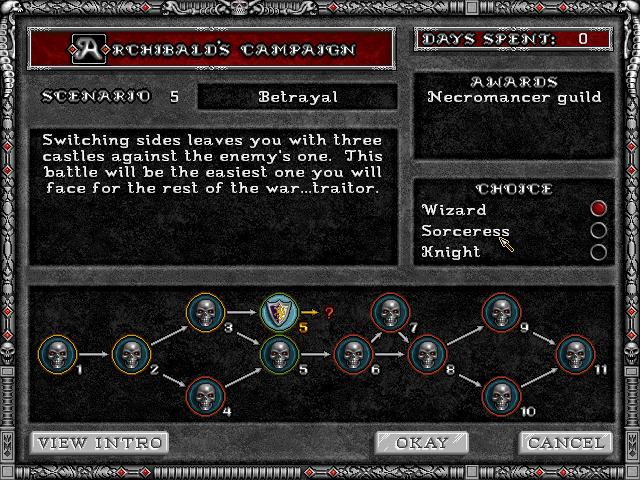
For this scenario, we've is a choice between being a Necromancer, Warlock, or Barbarian. While we've had Warlock heroes before, we have not controlled one of their castles yet. We shall now...
Warlock town, Succession Wars version
Warlock town, Price of Loyality version
...rectify this issue. Looking at the mini-map, I can tell this is a Small map. If I were playing more fairly, choosing Warlock might not be a great idea. On larger maps, it's more likely for Warlocks to develop a Dragon Tower, and be a virtually unstoppable force. On a smaller map, like this one, I think the Necromancer might have an advantage, as their unit production buildings don't really require too many non-Gold resources. At least from what I can recall. Barbarians would need crystal to build/recruit Cyclops, and Warlocks would want sulfur for their Green/Red/Black Dragons.
Either way, this is our first opportunity to hire the unique hero...

...Brother Brax. For a map of this size, we probably only need one hero, but, since the unique hero is provided, why not hire him?
I quickly find out that there's only one opponent that happens to control three castles and three heroes, rather than an allied front of three separate players. Now that I think on it, the functionality for allied players might not exist until Heroes 3. Still, being controlled by the same player would make it an allied front!
Blue Player falls pretty quick, as I'm sure you can imagine. Of note is that the scenario starts with a notice to the player that somebody turned traitor, and that you're alone in this mess. Which is further relayed in that, of the castles on this map, only one belongs to a faction that would be associated with Roland's forces. As if to say that two lords/generals turned to Roland's side, rather than just one. I also find it interesting that the Barbarian faction might not necessarily be represented here, outside of choosing to be one if you stick with Archibald.
As a matter of further curiosity, I loaded the autosave the game generates after each scenario to see what Roland's side looks like. I can confirm that it's a player swap. Instead of being Red Player, and in control of one castle and hero, you are Blue Player in control of three castles, but only control one hero. Which isn't quite what I was expecting, but, the raw advantage of controlling three castles isn't something to sneeze at!
Warlock town, Succession Wars version
Warlock town, Price of Loyality version
...rectify this issue. Looking at the mini-map, I can tell this is a Small map. If I were playing more fairly, choosing Warlock might not be a great idea. On larger maps, it's more likely for Warlocks to develop a Dragon Tower, and be a virtually unstoppable force. On a smaller map, like this one, I think the Necromancer might have an advantage, as their unit production buildings don't really require too many non-Gold resources. At least from what I can recall. Barbarians would need crystal to build/recruit Cyclops, and Warlocks would want sulfur for their Green/Red/Black Dragons.
Either way, this is our first opportunity to hire the unique hero...
...Brother Brax. For a map of this size, we probably only need one hero, but, since the unique hero is provided, why not hire him?
I quickly find out that there's only one opponent that happens to control three castles and three heroes, rather than an allied front of three separate players. Now that I think on it, the functionality for allied players might not exist until Heroes 3. Still, being controlled by the same player would make it an allied front!
Blue Player falls pretty quick, as I'm sure you can imagine. Of note is that the scenario starts with a notice to the player that somebody turned traitor, and that you're alone in this mess. Which is further relayed in that, of the castles on this map, only one belongs to a faction that would be associated with Roland's forces. As if to say that two lords/generals turned to Roland's side, rather than just one. I also find it interesting that the Barbarian faction might not necessarily be represented here, outside of choosing to be one if you stick with Archibald.
As a matter of further curiosity, I loaded the autosave the game generates after each scenario to see what Roland's side looks like. I can confirm that it's a player swap. Instead of being Red Player, and in control of one castle and hero, you are Blue Player in control of three castles, but only control one hero. Which isn't quite what I was expecting, but, the raw advantage of controlling three castles isn't something to sneeze at!
In this scenario, there's been an uprising of peasants against Archibald, with Roland supporting their efforts. Our choice is between being a Necromancer, Warlock, or Barbarian. Perhaps it's my particular sense of humor, but, this sounds like a job for Superman Necromancers!
Archibald grants us the use of a unique Knight hero, Corlagon. He starts with the Necromancy secondary skill, which is of particular note. If this was Heroes 3, he would probably be a Death Knight, however, as this is Heroes 2, the game works within it's own bounds. Our other starting hero is a random Necromancer hero (Sandro, in my case), and we'll be hiring Brother Brax as well, making our total hero-count 3. The mini-map suggests to me at least a Large map, or maybe an Extra Large map. We might actually need that many heroes putzing about.
There's some Peasant-groups on this map that might be deceptive in a normal game. Under normal circumstances, a group of Peasants generally indicates an encounter where there's 50-100 of the suckers, ripe for the Necromancy skill. However, I noticed at least one of these groups had, like, over 2000 Peasants, and a garrison at a nearby Knight town had a garrison of 400 Peasants.
To be fair, your starting armies on this map are pretty good. You might have a better chance of taking on those kinds of numbers than a typical starting hero. To be sure, the choice of class/faction that I made certainly desires to engage larger numbers of low-level creatures, and let the Necromancy secondary skill to do it's thing. Still, if I were playing more fairly, it might behoove me to have held back a bit from attacking those particular stacks, and be more careful. Certainly, if I left-clicked on the encounter with over 2000 (the tool-tip would read "A Legion of Peasants"), that would have given me pause. The garrison with 400 Peasants I might not necessarily know about until it's too late, as the tool-tip hides garrison values. However, running away, or surrendering (I don't remember if surrender is possible against an army with no hero), is it's own cost and is almost never worth it.
As a side-note about running away, and/or surrendering, doing so will allow that hero to be re-hired at a castle. The hero will retain their artifacts, but, their army would only be retained if they surrendered. Running away will cause the hero's army to be reset to a typical starting hero's army. Re-hiring the hero will still cost at least 500 gold. I think it might be more if the hero has artifacts that aren't a Spell Book, but, I'm not particularly willing to experiment/test that theory. Surrendering is even worse, as there is a cost in gold to surrender. It's been forever since I've even bothered to surrender, so, I'm not sure what that cost is. Probably based on the number and types of units the hero has, and is probably related to their actual gold-cost? Again, I'm not sure, and I'm not going to go out of my way to confirm either way.
The Diplomacy secondary skill reduces the cost of surrendering, and there's a few artifacts that assist in reducing the cost as well. However, I ultimately feel it's just not worth the cost to surrender.
Of course, I'm not playing fairly, the stacks fall to my armies, and a portion of the dead were raised as Skeletons. The Knight town I captured cannot be upgraded to a castle, which normally means that we're stuck with whatever it has. UGE can, of course, circumvent this, and "build" a Castle in that town, and therefore, be able to build it up as per normal. I know, I'm terrible.
So, the map/scenario description during the intermission said that "all are allied against us". Which made me think that there was one player controlling a mess load of castles and heroes. Apparently, I was wrong. Corlagon took out Yellow Player on Day 5, the map is maybe a quarter explored, and we're still playing this scenario. So, perhaps allied players are a thing in this game. It was probably just easier for the last map to have only two players, and set the human player to be whatever side they chose for it. I kinda appreciate that efficiency.
How many players are on this map? Looking at UGE, I can tell you there are seven total towns/castles, and I currently control four castles out of the possible seven that are on the map. Which means there's three castles left. If one of them started as an unclaimed town, that would make this a four-player map. Which sounds about right, though, I'll note that Heroes 2 can support maps of up to six players.
On the beginning of Day 7, there are two enemy castles in sight. In the north, by Corlagon, lies Green, and in the south, by Brother Brax, lies Orange. I'd say the map is about half explored at this point, and the sea to the east of my starting Necromancer castle has me considering sending somebody out that way. However, that doesn't seem necessary. Those castles were the last two players.
We have a choice of scenario at this point. We can either move to attack Roland's vassals directly, or take a detour to gain the loyalty of the Dragon King first. If this was a more legit play of the game, I'm sure conquering the Dragons would certainly be a big boost to Archibald's overall army strength. However, I think we all know, at this point, what my opinion of Dragons, in conjunction with negative Spell Power and Armageddon, is.
We begin this scenario with a random Warlock hero (in my case, Agar), a slightly better-than-typical army, and no castle. Which means we need to capture a castle by the end of the week or die flying trying.
Again, there is a watchtower that puts a castle into view, which I proceed to gun for. The watchtower also revealed the location of a Blue-controlled hero.
After taking the castle, and aiming toward the hero, I consider the size of the map. Kinda feels like a Large. Regardless, Brother Brax is welcome, as always, as is another hero. My choice is between another Necromancer, but, I land on Ariel, the Sorceress.
There are a lot of towns on this map. The count through UGE is 11. As I write this, I've got 4 of them, and it's Day 1 of Week 2.
I build a Thieves' Guild to get some basic info as to what I'm up against. As it turns out, there's only two players on this map: myself and Blue Player.
Day 3 Week 2, Agar spotted a Blue-controlled town, and Ariel spotted a Blue hero and Castle. I also spot some movement in the southeast, beyond the sea. None of my castles have the capacity to build boats, so we'll have to find one at some point. A Blue hero boarded a boat, so, they might try landing turning their turn. If they do, it might depend where they land, and how close it is to one of my castles. If I'm lucky, it could be a matter of Town Portal, perhaps a Dimension Door or two, and I could get a "free" boat to Blue's island!
I lost track of time, but, as of this sentence, it's Week 3, Day 3, I've conquered the mainland, hired an extra hero (Ruby), and the only thing left is the south-east corner where Blue is hiding. I've already got Ariel to land on the island at this point, with Ruby chasing down a hero at sea, with my other two heroes converging towards towns that has a Shipyard. Though, I think Summon Boat might work, as it would "see" the boat that Ariel built, and sailed in, as "mine", and would function. Heroes 3 can use Summon Boat to ship-build for you if you haven't already built a ship, but, I don't think Heroes 2 has that function.
Either way, I'm looking at the map, and I'm starting to realize that Blue doesn't have any castles left. Which means I could wait it out, as having no castles for a period of seven days means defeat. However, that just doesn't jive with me. I keep Ruby on Blue's last hero, with my other heroes trailing behind. Not that Ruby couldn't handle herself, of course, but, it's not like the others had anything else worth doing. When Ruby finally caught up with Blue's last hero, it ended it's turn on a Stonehenge, which is a location that grants +1 Spell Power. The way the map is set up, there is no way Ruby can't also get the buff. While having only -127 Spell Power, as opposed to -128, isn't necessarily a crime, I just find this oddly fascinating that Blue would retreat to such a location.
With this scenario out of the way, we have another choice of scenarios next. We can either search for the Ultimate Artifact, or raise such an army that would beat Roland senselessly and thoroughly.
As a general rule, the Ultimate Artifact can be one of eight artifacts. The Ultimate Book of Knowledge grants the bearer something on the order of +12 to Knowledge. Likewise, the Ultimate Sword of Dominion grants a +12 to Attack, the Ultimate Cloak of Protection grants +12 to Defense, and the Ultimate Wand of Magic grants +12 Magic Power. The Ultimate Shield grants +6 to Attack and Defense where the Ultimate Staff grants +6 to Spell Power and Knowledge. The Ultimate Crown grants +4 to all primary stats. The Golden Goose grants an additional 10K gold per day in income.
The scenario in question would have us find the Ultimate Crown. The stat-buffs it grants are pretty good by normal standards, but, this LP has hardly been normal! Though, while you could argue that I've been raising unstoppable armies since Day 1 Week 1 of Scenario 1, the other scenario will allow us to transfer an army into the last map. I'm not 100% sure if it's the entire hero that happens to have the best army transfers, or if it's a random hero that inherits the best army from this map. However, it is that scenario that we'll be doing next.
As an aside, I can't help but to notice how few screencaps I've been taking for this LP. I'm not sure if it's because I'm so into the game that I just forget, or it's because what I have to show won't be all that much different than what I've already shown? I dunno. I'll just see what I can do for next session.
This map requires that we win it in eight weeks, or loose. No extraordinary victory conditions, though. Our starting bonus is a choice between Black Pearl, Dragon Sword, or Breastplate of Protection, with Corlagon as the receiver of said artifact. This choice doesn't really matter at all to this LP, but, I think the Black Pearl increases Spell Power and Knowledge?
Our starting town cannot be upgraded into a castle. The idea being that it's basically up to Corlagon to take a castle, and build from there. I considered letting that particular point of scenario stipulation in place, but, eh, I ended up UGEing it to a castle. So sue me.
Besides, I think this is an extra large map? I should probably have at least three heroes. Brother Brax is available, as part of the campaign carryover bonus. The other hero will apparently be Ariel again? Sure, why not.
There's a total twelve towns/castles on this map, but, from the scenario description, I only have to capture whatever town/castle the AI player started with.
I didn't jot down what turn this was but, there was a watchtower near-ish to Ariel on the end of one of her turns, and I have certain suspicions about it...

...which I confirm here. The AI player was tucked away on the opposite side of the map, and Ariel's aimed toward the only one castle that would be able to build a boat to get there.
Boarding a boat consumes all movement a hero might have, presumably to account for the preparations to go to sea. Though, it sometimes feels a little wrong to start a turn only to board a boat, and waste an entire day's worth of movement. However, the majority of cases, it's fine.
As it happens, while Ariel could take the castle in that screencap that turn, she didn't quite have the movement to also board the boat. Which, yes, prompted the aside about boarding boats. However, she did, eventually, finish the job for us, took out the AI, and allowed us to declare victory. It was Day 5 Week 2 when that happened.
Which now means there's only one scenario left for Archibald's campaign. The next few days might be a tad busy, but, I might be able to have that session by Wednesday morning.
Our starting town cannot be upgraded into a castle. The idea being that it's basically up to Corlagon to take a castle, and build from there. I considered letting that particular point of scenario stipulation in place, but, eh, I ended up UGEing it to a castle. So sue me.
Besides, I think this is an extra large map? I should probably have at least three heroes. Brother Brax is available, as part of the campaign carryover bonus. The other hero will apparently be Ariel again? Sure, why not.
There's a total twelve towns/castles on this map, but, from the scenario description, I only have to capture whatever town/castle the AI player started with.
I didn't jot down what turn this was but, there was a watchtower near-ish to Ariel on the end of one of her turns, and I have certain suspicions about it...
...which I confirm here. The AI player was tucked away on the opposite side of the map, and Ariel's aimed toward the only one castle that would be able to build a boat to get there.
Boarding a boat consumes all movement a hero might have, presumably to account for the preparations to go to sea. Though, it sometimes feels a little wrong to start a turn only to board a boat, and waste an entire day's worth of movement. However, the majority of cases, it's fine.
As it happens, while Ariel could take the castle in that screencap that turn, she didn't quite have the movement to also board the boat. Which, yes, prompted the aside about boarding boats. However, she did, eventually, finish the job for us, took out the AI, and allowed us to declare victory. It was Day 5 Week 2 when that happened.
Which now means there's only one scenario left for Archibald's campaign. The next few days might be a tad busy, but, I might be able to have that session by Wednesday morning.
The day has come at last. The day when we crush Roland, and his rebellion, once and for all.

As you can see, the choice of bonus in this scenario is between one of three artifacts. These artifacts, in particular, are cursed. The Tax Lien reduces your Gold income by 250 per turn. The Hideous Mask prevents random enemy stacks from joining your army. Not that we necessarily want that, but, it's possible. The Ancient Fizban of Misfortune induces a -2 morale penalty. Of the three, the Tax Lien is probably the least punishing considering, but, we'll get into that in a bit. Of course, we can just UGE these things away, so, it's really not an issue.
However, there is one thing we get as if to balance the curse. They give us control the man, himself.

That's right. We have control over Archibald Ironfist, himself! His army was inherited from Corlagon's from last scenario. Which, yes, was Knight troops, as opposed to Necromancer troops.
We also get a hero and castle for each of Archibald's factions. So, even without hiring Brother Brax, we've got four heroes putzing about (Archibald, Tsabu, Alamar, Charity), and start with three castles. We might need four heroes, too, as this is an extra large map. However, I do want to point out that having three castles, and having a base income of 3000 Gold from that, is the main reason why the Tax Lien would be the least punishing of the cursed artifacts. Particularly in regards to Warlock castles, as it's special building (Dungeon) increases Gold income by 500 per day.
Day 7 Week 1. We've discovered where Yellow Player and Green Player are hanging out. They probably won't be long in this world. However, I wanted to show you...
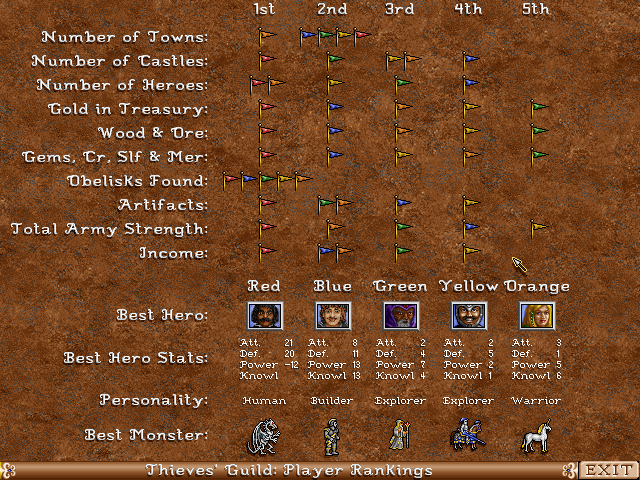
...the Theives' Guild info before I started eliminating players, and give you a feel for what information these Guilds relay. Not all this information is thrown at you with only one Guild, of course. It takes six Guilds for all the information to be relayed, with the last Guild only including the "Income" line. The stat we're more interested in than anything else is "Total Army Strength", though, knowing who has the largest/best army for each player is certainly a point of information that is useful. It kinda tickles my funny bone to see both Archibald and Roland listed as "Best Hero" on this screen.
Day 3 Week 2. Still no sign of Roland, and I've not eliminated any other player either. They probably started with three castles as well.
Day 5 Week 2. Archibald used Dimension Door to get into Blue's turf...

...last turn. The next turn, well, yeah, it's over. Archibald rules the lands of Enroth uncontested with, and this pun is absolutely intended, an iron fist. He imprisons Roland in political prison for the rest of his living days. Think Edmund Dantes from The Count of Monte Crisco, only there's no miraculous escape.
To be perfectly honest, I'm re-thinking this LP, and going through Roland's campaign. If I do come back to this, I will want to take a break. However, the question of "if" is in consideration. I feel like my play-style with this game has been pretty well-established, and the only reason to run through it is to post the town-tracks for Knights, Sorceresses, and Wizards. Which I could just post later, rather than go through the campaign? I dunno. What are the thoughts, here?
As you can see, the choice of bonus in this scenario is between one of three artifacts. These artifacts, in particular, are cursed. The Tax Lien reduces your Gold income by 250 per turn. The Hideous Mask prevents random enemy stacks from joining your army. Not that we necessarily want that, but, it's possible. The Ancient Fizban of Misfortune induces a -2 morale penalty. Of the three, the Tax Lien is probably the least punishing considering, but, we'll get into that in a bit. Of course, we can just UGE these things away, so, it's really not an issue.
However, there is one thing we get as if to balance the curse. They give us control the man, himself.
That's right. We have control over Archibald Ironfist, himself! His army was inherited from Corlagon's from last scenario. Which, yes, was Knight troops, as opposed to Necromancer troops.
We also get a hero and castle for each of Archibald's factions. So, even without hiring Brother Brax, we've got four heroes putzing about (Archibald, Tsabu, Alamar, Charity), and start with three castles. We might need four heroes, too, as this is an extra large map. However, I do want to point out that having three castles, and having a base income of 3000 Gold from that, is the main reason why the Tax Lien would be the least punishing of the cursed artifacts. Particularly in regards to Warlock castles, as it's special building (Dungeon) increases Gold income by 500 per day.
Day 7 Week 1. We've discovered where Yellow Player and Green Player are hanging out. They probably won't be long in this world. However, I wanted to show you...
...the Theives' Guild info before I started eliminating players, and give you a feel for what information these Guilds relay. Not all this information is thrown at you with only one Guild, of course. It takes six Guilds for all the information to be relayed, with the last Guild only including the "Income" line. The stat we're more interested in than anything else is "Total Army Strength", though, knowing who has the largest/best army for each player is certainly a point of information that is useful. It kinda tickles my funny bone to see both Archibald and Roland listed as "Best Hero" on this screen.
Day 3 Week 2. Still no sign of Roland, and I've not eliminated any other player either. They probably started with three castles as well.
Day 5 Week 2. Archibald used Dimension Door to get into Blue's turf...
...last turn. The next turn, well, yeah, it's over. Archibald rules the lands of Enroth uncontested with, and this pun is absolutely intended, an iron fist. He imprisons Roland in political prison for the rest of his living days. Think Edmund Dantes from The Count of Monte Crisco, only there's no miraculous escape.
To be perfectly honest, I'm re-thinking this LP, and going through Roland's campaign. If I do come back to this, I will want to take a break. However, the question of "if" is in consideration. I feel like my play-style with this game has been pretty well-established, and the only reason to run through it is to post the town-tracks for Knights, Sorceresses, and Wizards. Which I could just post later, rather than go through the campaign? I dunno. What are the thoughts, here?
Nice, I missed this at first, but now I'm on board now, if you want to continue. These are fairly impressive numbers of units. I guess that's the module.
Also, Heroes 2 main menu probably is one of my favourite uis ever.
Marrend, you're also very good at making me wanna play might and magics.
Also, Heroes 2 main menu probably is one of my favourite uis ever.
Marrend, you're also very good at making me wanna play might and magics.
With the UGE module, I only give my heroes an initial spread of 500, 400, 300, 200, and 100 for their units. The exact unit types generally depends on the faction, though, Archibald Scenario 1 was a notable exception to that rule. I think I outlined what units types I typically UGE into various hero armies briefly once, but, I could go over it again. The remainder are literal Armageddon magic.
But ya know what? I'm gonna do Roland's campaign anyway.
Our choice for this scenario is between 2000 gold, the Thunder Mace, and Gauntlets of Protection. This scenario, we start as the Wizard...
Wizard theme, Succession Wars version
Wizard theme, Price of Loyalty version
...Sarakin. This scenario is pretty much the exact same as the first scenario for Archibald, in that we are sent out to converge on the local lords to gain their loyalty.
While Archibald certainly doesn't mind using force to get what he wants, Roland is against war. However, as Archibald has positioned himself as something of a shoe-in for the throne of Enroth, Roland believes he must provide a viable alternative. To do so, however, he needs support, and not everyone is going to provide that support from diplomacy alone. They will need to be beaten to a pulp, to show that Roland can provide a showing of strength, when it is needed.
Naturally, the local lords in this scenario are of Archibald faction alignments. So, Necromancer, Warlock, Barbarian. I hire Flint (another Wizard) to help with the task at hand.
With those two heroes, it takes me until Day 5 Week 3 to conquer these lands under the banner of Roland. Titans are the MVP because they are on the faster end of the spectrum, and shoot with no penalty (shooting father than half the screen normally induces a penalty). Their only downside is that their 300 HP per unity means they only grow by 21 unts per Armageddon, but, they still pack quite the punch regardless.
author=Cap_H
Nice, I missed this at first, but now I'm on board now, if you want to continue. These are fairly impressive numbers of units. I guess that's the module.
Also, Heroes 2 main menu probably is one of my favourite uis ever.
Marrend, you're also very good at making me wanna play might and magics.
Similar here, though I already have too many games on my playlist (games that Marrend has made included). XP
I did a double-take when the cut-scene preceding this scenario mentioned needing the taxes this area, and the last, to ensure Roland's economic backing of this war. Just something about it felt oddly familiar. I might have been thinking of the peasant revolt that Roland backed in Archibald Scenario 6.
The game doesn't straight-up say that we're up against a specific faction as Archibald Scenario 2 was. The choice of faction is here, though. Which might not be saying too much, as faction choice felt like a common enough thing for a lot of Archibald's scenarios that I covered. So. Wizard, Sorceress, or Knight? I've got a funny feeling we'll want to be a Sorceress for an upcoming scenario, so...
Knight theme, Succession Wars version
Knight theme, Price of Loyality version
...Knight it will be! This is a small map, so we probably could do it with one hero, but we get two anyway. Takes me to Day 2 Week 2 before my opponents yield before my military might.
As it happens, our opponents consist of a Wizard, a Sorceress, and a Knight. The size of the map might be inclined more to the Knight as well, as their troops/buildings tend to not cost off-kilter resources (ie: sulfur, crystal, gems, mercury). I think the Crusader/Paladin building might need crystal (probably to represent the stained glass windows?), but, that's probably about it.
Before I forget for the umpteenth time, the next scenario is a branching path. Archibald is attacking the Dwarves, and is attempting to seize the Carator Mines simultaneously. Roland wants us to decide to protect the Dwarves first, then move on to the Mines, or just go to the Mines.
I'm pretty sure going to help the Dwarves first will grant a campaign-wide bonus. I just don't remember the nature of that bonus. It's possible it would grant us access to a unique hero, like the Necromancer's Guild did for Archibald. It seems to make the most sense, given the nature of the game. Yet, at the same time, another part of me thinks the bonus isn't going to be that, and not worth the effort of getting it.
So, I decided to do a search for "Sister Eliza". That's the unique hero Roland's campaign gets. She's the reward for completing Scenario 6 of Roland's campaign, which, well, isn't Scenario 3 or 4!
Both Roland Sceanrio 3 ("Save the Dwarves") and this scenario has us choose between factions. We haven't been a Sorceress yet, but, it's fine. We know we'll save their bacon Roland Scenario 6, and will probably be the Sorceress faction then.
This map, we'll be a Wizard again, our initial hero being Mandigal. This is a large map, so, we'll hire Dawn (Wizard) and Ector (Knight) to assist in the job. For the most part, they were split between the northern, southern, middle portions of the map, with maybe having a tendency of two heroes on the northern half.
Green player is the last to fall, if for no other reason that because the color blends with the grasslands on the mini-map. Though, being on the eastern side of the map where I start on the western might have been a factor as well.
The next scenario is "Turning Point"/"Betrayal" where we can switch sides to Archibald's campaign. We're obviously keeping with Roland, but, I feel remiss not to note it.
Again, I apologize for the lack of screencaps. Particularly in regards to this campaign. I dunno about next scenario, but, in regards to the remainder of the campaign, I will try to put forward at least one per scenario.
It's clear that you mastered the game. This isn't an lp for someone without the knowledge of the game.
So, remember when I had a certain respect for Archibald Scenario 5? I think I might have lost a little of that respect. This is exactly the same map as before, only with the players and castles set up so that Red Player is at an advantage over Blue. The castles in the upper-left and lower-right do not change alignment, and I kinda feel like they should. Like, I get the sense they are supposed to represent lords/generals that have jumped ship, and would, therefore, be alignments of the "allied" faction to Roland/Archibald.
However, that's not how it is. Perhaps it's a small detail that would have been nice if it was there, but, I can't bring myself to fault them for not making too many changes between campaigns.
As this scenario was, effectively a copy-paste job, and I feel zero inclanation to go over any details, I highly considered doing another scenario for this session. Ya know what? Let's do it.
The bonus for Scenario 6 is between Mirror Image, Summon Earth Elemental, and Ressurection. Combat spells. That aren't Armageddon. Well, there have been less relevant choices in the game!
The context here is that the Sorceress Guild of Noraston have been outspoken supporters of Roland, so, Archibald decided to launch an assult on them as to make an example of them. Our job is to turn the tide, and an example of Archibald instead.
We have Lord Halton in this scenario...
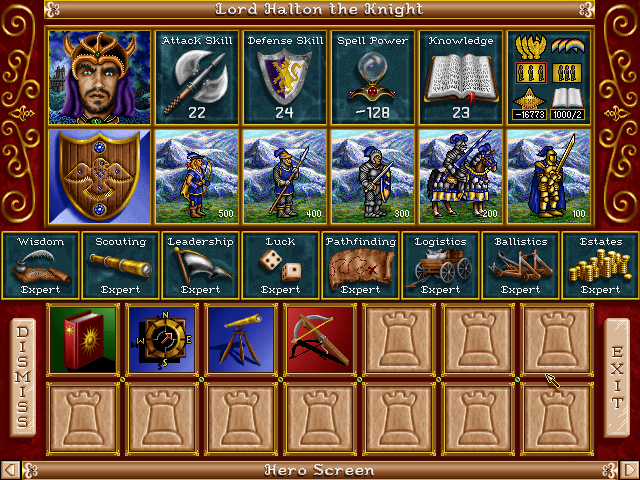
...who's a campgian-unique Knight hero to assist in our efforts. Our starting faction, is of course...
Sorceress theme, Succession Wars version
Sorceress theme, Price of Loyalty version
...Sorceress, with Carlawn representing a guildmember. The map has a large feel to it, so, I recruit Gem to help things along.
Week 1, Day 5, Lord Halton has started an assault on Yellow Player, while Carlawn explores at sea. Gem eliminates Red Player. Next day, Carlwan purchases a Megellan's map, which reveals...
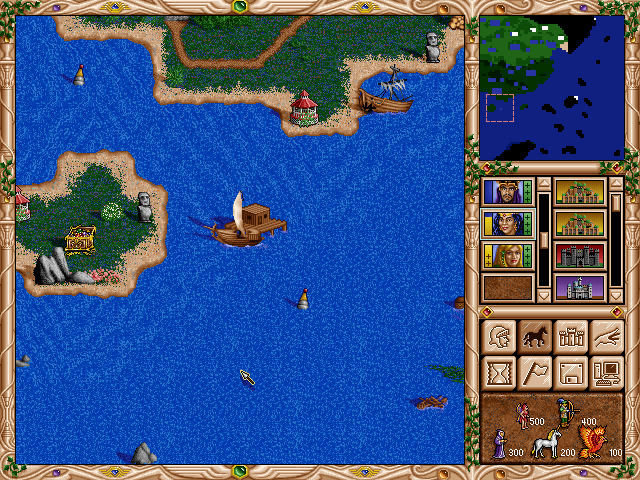
...quite a bit of info. Gem finishes off Yellow Player, leaving... well, at least one other player! Maybe we can find said player on the large island to the south?
As it happened, I thought I noticed an enemy hero wandering about... somewhere. I couldn't quite recall where it was, so, I did a View World to try and find it. It was near enough to one of my castles, so a Town Portal and a few Armageddons later, and the hero is defeated.
Week 2, Day 1. Looks like there's at least one Green hero at sea now. Which is good, because Lord Halton is available to take that hero out, and does so. Carlawn landed on Green's island last turn, and taking the castle there eliminates the player, allowing us to declare victory!
With the Sorceresses owing us a favor (or three), we can shift gears, and set ourselves up to attack Archibald's seat of power. The campaign splits, as Roland's advisors are of two minds, and it's up to us to make the call. We can either search for the Ultmiate Crown, or gather an army for the inevitable assault on Archibald. I discussed the details of the Ultimate Crown during Archibald Scenario 8, but I think we're gonna do the gather army action/scenario.
However, that's not how it is. Perhaps it's a small detail that would have been nice if it was there, but, I can't bring myself to fault them for not making too many changes between campaigns.
As this scenario was, effectively a copy-paste job, and I feel zero inclanation to go over any details, I highly considered doing another scenario for this session. Ya know what? Let's do it.
The bonus for Scenario 6 is between Mirror Image, Summon Earth Elemental, and Ressurection. Combat spells. That aren't Armageddon. Well, there have been less relevant choices in the game!
The context here is that the Sorceress Guild of Noraston have been outspoken supporters of Roland, so, Archibald decided to launch an assult on them as to make an example of them. Our job is to turn the tide, and an example of Archibald instead.
We have Lord Halton in this scenario...
...who's a campgian-unique Knight hero to assist in our efforts. Our starting faction, is of course...
Sorceress theme, Succession Wars version
Sorceress theme, Price of Loyalty version
...Sorceress, with Carlawn representing a guildmember. The map has a large feel to it, so, I recruit Gem to help things along.
Week 1, Day 5, Lord Halton has started an assault on Yellow Player, while Carlawn explores at sea. Gem eliminates Red Player. Next day, Carlwan purchases a Megellan's map, which reveals...
...quite a bit of info. Gem finishes off Yellow Player, leaving... well, at least one other player! Maybe we can find said player on the large island to the south?
As it happened, I thought I noticed an enemy hero wandering about... somewhere. I couldn't quite recall where it was, so, I did a View World to try and find it. It was near enough to one of my castles, so a Town Portal and a few Armageddons later, and the hero is defeated.
Week 2, Day 1. Looks like there's at least one Green hero at sea now. Which is good, because Lord Halton is available to take that hero out, and does so. Carlawn landed on Green's island last turn, and taking the castle there eliminates the player, allowing us to declare victory!
With the Sorceresses owing us a favor (or three), we can shift gears, and set ourselves up to attack Archibald's seat of power. The campaign splits, as Roland's advisors are of two minds, and it's up to us to make the call. We can either search for the Ultmiate Crown, or gather an army for the inevitable assault on Archibald. I discussed the details of the Ultimate Crown during Archibald Scenario 8, but I think we're gonna do the gather army action/scenario.
The scenario bonus feels very familiar: Black Pearl, Dragon Sword and Breastplate of Protection. The set-up is similar too. We start with a Warlock town (which I UGE into a castle), this time in the north-east corner of the map, and the hero that receives said artifact is... Atlas? A Barbarian?
We can UGE a hero's army to be whatever we want, of course. However, I can't help but to find it a little odd to be given a Barbarian hero when we're playing on Roland's campaign. Though, since I UGEd the starting castle, I use it to recruit...

...Sister Eliza, the best the Sorceress Guild has to offer. I also hire Wilfry (Wizard) to help move things along, as this is a larger map.
I didn't notice it during Archibald Scenario 10, as I tended to UGE all the towns I came across to castles. However, I'm now noticing that NONE of these towns can be upgraded to castles? They really wanted to limit your army-producing capabilities, didn't they?
I also have the worst luck and/or timing when it comes to these boats. Like, I found myself one movement shy of boarding a boat for Archibald's "build an army" map, and Sister Eliza was one movement shy from boarding the boat here as well. For full disclosure, I UGEd Lord Halton's movement last session because, yes, he was just shy of boarding the boat, and UGEing his movement allowed me to finish that scenario as soon as I did. So sue me.
As it happened, it was Week 2, Days 6 when Sister Eliza eliminated Yellow Player. The campaign no longer branches, so it's a straight shot from here. Which isn't saying much, as there's exactly two scenarios left, but, hey, it's still a thing.
As something of an after-thought, I'm get the particular sense that this map, too, is a copy paste job. I might not remember the specific layout of Archibald Scenario 10. I can recall that I started in the southwest, and the target was in the northeast. Which is the opposite of this map. However, it wouldn't surprise me too much if the only difference between these two scenarios is, effectively, a player flip!
We can UGE a hero's army to be whatever we want, of course. However, I can't help but to find it a little odd to be given a Barbarian hero when we're playing on Roland's campaign. Though, since I UGEd the starting castle, I use it to recruit...
...Sister Eliza, the best the Sorceress Guild has to offer. I also hire Wilfry (Wizard) to help move things along, as this is a larger map.
I didn't notice it during Archibald Scenario 10, as I tended to UGE all the towns I came across to castles. However, I'm now noticing that NONE of these towns can be upgraded to castles? They really wanted to limit your army-producing capabilities, didn't they?
I also have the worst luck and/or timing when it comes to these boats. Like, I found myself one movement shy of boarding a boat for Archibald's "build an army" map, and Sister Eliza was one movement shy from boarding the boat here as well. For full disclosure, I UGEd Lord Halton's movement last session because, yes, he was just shy of boarding the boat, and UGEing his movement allowed me to finish that scenario as soon as I did. So sue me.
As it happened, it was Week 2, Days 6 when Sister Eliza eliminated Yellow Player. The campaign no longer branches, so it's a straight shot from here. Which isn't saying much, as there's exactly two scenarios left, but, hey, it's still a thing.
As something of an after-thought, I'm get the particular sense that this map, too, is a copy paste job. I might not remember the specific layout of Archibald Scenario 10. I can recall that I started in the southwest, and the target was in the northeast. Which is the opposite of this map. However, it wouldn't surprise me too much if the only difference between these two scenarios is, effectively, a player flip!
Before we strike at the heart of Archibald's seat of power, we must first go up against a well-defended territory that I presume serves as a kind of outpost. The defenses are lead by Lord Corlagon, himself. Capturing him is not a victory condition, but, he wouldn't be present against the final assault against Archibald.
This scenario's bonus/choice is probably the least relevant choice to date: 20 crystals, 20 gems, or 20 mercury. Gems be helpful if I knew I started with a Wizard, and could use them toward Giant/Titan production. Same deal with mercury, a Sorceress hero, and Phoenix development.
That's probably why this choice is so incredibly irrelevant. Since I UGE armies directly, and let "negative Armageddon" do it's magic, I don't really have an inclination to build unit producing buildings. Hell, I even use UGE to specifically remove unit buildings from towns/castles!
As it happens, we start with a hero, and town, of each of Roland's factions for this map. Luna as our Sorceress, Lord Haart as our Knight (using Sir Gallant's ID slot and portrait), and Kalindra as our Wizard. The map feels on the medium size to me, so this more than enough. However, I hire Sister Eliza because why the hell not.
Taking down Corlagon was a little tricky, as he retreated on our first skirmish. I was reasonably sure the AI would re-hire Lord Corlagon, but, I wasn't sure if he would stay to help defend the castle. Luna was certainly within range of that castle, and the AI has been known to leave an otherwise active hero stay to guard of a castle, should it be in danger. Sure enough, Lord Corlagon was re-hired, and the AI decided to leave him behind. Which makes the act of capturing him a little easier, since defending heroes cannot retreat from defending a castle. At least, if memory serves me right? It's been quite a while.
However, as mentioned, capturing/defeating Lord Corlagon wasn't the scenario victory condition. The real victory condition of this scenario is to take out all the opposing forces. Taking out Corlagon is merely icing on the cake. It was a pretty quick succession of events, where I take out Orange Player, then Red, then Green.

