


CLIFF SPRITING HELP
Posts
Pages:
1
Okay, I really need some help here. I'm trying to sprite some cliff tiles for a chipset I'm in the middle of making, but I am ridiculously terrible at it.

Thats the tile I have made, next to the effect I want. I can get the bottom to look decent , but I can't get the top to look any good at all, and the bottom definitely needs improvement. Any ideas?
Also, I'd like some general advice on how you spriters out there do other types of cliffs, cause I really need to learn.

I actually don't understand the tile itself, I'd probably have to see it in use. Enterbrain used to have some excellent tutorials, including cliffs. The tutorials taught the mack and blue sort of style, it's a shame they are not up anymore!
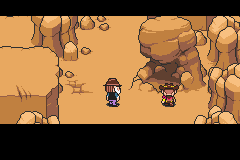
But if you want my advice, I think you should take a good look at some cliffs in Mother 3, they seem to have a similar style to the one you're going for.
For instance:
http://starmen.net/mother3/screenshots/CH1/m3_discovery.png
http://starmen.net/mother3/screenshots/CH7/m3_BoneyDigging.png
http://starmen.net/mother3/screenshots/CH7/m3_ArgillaPass.png

Nice! I enjoy the simplicity of that style.
Also, those tutorials I mentioned ARE still up, I just found them again. They're in japanese, but the pictures still teach a lot:
http://tkool.jp/fancontents/lecture/graphic/index.html#dot3
Also, those tutorials I mentioned ARE still up, I just found them again. They're in japanese, but the pictures still teach a lot:
http://tkool.jp/fancontents/lecture/graphic/index.html#dot3

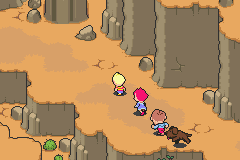
I'm no pixel artist, so take any advice from me with a grain of salt, but I think that cliff is a bit too smooth. It could benefit from being more jagged IMO.
Try running one pixel of the darker brown around the sides of the cliffs- it should help add depth.
EDIT: KEEP IN MIND THIS IS ROUGH, RUSHED, AND TERRIBLE.
But hopefully, it gets the idea across.

EDIT: KEEP IN MIND THIS IS ROUGH, RUSHED, AND TERRIBLE.
But hopefully, it gets the idea across.

I disagree, Tardis. That looks a little bit too close to pillow shading. To add depth to the bottom I'd probably run a few buttresses of rock out, which will both break up the lines and keep the eye on the right track.
It's the idea that's flawed, though, not the presentation. In some cases adding that extra colour helps, but here, like I said, it confuses the lightsource.

It's actually the physical shaping of the cliffs that seems off to me, more-so than the simplistic shading you've used. The "cliff edge" pieces appear awkward, and that black vertical line is very jarring because it seemingly doesn't extend all the way to the ground. I'd fix it up a tad.

post=101648
Nice! I enjoy the simplicity of that style.
Also, those tutorials I mentioned ARE still up, I just found them again. They're in japanese, but the pictures still teach a lot:
http://tkool.jp/fancontents/lecture/graphic/index.html#dot3
Wow these are great, does anyone know any other japanese pixel tutorials like these? There are a lot of english ones out there but man I think the japs have a lot more to teach since video games and pixel art are a lot more ingrained into their digital culture.

post=101660
Try running one pixel of a lighter brown around the sides of the cliffs- it should help add depth.

You should add a much more rocky surface, and use 4 (or more if you can) colors to shade it with instead of 2. And I disagree with Kaempfer, I actually like that rounded-at-the-bottom look.
post=102498
You should add a much more rocky surface, and use 4 (or more if you can) colors to shade it with instead of 2. And I disagree with Kaempfer, I actually like that rounded-at-the-bottom look.
Except it doesn't make any sense and it's a bad habit to get in to.
Makes sense to me. It works better for the earthbound-looking scene he posted.
What would be even better is if you made it different from the rest of the cliff:

Notice the cliffs in earthbound are dark at the very bottom because it's meeting the grass. You should make it different and (i assume that's sand) have something similar only with the sand.
For a more realistic example, notice how the cliff is in fact rounded at the boundary to the sandy floor as I explained:
http://files.myopera.com/garytmarsh/albums/836243/sand%20cliff.jpg
However, in that photo, there's more of the "wall" left, there's a nice sandy ramp until you reach the actual floor. In your "wall" tiles, it might benefit if there's that little "ramp" to go in between the end of the vertical cliff and the sandy floor tiles.
What would be even better is if you made it different from the rest of the cliff:
Notice the cliffs in earthbound are dark at the very bottom because it's meeting the grass. You should make it different and (i assume that's sand) have something similar only with the sand.
For a more realistic example, notice how the cliff is in fact rounded at the boundary to the sandy floor as I explained:
http://files.myopera.com/garytmarsh/albums/836243/sand%20cliff.jpg
However, in that photo, there's more of the "wall" left, there's a nice sandy ramp until you reach the actual floor. In your "wall" tiles, it might benefit if there's that little "ramp" to go in between the end of the vertical cliff and the sandy floor tiles.
Pages:
1

