


HOW TO USE "CHANGE MAP TILESET" TO HAVE 4 SEASONS IN YOUR TOWN.
step-by-step instructions, examples, and downloadable demo.
 Waxius
- 09/10/2017 03:25 AM
- 9327 views
How to Use "Change Map Tileset" to have 4 Seasons in your town.
Suppose you have constructed a town, but you'd like to see your town during the Spring, Summer, Autumn, and Winter seasons.
In this tutorial, we'll create one single map, and have that map change through each of the four seasons using the "Change Map Tileset" command.
Here's what you will need in your RPG Maker 2003 project:
- 1 Map
- 4 Tileset .png files for Spring, Summer, Autumn, and Winter
- 1 Common Event
- 1 Map event to trigger the change in season.
You will also need a graphic editor such as Gimp or Photoshop, capable of editing .png's with transparency.
Let's Begin!
This tutorial is broken down so that you can follow step-by-step in your own RPG Maker 2003. You can right-click and save my tilesets if you like, and if you want the actual project itself to dive into, I have a link at the end.
Implementing these seasons takes 5 main steps.
Step 1 - We will create a map to walk around in.
Step 2 - We will make a total of 4 tilesets, 1 for each season. In most cases, Spring is already made or you already have one you want to use, so you'd really only need to create 3 more.
Step 3 - We will define all four tilesets in the Database and assign the .png files to each.
Step 4 - We will create a common event that will read a variable and change the season. 1 for Spring, 2 for Summer, 3 for Autumn, and 4 for Winter.
Step 5 - We will create an event on the Map itself, that will CHANGE a variable and then call the common event. This will change the season right before your eyes!
Now for the breakdown!
STEP 1 - Create a Map
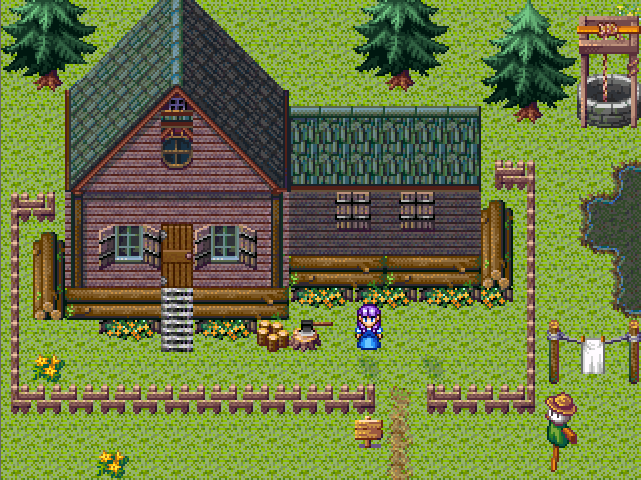
The first thing to do is create a map in RPG Maker 2003. In the screenshot below, I have created the outside of a house, with a well, a scarecrow, trees, some water, and a clothesline. I consider this to be the "Spring" tileset and it is the one that has been assigned to the map during it's creation.
STEP 2 - Select or Create Your Tilesets
In this step, you'll use a graphic editing program like Gimp or Photoshop. All you have to do is create 3 additional tileset based off of the tileset you choose in Step 1. If your tileset is the "Spring" tileset, then you'll need to create Summer, Autumn, and Winter versions of the same tileset.
For example, I used this tileset .png file for "Spring" for the outside of the house.

Using Gimp, I edited, changed colors, and drew (poorly) new objects over existing ones, and created these:
Summer: I changed the grass color, filled the well with water, and deleted the flowers in the window boxes.

Autumn: I changed the grass colors with yellow and red, changed one of the flower boxes into a pile of leaves, and changed wood blocks into a pumpkin.
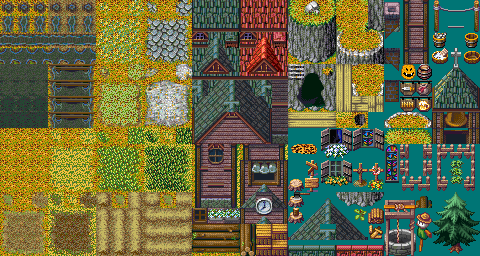
Winter: I changed the grass into snow, the animated water I made into a frozen lake, and the scarecrow is now a snowman. I also replaced some of the green with white on the trees.

STEP 3 - Define Your Tilesets in the Database
Now that you have tilesets to use, define them in the datebase with these instructions:
1.In RPG Maker project editor, click on the Database Button
2.Click on the Tilesets Tab
3.Doubleclick on an empty slot and name it Town - Spring.
4.Click on the "..." button for "Tileset-File" and choose your spring tileset. For me it was "Town01_a - Spring.png"
5.Add Summer, Autumn, and Winter the same way, using your new .png files for each.
If you did it correctly, it should look like this:
STEP 4 - Create a Common Event to Change the Seasons
In this step, we'll make a common event to change the season tileset based on a variable that we'll check for. Here are the instructions for this part:
1.Click on the Database Button in the RPG Maker project editor.
2.Click on the Common Event Tab
3.Click on an empty common event slot on the left, and name it "Determine Season". It should default to a "Call" Type event.
4.In the "Event Commands" window, doubleclick the first blank line.
5.Click on Page 3 of the Event Commands Dialogue Window
6.Choose "Conditional Branching"
7.Select the Variable Condition.
8.Uncheck the exception handler option at the bottom.
9.Click on the "..." on the Variable Condition to select a variable
10.Choose an unused variable slot and name it "SeasonNo"
11.Click OK to close the variable selection dialogue.
12.Back on the condition dialogue. Bubble in "number" and change the number from 0 to 1. Change the Drop down to say "Equal To"
13.Click OK to close the Conditional Branching dialogue.
14.Doubleclick in the first blank line inside, between the words "Branch" and "End"
15.Choose Page 3 of the End Commands dialogue.
16.Click "Change Map Tileset"
17.Choose "Town - Spring" as your tileset.
18.Click Ok to close the "Change Map Tileset" window.
REPEAT STEPS 4-18 THREE MORE TIMES for the remaining seasons.
For Summer: make sure in step 12 we set the "number" to 2 instead of 1, and in step 17 pick the "Town - Summer" instead of "Town - Spring".
For Autumn: make sure in step 12 we set the "number" to 3 instead of 1, and in step 17 pick the "Town - Autumn" instead of "Town - Spring".
For Winter: make sure in step 12 we set the "number" to 4 instead of 1, and in step 17 pick the "Town - Winter" instead of "Town - Spring".
If you did all of these steps correctly you should have a common event that looks exactly like this:

STEP 5 - Create a MAP EVENT that changes the SeasonNo. variable and calls the Determine Season common event.
Now that we have our common event, it's time to make something that triggers it. What we need is a Map Event that your hero interacts with. We have already created the SeasonNo. variable, so all we have to do is change it and then call the common event "Determine Season".
So here's how we do it:
1.On your map, double click on any solid object, I chose the block of wood in front of the axe, but you could choose the axe itself, or a section of the house or the fence.
Place your event where you like.
2.On the event page, set the "Trigger Condition" to "Action Key" and also set the "Event Layer" to be the "Same Layer as Hero". This ensures that you have to press the action button while you are facing the event's location.
3.Click on the first Blank line under event commands.
4.Click on Page 1 of the event commands dialogue window.
5.Choose Variable Operations
6.On the Variable Operations dialogue, bubble in Single Variable, click the "..." button and choose your variable for "SeasonNo."
7.For the "OPERATION" section, bubble in "ADD".
8.For the "OPERAND" section, bubble in "NUMBER" and type in "1".
9.Click OK.
What this does... is add +1 to the variable each and every time you press the action button during the game while facing the event.
But we're not done.. because the season number will continue to increase from 1 to 2 to 3 to 4 to 5 to 6 and so on... we don't have that many seasons!
So.. we'll add a condition branching check, and reset the seasonNo. variable back to 1 once it is greater than 4. Spring comes after Winter after all doesn't it?
10. Doubleclick on the next blank line after your variable operation command.
11. Click on Page 3, and choose the "Conditional Branch" option.
12. Bubble in Variable, set the variable to "SeasonNo.". Type in 4 for the number and choose "Greater than" in the dropdown.

13. Doubleclick on the blank link between BRANCH and END.
14. Choose Page 1, and "Variable Operations" again. This time, change the OPERATION away from ADD, and instead use "SET"
15. Click OK.
Now we've basically made it so that the seasons will go from 1 to 2 to 3 to 4 and back to 1 again.
Last Steps!
16. Doubleclick the next blank line after END, goto page 3 and choose the "CALL EVENT" command.
17. Choose the "Determine Season" event we created.
18. Click OK.
19. And finally.. just for aesthetics. Doubleclick the next blank link after the call event command. Choose Page 2.
20. Click on the SHOW SCREEN option, and set the drop down to "Fade In"
21. Click OK.
If you followed these steps correctly... your event should look like this:
So what did we accomplish?
Take a look at the final result. Was it worth the effort?
Spring:
Summer:
Autumn:

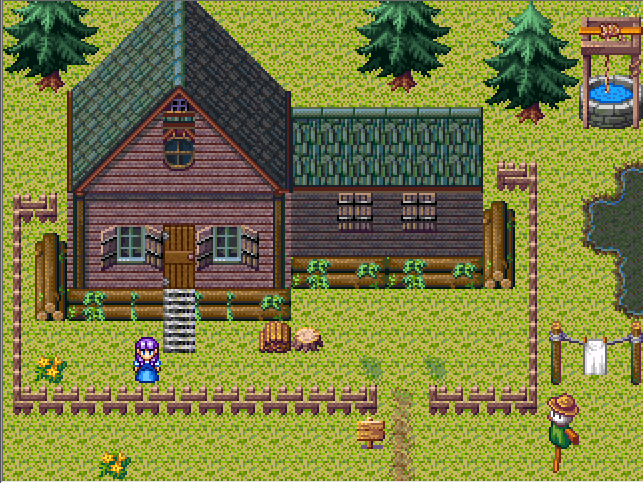
Winter:

What Now?
You might be thinking... this is great and all... but what now? Well, that's up to you. You can think of imaginative ways to trigger the change of seasons. Maybe on a 10 minute timer? Maybe the season only changes after you have completed part of the plot? Anything is possible. The "Change Map Tileset" can be very useful in other ways too.. not just for seasons. But that's a tutorial for another day!
To see the fading in effect on Youtube... click here: RM2K/3 Change Map Tileset Example
For the project files and concept demo... click here: Demo - Change Map Tileset.zip
Thank you for reading, I hope this helps you in your game development efforts!
David (aka Waxius)
Suppose you have constructed a town, but you'd like to see your town during the Spring, Summer, Autumn, and Winter seasons.
In this tutorial, we'll create one single map, and have that map change through each of the four seasons using the "Change Map Tileset" command.
Here's what you will need in your RPG Maker 2003 project:
- 1 Map
- 4 Tileset .png files for Spring, Summer, Autumn, and Winter
- 1 Common Event
- 1 Map event to trigger the change in season.
You will also need a graphic editor such as Gimp or Photoshop, capable of editing .png's with transparency.
Let's Begin!
This tutorial is broken down so that you can follow step-by-step in your own RPG Maker 2003. You can right-click and save my tilesets if you like, and if you want the actual project itself to dive into, I have a link at the end.
Implementing these seasons takes 5 main steps.
Step 1 - We will create a map to walk around in.
Step 2 - We will make a total of 4 tilesets, 1 for each season. In most cases, Spring is already made or you already have one you want to use, so you'd really only need to create 3 more.
Step 3 - We will define all four tilesets in the Database and assign the .png files to each.
Step 4 - We will create a common event that will read a variable and change the season. 1 for Spring, 2 for Summer, 3 for Autumn, and 4 for Winter.
Step 5 - We will create an event on the Map itself, that will CHANGE a variable and then call the common event. This will change the season right before your eyes!
Now for the breakdown!
STEP 1 - Create a Map
The first thing to do is create a map in RPG Maker 2003. In the screenshot below, I have created the outside of a house, with a well, a scarecrow, trees, some water, and a clothesline. I consider this to be the "Spring" tileset and it is the one that has been assigned to the map during it's creation.
STEP 2 - Select or Create Your Tilesets
In this step, you'll use a graphic editing program like Gimp or Photoshop. All you have to do is create 3 additional tileset based off of the tileset you choose in Step 1. If your tileset is the "Spring" tileset, then you'll need to create Summer, Autumn, and Winter versions of the same tileset.
For example, I used this tileset .png file for "Spring" for the outside of the house.
Using Gimp, I edited, changed colors, and drew (poorly) new objects over existing ones, and created these:
Summer: I changed the grass color, filled the well with water, and deleted the flowers in the window boxes.
Autumn: I changed the grass colors with yellow and red, changed one of the flower boxes into a pile of leaves, and changed wood blocks into a pumpkin.
Winter: I changed the grass into snow, the animated water I made into a frozen lake, and the scarecrow is now a snowman. I also replaced some of the green with white on the trees.
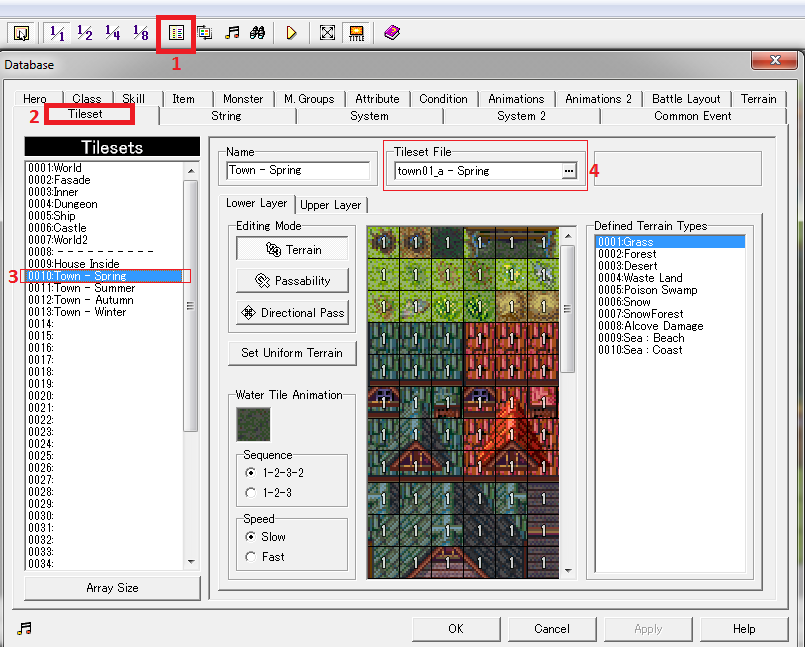
STEP 3 - Define Your Tilesets in the Database
Now that you have tilesets to use, define them in the datebase with these instructions:
1.In RPG Maker project editor, click on the Database Button
2.Click on the Tilesets Tab
3.Doubleclick on an empty slot and name it Town - Spring.
4.Click on the "..." button for "Tileset-File" and choose your spring tileset. For me it was "Town01_a - Spring.png"
5.Add Summer, Autumn, and Winter the same way, using your new .png files for each.
If you did it correctly, it should look like this:
STEP 4 - Create a Common Event to Change the Seasons
In this step, we'll make a common event to change the season tileset based on a variable that we'll check for. Here are the instructions for this part:
1.Click on the Database Button in the RPG Maker project editor.
2.Click on the Common Event Tab
3.Click on an empty common event slot on the left, and name it "Determine Season". It should default to a "Call" Type event.

4.In the "Event Commands" window, doubleclick the first blank line.
5.Click on Page 3 of the Event Commands Dialogue Window
6.Choose "Conditional Branching"
7.Select the Variable Condition.
8.Uncheck the exception handler option at the bottom.
9.Click on the "..." on the Variable Condition to select a variable
10.Choose an unused variable slot and name it "SeasonNo"
11.Click OK to close the variable selection dialogue.
12.Back on the condition dialogue. Bubble in "number" and change the number from 0 to 1. Change the Drop down to say "Equal To"
13.Click OK to close the Conditional Branching dialogue.

14.Doubleclick in the first blank line inside, between the words "Branch" and "End"
15.Choose Page 3 of the End Commands dialogue.
16.Click "Change Map Tileset"
17.Choose "Town - Spring" as your tileset.
18.Click Ok to close the "Change Map Tileset" window.

REPEAT STEPS 4-18 THREE MORE TIMES for the remaining seasons.
For Summer: make sure in step 12 we set the "number" to 2 instead of 1, and in step 17 pick the "Town - Summer" instead of "Town - Spring".
For Autumn: make sure in step 12 we set the "number" to 3 instead of 1, and in step 17 pick the "Town - Autumn" instead of "Town - Spring".
For Winter: make sure in step 12 we set the "number" to 4 instead of 1, and in step 17 pick the "Town - Winter" instead of "Town - Spring".
If you did all of these steps correctly you should have a common event that looks exactly like this:
STEP 5 - Create a MAP EVENT that changes the SeasonNo. variable and calls the Determine Season common event.
Now that we have our common event, it's time to make something that triggers it. What we need is a Map Event that your hero interacts with. We have already created the SeasonNo. variable, so all we have to do is change it and then call the common event "Determine Season".
So here's how we do it:
1.On your map, double click on any solid object, I chose the block of wood in front of the axe, but you could choose the axe itself, or a section of the house or the fence.
Place your event where you like.

2.On the event page, set the "Trigger Condition" to "Action Key" and also set the "Event Layer" to be the "Same Layer as Hero". This ensures that you have to press the action button while you are facing the event's location.
3.Click on the first Blank line under event commands.
4.Click on Page 1 of the event commands dialogue window.
5.Choose Variable Operations
6.On the Variable Operations dialogue, bubble in Single Variable, click the "..." button and choose your variable for "SeasonNo."
7.For the "OPERATION" section, bubble in "ADD".
8.For the "OPERAND" section, bubble in "NUMBER" and type in "1".
9.Click OK.
What this does... is add +1 to the variable each and every time you press the action button during the game while facing the event.
But we're not done.. because the season number will continue to increase from 1 to 2 to 3 to 4 to 5 to 6 and so on... we don't have that many seasons!
So.. we'll add a condition branching check, and reset the seasonNo. variable back to 1 once it is greater than 4. Spring comes after Winter after all doesn't it?
10. Doubleclick on the next blank line after your variable operation command.
11. Click on Page 3, and choose the "Conditional Branch" option.
12. Bubble in Variable, set the variable to "SeasonNo.". Type in 4 for the number and choose "Greater than" in the dropdown.
13. Doubleclick on the blank link between BRANCH and END.
14. Choose Page 1, and "Variable Operations" again. This time, change the OPERATION away from ADD, and instead use "SET"
15. Click OK.
Now we've basically made it so that the seasons will go from 1 to 2 to 3 to 4 and back to 1 again.
Last Steps!
16. Doubleclick the next blank line after END, goto page 3 and choose the "CALL EVENT" command.
17. Choose the "Determine Season" event we created.
18. Click OK.
19. And finally.. just for aesthetics. Doubleclick the next blank link after the call event command. Choose Page 2.
20. Click on the SHOW SCREEN option, and set the drop down to "Fade In"
21. Click OK.
If you followed these steps correctly... your event should look like this:

So what did we accomplish?
Take a look at the final result. Was it worth the effort?
Spring:
Summer:
Autumn:
Winter:
What Now?
You might be thinking... this is great and all... but what now? Well, that's up to you. You can think of imaginative ways to trigger the change of seasons. Maybe on a 10 minute timer? Maybe the season only changes after you have completed part of the plot? Anything is possible. The "Change Map Tileset" can be very useful in other ways too.. not just for seasons. But that's a tutorial for another day!
To see the fading in effect on Youtube... click here: RM2K/3 Change Map Tileset Example
For the project files and concept demo... click here: Demo - Change Map Tileset.zip
Thank you for reading, I hope this helps you in your game development efforts!
David (aka Waxius)

