


BASIC FRANKENSPRITING TUTORIAL
A (hopefully) simple tutorial on how to customize XP characters sets.
 Saya
Saya- 03/28/2011 03:34 AM
- 6550 views
Saya’s Frankenspriting Tutorial
Alright, this is my first tutorial, so I hope I can make this clear and helpful. I’m still new to RPGMaker, but I have some experience in Photoshop and pixel art. In this tutorial, I will do a basic Frankensprite, which is a combination some parts of one sprite with some parts of another sprite. Naturally, the most popular engine to do this in is XP, but the techniques can be transferred to RM200X or RMVX.
I apologize for the image overload, and for the image quality. I forgot that I was saving them as jpegs!
Let’s start. In this tutorial, I will be giving RTP thief 4 a new pair of boots, borrowing them from RTP gunner 2. Here are the two pictures we will be working with today:


This is a fairly basic Frankensprite, and I will not be doing any recoloring today. If I have time, I will upload a recoloring tutorial as well.
I will be working in Photoshop, but any program that has layers will do.
First off, open both images on Photoshop. Select one of them as the “baseâ€, which will probably be the one you’ll be keeping the most of. Because I’m working with everything in thief girl except for her boots, I will keep her as the base.

Now, you might notice that the image is locked, and you cannot create any new layers on it. Fix this by going to Image > Mode > RGB color.


Now, the layers icon is unlocked. Next, create a new layer in the base image.

Then, go to your other image and select all of it using the marquee tool.

Copy (Edit > Copy once selected), and paste it into your base image (Edit > Paste). The other image should be above your base image on the new layer.

If you are working with character sets that have non-transparent backgrounds, you can delete the background by selecting it with the magic wand tool (Press W), and delete it (Ctrl+X).
Make sure that the image is aligned properly, so that the face matches the face (unless you are working on sprites with very different heights). Select the whole character set and nudge it into place using the arrow keys.
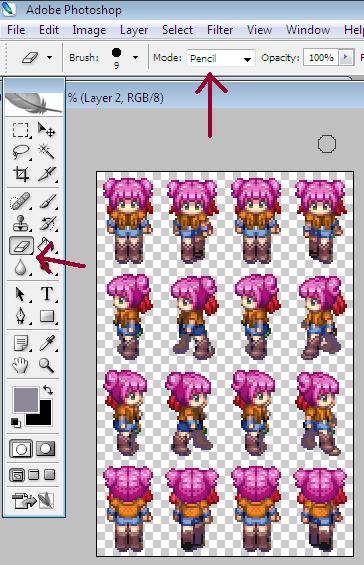
Now here comes the tedious part. Zoom in using the magnifying glass(Press Z) to a point you are comfortable with. Select the eraser tool(Press E) and set it to pixel mode.
The sprite on the layer below can be distracting, so what I did was make another layer on top of the base, and filled it in with a grey color.

Now, select the upper layer, and start erasing the parts you don’t need. Once you erase enough of the sprite, use the rectangular selection tool to select the rest and delete it (Ctrl+X).

Continue for the whole sprite unless you have just the boots (or whatever portion you need).

Now, remove the grey layer…

Looks great, huh?
Unfortunately, sometimes the base sprite has things that show past its new limbs. In this case, the thief girl’s side view legs show through. So, select the base layer, and erase. At this point, feel free to use the rectangular selection tool and Ctrl+X it to cleanliness, but if it requires finer touch, use the eraser tool.

Voila! It’s absolutely beautiful now! But first, in order to convert it to a useable format, go to Image > Mode > Indexed Color. The number of colors should be below 255. Click “Okayâ€, and Edit > Save the image as a PNG file.

Congratulations! You’ve completed your first Frankensprite. Now, go forth and make original character sets like never before!
Alright, this is my first tutorial, so I hope I can make this clear and helpful. I’m still new to RPGMaker, but I have some experience in Photoshop and pixel art. In this tutorial, I will do a basic Frankensprite, which is a combination some parts of one sprite with some parts of another sprite. Naturally, the most popular engine to do this in is XP, but the techniques can be transferred to RM200X or RMVX.
I apologize for the image overload, and for the image quality. I forgot that I was saving them as jpegs!
Let’s start. In this tutorial, I will be giving RTP thief 4 a new pair of boots, borrowing them from RTP gunner 2. Here are the two pictures we will be working with today:
This is a fairly basic Frankensprite, and I will not be doing any recoloring today. If I have time, I will upload a recoloring tutorial as well.
I will be working in Photoshop, but any program that has layers will do.
First off, open both images on Photoshop. Select one of them as the “baseâ€, which will probably be the one you’ll be keeping the most of. Because I’m working with everything in thief girl except for her boots, I will keep her as the base.
Now, you might notice that the image is locked, and you cannot create any new layers on it. Fix this by going to Image > Mode > RGB color.
Now, the layers icon is unlocked. Next, create a new layer in the base image.
Then, go to your other image and select all of it using the marquee tool.
Copy (Edit > Copy once selected), and paste it into your base image (Edit > Paste). The other image should be above your base image on the new layer.
If you are working with character sets that have non-transparent backgrounds, you can delete the background by selecting it with the magic wand tool (Press W), and delete it (Ctrl+X).
Make sure that the image is aligned properly, so that the face matches the face (unless you are working on sprites with very different heights). Select the whole character set and nudge it into place using the arrow keys.
Now here comes the tedious part. Zoom in using the magnifying glass(Press Z) to a point you are comfortable with. Select the eraser tool(Press E) and set it to pixel mode.
The sprite on the layer below can be distracting, so what I did was make another layer on top of the base, and filled it in with a grey color.
Now, select the upper layer, and start erasing the parts you don’t need. Once you erase enough of the sprite, use the rectangular selection tool to select the rest and delete it (Ctrl+X).
Continue for the whole sprite unless you have just the boots (or whatever portion you need).
Now, remove the grey layer…
Looks great, huh?
Unfortunately, sometimes the base sprite has things that show past its new limbs. In this case, the thief girl’s side view legs show through. So, select the base layer, and erase. At this point, feel free to use the rectangular selection tool and Ctrl+X it to cleanliness, but if it requires finer touch, use the eraser tool.
Voila! It’s absolutely beautiful now! But first, in order to convert it to a useable format, go to Image > Mode > Indexed Color. The number of colors should be below 255. Click “Okayâ€, and Edit > Save the image as a PNG file.
Congratulations! You’ve completed your first Frankensprite. Now, go forth and make original character sets like never before!
Posts 

Pages:
1
Lol I always did it the hard way by just editing the character then pasting the parts over the main sprite. Nice tutorial, kinda short though.
author=McBick
Lol I always did it the hard way by just editing the character then pasting the parts over the main sprite. Nice tutorial, kinda short though.
Hehe, I just like to see what I'm working with so I don't make extra mistakes. I'm thinking of adding onto this tutorial by doing a section on recoloring and other techniques.
Thanks for the feedback! I hope it helps you.
Pages:
1

