


MAP MAKING, A SET OF GUIDELINES (FOREST EX)
A set of guidlines to help you with making maps
 AppleNinjaX
- 12/18/2011 10:34 PM
- 8580 views
Mapping, a integral part of any game. You can have a awesome story, super cool sprites and tilesets, and yadda yadda, but who wants to play a game that is not visually pleasing. The truth is, when your not battling or watching blank screen cut scenes, the player is going to spend every second playing in your maps. The goal of a RPG is to interlock the player into your game, making them feel like they are the little hero dude, running around, stopping those bad mans from being all band...and stuff.
"But hey mister appleNinja, I'm just not good at mapping what do I do!"
Well, mapping is a skill but it's not something that people are gifted with or something that only "really really really good mappers" can do. It's' just experience that helps you to map, learning strategies, getting good with your tilesets, working how you like your visual experiences. This guide will attempt to teach you MY mapping strategy that helps you to keep your maps in line, and not go all A.D.D on them. With this structure. We will be making a forest for this guide. The guidelines i'm going to give still can apply to any map.
Before you read through with this guide, I would like you to do 1 thing
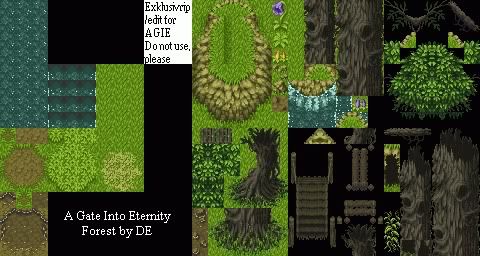
1.)Find a forest tile set you like. Work with it, get used to it's features. Experiment with it understand how it works. When you feel like you have a good sense for the tileset, proceed.
================================================================================
Ok, here we go. for this map, I will be using this tileset. I will be doing a standard size 20 x 15 map, just so you can get the feel for it up close. any size is fine.
==============================================================================
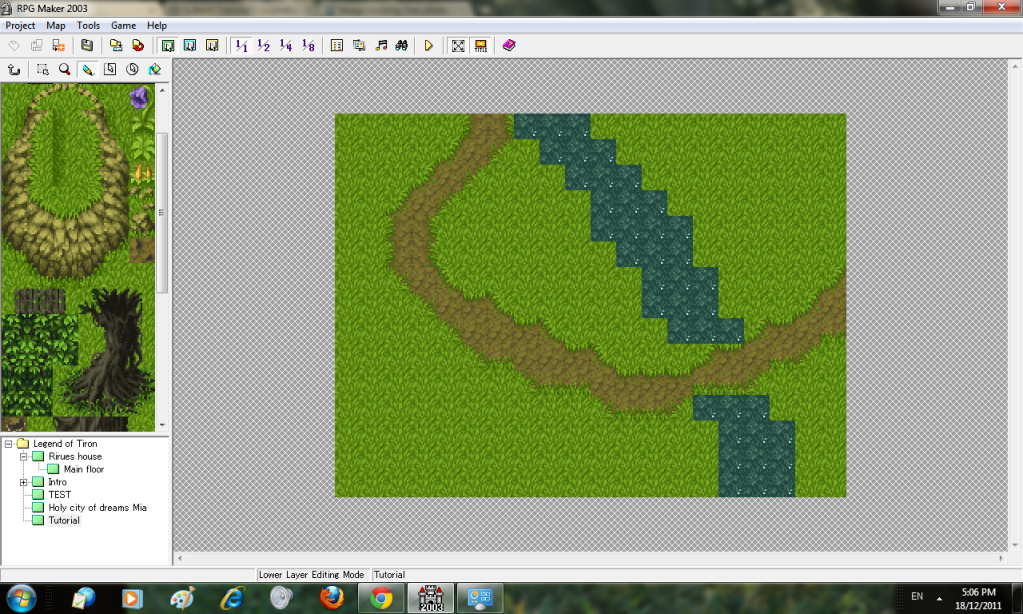
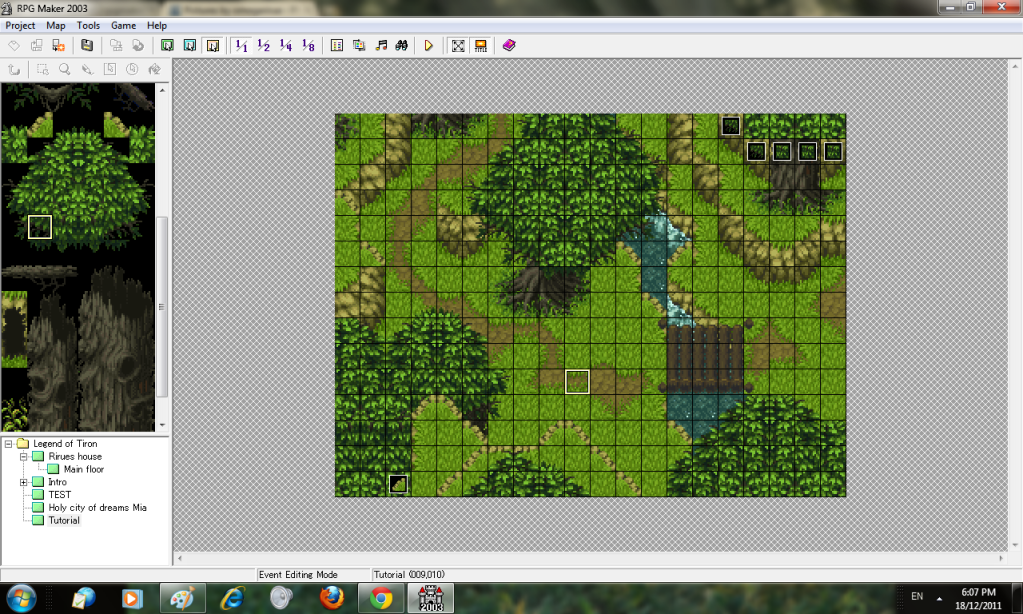
1.)The layout: Generally, you want to know how your map is going to be played out. Will the hero go up or down, where does he come in and exit. In the layout I find it customary to do two things. Your path and water. Start by filling the map with your main floor type (most likely grass in a forest). Quickly make a river, don't fancy it, don't do the edges yet, just make the general layout of how the river is going to run. Then, work your path, dirt or road, whatever your using, design a pathway for your hero to follow.
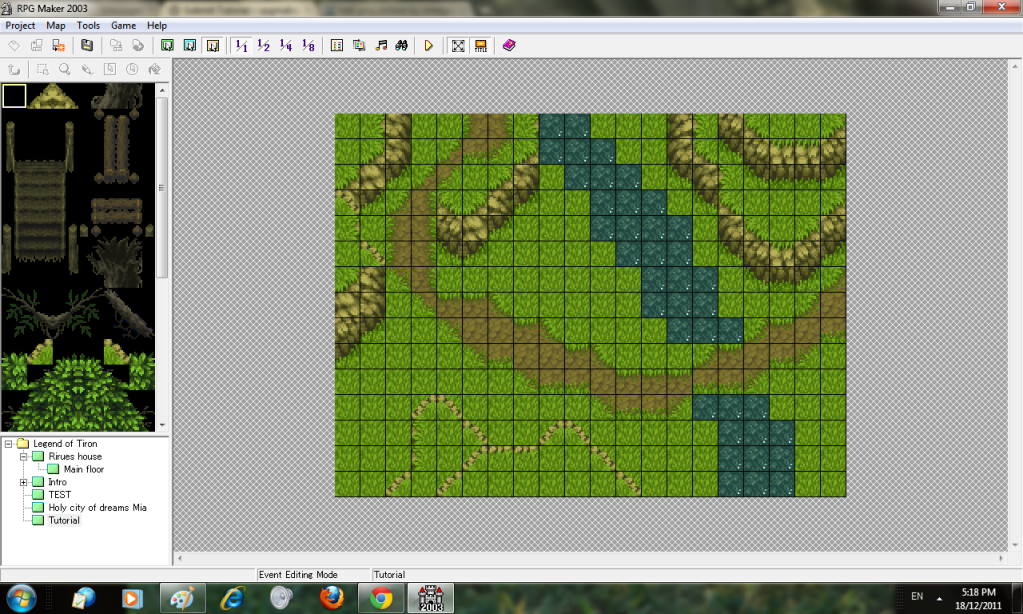
2.)Main hills: Next, we need to add the "main elevation". these are the hills which have a much more predominate effect on the map. They change the overall elevation
blockade the ends of the screen and direct how the maneuvers the area in a general aspect. Form some hills on your paths or around to redirect the player. Make them all different sizes and shapes, some large, some small. Hills should not be straight for more then 2 squares in a row. This adds a flat boring look. Try experimenting with how you make your hills. Also, elevation on elevation adds a more realistic look, and can look nice in many scenarios.
Often, you'll find that your hills might build into your water or path. This is fine, simply adjust whatever you choose to make it fit.
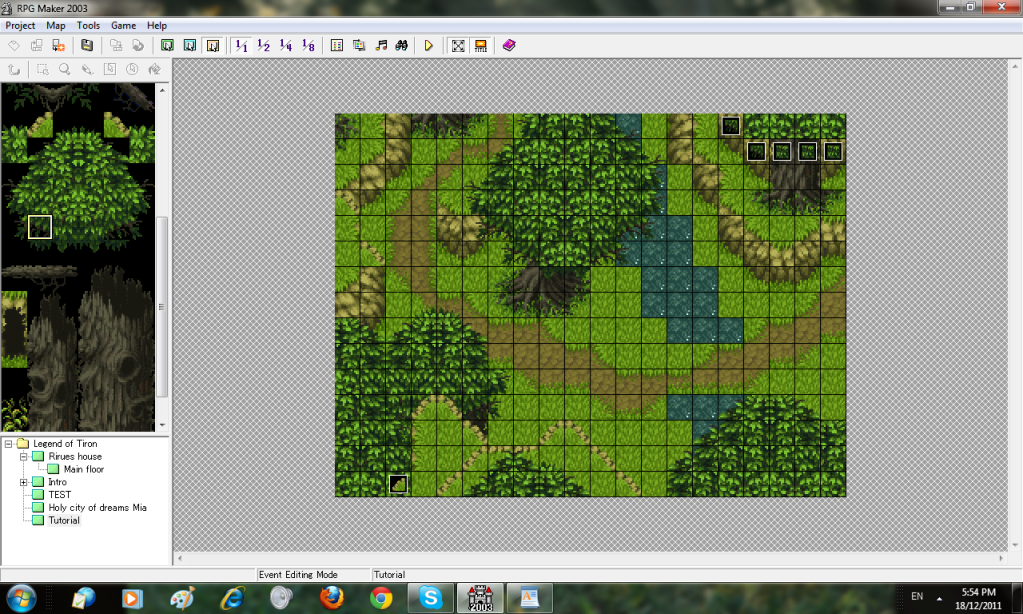
3.) Trees: Trees, are a bit more complicated for me to explain, becuse trees vary a lot depending on your chipset. But they are of course a necassity to any forest maps, so I will give some detail into them. use trees as your souce of stopping the player from getting ot the edge of the map.In a real forest, tress are everywhere, so it's necassary to embark lots of trees. The more dense you want your forest, use lot's and lot's of trees. Blend them well with the water and elevation to make a unique approch on things.
If your tileset supports it, use your treebody well to. Never put them linear to eachother, they should be spread out.
4.)The touch up:- In the touch up phase, were going to attempt to "perfect" what we have so far. break up parts of your path, nothing should be to straight. Separate segments etc, to make it look like grass has grown over the path. Fix the water tiles to make sure they connect with the land properly, and make sure all your tiles are set right and put in properly. If we were to play the game, the map should look 100% fine when were done this (If you are using the tileset I used, the water animation I used to connect the water to the grass is still frame, I will be using a sprite later.
5. Finishing our grass: Now that out map base is done, we will start with detail. Before you go adding flowers and little things, we finish our grass. Almost all good forest sets, will have various forms of spread tiles (The tiles in the top of your chipset that connect and make paths or roofs. Using these, we will create various forms of detail on our map. Make sure to spread them out and combine different kinds. Nothing should be square or straight. Most likely your path will change a bit more, this is good.

6.)The detail: Now comes the fun part. Take all those little details in your chipset, and just put them around where it looks nice.
.Don't cram similar decorations in the same area
.Try not to put two things that stand out directly next to each other
.Try to fill up as much of the grass as possible.
If you follow these three rules, you should be pretty much solid.
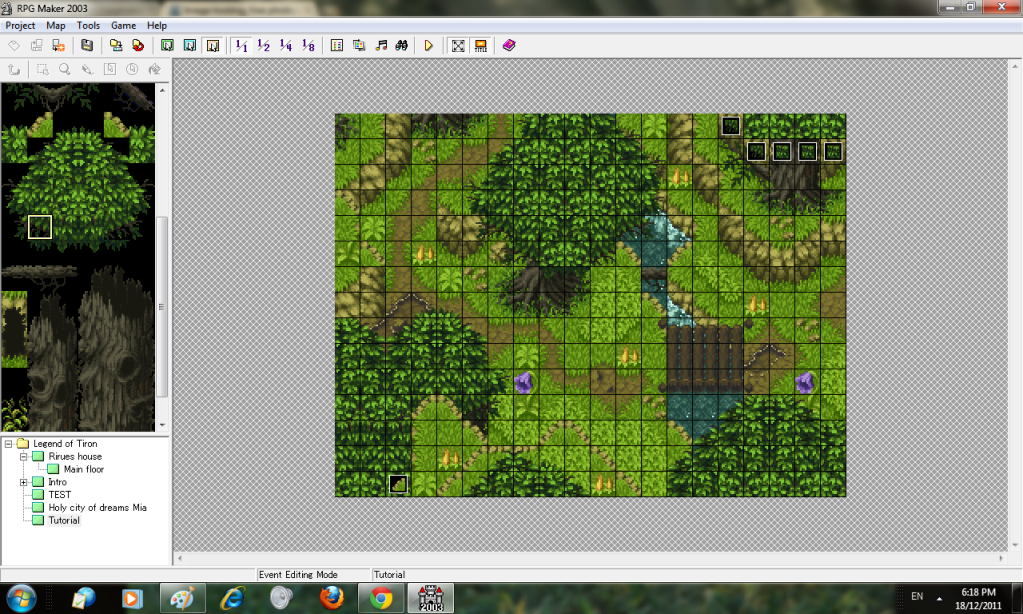
7.)Finale:- Finally, take whatever sprites you got that fit and throw them in there. Animals, flora, rocks. There's a million sprites out there, whatever you think looks nice, put them in!
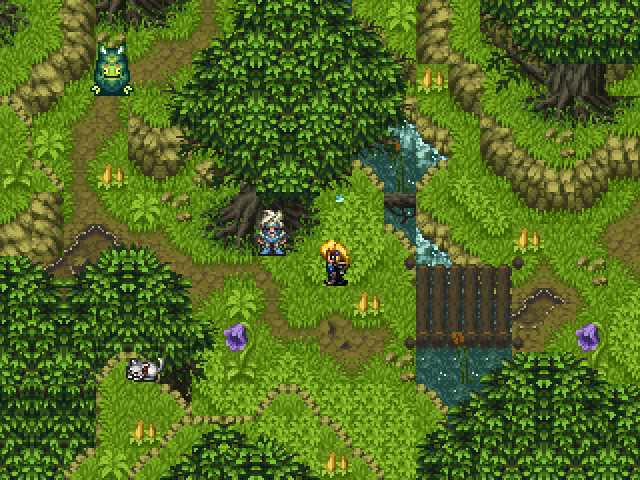
Remember these are just my guidelines for making a map without getting off track and messing things up. The best way to learn is download games, look how they map, and get ideas for yourself. learn to work your tilesets!! You'll get it!
-AppleNinjaX :)
"But hey mister appleNinja, I'm just not good at mapping what do I do!"
Well, mapping is a skill but it's not something that people are gifted with or something that only "really really really good mappers" can do. It's' just experience that helps you to map, learning strategies, getting good with your tilesets, working how you like your visual experiences. This guide will attempt to teach you MY mapping strategy that helps you to keep your maps in line, and not go all A.D.D on them. With this structure. We will be making a forest for this guide. The guidelines i'm going to give still can apply to any map.
Before you read through with this guide, I would like you to do 1 thing
1.)Find a forest tile set you like. Work with it, get used to it's features. Experiment with it understand how it works. When you feel like you have a good sense for the tileset, proceed.
================================================================================
Ok, here we go. for this map, I will be using this tileset. I will be doing a standard size 20 x 15 map, just so you can get the feel for it up close. any size is fine.
==============================================================================
1.)The layout: Generally, you want to know how your map is going to be played out. Will the hero go up or down, where does he come in and exit. In the layout I find it customary to do two things. Your path and water. Start by filling the map with your main floor type (most likely grass in a forest). Quickly make a river, don't fancy it, don't do the edges yet, just make the general layout of how the river is going to run. Then, work your path, dirt or road, whatever your using, design a pathway for your hero to follow.
2.)Main hills: Next, we need to add the "main elevation". these are the hills which have a much more predominate effect on the map. They change the overall elevation
blockade the ends of the screen and direct how the maneuvers the area in a general aspect. Form some hills on your paths or around to redirect the player. Make them all different sizes and shapes, some large, some small. Hills should not be straight for more then 2 squares in a row. This adds a flat boring look. Try experimenting with how you make your hills. Also, elevation on elevation adds a more realistic look, and can look nice in many scenarios.
Often, you'll find that your hills might build into your water or path. This is fine, simply adjust whatever you choose to make it fit.
3.) Trees: Trees, are a bit more complicated for me to explain, becuse trees vary a lot depending on your chipset. But they are of course a necassity to any forest maps, so I will give some detail into them. use trees as your souce of stopping the player from getting ot the edge of the map.In a real forest, tress are everywhere, so it's necassary to embark lots of trees. The more dense you want your forest, use lot's and lot's of trees. Blend them well with the water and elevation to make a unique approch on things.
If your tileset supports it, use your treebody well to. Never put them linear to eachother, they should be spread out.
4.)The touch up:- In the touch up phase, were going to attempt to "perfect" what we have so far. break up parts of your path, nothing should be to straight. Separate segments etc, to make it look like grass has grown over the path. Fix the water tiles to make sure they connect with the land properly, and make sure all your tiles are set right and put in properly. If we were to play the game, the map should look 100% fine when were done this (If you are using the tileset I used, the water animation I used to connect the water to the grass is still frame, I will be using a sprite later.
5. Finishing our grass: Now that out map base is done, we will start with detail. Before you go adding flowers and little things, we finish our grass. Almost all good forest sets, will have various forms of spread tiles (The tiles in the top of your chipset that connect and make paths or roofs. Using these, we will create various forms of detail on our map. Make sure to spread them out and combine different kinds. Nothing should be square or straight. Most likely your path will change a bit more, this is good.
6.)The detail: Now comes the fun part. Take all those little details in your chipset, and just put them around where it looks nice.
.Don't cram similar decorations in the same area
.Try not to put two things that stand out directly next to each other
.Try to fill up as much of the grass as possible.
If you follow these three rules, you should be pretty much solid.
7.)Finale:- Finally, take whatever sprites you got that fit and throw them in there. Animals, flora, rocks. There's a million sprites out there, whatever you think looks nice, put them in!
Remember these are just my guidelines for making a map without getting off track and messing things up. The best way to learn is download games, look how they map, and get ideas for yourself. learn to work your tilesets!! You'll get it!
-AppleNinjaX :)

Pages:
1

