


BUTTON INPUT MINIGAME
How to make a minigame where you have to press the correct buttons
 Kazesui
- 01/24/2012 09:05 PM
- 6636 views
In this tutorial we're going to take a look at how we can create a simple minigame where the player has to press the correct buttons to win. At the end of the tutorial there will be a link to a sample project demonstrating the minigame.
Now, more specifically about the minigame, each button to be pressed will be represented by a picture, placed randomly on the screen. The player will have a certain amount of time to press the key, otherwise the button disappears and the next one shows up. There will be a certain amount of buttons presented to the player, of which the player will have to correctly input some amount of them.
Now that we specifically know what we want to make, we can think about how to go about it. Things like time given for a key to pressed could vary if we want to introduce more levels to the minigame, and same for the amount of keys you need to press correctly. As such it would be a good idea to keep these values in variables.
This would allow us to make a single event handling the minigame itself, and just change the variables for different levels.
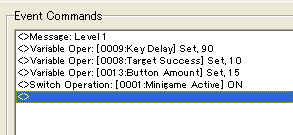
The picture shows how the code for activating the minigame can be handled. We configure 3 variables to the level specification and then start the minigame by turning a switch on.
Key Delay does in this context represent the amount of time you have to press the right button before it disappears. In the sample project, a value of 60 would represent 1.0 seconds.
Target Success is the variable saying how many buttons you should input correctly, while Button Amount decides the total amount of buttons to appear.
In this case, the player needs to input 10/15 buttons correctly, and has 1.5 seconds for each button input.
Now let's look at some sample code of how the main event can be created.
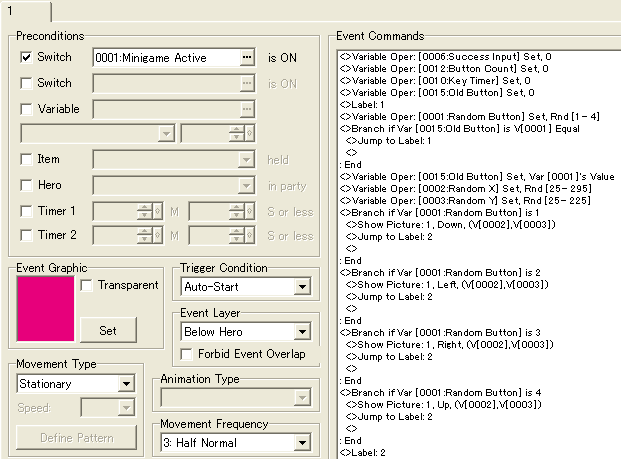
We here have an event set to auto start when a switch is activated. The event starts by initalizing some variables by setting them to 0. These variables will be used to keep track of the progress of the minigame and has to be reseted for each time the minigame is activated.
Success Input will tell how many correct inputs the player has done so far
Button Count will tell how many buttons has been displayed so far,
Key Timer will tell how much time has progressed for the current button, and
Old Button is just there to tell which button was previously created.
We then want to create buttons and check for correct input for as many times as we have buttons, which means doing the same thing over again several times. For stuff like this we'd like to loop the code. We do this by using labels or the loop command. Labels are more flexible and slightly more performant, so I advice the use of labels.
On the topic of label loops: to make a good label loop, you normally put a label after initializing some variables which will be used for counting the amount of times you have looped, execute some code inside the loop, check if counting variables is less than a certain amount with a branch and if yes, jump to label at the start after having increased the counting variable by 1. This is what we'll be doing here, and is also important to understand because we'll have a loop within the loop as well in the following code.
Onto the content of the loop (straight after "Label 1:" in the picture above).
We start by using the random function of the variable to get a value from 1 to 4.
These represent what key should be pressed for the button to be made. We then check if this value is equal to the Old Button variable. Since it was set to 0 at the start, this will obviously not be the case right away, but this code will trigger again once we loop it, so it makes sense to have the branch right after selecting which button should be displayed. If the value is equal, we simply jump to label 1, and let the variable try to assign a new value.
Once this is done, the button has been accepted and we set the Old Button variable to this one, so that it can check against for the next time it loops.
Now we want to set some other variables to random values to make the minigame a bit more exciting. We will set a variable Random X to a value between 25 and 295, and a Random Y to a value between 25 and 225. These values are based on the resolution of rm2k3, which is 320x240. By letting Random X take a value from the given range, we prevent the button being cut off from the edges of the screen and we still allow to appear about anywhere along the x axis.
These variables will in other words be used to show a picture with the variables as screen relative coordinates. So for this, you'll have to make some pictures representing whatever buttons you wished to be pressed. The sample project contain four pictures, one for each arrow.
We utilize branches to show the correct picture, based on the Random Button Variable which tells which key is to be pressed.
Notice how the values and pictures of these branches are the same as the values for the keys given in the "key input command"
(by opening the maker and checking yourself)
At the end of the picture, we arrive at Label 2, which implies start of a new loop.
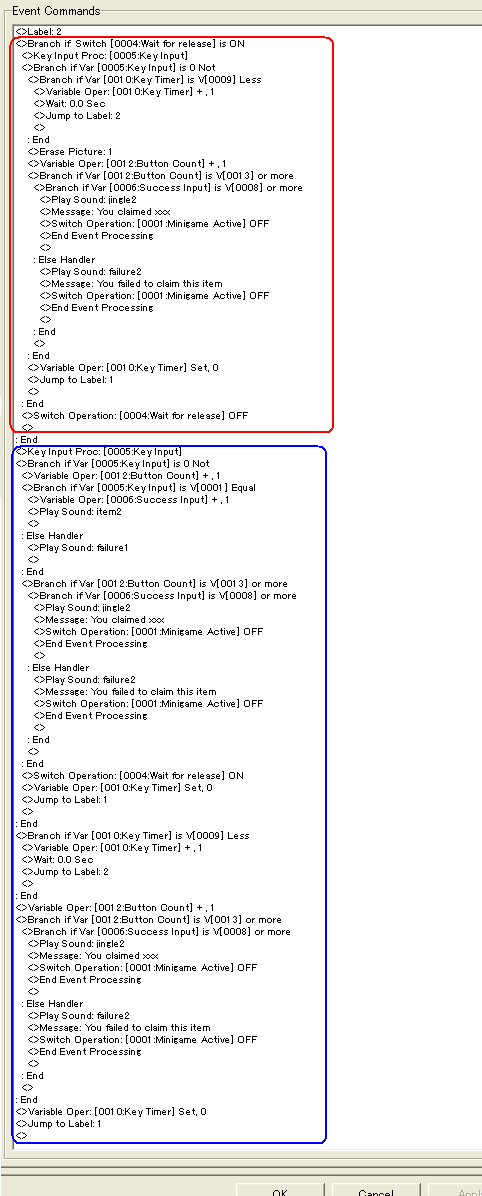
I've taken the liberty of splitting this part of the event into two sections., a red and a blue one. I will start by explaining the blue section.
The blue section has a key input process at the top which has "wait until key is pressed" unchecked. This is important, because otherwise, we won't be able to remove a button eventhough it has timed out unless the player presses a key first.
When the key input is has the "wait until pressed" checked, it will check if any key is held down at the time this very line of the event code is executed. If no key is held down, the variable used for the key input process will have the value 0, Thus we can check if a key has been pressed, simply by having a branch check if this value is not equal to 0.
If it is not, that means a key has been pressed, and we can increase Button Count by 1. We then check if the value of the key pressed is the same as that of the random button. If yes, play success sound and add 1 to the Success Input, if not, play a sound of great failure.
After this is done, we check if Button Count has reached the value of Button Amount, which we set before starting this event (in sample it was set to 15).
If yes, then the event should terminate and we should decide if the player was successful or not. This is done by checking if Success Input is equal to or larger than Success Target which is set to 10 in the sample. If yes, applaud the player for great success, if not award him with sounds and message of defeat.
If Button Count hasn't reached the full value yet, Activate a switch saying that a key has been pressed, reset the Key Timer and jump back to label 1 to assign a new button.
If a key hasn't been pressed it will skip this block and go to another branch, which checks if Key Timer is less than Key Delay. If yes, it will perform a 0.0 wait (equivalent to 1/60th second), add 1 to the Key Timer and jump back to label 2 to go straight back to the key input to check if a key is being held down now.
If the Key Timer has reached the value of Key Delay, it will add 1 to Button Count, and also now check if it has reached the maximum amount, and act accordingly to display victory or defeat if it was the last button.
And that's almost it... but I still haven't explained what the red section is for, or why you would turn on a switch telling that a key had been pressed.
These two are are related to the fact that we're using key input without waiting for a key to be pressed.
When we press down a button, we hold it down at varying length, possibly anything from 0.1 to 0.4 seconds for a quick press. They Key Input process here, only checks if a key is held down, meaning that one press could quickly become many. And we can't tick the wait until key is pressed either, because then we'll get the problem of having to wait for the player to press a key, eventhough a button has timed out.
So the solution is to handle this manually. We do this by turning a switch on, telling when a key has been pressed, and then adding the red section.
The red section checks if the switch Wait For Release is on, and if yes it goes straight to a key input process checking if the variable used for the key input is not equal to 0. If so, a key is still being held down, And we check if the Key Timer has expired. If yes, terminate the button and check if it was the last button, and if so determine failure or success, as earlier.
And that's all there is to it. As you might have noticed, the code for checking whether the player won or lost at the end repeated six times, so this could have been put in another event which could instead have been called each of those 3 times and this would make the code neater and easier to change.
You could look at is an excercise if you feel like doing more with this minigame.
Hope some of you have learned something from this, and here is the sample project I promised you: Sample
Now, more specifically about the minigame, each button to be pressed will be represented by a picture, placed randomly on the screen. The player will have a certain amount of time to press the key, otherwise the button disappears and the next one shows up. There will be a certain amount of buttons presented to the player, of which the player will have to correctly input some amount of them.
Now that we specifically know what we want to make, we can think about how to go about it. Things like time given for a key to pressed could vary if we want to introduce more levels to the minigame, and same for the amount of keys you need to press correctly. As such it would be a good idea to keep these values in variables.
This would allow us to make a single event handling the minigame itself, and just change the variables for different levels.
The picture shows how the code for activating the minigame can be handled. We configure 3 variables to the level specification and then start the minigame by turning a switch on.
Key Delay does in this context represent the amount of time you have to press the right button before it disappears. In the sample project, a value of 60 would represent 1.0 seconds.
Target Success is the variable saying how many buttons you should input correctly, while Button Amount decides the total amount of buttons to appear.
In this case, the player needs to input 10/15 buttons correctly, and has 1.5 seconds for each button input.
Now let's look at some sample code of how the main event can be created.
We here have an event set to auto start when a switch is activated. The event starts by initalizing some variables by setting them to 0. These variables will be used to keep track of the progress of the minigame and has to be reseted for each time the minigame is activated.
Success Input will tell how many correct inputs the player has done so far
Button Count will tell how many buttons has been displayed so far,
Key Timer will tell how much time has progressed for the current button, and
Old Button is just there to tell which button was previously created.
We then want to create buttons and check for correct input for as many times as we have buttons, which means doing the same thing over again several times. For stuff like this we'd like to loop the code. We do this by using labels or the loop command. Labels are more flexible and slightly more performant, so I advice the use of labels.
On the topic of label loops: to make a good label loop, you normally put a label after initializing some variables which will be used for counting the amount of times you have looped, execute some code inside the loop, check if counting variables is less than a certain amount with a branch and if yes, jump to label at the start after having increased the counting variable by 1. This is what we'll be doing here, and is also important to understand because we'll have a loop within the loop as well in the following code.
Onto the content of the loop (straight after "Label 1:" in the picture above).
We start by using the random function of the variable to get a value from 1 to 4.
These represent what key should be pressed for the button to be made. We then check if this value is equal to the Old Button variable. Since it was set to 0 at the start, this will obviously not be the case right away, but this code will trigger again once we loop it, so it makes sense to have the branch right after selecting which button should be displayed. If the value is equal, we simply jump to label 1, and let the variable try to assign a new value.
Once this is done, the button has been accepted and we set the Old Button variable to this one, so that it can check against for the next time it loops.
Now we want to set some other variables to random values to make the minigame a bit more exciting. We will set a variable Random X to a value between 25 and 295, and a Random Y to a value between 25 and 225. These values are based on the resolution of rm2k3, which is 320x240. By letting Random X take a value from the given range, we prevent the button being cut off from the edges of the screen and we still allow to appear about anywhere along the x axis.
These variables will in other words be used to show a picture with the variables as screen relative coordinates. So for this, you'll have to make some pictures representing whatever buttons you wished to be pressed. The sample project contain four pictures, one for each arrow.
We utilize branches to show the correct picture, based on the Random Button Variable which tells which key is to be pressed.
Notice how the values and pictures of these branches are the same as the values for the keys given in the "key input command"
(by opening the maker and checking yourself)
At the end of the picture, we arrive at Label 2, which implies start of a new loop.
I've taken the liberty of splitting this part of the event into two sections., a red and a blue one. I will start by explaining the blue section.
The blue section has a key input process at the top which has "wait until key is pressed" unchecked. This is important, because otherwise, we won't be able to remove a button eventhough it has timed out unless the player presses a key first.
When the key input is has the "wait until pressed" checked, it will check if any key is held down at the time this very line of the event code is executed. If no key is held down, the variable used for the key input process will have the value 0, Thus we can check if a key has been pressed, simply by having a branch check if this value is not equal to 0.
If it is not, that means a key has been pressed, and we can increase Button Count by 1. We then check if the value of the key pressed is the same as that of the random button. If yes, play success sound and add 1 to the Success Input, if not, play a sound of great failure.
After this is done, we check if Button Count has reached the value of Button Amount, which we set before starting this event (in sample it was set to 15).
If yes, then the event should terminate and we should decide if the player was successful or not. This is done by checking if Success Input is equal to or larger than Success Target which is set to 10 in the sample. If yes, applaud the player for great success, if not award him with sounds and message of defeat.
If Button Count hasn't reached the full value yet, Activate a switch saying that a key has been pressed, reset the Key Timer and jump back to label 1 to assign a new button.
If a key hasn't been pressed it will skip this block and go to another branch, which checks if Key Timer is less than Key Delay. If yes, it will perform a 0.0 wait (equivalent to 1/60th second), add 1 to the Key Timer and jump back to label 2 to go straight back to the key input to check if a key is being held down now.
If the Key Timer has reached the value of Key Delay, it will add 1 to Button Count, and also now check if it has reached the maximum amount, and act accordingly to display victory or defeat if it was the last button.
And that's almost it... but I still haven't explained what the red section is for, or why you would turn on a switch telling that a key had been pressed.
These two are are related to the fact that we're using key input without waiting for a key to be pressed.
When we press down a button, we hold it down at varying length, possibly anything from 0.1 to 0.4 seconds for a quick press. They Key Input process here, only checks if a key is held down, meaning that one press could quickly become many. And we can't tick the wait until key is pressed either, because then we'll get the problem of having to wait for the player to press a key, eventhough a button has timed out.
So the solution is to handle this manually. We do this by turning a switch on, telling when a key has been pressed, and then adding the red section.
The red section checks if the switch Wait For Release is on, and if yes it goes straight to a key input process checking if the variable used for the key input is not equal to 0. If so, a key is still being held down, And we check if the Key Timer has expired. If yes, terminate the button and check if it was the last button, and if so determine failure or success, as earlier.
And that's all there is to it. As you might have noticed, the code for checking whether the player won or lost at the end repeated six times, so this could have been put in another event which could instead have been called each of those 3 times and this would make the code neater and easier to change.
You could look at is an excercise if you feel like doing more with this minigame.
Hope some of you have learned something from this, and here is the sample project I promised you: Sample
Posts 

Pages:
1

I'm using this right now in my game, Infection! It works great, very great tutorial and mini-game idea!
Pages:
1

