


LOCKPICKING SYSTEM
A guide to make a simple lockpicking system in rm2k/3.
 Mattdk
- 02/01/2010 11:04 AM
- 4016 views
This is my first tutorial on this site, and I thought I would keep it somewhat simple. So here goes, this tutorial is for creating a simple lockpicking system. This system is used as-is in an ongoing project of mine (Dragon Quest: Heroes Awakening).
Its quite simple. The player must properly insert the pick into the lock and use it. there is a 40% chance the lockpicking will fail, and if it fails, another 40% chance that you will break the lockpick. Also, if the lockpick is not correctly inserted, then the player will always fail in picking the lock (and roll the 40% break chance, too). You can also easily incorporate a lockpicking 'skill' of sorts that lowers failure/break odds, that will not be covered in this tutorial though.
What you'll need (you don't actually 'need' these, but having them and following along will speed things up a little):
LockPicking.rar (Resource pack of 5 images used in this tutorial).
Door_Graphics (charset containing doors, used in this tutorial).
Events: 2
1: Door Event
2: Common Event (call)
Items: 2
1: Lockpick
2: Key
Variables: 5
1: Keytype (Defines what type of lock you are picking+what lockpick you use)
2: Keypoke X (Defines the lockpicks X position onscreen)
3: Keypoke Y (Defines the lockpicks Y position onscreen)
4: Key Input.A (Handles Key input processing)
5: Randomizer (Handles Failure/Break chance)
Switches: 1
1: Door.Open.A (Opens the door on success)
Labels: 2 (1,2)
Ok so first, we start by creating the door event. This door will require a key to open (they key is not covered by the tutorial). If the player does not have the key, the door event will check if the player has a lockpick instead. If the player has a lockpick, then the player will be given the chance to pick the lock. If the player has no key or lockpick, then the door will spit out a 'locked' sort of message.
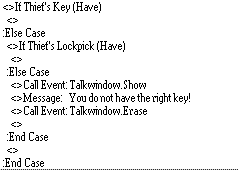
Create your new Door event. Create a conditional branch for if the player has the key, add an else case. In the else case, create a conditional branch for if the player has the lockpick, add an else case again. In the second else case, add some kind of 'door is locked' message. So far, your door event should look like this:
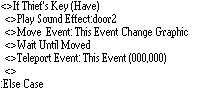
Add some quick code to cover the clause of the player actually having the key first. Under the conditional branch for if the player has the key, I personally prefer to add a door sound effect, then animate the door opening. For sake of reference, here is my method of opening a door:
Create your lockpicking Common event. Set it to call. Leave it blank for now.
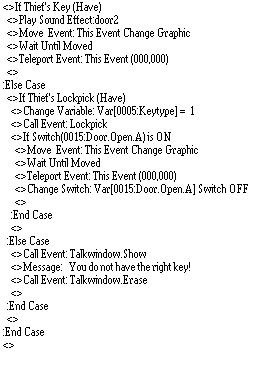
Now onto the lockpicking itself! Okay so, under the conditional branch that checks if the player has a lockpick, start with a variable command. Use our first variable we defined, 'Keytype', and set it to 1. This variable defines the door/lockpick type you are using. Its here for flexability ,you can add to the system with this variable, and create a multitude of different locks to pick. Next, add a call event, and call your lockpicking common event. Below this, create a conditional branch for if the switch we defined earlier (Door.Open.A) is on, don't add an else case here. Inside that conditional branch, again setup your door open animation. I prefer to do it the same as the open door animation, minus the sound (I keep the door open sound for lockpicking stored in the common event we are using).
After all that, you have completed the door event! Almost there! Your door event should look something like this:
Now, onto the common event. Open up your database and common events, and select the currently blank Lockpicking event you created earlier. Keep this event as a call event, with no switch activation.
First, create a conditional branch That checks if Variable Keytype = 1. No else case. Now its time to show the player your lockpicking graphics. For the sake of not writing a novel, I'm going to skip the exact animation steps I used, and let a screenshot speak for me. So create your starting animations. The idea is to have a picture of a lock and a lockpick/key device, and the player has to move the lockpick into the lock and press the <action> key at the right time to open the lock.
Here is my 'base' animation sequence, made with the resources inside 'Lockpicking.rar'. Its a little much, but I used 2 images for the background (transparent back window, with a solid border window), an image for the lock itself, and an image for the lockpick:
As you can see the lock appears above the lockpick on the Y axis, so the player has to move the lockpick <up> into its proper position before hitting the <action> key.
Under the animation, insert two variable operations. In the first one, set 'Keypoke X' to 160. In the second one, set 'Keypoke Y' to 160 as well. Note that these variables are set to the lockpicks default onscreen position. Next, add Label #1. Below this label, add a showpicture event for your lockpick, and set positions to the X and Y variables that we just defined. This will refresh the lockpicks position as the player moves it. Next add an input processing(password) event. Store value in 'Key Input A', enable 'wait until key pressed/hit'. At this stage, your event should look something like this:
Create a conditional branch checking if the value of 'Key Input A' = 6 (6 is the <cancel> button). Inside this conditional branch, create a cancel event of sorts. The simplest way is to erase all pictures, and set the keytype variable to 0. Then the event will end and the door will remain locked.
Create two more consecutive conditional branches checking if the value of 'Key Input A' is 2 and 3. In each of these branches, simply add a GotoLabel:#1 command and thats it.
Create a conditional branch checking if the value of 'Key Input A' is 4. Inside this branch, change variable 'Keypoke Y' (-) 5 (minus 5). Also, add a sound for the lockpick moving if you like, then add a GotoLabel:#1.
Create a conditional branch checking if the value of 'Key Input A' is 1. Inside this branch, change variable 'Keypoke Y' (+)5 (plus 5). Also, add a sound for the lockpick moving if you like, then add a GotoLabel:#1.
Now, the event should look something like this:
Almost there!
Now, create a conditional branch checking if the value of 'Key Input A' is 5. Inside this branch we will handle the player using the lockpick. We have to be sure of a few things, like for example that the lockpick is in the proper onscreen position. Inside this branch, create another conditional branch and check if 'Keypoke Y' is 120, and add an else case. Inside this else case, add a Label:#2. That else case is what we call when the player uses the lockpick in the wrong position (or when the lockpick fails, as it will also roll the chance to break it). Next we will use that randomizer variable! Set your random variable to a number between 1 and 100 using the random option in variable operations (note that my random variable is titled '# of saves'. This is because I recycled a variable that is rarely used. You can do the same if you see fit).
Create a conditional branch that checks if 'random' variable is set to '40' or less. Inside this conditional branch, change variable 'Keypoke Y' (-) 5 (minus 5), and add a GotoLabel:#2. This branch dictates the failure rate of 40% that was outlined at the start of the tutorial.
Right below that conditional branch is the space that will be used when the door is opened successfully. Here is where I prefer to add a key sound. Then change the 'lockpicktool' picture to the second one I included in Lockpicking.rar, to properly animate the lockpick. After this, insert your 'lock has been picked' message to the player, followed by any rewards or stat increases that might be garnered from lockpicking (I use simple exp addition, but if you want to add a lockpicking skill, this is the spot you would add exp for it). Next the simplest thing you can do is scroll up to the conditional branch you created that covers the <cancel> command, and copy the code from there, and paste it back down here, below where you added exp. Everything should be the same as in the <cancel> code, accept for 1 thing: Somewhere in there, add a switch operation, and turn <ON> the 'Door.Open.A' switch defined at the start of the tutorial.
Were almost there! Now all we need to do is add the code which handles that 40% failure chance, and the 40% lockpick break chance. The common event should be looking something like this:
Go down to where we inserted Label:#2 earlier. Then change the 'lockpicktool' picture to the second one I included in Lockpicking.rar, to properly animate the lockpick. Follow this up with your 'lockpicking failed' message to the player. Once again, we need to use the random variable. Set the 'Randomizer' variable to a value between 1 and 100 using the random command in variable operations. Below this, create a conditional branch for if the random variable is 40 or less. Inside this conditional branch we need to insert the code for breaking the lockpick. How you do this comes down to what atmosphere your aiming for. In designing this system, I went towards memorizing/fading out the BGM, then playing an 'error' sound, followed by a message to the player stating that the lockpick has been broken, then the BGM is resumed. Do it how you prefer, and at the bottom of that, add an item operation and remove 1 lockpick from the inventory.
Finally, below that last conditional branch (where the code for broken lockpicks reside) you need to copy/paste the code from the <cancel> option we made earlier in the tutorial. Finally, the common event should end up looking something like this:
So thats it! You have now coded a basic lockpicking system. Though limited and somewhat rudimentary, this system can also be customized with relative ease. You should be able to add a lockpicking skill system with little effort, and have it decrease the failure and break odds as you see fit. You should also be able to create different lockpicks for different locks if you want to, simply copy/paste the door event and assign a new door graphic. Maybe add some more notches to the lockhole. Additional doors would be best served using other values for the Keytype variable (thats what the variable is for anyway). Simply copy/paste all the code in the common event and change the Keytype to 2 on the copied branch code, then make whatever customizations to the additional door that you wanted.
In closing, I'll say that this took a lot longer to write out than it did to actually code. If you had made this system from scratch without following this tutorial, including the lockpick graphics, you would have been completed it in less than an hours time. Have a nice day!
Its quite simple. The player must properly insert the pick into the lock and use it. there is a 40% chance the lockpicking will fail, and if it fails, another 40% chance that you will break the lockpick. Also, if the lockpick is not correctly inserted, then the player will always fail in picking the lock (and roll the 40% break chance, too). You can also easily incorporate a lockpicking 'skill' of sorts that lowers failure/break odds, that will not be covered in this tutorial though.
What you'll need (you don't actually 'need' these, but having them and following along will speed things up a little):
LockPicking.rar (Resource pack of 5 images used in this tutorial).
Door_Graphics (charset containing doors, used in this tutorial).
Events: 2
1: Door Event
2: Common Event (call)
Items: 2
1: Lockpick
2: Key
Variables: 5
1: Keytype (Defines what type of lock you are picking+what lockpick you use)
2: Keypoke X (Defines the lockpicks X position onscreen)
3: Keypoke Y (Defines the lockpicks Y position onscreen)
4: Key Input.A (Handles Key input processing)
5: Randomizer (Handles Failure/Break chance)
Switches: 1
1: Door.Open.A (Opens the door on success)
Labels: 2 (1,2)
Ok so first, we start by creating the door event. This door will require a key to open (they key is not covered by the tutorial). If the player does not have the key, the door event will check if the player has a lockpick instead. If the player has a lockpick, then the player will be given the chance to pick the lock. If the player has no key or lockpick, then the door will spit out a 'locked' sort of message.
Create your new Door event. Create a conditional branch for if the player has the key, add an else case. In the else case, create a conditional branch for if the player has the lockpick, add an else case again. In the second else case, add some kind of 'door is locked' message. So far, your door event should look like this:
Add some quick code to cover the clause of the player actually having the key first. Under the conditional branch for if the player has the key, I personally prefer to add a door sound effect, then animate the door opening. For sake of reference, here is my method of opening a door:
Create your lockpicking Common event. Set it to call. Leave it blank for now.
Now onto the lockpicking itself! Okay so, under the conditional branch that checks if the player has a lockpick, start with a variable command. Use our first variable we defined, 'Keytype', and set it to 1. This variable defines the door/lockpick type you are using. Its here for flexability ,you can add to the system with this variable, and create a multitude of different locks to pick. Next, add a call event, and call your lockpicking common event. Below this, create a conditional branch for if the switch we defined earlier (Door.Open.A) is on, don't add an else case here. Inside that conditional branch, again setup your door open animation. I prefer to do it the same as the open door animation, minus the sound (I keep the door open sound for lockpicking stored in the common event we are using).
After all that, you have completed the door event! Almost there! Your door event should look something like this:
Now, onto the common event. Open up your database and common events, and select the currently blank Lockpicking event you created earlier. Keep this event as a call event, with no switch activation.
First, create a conditional branch That checks if Variable Keytype = 1. No else case. Now its time to show the player your lockpicking graphics. For the sake of not writing a novel, I'm going to skip the exact animation steps I used, and let a screenshot speak for me. So create your starting animations. The idea is to have a picture of a lock and a lockpick/key device, and the player has to move the lockpick into the lock and press the <action> key at the right time to open the lock.
Here is my 'base' animation sequence, made with the resources inside 'Lockpicking.rar'. Its a little much, but I used 2 images for the background (transparent back window, with a solid border window), an image for the lock itself, and an image for the lockpick:
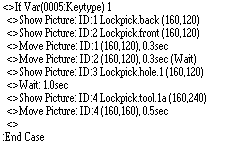
As you can see the lock appears above the lockpick on the Y axis, so the player has to move the lockpick <up> into its proper position before hitting the <action> key.
Under the animation, insert two variable operations. In the first one, set 'Keypoke X' to 160. In the second one, set 'Keypoke Y' to 160 as well. Note that these variables are set to the lockpicks default onscreen position. Next, add Label #1. Below this label, add a showpicture event for your lockpick, and set positions to the X and Y variables that we just defined. This will refresh the lockpicks position as the player moves it. Next add an input processing(password) event. Store value in 'Key Input A', enable 'wait until key pressed/hit'. At this stage, your event should look something like this:
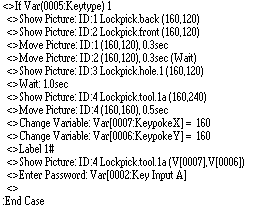
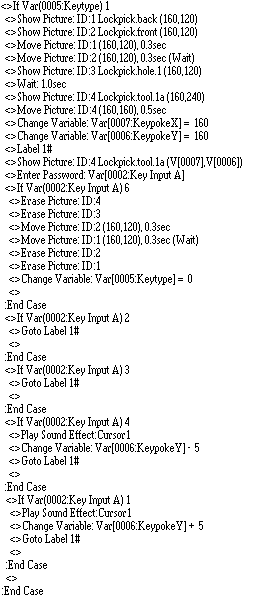
Create a conditional branch checking if the value of 'Key Input A' = 6 (6 is the <cancel> button). Inside this conditional branch, create a cancel event of sorts. The simplest way is to erase all pictures, and set the keytype variable to 0. Then the event will end and the door will remain locked.
Create two more consecutive conditional branches checking if the value of 'Key Input A' is 2 and 3. In each of these branches, simply add a GotoLabel:#1 command and thats it.
Create a conditional branch checking if the value of 'Key Input A' is 4. Inside this branch, change variable 'Keypoke Y' (-) 5 (minus 5). Also, add a sound for the lockpick moving if you like, then add a GotoLabel:#1.
Create a conditional branch checking if the value of 'Key Input A' is 1. Inside this branch, change variable 'Keypoke Y' (+)5 (plus 5). Also, add a sound for the lockpick moving if you like, then add a GotoLabel:#1.
Now, the event should look something like this:
Almost there!
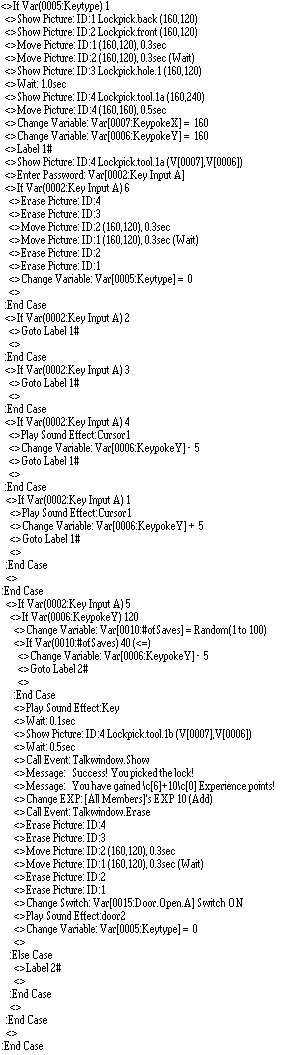
Now, create a conditional branch checking if the value of 'Key Input A' is 5. Inside this branch we will handle the player using the lockpick. We have to be sure of a few things, like for example that the lockpick is in the proper onscreen position. Inside this branch, create another conditional branch and check if 'Keypoke Y' is 120, and add an else case. Inside this else case, add a Label:#2. That else case is what we call when the player uses the lockpick in the wrong position (or when the lockpick fails, as it will also roll the chance to break it). Next we will use that randomizer variable! Set your random variable to a number between 1 and 100 using the random option in variable operations (note that my random variable is titled '# of saves'. This is because I recycled a variable that is rarely used. You can do the same if you see fit).
Create a conditional branch that checks if 'random' variable is set to '40' or less. Inside this conditional branch, change variable 'Keypoke Y' (-) 5 (minus 5), and add a GotoLabel:#2. This branch dictates the failure rate of 40% that was outlined at the start of the tutorial.
Right below that conditional branch is the space that will be used when the door is opened successfully. Here is where I prefer to add a key sound. Then change the 'lockpicktool' picture to the second one I included in Lockpicking.rar, to properly animate the lockpick. After this, insert your 'lock has been picked' message to the player, followed by any rewards or stat increases that might be garnered from lockpicking (I use simple exp addition, but if you want to add a lockpicking skill, this is the spot you would add exp for it). Next the simplest thing you can do is scroll up to the conditional branch you created that covers the <cancel> command, and copy the code from there, and paste it back down here, below where you added exp. Everything should be the same as in the <cancel> code, accept for 1 thing: Somewhere in there, add a switch operation, and turn <ON> the 'Door.Open.A' switch defined at the start of the tutorial.
Were almost there! Now all we need to do is add the code which handles that 40% failure chance, and the 40% lockpick break chance. The common event should be looking something like this:
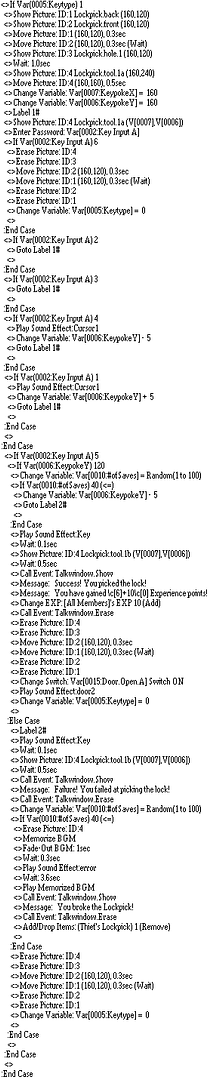
Go down to where we inserted Label:#2 earlier. Then change the 'lockpicktool' picture to the second one I included in Lockpicking.rar, to properly animate the lockpick. Follow this up with your 'lockpicking failed' message to the player. Once again, we need to use the random variable. Set the 'Randomizer' variable to a value between 1 and 100 using the random command in variable operations. Below this, create a conditional branch for if the random variable is 40 or less. Inside this conditional branch we need to insert the code for breaking the lockpick. How you do this comes down to what atmosphere your aiming for. In designing this system, I went towards memorizing/fading out the BGM, then playing an 'error' sound, followed by a message to the player stating that the lockpick has been broken, then the BGM is resumed. Do it how you prefer, and at the bottom of that, add an item operation and remove 1 lockpick from the inventory.
Finally, below that last conditional branch (where the code for broken lockpicks reside) you need to copy/paste the code from the <cancel> option we made earlier in the tutorial. Finally, the common event should end up looking something like this:
So thats it! You have now coded a basic lockpicking system. Though limited and somewhat rudimentary, this system can also be customized with relative ease. You should be able to add a lockpicking skill system with little effort, and have it decrease the failure and break odds as you see fit. You should also be able to create different lockpicks for different locks if you want to, simply copy/paste the door event and assign a new door graphic. Maybe add some more notches to the lockhole. Additional doors would be best served using other values for the Keytype variable (thats what the variable is for anyway). Simply copy/paste all the code in the common event and change the Keytype to 2 on the copied branch code, then make whatever customizations to the additional door that you wanted.
In closing, I'll say that this took a lot longer to write out than it did to actually code. If you had made this system from scratch without following this tutorial, including the lockpick graphics, you would have been completed it in less than an hours time. Have a nice day!
Posts 

Pages:
1


Pages:
1

