


INTRODUCTION TO PIXEL MOVEMENT IN RM2K3
Want to find out how much work there really is to doing basic pixel movement?
 Kazesui
- 07/11/2011 09:06 AM
- 40818 views
There are probably a lot of you out there who wonder how you can do pixel movement in rpg maker 2k3... and a lot of you will probably still wonder even after reading this tutorial. This is because this isn't something for newbies. I try to make it quite simple though, so that as many as possible will get it.
Another thing I'd like to add is that there are many ways of doing this with this simply being my way. Feel free to try other stuff which you think will work as well.
This tutorial will teach you how to make a character move with pixel movement while detecting terrain obstacles and while being able to interact with events. I will also go through 2 ways of "changing" the map while using this technique.
A sample project containing the code we'll be going through can be found here:
Sample Project
Let's start with the simplest task, making the sprite move. For that, we first need a picture representing the sprite. To get one, you could simply do like me and simple make pictures out of some RTP char given in the charset. If you want to do animations, make sure that they all have the same resolution, otherwise it could become a pain to position them correctly in the game.

This is all it takes to make the sprite move. First we use an key input command where we uncheck the option "wait until key pressed" and where we only check for up and down. This is followed by 2 branches, checking if the variable we used for the key input is equal to 1 or 4, the value retrieved if either down or up was pressed.
If either of them was pressed, then the picture should move along the Y axis. In most part of the computer realm the point of origin can be found at the upper left, with the Y axis being positive downwards, and the X axis being positive towards the right. This means, that to move the picture downward, we have to add the variable containing the Y coordinate of the sprite, and to move it up, we'll have to subtract from it.
Whenever we have a list of branches, where only one of the branches can be true at the same time, it's normally good to create a label below the last branch, and jump to it at the end of each branch block, since this saves the engine from having to interpret unnecessary branches which can't be taken anyway, and when going into the realm of advance stuff like pixel movement, we'll want to have an eye on performance.
Following the label we have another key input, checking for left or right this time, and with similar setup for them as well. Checking for Left and Right like this right after checking for up and down, allows the sprite to go in both X and Y direction, meaning you'll be able to walk diagonally.
To update the position of the sprite we use move picture with the updated coordinates as position and 0.0 wait (without wait until done checked). This is pretty much the way to go to assure that the picture always is at the position we want.
And this is all you need to make a sprite move with pixel movement. At the end of an parallel process there's always a hidden "0.0 wait", so with this event, you'll be able to move 1 pixel per frame, that is equal to the speed "3: normal" in the editor.
It might not look so cool at the moment, since it's only a still picture moving about, even on the walls and stuff. But it is important to start with the simple stuff and make sure that they're working as intended before moving on. You should not try to make everything at once in bigger projects involving stuff you haven't dealt with too much before (or even then). Begin small, and build up as you go.
That said, it doesn't harm to plan ahead a little, so that implementations down the road will be easier to do.
Anyway, let's move on to how to animate our character. To do that, we will have to add some more code to our "movement event". We need to find a way to determine if the sprite is walking or not, and in which direction it is walking.

This is how it looks in the sample. We start by finding out if the sprite is standing still. This is done by placing a key input at the top similar like before, only that now all 4 directions have been checked. This way, we know that the sprite is standing still if the variable returns 0. This is caught by a branch which sets some variables, sets a switch called "hero moves" off and call an event which we will get back to later. At the end there's an "end event processing", meaning that the rest of the code below won't be interpreted, and why should it? We have already determined that the sprite isn't moving, so we won't need to update the sprite's location either.
Others than that, we can also see that a variable operation has been added to each direction, setting a variable "direction tmp" to the same value as the value retrieved from the key input. Since the same is down for both up/down and left/right pairs, the "direction tmp" variable will be overwritten if the sprite is moving either left or right. This means that in the case of walking diagonally, the sprite will be facing in either the left or right direction.
At the end we update a variable "Direction Hero" with the value in the tmp variable, which will be used to show the correct picture.

And this we do with a map event running on parallel process. Don't mind the char used for the event, he's just used for easier recognition of the event while looking in the editor. He's not visible in the game.
All the pages are the same, except for showing pictures of the character walking in another direction and the number of the variable "direction hero" has to be equal to for the page to trigger. So we let the variable decide which page to use as long as "Hero moves" is set on. The event code first does a modulo operation on the Animation Frame variable, meaning that it's value won't be higher than 3, and then adds by 1. Doing this makes the variable count from 1 to 4 and then back to 1 in an endless loop, and then we'll only have to put up some branches containing the different animations for that direction.
And voila, now we have a sprite which animates in the different directions. You might recall the movement event calling an event back up there. The variable it sets, is the Animation Frame variable, and the event which is called is this one. It has a variable which is always 2 for the sake of getting this event, and uses the "Direction Hero" variable to determine the page to call. Since the page always is called with "Animation Frame" having 1 as value, it will always become 2 after the addition, choosing the middle sprite for standing still, just like the sprites would do normally when doing tile based movement.
Now, all we need is for some detection towards terrain obstacles to have the most basic mechanics down.
This is once again done with a map event, and what better is used for an event which will block movement then a big scary knight which might would probably have done the same?
Pictures are shown at screen related coordinates, and terrain is given at tiles, so we'll have to translate the screen related coordinates to tile ones to know if there is unpassable terrain there. We do this by setting to variables, Tile X and Tile Y, equal to the respective screen related coordinates of the character, and then we add an offset depending on the direction we want to search in. This offset will depend on the size of the sprite you've chosen. Mine was 24x32, and since the pictures are set at their middle point, it'll be 16 pixels down to reach the bottom, in order to check if there is any obstacle there. Once offset is added, both variables are divided by 16 to return the tile coordinates (since each tile is 16x16 pixels). This allows us to call "Store terrain ID" as well as "Store event ID" which we will be using later. Mind you that we'll have to set the terrain ID first to the value we want to check for. In the sample project, they have been set to 4, so a branch checks if the terrain ID equals 4, and if so it subtracts 1 from the Y coordinate.
To understand why, we look at the event itself. It's not a parallel process and we won't be using action key to call it either, so it'll have to be called from somewhere else. It would make sense to check for collision when we're walking, so we'll add it to the movement code

We can see that calls for different pages are done for the different directions, right before adding to the value. This means that the -1 from before will be negated right afterwards, meaning no movement in case of an obstacle.
And with this we have basic functionality. You might have noticed that the 1 which used to added for the different directions has been changed with a variable. This has been done to allow for adjustable speed, which allows for functions like running:

This is just a simple little event which sets the speed variable to 2 if the button x is held down, and 1 if it isn't. 2 pixels per frame equals "4: twice normal" in the editor.
Now, if you test the collision detection, you will notice that the collision detection is somewhat bugged, especially with the new running system implemented. Since it's only testing in the middle right in front of the sprite, by walking a little on the side, you'll still be able to walk into walls. To prevent this, we'll need to check two points (or more if you have a very big sprite) at each edge. Also, events can be obstacles too, so we'll want to check for events standing in the way as well. So back we go to add more code to the event dealing with collision detection:

We check for both corners by doing it in two steps. First we add 15 to the Y variable as well as the current speed to get the next position along the Y axis, and the we subtract 7 from the X coordinate in order to get the lower left corner. We get both terrain and event ID and if either shows an obstacle, we subtract from the coordinates to negate movement and end the event there. If not we check the lower right corner as well. The reason we check add or subtract 7 from the X coordinate, while adding or subtracting 8 when looking left or right, is to avoid getting stuck along the walls. If you move into a wall going left, you wouldn't be able to walk up or down, since the position further up and down would still be 1 pixel into the wall, so it has to be 1 pixel less.
Now the collision works just fine and the running doesn't bug it either. Event's can block the player as well now. This means it's time to move on to the next part. Making it possible for your picture to interact with events. We'll look into how to deal with a treasure chest, as well as how to talk with an NPC.

First off, we'll need an event to handle action input, since we won't be able to use the hero for it anymore. This one is actually quite similar to the original collision event in terms of looking right in middle front of the sprite for events.
We store the event ID and if the event ID is larger or equal to the lowest ID of an obstacle event, it sets the Action Page equal to one, calls the event with the ID you just found at page 1, since we use Action page for the page number.
Doing this, we can make a treasure chest:

Hero we set the Action Page again to the value of a variable "Chest", which initially has the value 2. Then it calls the event again this time with the value just obtained. When interacting with the chest for the first time, we'll see the chest open and the Chest variable will be set to 3. This means that for all later interactions with the chest, page 3 will be executed instead. Page 3 will of course be set with an open chest and with chest variable being equal to 3 as an requirement, making it work like a normal chest.
When dealing with an NPC which always says the same though, a single page can do:

We just check for the direction of the hero, and make sure the NPC face in the opposite direction to make sure the NPC faces the hero before talking. Talking to a char like this with a picture from above, will reveal that you will be standing "on" that char. To prevent that you'll have to make a picture for the NPC as well with an higher ID than that of the hero, but I'll let that be your problem.
Doing this we're able to interact with events through a picture. The sample project also contains some crystals you can move around.
Now there are only a few things left. To be able to make a simple game, we will of course have to be able to change the map, And we'll also have to initialize certain values at start.

The first page is a one time thing, setting certain start values for the game. We set the position we want to her to start in terms of screen relative coordinates and we also set various variable values, like chest to 2, so that it goes straight to page 2 upon interaction and other similar cases.
The page 2 of this event which also is set to auto start deals with something supposed to happen each time we visit this map. The call event calls for the animation, to make sure the hero is facing the right direction. Event start ID marks the start of interact able events, while obstacle start ID marks which of them are unpassable. This means that you will have to take care in terms of Event ID's. The ones which you should be able to interact with will have to have the highest ID's with the obstacles being highest again. Not doing so, could lead to more problematic testing as well as less efficient code.
The last page of this event is merely empty, just waiting for a switch to be turned off for the next arrival at this map. Erase event could probably also be used at this point, to make sure it only happens once per map.
To make a similar effect to that of "touched by hero" for the sake of triggering an teleport event, we'll have to add yet another common event:

Fairly similar to that of the collision events earlier, but this time it suffices to check at the middle point of the sprite (which is below the middle point of the picture). Also we check that the event id found is higher or equal to the lowest ID of interactable event, but lower than that of the obstacle ones. Once this is done we can make the event triggering the teleport:

Using a picture of high ID to cover up the rest of the screen can provide for a nice way to fade out the screen, especially if the normal fades won't do, since tint screen won't cover pictures. Hero Mobile Controls the mobility of the hero so shutting it down will prevent continous update of the picture position which can give problems during transition, especially since you have to enter the new coordinates as well. the 0.0 wait is placed there since the maker sometimes need to wait a frame to update various parts of itself. I then set the switch Area initialized off so that the auto start dealing with initialization of that map can run.
In the next map, we'll come across another way to switch map, that is by panorating the map Zelda-style. This can be achieved like this:

We divide the map into "Zones" and check for them when crossing the border by same means as a normal teleport event. if you're about to enter another zone than the one you're currently in, the branch will be true. We then set Hero moves and Hero Mobile off to make sure no picture update will be done during transition, and do another show picture but with "scrolling with map checked" to make sure we don't move out of place while panning the screen. Since a screen is 320 pixels long, we subtract that amount from the X coordinate, to make sure it will relate correctly in terms of the screen, and we set a new variable, X Offset" with the value 320.
In all operations dealing with translating picture related coordinates to tile ones, the offset will also have to be added, since the picture is actually further into the map and the screen relative coordinates are always relative to the screen.
Once this is done, you will be able to move back and forth Zelda style without problem, and you'll still be able to interact with events around.
This concludes the introduction tutorial on how to do pixel based movement in rm2k3. Hope you've learned from it and will have further fun with it. Make sure to download the sample project at the top to check it's functionality and to get a better look at the code.
Thank you for reading
A video showing the end result given in the sample project
Another thing I'd like to add is that there are many ways of doing this with this simply being my way. Feel free to try other stuff which you think will work as well.
This tutorial will teach you how to make a character move with pixel movement while detecting terrain obstacles and while being able to interact with events. I will also go through 2 ways of "changing" the map while using this technique.
A sample project containing the code we'll be going through can be found here:
Sample Project
Let's start with the simplest task, making the sprite move. For that, we first need a picture representing the sprite. To get one, you could simply do like me and simple make pictures out of some RTP char given in the charset. If you want to do animations, make sure that they all have the same resolution, otherwise it could become a pain to position them correctly in the game.
This is all it takes to make the sprite move. First we use an key input command where we uncheck the option "wait until key pressed" and where we only check for up and down. This is followed by 2 branches, checking if the variable we used for the key input is equal to 1 or 4, the value retrieved if either down or up was pressed.
If either of them was pressed, then the picture should move along the Y axis. In most part of the computer realm the point of origin can be found at the upper left, with the Y axis being positive downwards, and the X axis being positive towards the right. This means, that to move the picture downward, we have to add the variable containing the Y coordinate of the sprite, and to move it up, we'll have to subtract from it.
Whenever we have a list of branches, where only one of the branches can be true at the same time, it's normally good to create a label below the last branch, and jump to it at the end of each branch block, since this saves the engine from having to interpret unnecessary branches which can't be taken anyway, and when going into the realm of advance stuff like pixel movement, we'll want to have an eye on performance.
Following the label we have another key input, checking for left or right this time, and with similar setup for them as well. Checking for Left and Right like this right after checking for up and down, allows the sprite to go in both X and Y direction, meaning you'll be able to walk diagonally.
To update the position of the sprite we use move picture with the updated coordinates as position and 0.0 wait (without wait until done checked). This is pretty much the way to go to assure that the picture always is at the position we want.
And this is all you need to make a sprite move with pixel movement. At the end of an parallel process there's always a hidden "0.0 wait", so with this event, you'll be able to move 1 pixel per frame, that is equal to the speed "3: normal" in the editor.
It might not look so cool at the moment, since it's only a still picture moving about, even on the walls and stuff. But it is important to start with the simple stuff and make sure that they're working as intended before moving on. You should not try to make everything at once in bigger projects involving stuff you haven't dealt with too much before (or even then). Begin small, and build up as you go.
That said, it doesn't harm to plan ahead a little, so that implementations down the road will be easier to do.
Anyway, let's move on to how to animate our character. To do that, we will have to add some more code to our "movement event". We need to find a way to determine if the sprite is walking or not, and in which direction it is walking.
This is how it looks in the sample. We start by finding out if the sprite is standing still. This is done by placing a key input at the top similar like before, only that now all 4 directions have been checked. This way, we know that the sprite is standing still if the variable returns 0. This is caught by a branch which sets some variables, sets a switch called "hero moves" off and call an event which we will get back to later. At the end there's an "end event processing", meaning that the rest of the code below won't be interpreted, and why should it? We have already determined that the sprite isn't moving, so we won't need to update the sprite's location either.
Others than that, we can also see that a variable operation has been added to each direction, setting a variable "direction tmp" to the same value as the value retrieved from the key input. Since the same is down for both up/down and left/right pairs, the "direction tmp" variable will be overwritten if the sprite is moving either left or right. This means that in the case of walking diagonally, the sprite will be facing in either the left or right direction.
At the end we update a variable "Direction Hero" with the value in the tmp variable, which will be used to show the correct picture.
And this we do with a map event running on parallel process. Don't mind the char used for the event, he's just used for easier recognition of the event while looking in the editor. He's not visible in the game.
All the pages are the same, except for showing pictures of the character walking in another direction and the number of the variable "direction hero" has to be equal to for the page to trigger. So we let the variable decide which page to use as long as "Hero moves" is set on. The event code first does a modulo operation on the Animation Frame variable, meaning that it's value won't be higher than 3, and then adds by 1. Doing this makes the variable count from 1 to 4 and then back to 1 in an endless loop, and then we'll only have to put up some branches containing the different animations for that direction.
And voila, now we have a sprite which animates in the different directions. You might recall the movement event calling an event back up there. The variable it sets, is the Animation Frame variable, and the event which is called is this one. It has a variable which is always 2 for the sake of getting this event, and uses the "Direction Hero" variable to determine the page to call. Since the page always is called with "Animation Frame" having 1 as value, it will always become 2 after the addition, choosing the middle sprite for standing still, just like the sprites would do normally when doing tile based movement.
Now, all we need is for some detection towards terrain obstacles to have the most basic mechanics down.
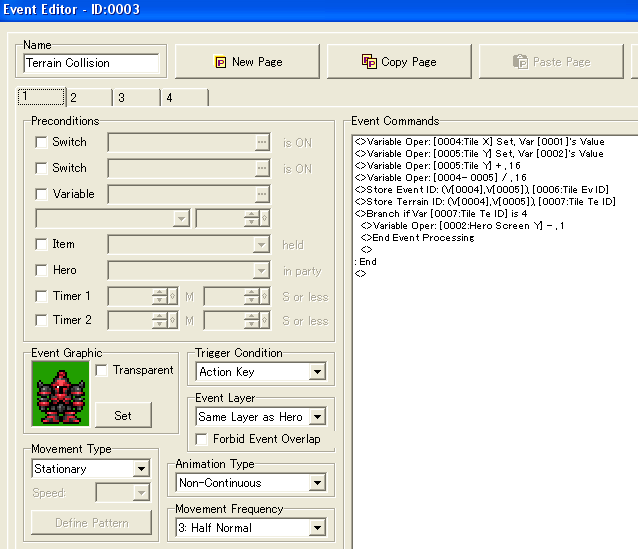
This is once again done with a map event, and what better is used for an event which will block movement then a big scary knight which might would probably have done the same?
Pictures are shown at screen related coordinates, and terrain is given at tiles, so we'll have to translate the screen related coordinates to tile ones to know if there is unpassable terrain there. We do this by setting to variables, Tile X and Tile Y, equal to the respective screen related coordinates of the character, and then we add an offset depending on the direction we want to search in. This offset will depend on the size of the sprite you've chosen. Mine was 24x32, and since the pictures are set at their middle point, it'll be 16 pixels down to reach the bottom, in order to check if there is any obstacle there. Once offset is added, both variables are divided by 16 to return the tile coordinates (since each tile is 16x16 pixels). This allows us to call "Store terrain ID" as well as "Store event ID" which we will be using later. Mind you that we'll have to set the terrain ID first to the value we want to check for. In the sample project, they have been set to 4, so a branch checks if the terrain ID equals 4, and if so it subtracts 1 from the Y coordinate.
To understand why, we look at the event itself. It's not a parallel process and we won't be using action key to call it either, so it'll have to be called from somewhere else. It would make sense to check for collision when we're walking, so we'll add it to the movement code
We can see that calls for different pages are done for the different directions, right before adding to the value. This means that the -1 from before will be negated right afterwards, meaning no movement in case of an obstacle.
And with this we have basic functionality. You might have noticed that the 1 which used to added for the different directions has been changed with a variable. This has been done to allow for adjustable speed, which allows for functions like running:
This is just a simple little event which sets the speed variable to 2 if the button x is held down, and 1 if it isn't. 2 pixels per frame equals "4: twice normal" in the editor.
Now, if you test the collision detection, you will notice that the collision detection is somewhat bugged, especially with the new running system implemented. Since it's only testing in the middle right in front of the sprite, by walking a little on the side, you'll still be able to walk into walls. To prevent this, we'll need to check two points (or more if you have a very big sprite) at each edge. Also, events can be obstacles too, so we'll want to check for events standing in the way as well. So back we go to add more code to the event dealing with collision detection:
We check for both corners by doing it in two steps. First we add 15 to the Y variable as well as the current speed to get the next position along the Y axis, and the we subtract 7 from the X coordinate in order to get the lower left corner. We get both terrain and event ID and if either shows an obstacle, we subtract from the coordinates to negate movement and end the event there. If not we check the lower right corner as well. The reason we check add or subtract 7 from the X coordinate, while adding or subtracting 8 when looking left or right, is to avoid getting stuck along the walls. If you move into a wall going left, you wouldn't be able to walk up or down, since the position further up and down would still be 1 pixel into the wall, so it has to be 1 pixel less.
Now the collision works just fine and the running doesn't bug it either. Event's can block the player as well now. This means it's time to move on to the next part. Making it possible for your picture to interact with events. We'll look into how to deal with a treasure chest, as well as how to talk with an NPC.
First off, we'll need an event to handle action input, since we won't be able to use the hero for it anymore. This one is actually quite similar to the original collision event in terms of looking right in middle front of the sprite for events.
We store the event ID and if the event ID is larger or equal to the lowest ID of an obstacle event, it sets the Action Page equal to one, calls the event with the ID you just found at page 1, since we use Action page for the page number.
Doing this, we can make a treasure chest:
Hero we set the Action Page again to the value of a variable "Chest", which initially has the value 2. Then it calls the event again this time with the value just obtained. When interacting with the chest for the first time, we'll see the chest open and the Chest variable will be set to 3. This means that for all later interactions with the chest, page 3 will be executed instead. Page 3 will of course be set with an open chest and with chest variable being equal to 3 as an requirement, making it work like a normal chest.
When dealing with an NPC which always says the same though, a single page can do:
We just check for the direction of the hero, and make sure the NPC face in the opposite direction to make sure the NPC faces the hero before talking. Talking to a char like this with a picture from above, will reveal that you will be standing "on" that char. To prevent that you'll have to make a picture for the NPC as well with an higher ID than that of the hero, but I'll let that be your problem.
Doing this we're able to interact with events through a picture. The sample project also contains some crystals you can move around.
Now there are only a few things left. To be able to make a simple game, we will of course have to be able to change the map, And we'll also have to initialize certain values at start.
The first page is a one time thing, setting certain start values for the game. We set the position we want to her to start in terms of screen relative coordinates and we also set various variable values, like chest to 2, so that it goes straight to page 2 upon interaction and other similar cases.
The page 2 of this event which also is set to auto start deals with something supposed to happen each time we visit this map. The call event calls for the animation, to make sure the hero is facing the right direction. Event start ID marks the start of interact able events, while obstacle start ID marks which of them are unpassable. This means that you will have to take care in terms of Event ID's. The ones which you should be able to interact with will have to have the highest ID's with the obstacles being highest again. Not doing so, could lead to more problematic testing as well as less efficient code.
The last page of this event is merely empty, just waiting for a switch to be turned off for the next arrival at this map. Erase event could probably also be used at this point, to make sure it only happens once per map.
To make a similar effect to that of "touched by hero" for the sake of triggering an teleport event, we'll have to add yet another common event:
Fairly similar to that of the collision events earlier, but this time it suffices to check at the middle point of the sprite (which is below the middle point of the picture). Also we check that the event id found is higher or equal to the lowest ID of interactable event, but lower than that of the obstacle ones. Once this is done we can make the event triggering the teleport:
Using a picture of high ID to cover up the rest of the screen can provide for a nice way to fade out the screen, especially if the normal fades won't do, since tint screen won't cover pictures. Hero Mobile Controls the mobility of the hero so shutting it down will prevent continous update of the picture position which can give problems during transition, especially since you have to enter the new coordinates as well. the 0.0 wait is placed there since the maker sometimes need to wait a frame to update various parts of itself. I then set the switch Area initialized off so that the auto start dealing with initialization of that map can run.
In the next map, we'll come across another way to switch map, that is by panorating the map Zelda-style. This can be achieved like this:
We divide the map into "Zones" and check for them when crossing the border by same means as a normal teleport event. if you're about to enter another zone than the one you're currently in, the branch will be true. We then set Hero moves and Hero Mobile off to make sure no picture update will be done during transition, and do another show picture but with "scrolling with map checked" to make sure we don't move out of place while panning the screen. Since a screen is 320 pixels long, we subtract that amount from the X coordinate, to make sure it will relate correctly in terms of the screen, and we set a new variable, X Offset" with the value 320.
In all operations dealing with translating picture related coordinates to tile ones, the offset will also have to be added, since the picture is actually further into the map and the screen relative coordinates are always relative to the screen.
Once this is done, you will be able to move back and forth Zelda style without problem, and you'll still be able to interact with events around.
This concludes the introduction tutorial on how to do pixel based movement in rm2k3. Hope you've learned from it and will have further fun with it. Make sure to download the sample project at the top to check it's functionality and to get a better look at the code.
Thank you for reading
A video showing the end result given in the sample project
Posts 

Not sure where the problem is, so I'll do a potentially unnecessary detailed explanation.
From Basic Mathematics, you might remember that graphs typically have x and y coordinates, with x growing in the right direction, and decreasing to the left, while y increases upwards and decreases downwards.
It's similar for most computer related scenarios, except that y increases downwards and decreases upwards.
Now, Imagine that the sprite we're using have a collision field looking like a filled square. If this square touches any obstacle, it should not be able to move further in the direction of the obstacle. However, the coordinates we typically operate with to move the sprite, is only a single pixel inside that this square, so what we do, is that we take the coordinate of this pixel, the subtract or add from the x and y coordinates, so that the position of the pixel now is at one of the corners of the square. We then convert this set of pixel coordinates to tile coordinates, so that we can get the terrain and potential event ID from this tile to check if there's an obstacle there.
However, if we only check at one corner, for example the top left, then if we'd stay slightly to left of an obstacle above, but still so that we'd hit the obstacle while trying to move up, we'd walk straight into the obstacle, and that's why we need to check at both corners. The next corner can be found simply by adding at to the previous corner once it has been checked, since the check has already been done. For very large sprites, you would even have to check somewhere inbetween the corners, since the tiles only span 16 pixels, and we have to check all tiles in the direction we're heading (meaning, corners can at max be 16 pixels apart)

Thanks for that explanation. It clears things up a bit, but this stuff is still confusing for me. I've never been good with X and Y coordinates, for some reason I just can't make sense out of it. You're dividing by 16, subtracting 7, adding 15, I know this probably sounds dumb but I keep scratching my head and thinking "Why is he doing this?".
I could copy and paste all of this stuff and switch up the variables, it might work but I still won't get it, which is the most important to me. Like with that movement thing, after puzzling for a while it finally clicked in my head and now I understand how it works. Unless I understand it, I won't be able to use it effectively.
I'm sorry if I'm not pin-pointing a specific problem, there really isn't one. It's just the stuff with the collisions and the coordinates that's confusing me.
The addision and subtracting comes before the division by 16.
As said, the pixel coordinates of your hero sprite is somewhere inside the picture, but you need to use coordinates to move the picture as well as check if there are obstacles, and you can only check for obstacles at the coordinates you specify.
If you leave the coordinates as normal, you'd walk halfway into an obstacle because the coordinates are inside the picture. This is why you subtract and add from these coordinates.
Since the coordinates of your sprite is always the same relative to the sprite picture, the corners will also always be the same relative to those coordinates.
Meaning the lower left corner will always be 7 pixels to the left and 15 pixels down of the coordinates of the sprite (-7 in x direction and +15 in y direction).
However, we want to use get event ID and get terrain ID for collision checking, and to do that, we need tile coordinates, not pixel coordinates / screen relative coordinates. This is why we divide by 16. Since every tile is 16x16 pixels big, we can get the tile coordinates this way.
the screen relative coordinates 160,120 (middle of the screen), would then be 10,7 in tile coordinates on a 20x15 map (This gets slightly different for bigger maps). With this, we're then able to use get terrain and event ID, which makes checking for obstacles lot easier
But why 7 pixels to the left? You said the picture size of your sprites is 24x32. So the center is at 12x16, right? Then shouldn't the lower left corner be 12 pixels to the left, 16 pixels down?
The picture itself might be 24x32, but the sprite surely isn't. Also, like the typical chars, you want the head to walk into the obstacles somewhat, to give the impression that the hero is standing. If you went to the actual corners, you'd have lots of space between the sprite and the wall.
As long as you don't change the division by 16, you can play around a bit with the subtraction and addition and alter the values to get an idea of how it works.
As long as you don't change the division by 16, you can play around a bit with the subtraction and addition and alter the values to get an idea of how it works.
Alright, well since I'm using an RTP character too my pictures are the same size as yours. I've replicated your collision event to the letter, but my character still keeps walking through everything.
Do you have any idea what could be the problem? I've done everything, made the running event, added the pages and switches to the MapRef event, etc.
Do you have any idea what could be the problem? I've done everything, made the running event, added the pages and switches to the MapRef event, etc.
Have you remembered to set the terrain ID's in the chipset you're using?
This must be done, otherwise the code won't be able to tell passable tiles from unpassable tiles
This must be done, otherwise the code won't be able to tell passable tiles from unpassable tiles
unpassable tiles should be given terrain ID 4 if the code from the collision event is pretty much the same.
The branch checking the variable where the terrain ID is stored after the get terrain id command, is the one which decides what value the tiles should have.
A value which can be switched to your liking, and also good for expanding if you want different behaviour for other kinds of tiles (ice floor, floor which slows you down, etc.), by simply adding more branches. That can of course come later though, as this could also quickly complicate things a bit further
Wow, that actually works :D
However, I can still walk through events, and I can't set the terrain for upper layer chips, so I can walk through those as well. Is there a fix for that?
However, I can still walk through events, and I can't set the terrain for upper layer chips, so I can walk through those as well. Is there a fix for that?
For upper layer... nope :x
You'd just have to make some lower layer tile below it be unpassable or so.
As for events, you might have forgotten to set the variables "Event Start ID" and Event End ID".
You have to ensure that all the events which are supposed to be unpassable make a consecutive sequence of event ID's, and then set the lowest ID of the sequence to the start ID and the highest to the End ID.
This is because you might not want all events to be unpassable, and they need to make a consecutive sequence for it to reasonable easy and not be too big a load in terms of executing the event (bad event code will quickly lead to lag).
But... That's virtually impossible, right? I mean, since you can't put transparent blank tiles on lower layer, how would I accomplish that?
That might be it, where do I set those variables?
That might be it, where do I set those variables?
in some autostart event. They only need to be set once per map, and they will depend on the events you're using for that particular map.
As for the lower layer tile, you'd just have to copy the passable tile so that you have two of the same tile, one which you make passable, and one which you make not.
Alternatively just use some other tile below those the upper tiles which should be unpassable
As for the lower layer tile, you'd just have to copy the passable tile so that you have two of the same tile, one which you make passable, and one which you make not.
Alternatively just use some other tile below those the upper tiles which should be unpassable
But then I'd have to make duplicates of a lot of tiles, and with the chipset size limit that's not easy to pull off...
I don't have an "Event End ID" by the way, and I can't find anything about that in your sample or the tutorial. I only got "Even Start ID" and "Obstacle Start ID". "Event Start ID" is set to 4, but I can still walk through event ID 4.
I don't have an "Event End ID" by the way, and I can't find anything about that in your sample or the tutorial. I only got "Even Start ID" and "Obstacle Start ID". "Event Start ID" is set to 4, but I can still walk through event ID 4.
Ah, mixed up a bit with something else I once made.
Just checked the project and yes, you're right, there's no End ID.
There's just Event Start ID, which determines which events you'll be able to interact with by walking on them, and the Obstacle Start ID which gives the events which should not be passable.
So you'll need to set the obstacle id one instead, and all events with same or higher id will then become unpassable
Thank you, that works. Finally I have near-perfect working movement and collisions.
If anything comes to mind or you have any more suggestions regarding to the upper layer tiles, please let me know. I'll ponder on it myself for a while and see what I can come up with.
If anything comes to mind or you have any more suggestions regarding to the upper layer tiles, please let me know. I'll ponder on it myself for a while and see what I can come up with.
so you didn't update the tutorial yet? based on what i'm reading in the comments it seems that way. there is still no mention of the autostart event. i know it's in the sample but it's very inconvenient for me to switch between the sample and my project.
btw, the tutorial is kind of hard to follow. maybe it's just the way your word things and the way i understand things. i sometimes have to reread something to really get it.
i'm working through this and i'm at movement 2 common event. i have directional animated walking. i'm using custom graphics and have a 5 frame walk animation. since i'm using more frames i assumed i would change the var-mod function accordingly. when i stop moving, it shows the first frame of the animation, which is not ok to use for a standing still frame. does your system later set up a standing frame or should i fix that now.
i was thinking of setting var-Animation Frame to something, like -1, when sw-Hero Moving is turned off. then when it calls the Animator event, there will be a branch at the top of the page code for the -1 var and it will show the standing frame instead of frame 1 of the cycle. does that sound compatible to future additions?
author=Link_2112
btw, the tutorial is kind of hard to follow. maybe it's just the way your word things and the way i understand things. i sometimes have to reread something to really get it.
This is probably more my fault and less your fault. It's typically a result of there being too many tiny details which needs to be conveyed.
This often gets tricky to present in a clean matter for me, unless rewriting several times.
On that note... I guess the tutorial hasn't been updated cuz I forgot about it. Also, my lack of sparetime has not been helping this matter either.
i'm working through this and i'm at movement 2 common event. i have directional animated walking. i'm using custom graphics and have a 5 frame walk animation. since i'm using more frames i assumed i would change the var-mod function accordingly. when i stop moving, it shows the first frame of the animation, which is not ok to use for a standing still frame. does your system later set up a standing frame or should i fix that now.
i was thinking of setting var-Animation Frame to something, like -1, when sw-Hero Moving is turned off. then when it calls the Animator event, there will be a branch at the top of the page code for the -1 var and it will show the standing frame instead of frame 1 of the cycle. does that sound compatible to future additions?
I'll have to go by memory on this one, since I don't have rm2k3 installed on my computer right now, but I think it worked like this. When there is no movement, the frame variable is simply being constantly set to the frame to be used for standing still, which would be 1 in the sample project I think. If the standing still frame is part of your walking frame, you could just change that 0 to whatever frame you'd want to use instead. This is actually what you'd do if it's not part of the walking frame as well, so in this case, going with -1 as you suggested should work perfectly fine.
ah, ok.
there's many extra words and typos, too. heh i like this one:
i'm taking my time with this so i'm not at hit detection, but i have a question about it. is it going to be limited to the grid of 2k3? or can i make a rounded object for the hero to circle around?
there's many extra words and typos, too. heh i like this one:
Hero we set the Action Page again to the value of a variable "Chest",
i'm taking my time with this so i'm not at hit detection, but i have a question about it. is it going to be limited to the grid of 2k3? or can i make a rounded object for the hero to circle around?
This tutorial only touches pure grid shapes, since it's easier not to. I tried to just tell how to do the rather important parts first, while more aesthetical ones like rounded corners (if I get you correctly), would be something of later interest.
It's perfectly possible though. One way of doing it would be to use terrain id's, and then you could use a simple mathematical function to check if the player is within the object radius and then just "push" it out to the correct position.
There's probably some fine tuning which would be needed here, you should be able to create a number of shapes doing this, which is tinier than the typical grid size.
If you plan to have a lot, using events which you can step on might be a better idea (and would also avoid forcing you to do panorama mapping straight away, to embrace the usage of terrain id's)

