


MAPPING IN 5 EASY STEPS
Indra's quick and practical method
 Indra
Indra- 01/31/2012 11:27 PM
- 69908 views
So, since lately I’ve been doing nothing but mapping (what with the writing muses being on vacation). I’ve mapped and mapped and mapped, and not for myself (to me it’s harder to laze about when it’s something for other people) and I’ve grown somewhat confident in my mapping skills. Some people asked me the typical “How do you do it?” or commented “You’re fast”.
The answer is being practical, using the editor, and practice. My mapping style is not pretty. I’m not a parallaxer. I use the editor and a 100% RTP tileset. I’ll summarize my usual methods below. I’ll be assuming you know the mechanics of the editor (shift clicking, the shadow tool, etc). While I use the ACE engine and the RTP for the examples, any engine that uses an editor and a tileset should be the same (heck, you can probably apply this to parallaxing too).
Step 1: General setting plan
Take a piece of paper. Or the editor. Whatever works. What are you going to be mapping? A city, a dungeon, fields? Each work differently, so it’s important you set on that first.
Now, what’s the point of the area? Is it a cutscene? A boss room? Is it only a glorified corridor to transfer to the next area? Is it a place where a secret npc/item/monster shows up? Does it NEED to have certain features or support some gimmick or puzzle?
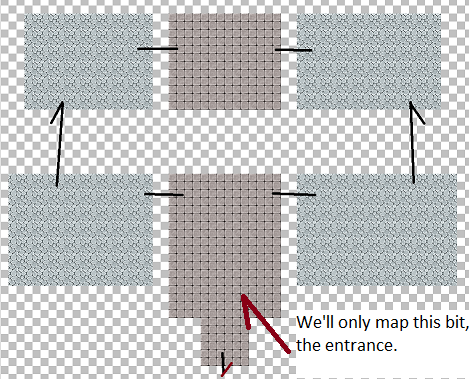
If it’s a complex area (more than one map) you’ll want to think of a rough idea of how they are connected. You can later modify this as needed, but it helps to know how to organize the maps and what direction to map towards.
With that in mind, set down a barebones of how the rooms are distributed and what is in each room. Depending on the map, plan on other floors too.
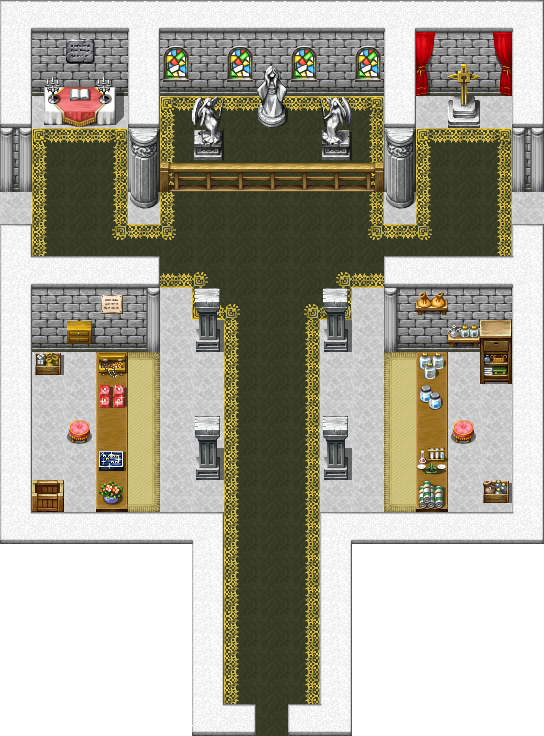
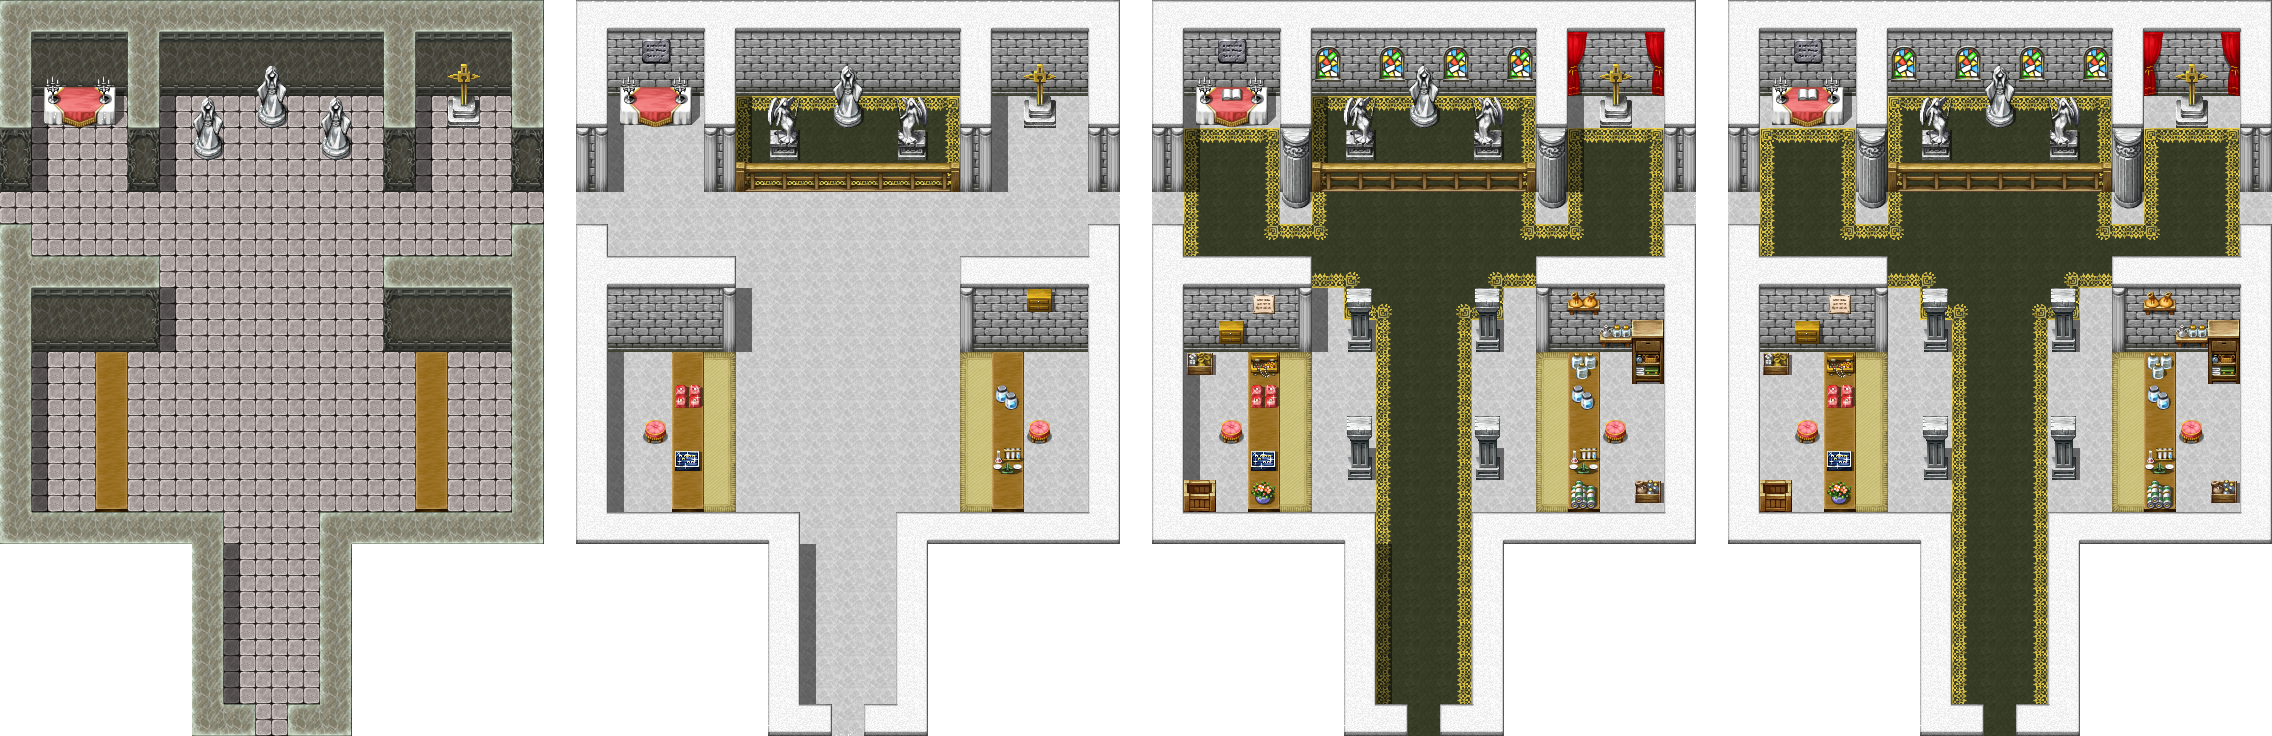
For the sake of this tutorial, I’ll make an interior map, a church. We’ll make it a wide building with two floors and the central area longer than the rest. (I will only fully map one room, but this way you can see the room distribution and planning and how space would work around multiple floors.).
Step 2: Barebones structure
With a rough idea of the zone’s distribution, it’s time to make an outline of the individual map. Take any suitable generic ground tile and make the shape of the room, then add the walls and limits.
Does it look to big/small for the setting you want? Adjust as needed. You can plop down temporary tiles in the map to see how it fills out and if it needs more or less space. For now what tiles you use exactly is not a concern. Just focus on distribution and space. Also remember to set up the space for the connections to other maps.
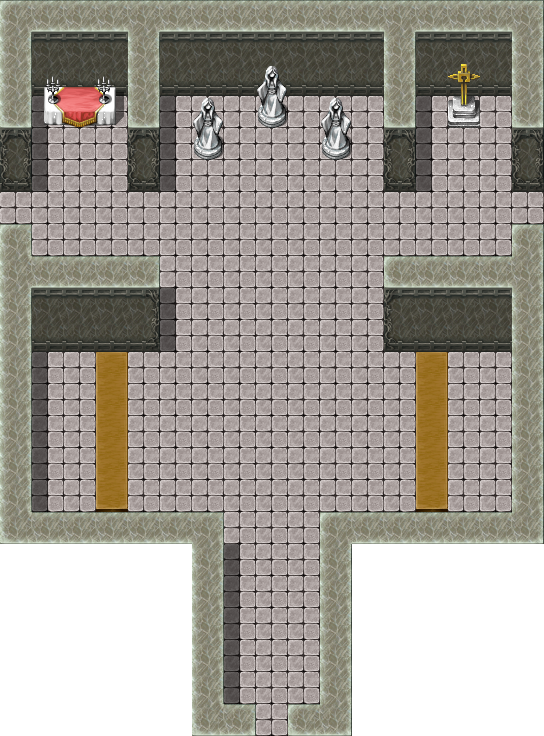
It’s also the time to do a rough room division of the map if needed. If the map looks too big and empty, consider splitting the space or breaking the monotony with individual spaces (in the case of this example, smaller areas limited with walls and counters).
For the example, we’ll map the main room in the first floor of the temple. On the far top of the map we’ll put the altar with statues, and at the sides we’ll put a couple of counters and shops (because it’s selling its talismans, or whatever).
Step 3: Style and primary features
Time to choose what to use. What tiles are you going to be using for the walls and floor? Do they match? Do they fit the setting and tone your game has?
You wouldn’t put a fancy rug in a very poor house, and you wouldn’t use a ragged stone wall on a fancy manor. Same goes for furniture. Try to keep in mind what the map is FOR. It makes no sense to put cupboards full of bread and wine in a smithy, and a bar won’t be displaying jewellery.
Of course remember you’re making a game and it doesn’t have to be 100% realistic. If you’re having trouble filling space you can always make up excuses to put stuff in the area. Just make sure you don’t break the internal rules of your game’s world.
If you’re lacking specific resources, try to get them now or use a placeholder and find them later (say you need a certain style of statue/column/furniture you don’t have on the tileset, just slap a generic column in there and switch it with the real tile later).
When you’ve placed your A tiles (walls and floors) place the focus points of each area. Counters and a few items in a shop, beds in a room, statues, etc. Whatever’s important.

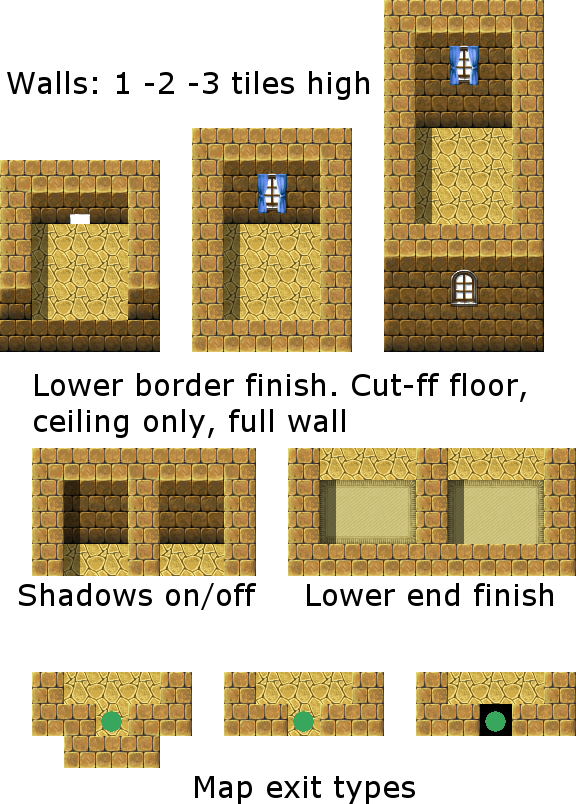
Also settle on your mapping style. How many tiles high do you make your walls? How to you map the lower limit of the map? Put in the full wall or only the ceiling, or do you use a cut-off floor tile? How do you map exits and transfers? Will you use the autoshadows? Decide on one and STICK TO IT. Consistence is very important.
Here are some common styles you could use. These are not all of them, and you can do pretty much anything as longs as it’s consistent through the entire game.
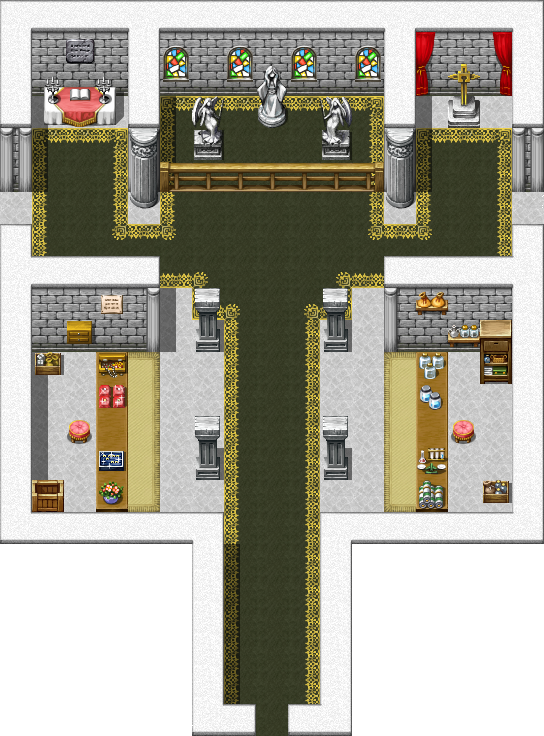
Step 4: Details
With the basic map done, it’s time to go crazy and fill out the rest. We already gave the central featrues of the room their place, so the rest is dressing up and adding details to the map.
Unless the point of the map calls for it, what you want is for it to be neither empty not cluttered. More than the actual contents, it’s a matter of distracting the player’s eyes.
Keep in mind where the player is supposed to WALK, and leave their path free of obstacles. Around that path, add decorations, not occupying every single tile or being too symmetrical. Try to be random (or not, depending on the setting, but absolute symmetry usually makes maps too stiff). Also keep in mind where the tiles are designed to be used. Some are clearly made to sit on flat surfaces like counters or the floor, others are mounted on the walls.
Step 5: Finishing touches and revision
How does the map look? Do you like the effect? Now that it’s done, do you dislike the walls, or the floors? Go and change them. Did you need some tiles you didn’t have available and used placeholders? Go and import the correct ones. Fix everything that needs fixing.
It’s also the time to apply the final shadows. Since any use of the shadow tool tends to snap back to the default if you touch it during mapping, you should wait for the last step to add or remove them. Remember to keep a fixed style. If you paint shadows over walls, do it always the same way.
Also remember to apply shadows to add depth (for example in bridges, overhanging areas and such).
For the example we’ll get rid of all shadows (‘coz they annoy me).
When everything’s done, step back and revise the result. Did you miss some shift-click mapping? Are all the shadows correct? No cut-off mapping errors? If so, you’re done!
Things to remember:
-Keep a consistent style. If you remove shadows, do it all the time. If you use a cut-off floor style, keep it. If at any point you decide to change your style, revise everything and change it.
-Always playtest your maps when they’re ready to see if there are any passability errors.
-Remember to leave clear routes for the player to navigate. Also keep in mind where you will place Npcs, if any, and their walk routes if applicable. If you have npcs roaming around, leave space to allow the player to pass the npcs so they don’t block exits.
-Context is important. If a town is poor, it won’t have many niceties like paintings in the houses or fancy furniture. A village in the snow will usually have fireplaces; hot tropical settings don’t have much use for them. Remember to decorate all maps according to their setting.
-With most RM engines (with the exception of VX) you can have as many full tilesets as you want. Sometimes it may be a matter of simply adding things to an existing tileset, which is only a matter of making a copy of the tileset (so you don’t have to manually input all the passabilities again) and adding an extra tile sheet with what you need. Remember default resources are split the tiles over various sets; what you need for a dungeon may simply be under “Interiors”.
Tips and tricks:
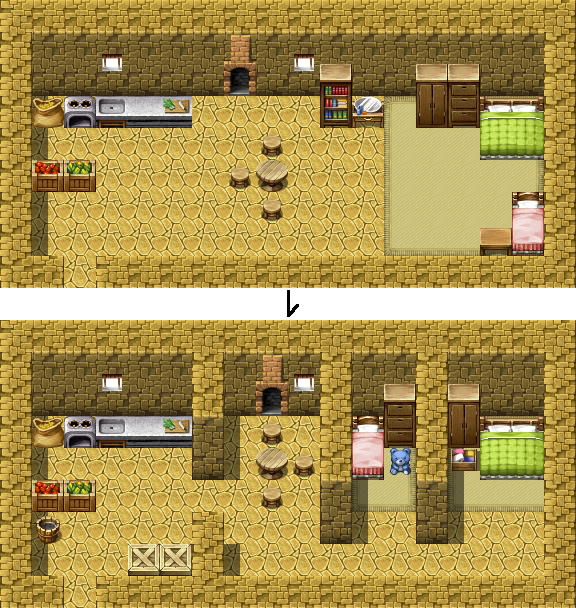
-Interior areas: it’s a good tactic to make interiors vary from simple squares by editing the room’s base shape.
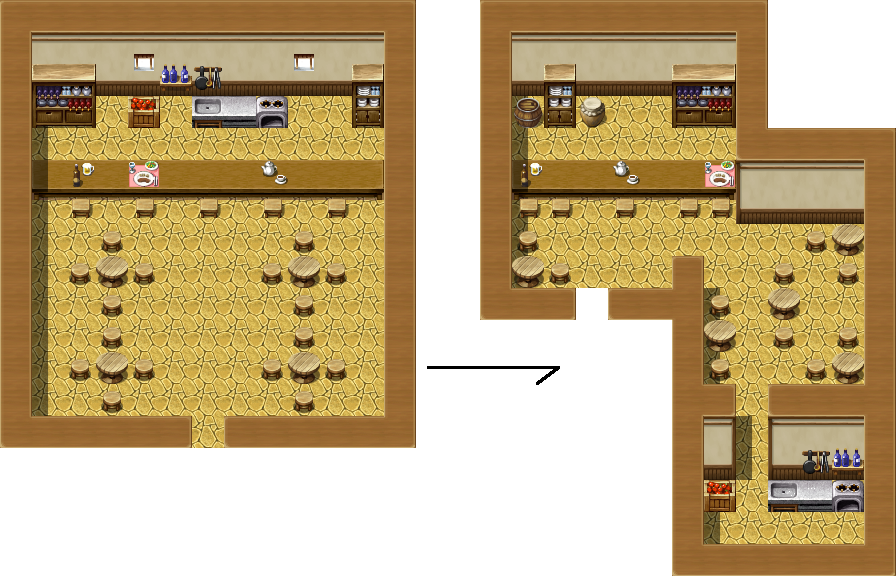
You can also create a nice visual effect by splitting the space with walls into lesser rooms. You will have to watch out, though, walls take a lot of vertical space depending on how high you do the walls, so this setup will quickly eat up space (this is actually a good thing if you have areas with nothing interesting to add).
-Exterior areas: Grass, dirt roads and elevation are your friends. Patches of grass and dirt roads (or differently colored grounds) divert the attention of the player nicely without having to actually add much decoration. Roads are also especially useful to give a sense of direction to the player. Remember to randomize them a bit so they’re not completely straight lines.
-Dungeons: It’s especially important to remember what you’re supposed to do in each map. If there’s a puzzle in there, don’t clutter up the place and let the player roam comfortably. If it’s only a decorative hallway to another map, make sure there’s some direction as to where the player is supposed to go.
-Simple edits and recolors: Everyone can do this, and it helps a lot to create ambience. You may find that repeating, for example, the same weeds and flowers in fields over and over across the world gets old. It’s simple enough to recolor the flowers or make a simple cut/paste job to come up with new items. Small objects like flowers and single tile decorations are usually simple to cut and combine.
There’s also recoloring. The same grassy tiles can become a different map just by changing the colors (making the coloring greyer, more vibrant, a different tone, whatever) same goes for walls and floors.
So if you ever feel like those trees, caves and stones are looking boring, crack open a graphics editor and mess with the tiles a bit.
-Map size: If you don't feel very confident in your mapping, don't try to take on huge maps, the bigger the map, the harder it is to make it good. Keep to smaller compact maps and even skip “realistic” paths with a choice menu. For example, if you don’t have enough skill or time or resources to map the roads between towns, just give your party a pop-up menu that allows you to fast travel between locations. You can even make it a thing in the game (like a carriage system, horses you can find, exploration via npc orders, need to find maps to open new zones, etc).
-If you want an area to feel unique, give it a recurring tiles. In the wilderness it can be a specific plant, even a simple recolor can do. In towns you can have the town “specialty” (like a town focused on farming, smithing, music, anything you can think of). It will improve the flavor of each place and make them way less monotonous and samey.
-LEARN HOW TO USE SHIFT-CLICK MAPPING. Look it up, it’s important.
-This is a big pet peeve of mine: any passable tile at the EDGE of the map should provoke some some reaction. If the tile is a border and it doesn’t take you somewhere else, it will only confuse the player. If that space leads nowhere, ROPE IT OFF. Many times I’ve been frustrated by playing maps poorly mapped where I went to the edge of a field only to find despite it clearly looking like I should be able to move to another map, it did nothing. All it takes is a few trees or bushes or a cliff barring the way, come on people.
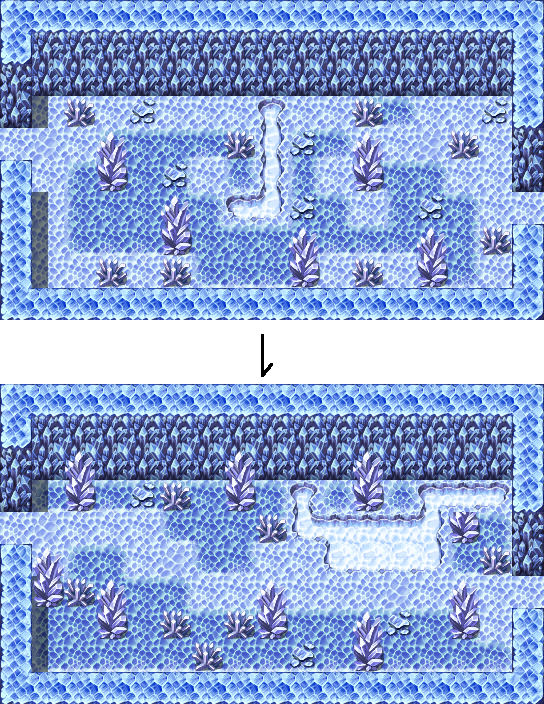
To finish, here's an example of the five steps for examples in interior (the same we just did above) exterior and dungeon areas. (I’ll skip step 1 for these, just imagine a bunch of connected squares).
Interior: Temple (What we just did)
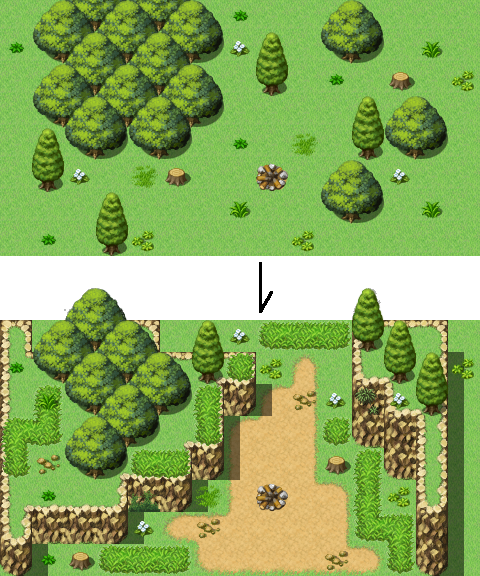
Exterior: Forest

Dungeon: Ice Castle

-------------------------------
And that's all! I hope you find this helpful.
If you have any questions or feel some areas lack explanation, tell me and I'll work on it.
The answer is being practical, using the editor, and practice. My mapping style is not pretty. I’m not a parallaxer. I use the editor and a 100% RTP tileset. I’ll summarize my usual methods below. I’ll be assuming you know the mechanics of the editor (shift clicking, the shadow tool, etc). While I use the ACE engine and the RTP for the examples, any engine that uses an editor and a tileset should be the same (heck, you can probably apply this to parallaxing too).
Step 1: General setting plan
Take a piece of paper. Or the editor. Whatever works. What are you going to be mapping? A city, a dungeon, fields? Each work differently, so it’s important you set on that first.
Now, what’s the point of the area? Is it a cutscene? A boss room? Is it only a glorified corridor to transfer to the next area? Is it a place where a secret npc/item/monster shows up? Does it NEED to have certain features or support some gimmick or puzzle?
If it’s a complex area (more than one map) you’ll want to think of a rough idea of how they are connected. You can later modify this as needed, but it helps to know how to organize the maps and what direction to map towards.
With that in mind, set down a barebones of how the rooms are distributed and what is in each room. Depending on the map, plan on other floors too.
For the sake of this tutorial, I’ll make an interior map, a church. We’ll make it a wide building with two floors and the central area longer than the rest. (I will only fully map one room, but this way you can see the room distribution and planning and how space would work around multiple floors.).
Step 2: Barebones structure
With a rough idea of the zone’s distribution, it’s time to make an outline of the individual map. Take any suitable generic ground tile and make the shape of the room, then add the walls and limits.
Does it look to big/small for the setting you want? Adjust as needed. You can plop down temporary tiles in the map to see how it fills out and if it needs more or less space. For now what tiles you use exactly is not a concern. Just focus on distribution and space. Also remember to set up the space for the connections to other maps.
It’s also the time to do a rough room division of the map if needed. If the map looks too big and empty, consider splitting the space or breaking the monotony with individual spaces (in the case of this example, smaller areas limited with walls and counters).
For the example, we’ll map the main room in the first floor of the temple. On the far top of the map we’ll put the altar with statues, and at the sides we’ll put a couple of counters and shops (because it’s selling its talismans, or whatever).
Step 3: Style and primary features
Time to choose what to use. What tiles are you going to be using for the walls and floor? Do they match? Do they fit the setting and tone your game has?
You wouldn’t put a fancy rug in a very poor house, and you wouldn’t use a ragged stone wall on a fancy manor. Same goes for furniture. Try to keep in mind what the map is FOR. It makes no sense to put cupboards full of bread and wine in a smithy, and a bar won’t be displaying jewellery.
Of course remember you’re making a game and it doesn’t have to be 100% realistic. If you’re having trouble filling space you can always make up excuses to put stuff in the area. Just make sure you don’t break the internal rules of your game’s world.
If you’re lacking specific resources, try to get them now or use a placeholder and find them later (say you need a certain style of statue/column/furniture you don’t have on the tileset, just slap a generic column in there and switch it with the real tile later).
When you’ve placed your A tiles (walls and floors) place the focus points of each area. Counters and a few items in a shop, beds in a room, statues, etc. Whatever’s important.
Also settle on your mapping style. How many tiles high do you make your walls? How to you map the lower limit of the map? Put in the full wall or only the ceiling, or do you use a cut-off floor tile? How do you map exits and transfers? Will you use the autoshadows? Decide on one and STICK TO IT. Consistence is very important.
Here are some common styles you could use. These are not all of them, and you can do pretty much anything as longs as it’s consistent through the entire game.
Step 4: Details
With the basic map done, it’s time to go crazy and fill out the rest. We already gave the central featrues of the room their place, so the rest is dressing up and adding details to the map.
Unless the point of the map calls for it, what you want is for it to be neither empty not cluttered. More than the actual contents, it’s a matter of distracting the player’s eyes.
Keep in mind where the player is supposed to WALK, and leave their path free of obstacles. Around that path, add decorations, not occupying every single tile or being too symmetrical. Try to be random (or not, depending on the setting, but absolute symmetry usually makes maps too stiff). Also keep in mind where the tiles are designed to be used. Some are clearly made to sit on flat surfaces like counters or the floor, others are mounted on the walls.
Step 5: Finishing touches and revision
How does the map look? Do you like the effect? Now that it’s done, do you dislike the walls, or the floors? Go and change them. Did you need some tiles you didn’t have available and used placeholders? Go and import the correct ones. Fix everything that needs fixing.
It’s also the time to apply the final shadows. Since any use of the shadow tool tends to snap back to the default if you touch it during mapping, you should wait for the last step to add or remove them. Remember to keep a fixed style. If you paint shadows over walls, do it always the same way.
Also remember to apply shadows to add depth (for example in bridges, overhanging areas and such).
For the example we’ll get rid of all shadows (‘coz they annoy me).
When everything’s done, step back and revise the result. Did you miss some shift-click mapping? Are all the shadows correct? No cut-off mapping errors? If so, you’re done!
Things to remember:
-Keep a consistent style. If you remove shadows, do it all the time. If you use a cut-off floor style, keep it. If at any point you decide to change your style, revise everything and change it.
-Always playtest your maps when they’re ready to see if there are any passability errors.
-Remember to leave clear routes for the player to navigate. Also keep in mind where you will place Npcs, if any, and their walk routes if applicable. If you have npcs roaming around, leave space to allow the player to pass the npcs so they don’t block exits.
-Context is important. If a town is poor, it won’t have many niceties like paintings in the houses or fancy furniture. A village in the snow will usually have fireplaces; hot tropical settings don’t have much use for them. Remember to decorate all maps according to their setting.
-With most RM engines (with the exception of VX) you can have as many full tilesets as you want. Sometimes it may be a matter of simply adding things to an existing tileset, which is only a matter of making a copy of the tileset (so you don’t have to manually input all the passabilities again) and adding an extra tile sheet with what you need. Remember default resources are split the tiles over various sets; what you need for a dungeon may simply be under “Interiors”.
Tips and tricks:
-Interior areas: it’s a good tactic to make interiors vary from simple squares by editing the room’s base shape.
You can also create a nice visual effect by splitting the space with walls into lesser rooms. You will have to watch out, though, walls take a lot of vertical space depending on how high you do the walls, so this setup will quickly eat up space (this is actually a good thing if you have areas with nothing interesting to add).
-Exterior areas: Grass, dirt roads and elevation are your friends. Patches of grass and dirt roads (or differently colored grounds) divert the attention of the player nicely without having to actually add much decoration. Roads are also especially useful to give a sense of direction to the player. Remember to randomize them a bit so they’re not completely straight lines.
-Dungeons: It’s especially important to remember what you’re supposed to do in each map. If there’s a puzzle in there, don’t clutter up the place and let the player roam comfortably. If it’s only a decorative hallway to another map, make sure there’s some direction as to where the player is supposed to go.
-Simple edits and recolors: Everyone can do this, and it helps a lot to create ambience. You may find that repeating, for example, the same weeds and flowers in fields over and over across the world gets old. It’s simple enough to recolor the flowers or make a simple cut/paste job to come up with new items. Small objects like flowers and single tile decorations are usually simple to cut and combine.
There’s also recoloring. The same grassy tiles can become a different map just by changing the colors (making the coloring greyer, more vibrant, a different tone, whatever) same goes for walls and floors.
So if you ever feel like those trees, caves and stones are looking boring, crack open a graphics editor and mess with the tiles a bit.
-Map size: If you don't feel very confident in your mapping, don't try to take on huge maps, the bigger the map, the harder it is to make it good. Keep to smaller compact maps and even skip “realistic” paths with a choice menu. For example, if you don’t have enough skill or time or resources to map the roads between towns, just give your party a pop-up menu that allows you to fast travel between locations. You can even make it a thing in the game (like a carriage system, horses you can find, exploration via npc orders, need to find maps to open new zones, etc).
-If you want an area to feel unique, give it a recurring tiles. In the wilderness it can be a specific plant, even a simple recolor can do. In towns you can have the town “specialty” (like a town focused on farming, smithing, music, anything you can think of). It will improve the flavor of each place and make them way less monotonous and samey.
-LEARN HOW TO USE SHIFT-CLICK MAPPING. Look it up, it’s important.
-This is a big pet peeve of mine: any passable tile at the EDGE of the map should provoke some some reaction. If the tile is a border and it doesn’t take you somewhere else, it will only confuse the player. If that space leads nowhere, ROPE IT OFF. Many times I’ve been frustrated by playing maps poorly mapped where I went to the edge of a field only to find despite it clearly looking like I should be able to move to another map, it did nothing. All it takes is a few trees or bushes or a cliff barring the way, come on people.
To finish, here's an example of the five steps for examples in interior (the same we just did above) exterior and dungeon areas. (I’ll skip step 1 for these, just imagine a bunch of connected squares).
Interior: Temple (What we just did)
Exterior: Forest
Dungeon: Ice Castle
-------------------------------
And that's all! I hope you find this helpful.
If you have any questions or feel some areas lack explanation, tell me and I'll work on it.
Posts 


This is a really nice tutorial! I'd never seen some of those wall and floor styles before. I also really like the focal point idea, I find having a specific doodad or feature in a room helps players remember the area and makes it harder for them to get lost.


I was recommended to check out this article.
But the Example images don't display. I've tried both Chrome and Opera.
Any ideas?
But the Example images don't display. I've tried both Chrome and Opera.
Any ideas?

Huh.
I am guessing where ever they were hosted is gone now. I wonder if anyone had backups?
Anyone know Indra?
I am guessing where ever they were hosted is gone now. I wonder if anyone had backups?
Anyone know Indra?
DONE. Damn you imageshack D<
One thing about decorations and doodads: I find one approach is to start plain and then play-test through the map. Seeing the map as you would in the game provides gestalt (the big picture) and your gut will to tell you "this area could really use a ZZZ". Sometimes you'll even want to play from a game state or two back (use saves when testing maps!) and occasionally from the start.
Staring at a map in the editor often won't give these cues because the context is all off.
The only catch with saves is that occasionally a fresh game start required after a barrage of event editing that alters the meaning of existing switches and variables (or alters user inventory for example an event to give a key item might disappear but such a bug gets unnoticed if in the save the character has the key and this inconsistency would only get noticed on a play-through from the very start of the game).
How do you do the carpet cutoff? I sen people do this with some of the maps and I cant never figure out how to make that work, so I just never bothered.
hold down the Shift key when placing a tile. To reintroduce edging around an autotile, you can then set a tile down next to the edge of the autotile, and the tile's edge will automatically re-edge itself.

