


NEW DEVELOPER MAPPING HELP THREAD
Posts

Yes, there is. Parallaxing is basically this (or what it used to be called before... well, whatever. History lesson not necessary). Basically, draw your background and set it as a parallax in the map options. Then you'll want to cut out the pieces that are supposed to be set to the same level as the hero (things they can't walk on, but aren't overlapping them) and put them on a chipset (yeah, I know 'no tilesets', but this part you don't have to mess around with the patterns or anything. Just straight copy/dump). After that, anything that is supposed to be overhead, make into a picture (and if you have multiple overhead layers, then make a series of pictures. The lower the picture number, the lower it's height on the z plane, so picture 1 would show up below picture 2).
To get an idea of how it would work, check out Sunset Over Imdahl - it's a game made in the early-mid 2000's and used this technique.
To get an idea of how it would work, check out Sunset Over Imdahl - it's a game made in the early-mid 2000's and used this technique.
author=Liberty
Yes, there is. Parallaxing is basically this (or what it used to be called before... well, whatever. History lesson not necessary). Basically, draw your background and set it as a parallax in the map options. Then you'll want to cut out the pieces that are supposed to be set to the same level as the hero (things they can't walk on, but aren't overlapping them) and put them on a chipset (yeah, I know 'no tilesets', but this part you don't have to mess around with the patterns or anything. Just straight copy/dump). After that, anything that is supposed to be overhead, make into a picture (and if you have multiple overhead layers, then make a series of pictures. The lower the picture number, the lower it's height on the z plane, so picture 1 would show up below picture 2).
To get an idea of how it would work, check out Sunset Over Imdahl - it's a game made in the early-mid 2000's and used this technique.
Thank you very much! I'll do research into parallaxing. I'll check out Sunset Over Imdahl too.
author=Liberty
Then you'll want to cut out the pieces that are supposed to be set to the same level as the hero (things they can't walk on, but aren't overlapping them) and put them on a chipset
I might be reading this incorrectly, but is this just to set non-passable areas so the characters can't walk all over walls and rivers and the sky, etc?
In that case, would it be possible to just create a single, completely transparent impassable tile and just paint that over all the walls, etc, instead?
It depends on how big your charactersets are - if you're using the usual 2k/3 style or something taller than one tile in height, the picture has z-plane preferences, so it will always be overhead of the player. If the top of your character sprite overlaps the same level items, it will be cut off as the picture will be overhead of it.
It also makes it a bit easier to visualise if the layers are separated from each other. This way you can plan out the walls and the like to the grid so that it keeps it's placing and doesn't mess up the walking areas (unless you're using a script to remove/change the grid, but even then it does help).
It also makes it a bit easier to visualise if the layers are separated from each other. This way you can plan out the walls and the like to the grid so that it keeps it's placing and doesn't mess up the walking areas (unless you're using a script to remove/change the grid, but even then it does help).

Guys can you please help me?
My game keep's getting rejected and this is the 8th attempt!Im getting too tired of this and i don't even know whats wrong with the game in the first place...
Hes the description:
You woke up in a cave. With no memories of your past.Forced to fight monsters. You tried going to a nearby village, but found it near its annihilation. What would you if you are in a world with a war against demons and humans? Would you hide somewhere and wait for your obliteration? Would you rescue innocent lives while risking your's? Or would you join the military and fight in the front lines.
Our protagonist here is in the same situation. He's a Berserker. The last of its kind. It was an ancient clan with people with a special class. A class with physical strength beyond godlike caliber. Get into his boots and experience the adventure of risk, danger, valor, honour and friendship.
This game was inspired by an anime called "Sword Art Online"
THIS IS WHERE THE DESCRIPTION END
Now im gonna send u the maps picture (Which im going to use as screenshot's in the game post)

What would you do if you were in a world with a war being waged between men and demons?
Would you hide somewhere and wait for your demise?
Would you rescue innocent lives while risking your own?
Or would you join the military and fight in the front lines?
You're a Berserker. The last of a forgotten clan...
Wielding great strength like the gods of old, it's up to you to bring peace to a world wrought by war and bloodshed. Along the way trying to remember your past and those of your ancestors, your heritage.
You'll be faced with many grave risks and perils, but you will not face them alone.
Walk a mile in the shoes of man who seeks to regain his honor and valor in a world void of both.
@tawman- Hows that? also @Liberty- is that something that can help him?
edit: tawman, as for your maps, you need to tighten the interior rooms abit. You have too much empty space. The smaller and more detailed the better.
Description help was given here: https://rpgmaker.net/forums/topics/13072/?post=699261#post699261
You have some issues using ceiling tiles properly. Let's take it from the top:
Image 1:
It's very odd the way the ceilings don't join up. Also, no idea what is going on with the red ground - it looks very weird. At points the walls are one tile high, whilst at others they're two tiles high. Try to keep enclosed rooms like that all the same height until you get a good grasp on how to use the tiles properly. Rule of thumb, though, is that if they share the same ceiling they should be the same height in the walls. For example the top wall has one tile at 2 tiles height whilst the rest is 1. You can see how the autotile (the name for tiles that connect automatically) cuts off the bottom of the 1-high ones because it expects it to bee all the same height.
Image 2:
No idea what you were going for with the stuff over the middle left and right areas. Just make it all ceiling tiles instead of ceiling and walls because it looks incredibly weird. I also recommend using some decoration tiles (not lots, but a few). Things like stones, rocks, holes, cracks in walls... that kind of thing can really enhance a map and make it look a bit better.
Image 3:
This is actually pretty good, just keep in mind that the shelves in the bottom right room are meant to be on the walls, not the floor (they're wall shelves).
Image 4:
This room doesn't really make much sense. That said, it's weird in that there's no real rhyme or reason behind anything in it. It looks a bit like an abandoned house that some bum took over and trashed. The maps around the big map are supposed to be used on tables. The paper that looks like it's pinned in the corners (just above the wood in the lower right of the image) are supposed to be used on the walls - both the full one and the one that's ripped. Think of it like a poster that someone has pinned to a wall and you'll get the general idea. I recommend thinking about what sort of house you're making and who lives there, then filling in the basics (like a kitchen, table, bedroom) and adding clutter/decoration based on who is there. If it's a bum, then maybe it's messy. If it's abandoned it probably won't have much furniture, but otherwise there should be some sort of thought put into it.
Image 5:
Very big. Some of the walls are only one tile high despite others being 2 tiles high. There's shelves in the kitchen area that should be on the wall instead of the floor. Try making it smaller - the table in the top right doesn't need to be so big for just two people, even with four chairs. There's a LOT of empty room.
Remember that bookshelves/cabinets/cupboards should be one space down from the walls so that they don't float on them, and that if a wall shares a ceiling tile with another wall it should be the same height all the way around.
That's to start with, but it should give you a few ideas on how to improve a little. Good luck!
@InfectionFiles
Thanks a lot man.The description is so well defined and improved than mine that just explains how much experience you have.I can't give you anything but i hope my gratefulness satisfies you :D
Thanks a lot man.The description is so well defined and improved than mine that just explains how much experience you have.I can't give you anything but i hope my gratefulness satisfies you :D
@liberty
Thanks for the briefed details about the pros and cons of my mapping :D
Id like to know how i can identify which one is ceiling tile and which one is ground tile? Oh and image 4 is well how do i say this? Its a room of a families father who is a magical engineer and ventured of to another kingdom so in a way you could say that its abondoned.
Room 4 is the village chiefs house so i thought about making it big (as Chief's are rich af) but ill take on your advice and make it smaller :)
I was sent here from a game denial and am looking for some feedback on some screenshots. Any constructive criticism regarding the screenshots are appreciated as I really would like to publish this game later on.
(Short) Description of the game:
3 jobless friends, inspired by classic superhero stories, decide to become vigilantes as they hilariously patrol their streets and kick butt.
Some Screenshots:
Thank you in advance.
(Short) Description of the game:
3 jobless friends, inspired by classic superhero stories, decide to become vigilantes as they hilariously patrol their streets and kick butt.
Some Screenshots:
Thank you in advance.
Here are just a few suggestions:
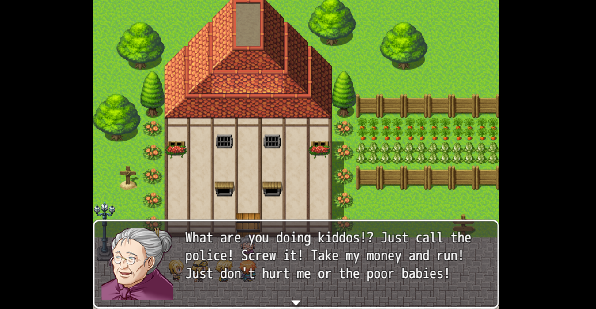
Map 1: 1) The fence doesn't have a left side... which maybe was by design, but if you made a fence to keep out animals (from your garden), you'd need a fence on each side. 2) There's something going on with the middle layer of the roof - you see how it's a different color, almost like light is hitting it? It should be the darker color that the top and bottom layer of the roof should be. 3) The windows with the flowerbeds need the top half added; right now, they are half a window.
Map 2: 1) The picture of the wagon(?) should be deleted. All of your walls should have a tile at the top that represents the top of the wall - and vice versa. Right now, the painting is on the top of the wall. 2) The two wall tops on the left of the map need walls - going into the bathroom and going into the hat room.
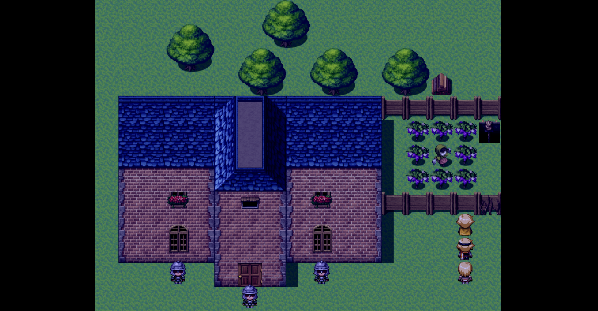
Map 3: 1) Same thing with the flowerbox windows - you need the top half added. 2) Some people might find the roof of the building a little weird. I think it's good enough for the tileset you have, though. 3) The grass is a little boring, so you may want to add a few grass poofs around or a dirt trail up to the door.
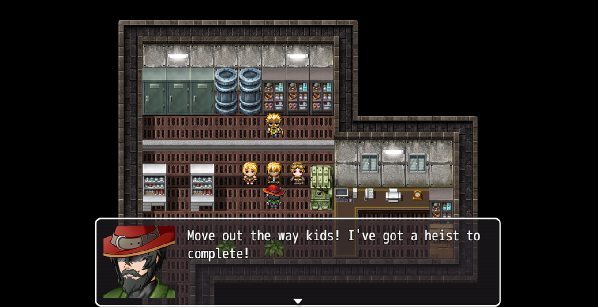
Map 4: This map is okay to me... but you should be careful about all of your maps as to how many tiles high your walls will be. In map #2, your wall was one tile high. Here, the wall is 3 tiles high. And that can be fine, if this is a taller building. But just be careful. 1) In your text, you may want to add commas before your pronouns. For example, correct English dictates that this should be "Move out the way, kids!" And, in map 1, "What are you doing, kiddos?"
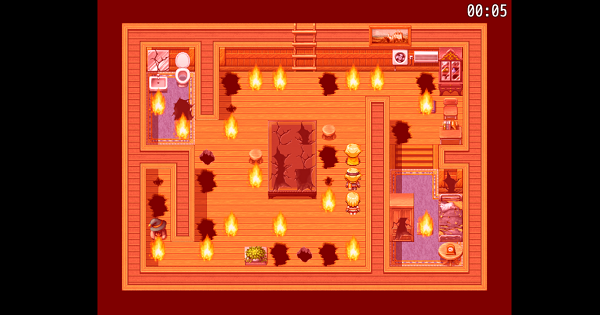
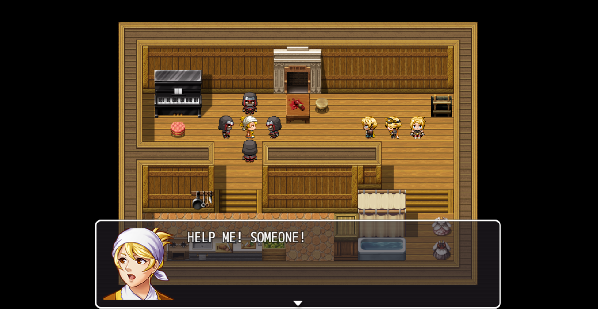
Map 5: 1) There is a conflict between your walls and your steps. Either the steps should go one tile lower than where they are, or the walls should go one tile higher. I would move the steps one tile down. 2) There are a few other funky things in this map, but I don't think they're terrible. For example, the piano pushed up next to the books is kinda weird... how will people reach the books behind the piano? :D
Good luck!
Map 1: 1) The fence doesn't have a left side... which maybe was by design, but if you made a fence to keep out animals (from your garden), you'd need a fence on each side. 2) There's something going on with the middle layer of the roof - you see how it's a different color, almost like light is hitting it? It should be the darker color that the top and bottom layer of the roof should be. 3) The windows with the flowerbeds need the top half added; right now, they are half a window.
Map 2: 1) The picture of the wagon(?) should be deleted. All of your walls should have a tile at the top that represents the top of the wall - and vice versa. Right now, the painting is on the top of the wall. 2) The two wall tops on the left of the map need walls - going into the bathroom and going into the hat room.
Map 3: 1) Same thing with the flowerbox windows - you need the top half added. 2) Some people might find the roof of the building a little weird. I think it's good enough for the tileset you have, though. 3) The grass is a little boring, so you may want to add a few grass poofs around or a dirt trail up to the door.
Map 4: This map is okay to me... but you should be careful about all of your maps as to how many tiles high your walls will be. In map #2, your wall was one tile high. Here, the wall is 3 tiles high. And that can be fine, if this is a taller building. But just be careful. 1) In your text, you may want to add commas before your pronouns. For example, correct English dictates that this should be "Move out the way, kids!" And, in map 1, "What are you doing, kiddos?"
Map 5: 1) There is a conflict between your walls and your steps. Either the steps should go one tile lower than where they are, or the walls should go one tile higher. I would move the steps one tile down. 2) There are a few other funky things in this map, but I don't think they're terrible. For example, the piano pushed up next to the books is kinda weird... how will people reach the books behind the piano? :D
Good luck!
author=djbeardo
Here are just a few suggestions:
Map 1: 1) The fence doesn't have a left side... which maybe was by design, but if you made a fence to keep out animals (from your garden), you'd need a fence on each side. 2) There's something going on with the middle layer of the roof - you see how it's a different color, almost like light is hitting it? It should be the darker color that the top and bottom layer of the roof should be. 3) The windows with the flowerbeds need the top half added; right now, they are half a window.
Map 2: 1) The picture of the wagon(?) should be deleted. All of your walls should have a tile at the top that represents the top of the wall - and vice versa. Right now, the painting is on the top of the wall. 2) The two wall tops on the left of the map need walls - going into the bathroom and going into the hat room.
Map 3: 1) Same thing with the flowerbox windows - you need the top half added. 2) Some people might find the roof of the building a little weird. I think it's good enough for the tileset you have, though. 3) The grass is a little boring, so you may want to add a few grass poofs around or a dirt trail up to the door.
Map 4: This map is okay to me... but you should be careful about all of your maps as to how many tiles high your walls will be. In map #2, your wall was one tile high. Here, the wall is 3 tiles high. And that can be fine, if this is a taller building. But just be careful. 1) In your text, you may want to add commas before your pronouns. For example, correct English dictates that this should be "Move out the way, kids!" And, in map 1, "What are you doing, kiddos?"
Map 5: 1) There is a conflict between your walls and your steps. Either the steps should go one tile lower than where they are, or the walls should go one tile higher. I would move the steps one tile down. 2) There are a few other funky things in this map, but I don't think they're terrible. For example, the piano pushed up next to the books is kinda weird... how will people reach the books behind the piano? :D
Good luck!
Wow thanks a lot for the detailed suggestion. I appreciate it and hope that I can use the criticism to improve my game and get it on to the rmn website.Thanks again!
Okay, more feedback!
Image 1:
- Those are signs, not fences. You can find fences on the autotile area with the ground tiles (at the very top of the tileset). There's a few types but a basic wooden one does exist.
- Try using some long grass autotile to give a bit more details to the ground. It's currently a sea of the same colour green with a few bits here and there to break it up. The long grass tile should help with that if you add bigger patches here and there.
- The roof issue which djbeardo brought up is due to not using the right tile for the middle part. Try using the ones you've used for the other layers instead.
- You're missing the tops of the windows with flowers.
- Honestly, the house is pretty damn tall. Maybe you could make it a little smaller? IF you've got a lot of houses like that it's going to make the map huge and a big old slog to walk through for the player. I know it feels weird but try to scale down a little when it comes to normal houses in towns, so that maps don't get too crazy-big.
Image 2:
- You're missing walls under ceiling tiles, which just looks very awkward. You need to have those walls to hold up the ceilings, especially due to the point of view that the graphics use - it's not top-down but 3/4 view meaning you would see the bottom part of something as well as the top. This means you would definitely see the walls under the ceiling tiles.
- The stairs make little sense and would make that area of the room one tile higher for the walls than the rest of the room as the stairs would take you down one level.
- The holes you use for the table (the longer ones) are wall tiles. You can tell because they have a depth to them that shows on the bottom.
- Carpets are usually square, rectangular, oval or circular. Being that these are autotiles, it's best to keep to square and rectangles - there are circular edits of carpets out there that are best used for if you want ovals/circles. Odd shapes are right out.
- The room is a bit too big for what is in it.
- Bathrooms shouldn't have carpets near sinks or baths - the water will make them rot and mould. Carpeted flooring is right out.
- Walls should be at least as high as the furniture in the room. This means that your walls should be two tiles high due to there being a cabinet that is over 1 tile high, else it'd be poking through the floor above.
+ You did a good thing actually making smaller rooms with wall partitions. A lot of people ignore that that is something you can do to make a big room a bit smaller.
Image 3:
- Again, those are signs, not fences.
- Also again, some long grass would really help make that less of a sea of green.
- Since you're using MV you can overlap decoration tiles (like the trees). You should do that a bit.
- A path to the house is a good idea. Paths should go where people walk a lot, so the entrance of a house is definitely a place for one.
- Flower windows are missing their tops. They use the same tops as the normal windows.
- Add some extra details around: flowers growing in wild patches, tree stumps, barrels and boxes, street lamps... stuff to liven up your maps a bit.
Image 4:
This is a sample map. In other words, not a map you made.
Image 5:
- Fireplace is supposed to be on a wall that is at least two tiles high.
- You need to have the top area wall be at least two tiles high.
- The areas with stairs going down would need to have walls that are one tile higher than the top area in order to keep the ceiling all the same height.
Okay, so I've been working on a mountain map. I was told to add some filler so I've done my best to add some decoration whilst ensuring the placement of objects still makes logical sense within my map.
Is there a point where things can get too cluttered?

Is there a point where things can get too cluttered?
That is looking pretty decent, actually. You might want to break up the straight lines a bit in the cliffs, especially on the left side - rule of thumb for lines in water and mountains is try not to do more than 3-5 in a row.
On the right with the grass, you've got a cliff issue, and you've also got some cliff issues near that (one of the cliff parts is 5 tiles high instead of 4 and you're using the bottom cliff tiles for middle cliffs - you can see the grass parts that are supposed to blend with grass at the bottom of the cliffs - it's an easy fix.)
In future, remember that you should use the top layer stuff like vines FROM the top layer and not copy them from on the map since it copies the tiles behind them as well.
The clutter is pretty well done. You could add a few more trees, though.
There's also a problem with the waterfall. The top one is fine, but the bottom one needs to be as high as the cliff walls as the level it's on.
Thank you very much Liberty!
I've taken your advice and broken up some of the straight lines. I would like to know if there is a best practice for breaking up straight lines in cliffs at the back. I've done some experimenting but it always looks a little strange. Also, do waterfalls and such count as breaking straight lines?
Aside from that, I think I'm fairly satisfied.
Next, I intend to work on a Port Town. Any advice?
Also, any recommendations for a ship tileset so that i may place it at the docks?
LockeZ

I'd really like to get rid of LockeZ. His play style is way too unpredictable. He's always like this too. If he ran a country, he'd just kill and imprison people at random until crime stopped.
5958
There's a point where things can get too cluttered but you're not even halfway there yet.
Easy way to fix the waterfall: fill in the topmost 2x2 tiles of the waterfall with water.
Easy way to fix the waterfall: fill in the topmost 2x2 tiles of the waterfall with water.
Tips for cliffs:
- Make indents as well as out-dents.
- Break lines up.
- If the top of the cliff is all one level height, then the height of the cliff wall all around should be the same height (you've got some parts in the top left where you've got 1-tile high cliff walls, but the bottom part of that cliff are 3 tiles high. You need to keep them the same height unless you do some staggering.)
- Staggering is a useful skill.
The waterfall in the new post is fine.
Examples of stuff:

First - Indenting.
Second - Out-denting.
Third - Both.
Fourth (right) - base cliff edge.
Using both in and out denting can really help shape a cliff.

Example of staggering. If you do this you have to make sure that the parts of the staggered cliffs add up to the height of the rest. If you look you can count the wall tile heights and they'll add up to 4 all the way to the ground.
Like so:

You'll also need to use shift mapping to fix some of the tiles properly. You can use it to do various things including making there look like overlap in cliffs and grass:


You can also add trees behind cliffs to give the illusion of there being space behind them.
- Make indents as well as out-dents.
- Break lines up.
- If the top of the cliff is all one level height, then the height of the cliff wall all around should be the same height (you've got some parts in the top left where you've got 1-tile high cliff walls, but the bottom part of that cliff are 3 tiles high. You need to keep them the same height unless you do some staggering.)
- Staggering is a useful skill.
The waterfall in the new post is fine.
Examples of stuff:
First - Indenting.
Second - Out-denting.
Third - Both.
Fourth (right) - base cliff edge.
Using both in and out denting can really help shape a cliff.
Example of staggering. If you do this you have to make sure that the parts of the staggered cliffs add up to the height of the rest. If you look you can count the wall tile heights and they'll add up to 4 all the way to the ground.
Like so:
You'll also need to use shift mapping to fix some of the tiles properly. You can use it to do various things including making there look like overlap in cliffs and grass:
You can also add trees behind cliffs to give the illusion of there being space behind them.
Wow, thank you very much for the information Liberty. I've taken it into consideration and decided to implement a few of them.
I now think I have a finished map. I know there are probably more straight lines than is best for a mountain map but as I made the outline before I knew all this I don't think I can change it any more without having to change the entire layout of the map. I am just not that good of a designer yet.

I now think I have a finished map. I know there are probably more straight lines than is best for a mountain map but as I made the outline before I knew all this I don't think I can change it any more without having to change the entire layout of the map. I am just not that good of a designer yet.
You made some great improvements! Nice job!
Two final thoughts:
1) I think you can lose the little "tops" of the cliff at the top of the lower stairs. So instead of a "C" or backwards "C" it would just look like an "L" or backwards "L".
2) The auto-shadows are a little inconsistent. It's hardly noticeable and maybe not worth stressing over. But definitely watch them when you do more town-oriented maps.

