


POKING BUTTONS: BASIC 2K3 TUTORIAL
Rpg Maker 2003 for Total Newbies
 Ebeth
Ebeth- 08/07/2014 12:34 PM
- 13194 views
As of 8/20/15 this has been updated with clearer images, more description & using the official 2K3 engine.
Tumblr version of this tutorial.
This is a very basic tutorial for Rpgmaker 2003 to help people just picking up the engine navigate it. This was written with what I would have loved to have when I first started- I could find slightly more advanced tutorials and waaay more advanced tutorials but nothing that told me what all the buttons did!
Some of this might not make full sense to you quite yet but I promise if you poke around in rpgmaker enough it will all become clear.
So let’s get started :D
------------------------------------------------------------------
So when you open Rpgmaker 2003 it looks something like this.
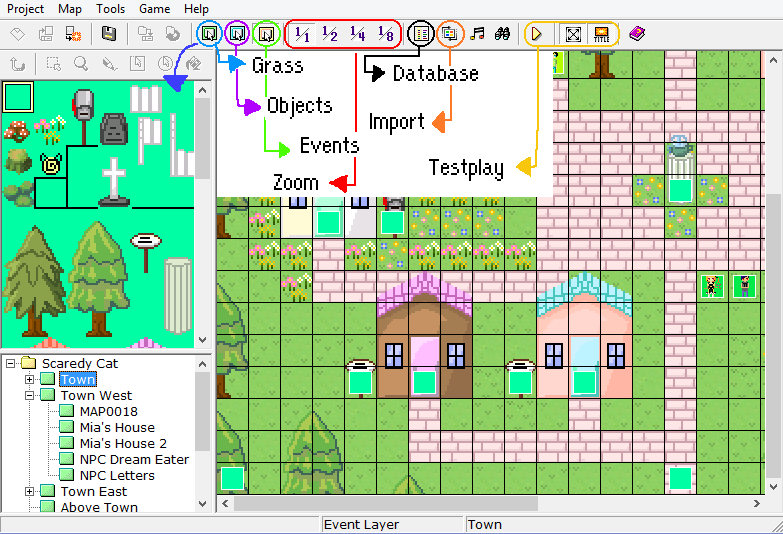
The blue, purple and green circled buttons are part of your mapmaking tools. They change what your able to edit on your map (which is the center) by toggling between the chipset (all those houses and stuff on the side).
Blue (grass) is your lower layer where your “flooring” and “walls” are.
Purple is where your objects and items are ie furniture, those pillars.
Green is where you program events.
The Red circled button is where you can zoom in and out of your map.
The Black circled button opens your database which is where you will be editing a lot of things and what I will be talking about today.
The Orange circled button is where you import custom art and music.
The Yellow circled button allows you to test play your game. The buttons next to it allow you to chose whether you want to test play in full screen or not and if you want to show the title screen at the start of a test play.
------------------------------------------------------------------

It is important to note the import button because this is where you will be uploading custom sprites, chipsets, music, ect if you chose to. But I won’t be talking about this in detail for this tutorial.
For now lets open up the database.
------------------------------------------------------------------

There’s a lot of tabs so lets focus on them one at a time. I'm going to start with the Terms tab. The Terms tab has tabs within itself. Tabception. Check all the tabs out.
Basically what you do here is customize various things that will show up in the game. You can change what the currency is called, what is said when you win a battle or enter a store or inn. You can also change stuff like the default “new game” button to whatever you want. Poke around, it’s fairly self-explanatory.
------------------------------------------------------------------

The system tab is super important!
Here you can set your title and game over screens (circled by black), as well as the music that will play when they show.
You can also set who is in your starting party here.(aka who you will playing as first). This is circled in green and really important to remember to set right! I've flubbed up on this and been really confused while play-testing many times.
You can also customize the sound effects that play for various actions,ie opening the menu, as what music will play during certain actions,
System graphics can also be customized here (circled in red) which is like your GUI.
------------------------------------------------------------------

In system 2 you can change what options you see what you open up your menu. Battle graphics GUI can also be customized here.
------------------------------------------------------------------

Common events are an important part of programming…that I didn’t really understand until I was essentially done with my game. Please look up a common events tutorial so you don't suffer like I did.
------------------------------------------------------------------

This is the tilesets tab. Once you upload your custom tilesets or even if you use the provided ones you need to check here. As you can see you can change which chipset goes with each tileset . For example my chipset “indoors town 1” is the “world map”. When I make a new map if I want to use this tileset I choose "world map" when creating it.
With your chipset you can toggle back and forth between the lower and upper layer- between the “grass” and the “objects”. While here you can customize the terrain, which usually means making sure no tile is considered a damage floor since if you touch a damage floor you instantly lose health. Different terrains will have different effects, mostly relating to battles.
Passability is really important! In this tab you can set what parts of the tileset a character can walk on, represented by an O, what parts of a tileset they cant walk on, represented by an X and what parts they can walk behind, represented by an ☆.
In Passage you can make it so you can only enter or exit from certain directions ie: a character can only stand on an object if they approach it from the left.
------------------------------------------------------------------

Actors tab is where you can customize the face, sprite, battle sprites name and title of your character.
You can also set their starting and max level, as well as their equipment and on what level they learn new skills. The names and effects of equipment can be changed under the items and skills tabs.
To set the base stats of a character, use base statistics. As you can see Mia has high attack but low hp. To set how quickly your character levels up use the experience curves section.
------------------------------------------------------------------

Classes tab is similar to the actors tab. You can set weapons/ attacks and levels for a class- that way any character assigned to that class will have those characteristics.
------------------------------------------------------------------

Skills are pretty straightforward.
You can change the names of skills, how powerful they are, how often they will miss, how much mp they use, the animation that plays when they are used, if they will inflict a condition like poison or blind. Remember that you can customize different skills for each hero and enemy!
------------------------------------------------------------------

Items are also pretty straightforward. You can change the names, prices, number of uses and effects of items ect.. You can also change which characters can use them.
For items that you don’t want to be used ie they are part of a fetch quest make sure that none of your heroes can use them.
For weapons make sure to check if they’re single or double handled! If a character is using a double handed weapon they can’t equip a shield item.
------------------------------------------------------------------

Enemies is exactly what it sounds like: the enemy’s you will fight. Here you can change their name, stats and what you receive upon defeating them. Under behavior you can change what skills they are able to use and when.
You can also change their graphic and make it transparent or “flying” (it floats up and down).
------------------------------------------------------------------

Troops is where you organize the enemies you have into groups. This is so when you program battles you simply call the enemies you want. To change which monsters appear use the add button. To arrange enemies how you want on screen chose manual and drag them around.
You can also change the background here & do a test battle here.
------------------------------------------------------------------

I've never used Attributes before so I'm not entirely familiar with it but the basic gist of it is that different weapons can be physical or magical and have different damage bonuses against actors or enemies.
------------------------------------------------------------------

States is where you can edit different statuses your heroes and enemies can be affected by.
------------------------------------------------------------------

Animations play during battles. You can upload your own. The animations tab is directly related to the skills tab because you can change animations of skills to any of the various animations found here.
------------------------------------------------------------------

The Battle Screen is where you customize how your battle will look, what happens during if your party is defeated, what commands will be available and what type of battle it will be.
------------------------------------------------------------------

You can set different parts of your tiles to different Terrains. This lets you do lots of cool stuff. Different terrains can have different encounter rates, passabiltiy for vehicles, footstep sound effects or use transparency to create effects that make it look like a character is walking through water.
------------------------------------------------------------------


One final tidbit! Left clicking on your map and going to map properties allows you to do a lot of stuff like set the music for the map, make it loop or use a parallax!
------------------------------------------------------------------
Here are some other helpful links for rpg maker beginners:
http://unprince.tumblr.com/post/57942907552
http://rpgmaker.net/tutorials/325/
A good tutorial about importing custom graphics:
http://unprince.tumblr.com/post/71728928310
An excellent tutorial explaining the basics of eventing:
http://rpgmaker.net/tutorials/842/
Tumblr version of this tutorial.
This is a very basic tutorial for Rpgmaker 2003 to help people just picking up the engine navigate it. This was written with what I would have loved to have when I first started- I could find slightly more advanced tutorials and waaay more advanced tutorials but nothing that told me what all the buttons did!
Some of this might not make full sense to you quite yet but I promise if you poke around in rpgmaker enough it will all become clear.
So let’s get started :D
------------------------------------------------------------------
So when you open Rpgmaker 2003 it looks something like this.
The blue, purple and green circled buttons are part of your mapmaking tools. They change what your able to edit on your map (which is the center) by toggling between the chipset (all those houses and stuff on the side).
Blue (grass) is your lower layer where your “flooring” and “walls” are.
Purple is where your objects and items are ie furniture, those pillars.
Green is where you program events.
The Red circled button is where you can zoom in and out of your map.
The Black circled button opens your database which is where you will be editing a lot of things and what I will be talking about today.
The Orange circled button is where you import custom art and music.
The Yellow circled button allows you to test play your game. The buttons next to it allow you to chose whether you want to test play in full screen or not and if you want to show the title screen at the start of a test play.
------------------------------------------------------------------
It is important to note the import button because this is where you will be uploading custom sprites, chipsets, music, ect if you chose to. But I won’t be talking about this in detail for this tutorial.
For now lets open up the database.
------------------------------------------------------------------
There’s a lot of tabs so lets focus on them one at a time. I'm going to start with the Terms tab. The Terms tab has tabs within itself. Tabception. Check all the tabs out.
Basically what you do here is customize various things that will show up in the game. You can change what the currency is called, what is said when you win a battle or enter a store or inn. You can also change stuff like the default “new game” button to whatever you want. Poke around, it’s fairly self-explanatory.
------------------------------------------------------------------
The system tab is super important!
Here you can set your title and game over screens (circled by black), as well as the music that will play when they show.
You can also set who is in your starting party here.(aka who you will playing as first). This is circled in green and really important to remember to set right! I've flubbed up on this and been really confused while play-testing many times.
You can also customize the sound effects that play for various actions,ie opening the menu, as what music will play during certain actions,
System graphics can also be customized here (circled in red) which is like your GUI.
------------------------------------------------------------------
In system 2 you can change what options you see what you open up your menu. Battle graphics GUI can also be customized here.
------------------------------------------------------------------
Common events are an important part of programming…that I didn’t really understand until I was essentially done with my game. Please look up a common events tutorial so you don't suffer like I did.
------------------------------------------------------------------
This is the tilesets tab. Once you upload your custom tilesets or even if you use the provided ones you need to check here. As you can see you can change which chipset goes with each tileset . For example my chipset “indoors town 1” is the “world map”. When I make a new map if I want to use this tileset I choose "world map" when creating it.
With your chipset you can toggle back and forth between the lower and upper layer- between the “grass” and the “objects”. While here you can customize the terrain, which usually means making sure no tile is considered a damage floor since if you touch a damage floor you instantly lose health. Different terrains will have different effects, mostly relating to battles.
Passability is really important! In this tab you can set what parts of the tileset a character can walk on, represented by an O, what parts of a tileset they cant walk on, represented by an X and what parts they can walk behind, represented by an ☆.
In Passage you can make it so you can only enter or exit from certain directions ie: a character can only stand on an object if they approach it from the left.
------------------------------------------------------------------
Actors tab is where you can customize the face, sprite, battle sprites name and title of your character.
You can also set their starting and max level, as well as their equipment and on what level they learn new skills. The names and effects of equipment can be changed under the items and skills tabs.
To set the base stats of a character, use base statistics. As you can see Mia has high attack but low hp. To set how quickly your character levels up use the experience curves section.
------------------------------------------------------------------
Classes tab is similar to the actors tab. You can set weapons/ attacks and levels for a class- that way any character assigned to that class will have those characteristics.
------------------------------------------------------------------
Skills are pretty straightforward.
You can change the names of skills, how powerful they are, how often they will miss, how much mp they use, the animation that plays when they are used, if they will inflict a condition like poison or blind. Remember that you can customize different skills for each hero and enemy!
------------------------------------------------------------------
Items are also pretty straightforward. You can change the names, prices, number of uses and effects of items ect.. You can also change which characters can use them.
For items that you don’t want to be used ie they are part of a fetch quest make sure that none of your heroes can use them.
For weapons make sure to check if they’re single or double handled! If a character is using a double handed weapon they can’t equip a shield item.
------------------------------------------------------------------
Enemies is exactly what it sounds like: the enemy’s you will fight. Here you can change their name, stats and what you receive upon defeating them. Under behavior you can change what skills they are able to use and when.
You can also change their graphic and make it transparent or “flying” (it floats up and down).
------------------------------------------------------------------
Troops is where you organize the enemies you have into groups. This is so when you program battles you simply call the enemies you want. To change which monsters appear use the add button. To arrange enemies how you want on screen chose manual and drag them around.
You can also change the background here & do a test battle here.
------------------------------------------------------------------
I've never used Attributes before so I'm not entirely familiar with it but the basic gist of it is that different weapons can be physical or magical and have different damage bonuses against actors or enemies.
------------------------------------------------------------------
States is where you can edit different statuses your heroes and enemies can be affected by.
------------------------------------------------------------------
Animations play during battles. You can upload your own. The animations tab is directly related to the skills tab because you can change animations of skills to any of the various animations found here.
------------------------------------------------------------------
The Battle Screen is where you customize how your battle will look, what happens during if your party is defeated, what commands will be available and what type of battle it will be.
------------------------------------------------------------------
You can set different parts of your tiles to different Terrains. This lets you do lots of cool stuff. Different terrains can have different encounter rates, passabiltiy for vehicles, footstep sound effects or use transparency to create effects that make it look like a character is walking through water.
------------------------------------------------------------------
One final tidbit! Left clicking on your map and going to map properties allows you to do a lot of stuff like set the music for the map, make it loop or use a parallax!
------------------------------------------------------------------
Here are some other helpful links for rpg maker beginners:
http://unprince.tumblr.com/post/57942907552
http://rpgmaker.net/tutorials/325/
A good tutorial about importing custom graphics:
http://unprince.tumblr.com/post/71728928310
An excellent tutorial explaining the basics of eventing:
http://rpgmaker.net/tutorials/842/
Posts 

Pages:
1
Tabception xD You might want to add some visual breaks between images and their accompanying information. Maybe decrease your screen resolution so the images aren't so large. The text isn't very clear in them.
I wrote a tutorial on events for beginners, too http://rpgmaker.net/tutorials/842/ (you can see what I mean about visual breaks in there). I was going write more tutorials but...meh. Lazy :P
If you ever want to learn about the stuff you don't know about, feel free to ask me. Terrain is a really useful tool. Everybody should know about it.
author=Link_2112
Tabception xD You might want to add some visual breaks between images and their accompanying information. Maybe decrease your screen resolution so the images aren't so large. The text isn't very clear in them.
I wrote a tutorial on events for beginners, too http://rpgmaker.net/tutorials/842/ (you can see what I mean about visual breaks in there). I was going write more tutorials but...meh. Lazy :P
If you ever want to learn about the stuff you don't know about, feel free to ask me. Terrain is a really useful tool. Everybody should know about it.
Got it! I added some visual breaks, working on fixing the images now.
Your tutorial's really useful- and if I have any terrain related questions I'll be sure to ask :)
Pages:
1

