


REPLACING GLYPHS IN RPG MAKER 2003 (FIXED)
Replacing RPG Maker 2003's glyphs with ResourceHacker.
 ClockworkPrince
- 06/17/2017 10:00 AM
- 11820 views
Replacing glyphs in RPG Maker 2003 (using ResourceHacker)
UPDATE: I managed to accidentally leave out part of the tutorial; this has now been fixed!
NOTE: This tutorial was first posted on Tumblr, so the images are hosted there. If they don't show up, please inform me so I can upload them elsewhere.
Ever wonder how I made symbols appear in Lavender’s menus?
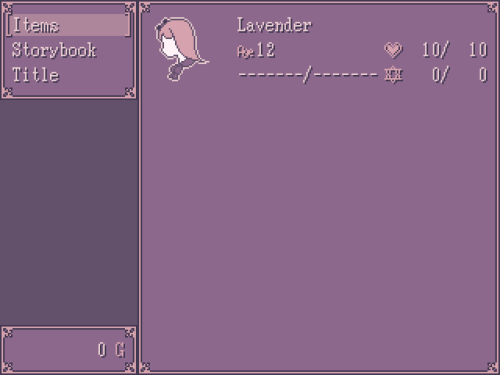
The “Age“ icon, the heart and the hexagram are all implemented using RPG Maker 2003′s glyphs system. But the ones I used were largely custom (save for the hexagram)!
This tutorial will teach you how!
First off, you need to download ResourceHacker: http://www.angusj.com/resourcehacker/
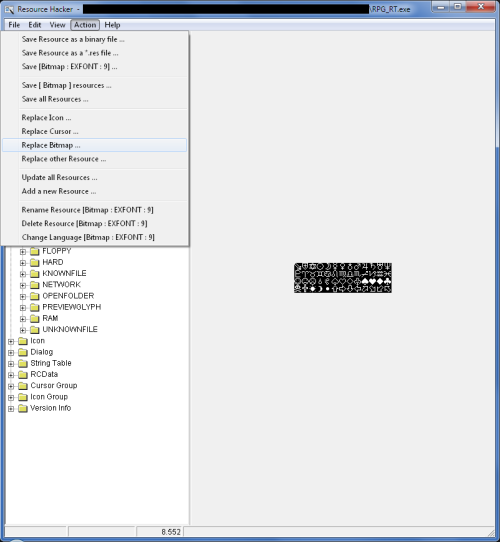
Then you open your game’s RPG_RT.exe file in ResourceHacker and Navigate to the subfolders Bitmap > EXFONT > 9
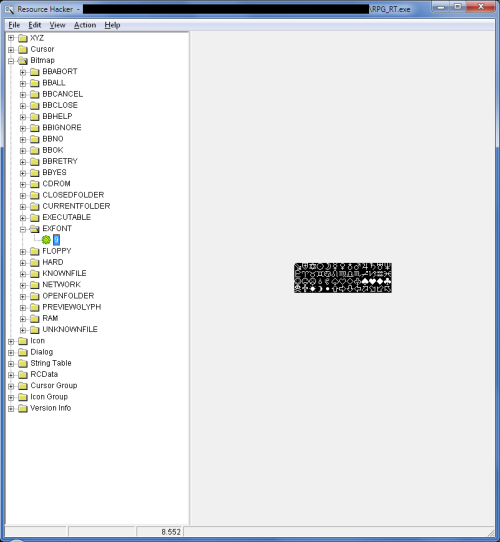
See this file here? It contains the standard glyphs for RPG Maker 2003. Now the next step depends on whether you’re extracting the glyphs or replacing them.
---
Extracting glyphs
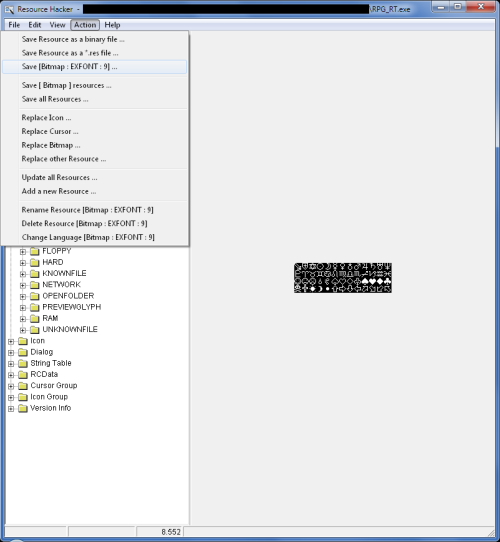
To extract the glyphs, simply go to the menu option Action > Save and choose a location to save the glyphs.
I recommend keeping an unaltered version of the glyphs around, just in case you want to use any of them.
A few notes on editing glyphs:
Now make your own custom glyphs in an image editor (preferably one that supports limited palettes) and you can move on to replacing the standard glyphs!
---
Replacing Glyphs
To replace the standard glyphs, open up RPG_RT.exe in ResourceHacker again, navigate to the glyphs image as described above and use the menu command Action > Replace Bitmap …

When you click that menu option, a pop-up will open.
First confirm that you have “EXFONT“ selected in the list on the right and then click the button Open file with new bitmap…
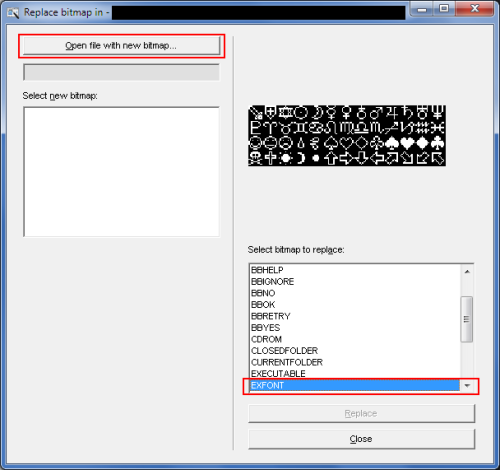
Now you select the new glyphs file and click on the Replace button.
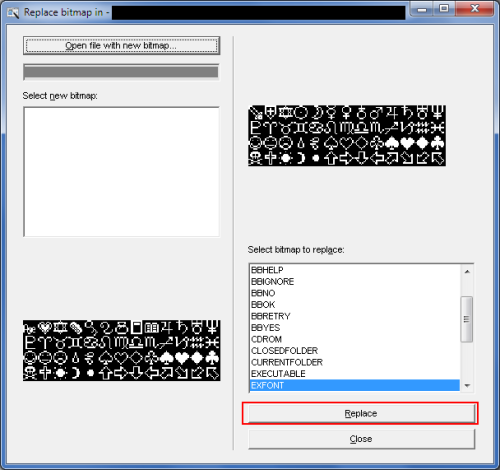
Now save your RPG_RT.exe file!
ResourceHacker will automatically make a back-up of your original RPG_RT.exe file and name it RPG_RT_original.exe. I recommend backing this file up and moving it out of your game’s folder, so players don’t get confused over which .exe file they should use.
---
That’s all there is to it! You should be able to now both extract and replace glyph files to your heart’s content.
UPDATE: I managed to accidentally leave out part of the tutorial; this has now been fixed!
NOTE: This tutorial was first posted on Tumblr, so the images are hosted there. If they don't show up, please inform me so I can upload them elsewhere.
Ever wonder how I made symbols appear in Lavender’s menus?
The “Age“ icon, the heart and the hexagram are all implemented using RPG Maker 2003′s glyphs system. But the ones I used were largely custom (save for the hexagram)!
This tutorial will teach you how!
First off, you need to download ResourceHacker: http://www.angusj.com/resourcehacker/
Then you open your game’s RPG_RT.exe file in ResourceHacker and Navigate to the subfolders Bitmap > EXFONT > 9
See this file here? It contains the standard glyphs for RPG Maker 2003. Now the next step depends on whether you’re extracting the glyphs or replacing them.
---
Extracting glyphs
To extract the glyphs, simply go to the menu option Action > Save and choose a location to save the glyphs.
I recommend keeping an unaltered version of the glyphs around, just in case you want to use any of them.
A few notes on editing glyphs:
- Every black pixel in the glyph will be read as transparent; all other colours, no matter how close to black, will be replaced with the selected text colour from the active System menu skin. (See RPG Maker 2003′s help file for more information on how to use text colours.)
- All glyphs are 12x12 in size and cannot be made bigger or smaller in regards to how much space they take up when used, no matter how much transparent pixels they contain.
- Glyphs can be used for every text field in the game that allows for 2 or more characters, for example: in item names/descriptions, all text fields in the Terms database section, etc.
- Only .BMP files can be used.
- Glyph codes go from $A (default: sword) to $Z (default: Pisces zodiac symbol) and then $a (default: happy face) to $z (default: up-left pointing arrow), from left to right, top to bottom.
Now make your own custom glyphs in an image editor (preferably one that supports limited palettes) and you can move on to replacing the standard glyphs!
---
Replacing Glyphs
To replace the standard glyphs, open up RPG_RT.exe in ResourceHacker again, navigate to the glyphs image as described above and use the menu command Action > Replace Bitmap …
When you click that menu option, a pop-up will open.
First confirm that you have “EXFONT“ selected in the list on the right and then click the button Open file with new bitmap…
Now you select the new glyphs file and click on the Replace button.
Now save your RPG_RT.exe file!
ResourceHacker will automatically make a back-up of your original RPG_RT.exe file and name it RPG_RT_original.exe. I recommend backing this file up and moving it out of your game’s folder, so players don’t get confused over which .exe file they should use.
---
That’s all there is to it! You should be able to now both extract and replace glyph files to your heart’s content.
Posts 

Pages:
1

srry to ask but should I do this before or after creating game disk?
(is creating game disk an actual necessary thing anyway?)
xoxo
(is creating game disk an actual necessary thing anyway?)
xoxo
author=chroma
srry to ask but should I do this before or after creating game disk?
(is creating game disk an actual necessary thing anyway?)
xoxo
Before creating the Game Disk!
Also, since you asked about it: I personally do not make Game Disks for my 2003 games, because they are basically just .exe archives that aren't really any different from .zip or .rar ones. I find them more cumbersome than ZIP archives, so I use those instead. (Game Disks do not encrypt your data like in RPG Maker XP, VX and VX Ace, so they're not even useful for encryption either.)
author=JosephSeraph
cool, it still works on legit 2k3 then :D
Yes, it does! That's the RPG Maker 2003 version I personally use.


Pages:
1

