


EVENTING A FLASHY CREDIT/INTRO SEQUENCE
Using a little bit of code and some ingenuity,you'll have something really awesome looking!
 Puddor
- 02/26/2010 11:18 AM
- 8976 views
Hi guys. Another tutorial from SorceressKyrsty, yet this one is a technical/event system. I hope you enjoy reading this, because I’m ecstatic I’ve gotten it working.
This is an event tutorial on creating Image/Credit scenes like those in the before titlescreen area of Final Fantasy VIII and Final Fantasy X-2. We’re leaning more towards the FF8 version here.
This requires a special, very simple ‘Splash Screen’ script by SephirothTDS that overwrites the original Main. If you have scripts in your game that will conflict with this I don’t know if this is for you, however I am running a vast array of scripts including Materia and RTAB combined with Animated Battlers. It runs fine for me, but I suggest creating a back-up project just in case ;).
However, it CAN cause errors with Materia. If you can’t use Battle Test, you probably can’t use this.
#==============================================================================
# ** Main
#------------------------------------------------------------------------------
# After defining each class, actual processing begins here.
#==============================================================================
#--------------------------------------------------------------------------
# * Constants
#--------------------------------------------------------------------------
# Intro map ID
INTRO_MAP_ID = 42
# Intro Map starting X position
INTRO_MAP_START_X = 1
# Intro Map starting Y position
INTRO_MAP_START_Y = 1
begin
#check font
Font.default_name = 'Arial’
Font.default_size = 18
# If battle test
if $BTEST
# Prepare for transition
Graphics.freeze
# Make scene object (title screen)
$scene = Scene_Title.new
# Call main method as long as $scene is effective
while $scene != nil
$scene.main
end
# Fade out
Graphics.transition(20)
else
# Load database
$data_actors = load_data("Data/Actors.rxdata")
$data_classes = load_data("Data/Classes.rxdata")
$data_skills = load_data("Data/Skills.rxdata")
$data_items = load_data("Data/Items.rxdata")
$data_weapons = load_data("Data/Weapons.rxdata")
$data_armors = load_data("Data/Armors.rxdata")
$data_enemies = load_data("Data/Enemies.rxdata")
$data_troops = load_data("Data/Troops.rxdata")
$data_states = load_data("Data/States.rxdata")
$data_animations = load_data("Data/Animations.rxdata")
$data_tilesets = load_data("Data/Tilesets.rxdata")
$data_common_events = load_data("Data/CommonEvents.rxdata")
$data_system = load_data("Data/System.rxdata")
# Make system object
$game_system = Game_System.new
# Prepare for transition
Graphics.freeze
# Stop BGM
Audio.bgm_stop
# Reset frame count for measuring play time
Graphics.frame_count = 0
# Make each type of game object
$game_temp = Game_Temp.new
$game_system = Game_System.new
$game_switches = Game_Switches.new
$game_variables = Game_Variables.new
$game_self_switches = Game_SelfSwitches.new
$game_screen = Game_Screen.new
$game_actors = Game_Actors.new
$game_party = Game_Party.new
$game_troop = Game_Troop.new
$game_map = Game_Map.new
$game_player = Game_Player.new
# Set up initial party
$game_party.setup_starting_members
# Set up initial map position
$game_map.setup(INTRO_MAP_ID)
# Move player to initial position
$game_player.moveto(INTRO_MAP_START_X, INTRO_MAP_START_Y)
# Refresh player
$game_player.refresh
# Run automatic change for BGM and BGS set with map
$game_map.autoplay
# Update map (run parallel process event)
$game_map.update
# Switch to map screen
$scene = Scene_Map.new
# Call main method as long as $scene is effective
while $scene != nil
$scene.main
end
end
# Fade out
Graphics.transition(20)
rescue Errno::ENOENT
# Supplement Errno::ENOENT exception
# If unable to open file, display message and end
filename = $!.message.sub("No such file or directory - ", "")
print("Unable to find file #{filename}.")
end
In the intro map ID, place the ID of the map you’re planning on using for this tutorial. I’d suggest a totally fresh map with no events. The X,Y co-ordinates shouldn’t matter because we’ll be using an Autorun event.
Woo, now we have that done! That’s it for script editing. The rest is all event code! Great, huh?
Alright, now to the event code. We’ll be relying on two very simple event codes but they are really powerful when executed correctly.
The first is the Fading Images code. Before we get to that, you should probably import your intro images into your Graphics/Pictures folder. This will make them nice and accessible.
Now that’s done, this is the code I used:
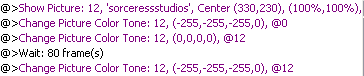
If you’re feeling confused at this point, don’t worry. It’ll all work out soon ^_^
The first line is ‘Show Picture’, which sets the co-ordinates. The image is then immediately turned black and then changed back to its regular colours in 12 frames. Why?
The first ‘turn black’ command happens so quickly that the viewer doesn’t see it. The second creates the affect of fading in. Pretty cool, huh?
Once it has faded to black again (the last command), as long as your map background is black and your main characters graphic set to ‘none’ (or your party set to 0) you can erase it anytime you like.
I just forget to, hee ^_^.
That’s the image code. The actual credits are a bit more work, but they’re aesthetic
because of this, and you can have whatever fonts you like without your player having to install them.
Cool, right?
Keep in mind as I said, this is a fair amount of work. It’s not hard, but it takes a while, especially if you have a lot of credits!
Firstly decide how many credits you want per black slide. I use two.
Here you have two options:
When setting up the credits, you place the animation in the database to the exact place you want it to appear on screen.
Or, create events in the places you want them to appear and then in your main event code, set the animation to play on that specific event. Personally, I believe this one to be easier.
With all these decisions made about the placing of your events made, it’s time to create the animations.
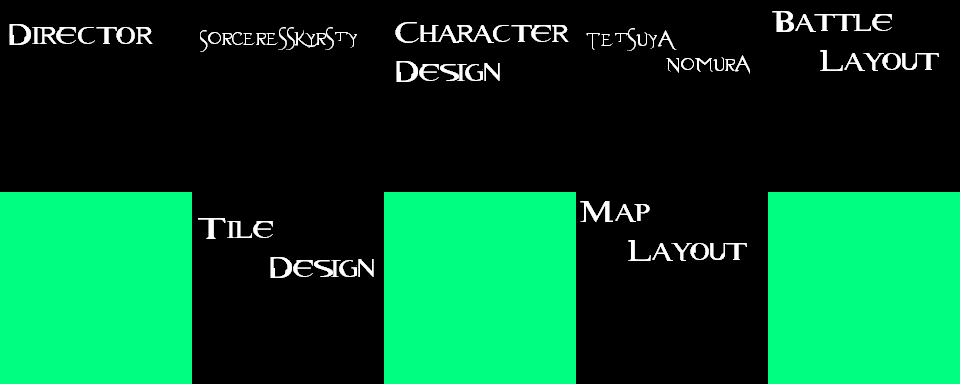
This is the layout I used. However, you don’t have to use this same layout, you can simply create the text event to have both the title of the credit and the person you’re crediting.
So, how this works is that the ‘Title’ fades in first. To do this, go into your animations tab and create a new, blank animation area. Import your credits (if you want to test this out, feel free to use this credit thing first). Insert your ‘Title’ as your first frame, and have it extend over ten frames.
Now, go through and use ‘Paste Last’ on each frame so the title appears on the exact same place in each frame. Then, go through and adjust your first frame to 0% opacity, then set up a Tween between frames 1-10.
Now your title fades in! Set up another ten frames and put in ‘Paste Last’, so the title remains on screen by itself for a little while.
Now, create a frame 21 with ‘Paste Last’, and insert your credited person. Create another ten frames with ‘paste last’ then change the opacity of the credited person’s name in frame 21 to 0%, and create a tween between 21-30.
Now the credited title fades in. As before set up another ten frames (or perhaps more) for the credit to remain on screen. Lastly, create your last ten frames with ‘Paste Last’ and create a tween from frame 41 (the last frame of the ‘hold’ area) to frame 50, where both titles should be completely transparent.
There, you have your credit! To save time, you may want to create the same animation sheet multiple times, just with different titles in the spots you used for your first credit.
Then you can copy/paste the animation and change the sheet used for it, avoiding having to do the method I mentioned above twice.
Now that’s all done with the credits, it’s time to implement them into the title sequence.
Simply create a ‘Show Animation’ command, referring to the choice you made earlier. Set a ‘Wait’ event to run for 5 frames less than your credit if you’re doing two or more.
The last credit should run exactly for as long as the animation does.
Then put in the code I pictured above for your next image. Continue this process (credit, image, credit, image) until you reach the end of your credits.
In order to do this, you’re going to need a lot of images.
If you want to have your credits run ON your images, instead of fading to black as soon as the image appears, place the ‘Show Animation’ codes in, then fade to black after the ‘Wait’ times expire. This method will require a lot more images though, keep that in mind.
FINAL NOTE:
In order to have your player able to skip this sequence, create a Parallel Process that runs after your 'essential' credits (developer logo, Enterbrain thing, whatever). So turn on a switch after their displayed and set up the Parallel Process to require the switch being active.
Now create a 'Conditional Branch' with no Else handler and set the Condition to being the 'B' button being pressed (Enter). Put in the handler 'Return to Title Screen'.
Also put 'Return to Title Screen' at the end of your sequence. Finished! ^^.
Here's a Youtube Link for the result (sorry some credits repeat, heh): http://www.youtube.com/watch?v=cdfMC0xgFcU
Well, I hope you understood and enjoyed this tutorial. I’m glad to have the eventing done for this, at least.
There’s no need to credit me for this event code, but DO credit SephirothTDS for the script! It has been very helpful to me and if you’re using this for an intro sequence it will be helpful to you as well.
TTFN,
~SorceressKyrsty
This is an event tutorial on creating Image/Credit scenes like those in the before titlescreen area of Final Fantasy VIII and Final Fantasy X-2. We’re leaning more towards the FF8 version here.
This requires a special, very simple ‘Splash Screen’ script by SephirothTDS that overwrites the original Main. If you have scripts in your game that will conflict with this I don’t know if this is for you, however I am running a vast array of scripts including Materia and RTAB combined with Animated Battlers. It runs fine for me, but I suggest creating a back-up project just in case ;).
However, it CAN cause errors with Materia. If you can’t use Battle Test, you probably can’t use this.
#==============================================================================
# ** Main
#------------------------------------------------------------------------------
# After defining each class, actual processing begins here.
#==============================================================================
#--------------------------------------------------------------------------
# * Constants
#--------------------------------------------------------------------------
# Intro map ID
INTRO_MAP_ID = 42
# Intro Map starting X position
INTRO_MAP_START_X = 1
# Intro Map starting Y position
INTRO_MAP_START_Y = 1
begin
#check font
Font.default_name = 'Arial’
Font.default_size = 18
# If battle test
if $BTEST
# Prepare for transition
Graphics.freeze
# Make scene object (title screen)
$scene = Scene_Title.new
# Call main method as long as $scene is effective
while $scene != nil
$scene.main
end
# Fade out
Graphics.transition(20)
else
# Load database
$data_actors = load_data("Data/Actors.rxdata")
$data_classes = load_data("Data/Classes.rxdata")
$data_skills = load_data("Data/Skills.rxdata")
$data_items = load_data("Data/Items.rxdata")
$data_weapons = load_data("Data/Weapons.rxdata")
$data_armors = load_data("Data/Armors.rxdata")
$data_enemies = load_data("Data/Enemies.rxdata")
$data_troops = load_data("Data/Troops.rxdata")
$data_states = load_data("Data/States.rxdata")
$data_animations = load_data("Data/Animations.rxdata")
$data_tilesets = load_data("Data/Tilesets.rxdata")
$data_common_events = load_data("Data/CommonEvents.rxdata")
$data_system = load_data("Data/System.rxdata")
# Make system object
$game_system = Game_System.new
# Prepare for transition
Graphics.freeze
# Stop BGM
Audio.bgm_stop
# Reset frame count for measuring play time
Graphics.frame_count = 0
# Make each type of game object
$game_temp = Game_Temp.new
$game_system = Game_System.new
$game_switches = Game_Switches.new
$game_variables = Game_Variables.new
$game_self_switches = Game_SelfSwitches.new
$game_screen = Game_Screen.new
$game_actors = Game_Actors.new
$game_party = Game_Party.new
$game_troop = Game_Troop.new
$game_map = Game_Map.new
$game_player = Game_Player.new
# Set up initial party
$game_party.setup_starting_members
# Set up initial map position
$game_map.setup(INTRO_MAP_ID)
# Move player to initial position
$game_player.moveto(INTRO_MAP_START_X, INTRO_MAP_START_Y)
# Refresh player
$game_player.refresh
# Run automatic change for BGM and BGS set with map
$game_map.autoplay
# Update map (run parallel process event)
$game_map.update
# Switch to map screen
$scene = Scene_Map.new
# Call main method as long as $scene is effective
while $scene != nil
$scene.main
end
end
# Fade out
Graphics.transition(20)
rescue Errno::ENOENT
# Supplement Errno::ENOENT exception
# If unable to open file, display message and end
filename = $!.message.sub("No such file or directory - ", "")
print("Unable to find file #{filename}.")
end
In the intro map ID, place the ID of the map you’re planning on using for this tutorial. I’d suggest a totally fresh map with no events. The X,Y co-ordinates shouldn’t matter because we’ll be using an Autorun event.
Woo, now we have that done! That’s it for script editing. The rest is all event code! Great, huh?
Alright, now to the event code. We’ll be relying on two very simple event codes but they are really powerful when executed correctly.
The first is the Fading Images code. Before we get to that, you should probably import your intro images into your Graphics/Pictures folder. This will make them nice and accessible.
Now that’s done, this is the code I used:
If you’re feeling confused at this point, don’t worry. It’ll all work out soon ^_^
The first line is ‘Show Picture’, which sets the co-ordinates. The image is then immediately turned black and then changed back to its regular colours in 12 frames. Why?
The first ‘turn black’ command happens so quickly that the viewer doesn’t see it. The second creates the affect of fading in. Pretty cool, huh?
Once it has faded to black again (the last command), as long as your map background is black and your main characters graphic set to ‘none’ (or your party set to 0) you can erase it anytime you like.
I just forget to, hee ^_^.
That’s the image code. The actual credits are a bit more work, but they’re aesthetic
because of this, and you can have whatever fonts you like without your player having to install them.
Cool, right?
Keep in mind as I said, this is a fair amount of work. It’s not hard, but it takes a while, especially if you have a lot of credits!
Firstly decide how many credits you want per black slide. I use two.
Here you have two options:
When setting up the credits, you place the animation in the database to the exact place you want it to appear on screen.
Or, create events in the places you want them to appear and then in your main event code, set the animation to play on that specific event. Personally, I believe this one to be easier.
With all these decisions made about the placing of your events made, it’s time to create the animations.
This is the layout I used. However, you don’t have to use this same layout, you can simply create the text event to have both the title of the credit and the person you’re crediting.
So, how this works is that the ‘Title’ fades in first. To do this, go into your animations tab and create a new, blank animation area. Import your credits (if you want to test this out, feel free to use this credit thing first). Insert your ‘Title’ as your first frame, and have it extend over ten frames.
Now, go through and use ‘Paste Last’ on each frame so the title appears on the exact same place in each frame. Then, go through and adjust your first frame to 0% opacity, then set up a Tween between frames 1-10.
Now your title fades in! Set up another ten frames and put in ‘Paste Last’, so the title remains on screen by itself for a little while.
Now, create a frame 21 with ‘Paste Last’, and insert your credited person. Create another ten frames with ‘paste last’ then change the opacity of the credited person’s name in frame 21 to 0%, and create a tween between 21-30.
Now the credited title fades in. As before set up another ten frames (or perhaps more) for the credit to remain on screen. Lastly, create your last ten frames with ‘Paste Last’ and create a tween from frame 41 (the last frame of the ‘hold’ area) to frame 50, where both titles should be completely transparent.
There, you have your credit! To save time, you may want to create the same animation sheet multiple times, just with different titles in the spots you used for your first credit.
Then you can copy/paste the animation and change the sheet used for it, avoiding having to do the method I mentioned above twice.
Now that’s all done with the credits, it’s time to implement them into the title sequence.
Simply create a ‘Show Animation’ command, referring to the choice you made earlier. Set a ‘Wait’ event to run for 5 frames less than your credit if you’re doing two or more.
The last credit should run exactly for as long as the animation does.
Then put in the code I pictured above for your next image. Continue this process (credit, image, credit, image) until you reach the end of your credits.
In order to do this, you’re going to need a lot of images.
If you want to have your credits run ON your images, instead of fading to black as soon as the image appears, place the ‘Show Animation’ codes in, then fade to black after the ‘Wait’ times expire. This method will require a lot more images though, keep that in mind.
FINAL NOTE:
In order to have your player able to skip this sequence, create a Parallel Process that runs after your 'essential' credits (developer logo, Enterbrain thing, whatever). So turn on a switch after their displayed and set up the Parallel Process to require the switch being active.
Now create a 'Conditional Branch' with no Else handler and set the Condition to being the 'B' button being pressed (Enter). Put in the handler 'Return to Title Screen'.
Also put 'Return to Title Screen' at the end of your sequence. Finished! ^^.
Here's a Youtube Link for the result (sorry some credits repeat, heh): http://www.youtube.com/watch?v=cdfMC0xgFcU
Well, I hope you understood and enjoyed this tutorial. I’m glad to have the eventing done for this, at least.
There’s no need to credit me for this event code, but DO credit SephirothTDS for the script! It has been very helpful to me and if you’re using this for an intro sequence it will be helpful to you as well.
TTFN,
~SorceressKyrsty
Posts 

Pages:
1

I tried to make a script like this a while ago, but i dropped the idea and started working on something else, kudos for making this, it is some nifty scripting.
I tried to make a script like this a while ago, but i dropped the idea and started working on something else, kudos for making this, it is some nifty scripting.

@Solitayre: I added a video link for it. Thanks for the recommendation.
@Solitayre: I added a video link for it. Thanks for the recommendation.


for some reason, the script line 19 (the default font name) won't work for me. it says "Script 'Main' line 19: Syntax Error occured." . I checked the font name was correct, which it was... why doesn't it work?
I have no idea. Every project I have placed this code into has worked. Give deleting the font related lines a shot, that might work. If you want to use a default font I suggest looking up tutorials on the matter if this doesn't work.
Pages:
1

