


ALWAYS DISPLAY “SCROLL PICTURE WITH MAP“ PICTURES AT THE CORRECT COORDINATES
How to use variables to display "Scroll Picture With Map" Pictures at the desired coordinates.
 ClockworkPrince
- 06/17/2018 11:41 AM
- 4631 views
Have you ever wanted to make a big map where can you both have a parallax image and map-size Pictures that scroll with the map showing, but not have to manually input lots of coordinates in several Show/Move Picture event commands due to having several coordinates you can enter the map in? If so, you have come to the right place!
Tutorial requirements:
- RPG Maker 2003 (this tutorial might work in other RPG Maker versions too, but you'd have to adapt some of the steps to correct for things such as different game resolutions or tile sizes)
- Basic knowledge about how variables and conditional branches work
- 2 variables per coordinate you want to calculate (so 2 for the X-coordinate, 2 for the Y-coordinate)
- A map that's bigger than 20x15 tiles/320x240 pixels and does NOT have any looping enabled (I'm sure you can make it work with looping maps too, but I haven't been able to figure out how to do it yet.)
- A map-sized Picture (multiply the map's size in tiles by 16)
- A calculator (optional, but recommended if you struggle with mental calculations or want a fail-safe)
---
First, it's important to take the size of the map into account, both in tiles and pixel size.
The map I am using as an example is 60x15 tiles or 960x240 pixels in size.
This means that the map does *not* scroll vertically, so only the horizontal coordinates for display are calculated in this example. The exact same principle works with vertical coordinate calculation too, except you have to use different offset values for vertical alignment of the picture. More on that later.
To start with, add these commands to the event where you need to use the Show Picture command:
The first Control Variables command is used to get the Player's X-coordinate as a variable value, though the value obtained is given to the variable in an amount of tiles due to the division by 16.
The second Control Variables command is added due to Pictures being displayed relative to the centre of the screen, not the top-left. This means that an offset value has to be put in to make sure the Picture isn't displayed more to the left than intended.
The centre of the screen is 10 tiles in horizontally, but since the left-most tile on the screen has an X-coordinate value of 0, 9 is the value that has to be put in rather than 10.
I've talked a lot about tile-based coordinates so far, but when displaying a Picture, pixel-based values are required instead! Since RPG Maker 2003 has tiles that are 16x16 pixels big, the third Control Variables command multiples the Player's X-coordinate value by 16 to get the correct player location value.
NOTE: The "comment" commands are used to help identify where the calculation and display section for your specific Picture are located. This is mainly for readability so you can easily find the section if you need to edit it later, though they are not necessary for your game to function correctly. *However*, readability is super important when you make events, as you might end up struggling to decipher what you were doing if you take a long break from working on your game! Comments are like reminder post-it notes or tabs in a paper files binder, so please use them!
---
Next, to make sure the Picture is displayed at the correct coordinates when the player is closer near the edge of the screen than usual (e.g. if they are near the edge of the map), add conditional branches to check if the player is near the edge of the map. Since it is easier to do this in tiles than in pixels, add this command *both* before the multiplication by 16 *and* before adding 9 as the offset value, like so:
For the left edge of the screen, the value for the X-calculation always needs to be *at least* 9, because the player is displayed at the coordinates (009,007) by default, unless they are at a map coordinate that's near the edge of the map. This minimum value never changes, because the X-coordinate is never below 0.
The right edge of the screen is a bit trickier, as the maximum possible X-coordinate varies per map. Because the coordinate of the left-most, top-most coordinate possible in a map is (000,000) rather than (001,001), 1 has to be subtracted from the horizontal amount of tiles in the map to get the value of 19 (which is where the player would be if they touch the right edge of the screen) and then another 10 to get the Picture to the centre-of-the-screen coordinate in tiles.
The example map is 60 tiles wide horizontally, so for this map the maximum value of the X-coordinate in tiles to use for our calculations is 49 (as 60 - 11 = 49). RPG Maker 2003 sadly has no way to put the current map's size in tiles into a variable, so it has to be manually put in here; in this case, 49 needs to be put in. (Don't forget to change the value of the second conditional branch if you end up resizing your map!)
---
Now there's a measure in place so the Picture doesn't end up showing in the wrong spot due to the player character not being right in the centre of the screen, the next step is getting the values needed for the Picture to show up correctly.
For this, the maximum positive coordinate value that the Picture would need to be displayed at is needed. This is the width of the Picture divided by 2. (Our example Picture is 960 pixels wide, so the value needed for this particular example scenario is 480.)
To do this, add two Control Variables commands. The first sets the *second* variable (this example uses variable 57 for this) to the width of the Picture, after which the second divides the value of the variable by 2.
---
Next up subtract the "Picture X calc" variable from the "Picture X-coord" variable. This will move the Picture horizontally to the desired spot.
---
We're almost there! Since this tutorial so far covers horizontal alignment of the Picture only,
we'll use a variable ("Picture Y-coord") for the Picture's Y-coordinate that's set to 120 only for now.
Then, add a Show Picture event command that uses the variables "Picture X-coord" and "Picture Y-coord" to display the Picture. Don't forget to tick "Scroll Picture With Map", otherwise it'll stay in place when the player walks around the map!
(For testing purposes it might be easiest to display it underneath the player first to see if it is in the right place, then change the Display Settings later if needed.)
---
And... that's it! If all is well, you now should have your Picture displayed at the right horizontal coordinates!
In order to make it work for vertical alignment too, 7 should be used both as a minimum value for the vertical coordinate and as the offset value to subtract from the "Picture Y Calc" variable, while a value of 8 should be subtracted from the map's height in tiles.
Since this tutorial is long enough already, I'm not going to provide a step-by-step implementation of the vertical alignment calculation process, but instead will simply provide the complete event commands batch that makes it work based on my example map:
This particular example has no vertical scrolling, so the "Picture Y calc" variable's value is always 7 (15 - 8 = 7, after all). If it did, though, the "Picture Y calc" variable would need different minimum and maximum values!
---
That about wraps it up! Your Picture should now show at the coordinates where you want it to go.
I hope this tutorial has been useful to you! Please leave a comment with constructive feedback if you see anything that could be improved or reworded for clarity, I'd really appreciate it!
Tutorial requirements:
- RPG Maker 2003 (this tutorial might work in other RPG Maker versions too, but you'd have to adapt some of the steps to correct for things such as different game resolutions or tile sizes)
- Basic knowledge about how variables and conditional branches work
- 2 variables per coordinate you want to calculate (so 2 for the X-coordinate, 2 for the Y-coordinate)
- A map that's bigger than 20x15 tiles/320x240 pixels and does NOT have any looping enabled (I'm sure you can make it work with looping maps too, but I haven't been able to figure out how to do it yet.)
- A map-sized Picture (multiply the map's size in tiles by 16)
- A calculator (optional, but recommended if you struggle with mental calculations or want a fail-safe)
---
First, it's important to take the size of the map into account, both in tiles and pixel size.
The map I am using as an example is 60x15 tiles or 960x240 pixels in size.
This means that the map does *not* scroll vertically, so only the horizontal coordinates for display are calculated in this example. The exact same principle works with vertical coordinate calculation too, except you have to use different offset values for vertical alignment of the picture. More on that later.
To start with, add these commands to the event where you need to use the Show Picture command:
@> Comment: ------------------------------------------------------------

@> Comment: Display scroll-with-map Picture

@> Comment: ------------------------------------------------------------

@> Control Variables: [0054:Picture X calc] = Player's X Coordinate

@> Control Variables: [0054:Picture X calc] -= 9

@> Control Variables: [0054:Picture X calc] *= 16

@> Comment: ------------------------------------------------------------
The first Control Variables command is used to get the Player's X-coordinate as a variable value, though the value obtained is given to the variable in an amount of tiles due to the division by 16.
The second Control Variables command is added due to Pictures being displayed relative to the centre of the screen, not the top-left. This means that an offset value has to be put in to make sure the Picture isn't displayed more to the left than intended.
The centre of the screen is 10 tiles in horizontally, but since the left-most tile on the screen has an X-coordinate value of 0, 9 is the value that has to be put in rather than 10.
I've talked a lot about tile-based coordinates so far, but when displaying a Picture, pixel-based values are required instead! Since RPG Maker 2003 has tiles that are 16x16 pixels big, the third Control Variables command multiples the Player's X-coordinate value by 16 to get the correct player location value.
NOTE: The "comment" commands are used to help identify where the calculation and display section for your specific Picture are located. This is mainly for readability so you can easily find the section if you need to edit it later, though they are not necessary for your game to function correctly. *However*, readability is super important when you make events, as you might end up struggling to decipher what you were doing if you take a long break from working on your game! Comments are like reminder post-it notes or tabs in a paper files binder, so please use them!
---
Next, to make sure the Picture is displayed at the correct coordinates when the player is closer near the edge of the screen than usual (e.g. if they are near the edge of the map), add conditional branches to check if the player is near the edge of the map. Since it is easier to do this in tiles than in pixels, add this command *both* before the multiplication by 16 *and* before adding 9 as the offset value, like so:
@> Comment: ------------------------------------------------------------

@> Comment: Display scroll-with-map Picture

@> Comment: ------------------------------------------------------------

@> Control Variables: [0054:Picture X calc] = Player's X Coordinate

@> Conditional Branch: Variable [0054:Picture X calc] < 9

  @> Comment: ------------------------------------------------------------

  @> Comment: Player enters map from the LEFT

  @> Comment: ------------------------------------------------------------

  @> Control Variables: [0054:Picture X calc] = 9

  @>

 : Branch End

@> Conditional Branch: Variable [0054:Picture X calc] > 49

  @> Comment: ------------------------------------------------------------

  @> Comment: Player enters map from the RIGHT

  @> Comment: ------------------------------------------------------------

  @> Control Variables: [0054:Picture X calc] = 49

  @>

 : Branch End

@> Control Variables: [0054:Picture X calc] -= 9

@> Control Variables: [0054:Picture X calc] *= 16

@> Comment: ------------------------------------------------------------
For the left edge of the screen, the value for the X-calculation always needs to be *at least* 9, because the player is displayed at the coordinates (009,007) by default, unless they are at a map coordinate that's near the edge of the map. This minimum value never changes, because the X-coordinate is never below 0.
The right edge of the screen is a bit trickier, as the maximum possible X-coordinate varies per map. Because the coordinate of the left-most, top-most coordinate possible in a map is (000,000) rather than (001,001), 1 has to be subtracted from the horizontal amount of tiles in the map to get the value of 19 (which is where the player would be if they touch the right edge of the screen) and then another 10 to get the Picture to the centre-of-the-screen coordinate in tiles.
The example map is 60 tiles wide horizontally, so for this map the maximum value of the X-coordinate in tiles to use for our calculations is 49 (as 60 - 11 = 49). RPG Maker 2003 sadly has no way to put the current map's size in tiles into a variable, so it has to be manually put in here; in this case, 49 needs to be put in. (Don't forget to change the value of the second conditional branch if you end up resizing your map!)
---
Now there's a measure in place so the Picture doesn't end up showing in the wrong spot due to the player character not being right in the centre of the screen, the next step is getting the values needed for the Picture to show up correctly.
For this, the maximum positive coordinate value that the Picture would need to be displayed at is needed. This is the width of the Picture divided by 2. (Our example Picture is 960 pixels wide, so the value needed for this particular example scenario is 480.)
To do this, add two Control Variables commands. The first sets the *second* variable (this example uses variable 57 for this) to the width of the Picture, after which the second divides the value of the variable by 2.
@> Comment: ------------------------------------------------------------

@> Comment: Display scroll-with-map Picture

@> Comment: ------------------------------------------------------------

@> Control Variables: [0054:Picture X calc] = Player's X Coordinate

@> Conditional Branch: Variable [0054:Picture X calc] < 9

  @> Comment: ------------------------------------------------------------

  @> Comment: Player enters map from the LEFT

  @> Comment: ------------------------------------------------------------

  @> Control Variables: [0054:Picture X calc] = 9

  @>

 : Branch End

@> Conditional Branch: Variable [0054:Picture X calc] > 49

  @> Comment: ------------------------------------------------------------

  @> Comment: Player enters map from the RIGHT

  @> Comment: ------------------------------------------------------------

  @> Control Variables: [0054:Picture X calc] = 49

  @>

 : Branch End

@> Control Variables: [0054:Picture X calc] -= 9

@> Control Variables: [0054:Picture X calc] *= 16

@> Control Variables: [0057:Picture X-coord] = 960

@> Control Variables: [0057:Picture X-coord] /= 2

@> Comment: ------------------------------------------------------------
---
Next up subtract the "Picture X calc" variable from the "Picture X-coord" variable. This will move the Picture horizontally to the desired spot.
@> Comment: ------------------------------------------------------------

@> Comment: Display scroll-with-map Picture

@> Comment: ------------------------------------------------------------

@> Control Variables: [0054:Picture X calc] = Player's X Coordinate

@> Conditional Branch: Variable [0054:Picture X calc] < 9

  @> Comment: ------------------------------------------------------------

  @> Comment: Player enters map from the LEFT

  @> Comment: ------------------------------------------------------------

  @> Control Variables: [0054:Picture X calc] = 9

  @>

 : Branch End

@> Conditional Branch: Variable [0054:Picture X calc] > 49

  @> Comment: ------------------------------------------------------------

  @> Comment: Player enters map from the RIGHT

  @> Comment: ------------------------------------------------------------

  @> Control Variables: [0054:Picture X calc] = 49

  @>

 : Branch End

@> Control Variables: [0054:Picture X calc] -= 9

@> Control Variables: [0054:Picture X calc] *= 16

@> Control Variables: [0057:Picture X-coord] = 960

@> Control Variables: [0057:Picture X-coord] /= 2

@> Control Variables: [0057:Picture X-coord] -= Variable [0054]
---
We're almost there! Since this tutorial so far covers horizontal alignment of the Picture only,
we'll use a variable ("Picture Y-coord") for the Picture's Y-coordinate that's set to 120 only for now.
Then, add a Show Picture event command that uses the variables "Picture X-coord" and "Picture Y-coord" to display the Picture. Don't forget to tick "Scroll Picture With Map", otherwise it'll stay in place when the player walks around the map!
(For testing purposes it might be easiest to display it underneath the player first to see if it is in the right place, then change the Display Settings later if needed.)
@> Comment: ------------------------------------------------------------

@> Comment: Display scroll-with-map Picture

@> Comment: ------------------------------------------------------------

@> Control Variables: [0054:Picture X calc] = Player's X Coordinate

@> Conditional Branch: Variable [0054:Picture X calc] < 9

  @> Comment: ------------------------------------------------------------

  @> Comment: Player enters map from the LEFT

  @> Comment: ------------------------------------------------------------

  @> Control Variables: [0054:Picture X calc] = 9

  @>

 : Branch End

@> Conditional Branch: Variable [0054:Picture X calc] > 49

  @> Comment: ------------------------------------------------------------

  @> Comment: Player enters map from the RIGHT

  @> Comment: ------------------------------------------------------------

  @> Control Variables: [0054:Picture X calc] = 49

  @>

 : Branch End

@> Control Variables: [0054:Picture X calc] -= 9

@> Control Variables: [0054:Picture X calc] *= 16

@> Control Variables: [0057:Picture X-coord] = 960

@> Control Variables: [0057:Picture X-coord] /= 2

@> Control Variables: [0057:Picture X-coord] -= Variable [0054]

@> Control Variables: [0058:Picture Y-coord] = 120

@> Show Picture: 1, 'example-picture', Variable [0057][0058], 100%, 0%, M1

@> Comment: ------------------------------------------------------------
---
And... that's it! If all is well, you now should have your Picture displayed at the right horizontal coordinates!
In order to make it work for vertical alignment too, 7 should be used both as a minimum value for the vertical coordinate and as the offset value to subtract from the "Picture Y Calc" variable, while a value of 8 should be subtracted from the map's height in tiles.
Since this tutorial is long enough already, I'm not going to provide a step-by-step implementation of the vertical alignment calculation process, but instead will simply provide the complete event commands batch that makes it work based on my example map:
@> Comment: ------------------------------------------------------------

@> Comment: Display scroll-with-map Picture

@> Comment: ------------------------------------------------------------

@> Comment: - Calculate Picture X-coordinate

@> Comment: ------------------------------------------------------------

@> Control Variables: [0054:Picture X calc] = Player's X Coordinate

@> Conditional Branch: Variable [0054:Picture X calc] < 9

  @> Comment: ------------------------------------------------------------

  @> Comment: Player enters map from the LEFT

  @> Comment: ------------------------------------------------------------

  @> Control Variables: [0054:Picture X calc] = 9

  @>

 : Branch End

@> Conditional Branch: Variable [0054:Picture X calc] > 49

  @> Comment: ------------------------------------------------------------

  @> Comment: Player enters map from the RIGHT

  @> Comment: ------------------------------------------------------------

  @> Control Variables: [0054:Picture X calc] = 49

  @>

 : Branch End

@> Control Variables: [0054:Picture X calc] -= 9

@> Control Variables: [0054:Picture X calc] *= 16

@> Control Variables: [0057:Picture X-coord] = 960

@> Control Variables: [0057:Picture X-coord] /= 2

@> Control Variables: [0057:Picture X-coord] -= Variable [0054]

@> Comment: ------------------------------------------------------------

@> Comment: - Calculate Picture Y-coordinate

@> Comment: ------------------------------------------------------------

@> Control Variables: [0055:Picture Y calc] = Player's Y Coordinate

@> Conditional Branch: Variable [0055:Picture Y calc] < 7

  @> Comment: ------------------------------------------------------------

  @> Comment: Player enters map from the TOP

  @> Comment: ------------------------------------------------------------

  @> Control Variables: [0055:Picture Y calc] = 7

  @>

 : Branch End

@> Conditional Branch: Variable [0055:Picture Y calc] > 7

  @> Comment: ------------------------------------------------------------

  @> Comment: Player enters map from the BOTTOM

  @> Comment: ------------------------------------------------------------

  @> Control Variables: [0055:Picture Y calc] = 7

  @>

 : Branch End

@> Control Variables: [0055:Picture Y calc] -= 7

@> Control Variables: [0055:Picture Y calc] *= 16

@> Control Variables: [0058:Picture Y-coord] = 240

@> Control Variables: [0058:Picture Y-coord] /= 2

@> Control Variables: [0058:Picture Y-coord] -= Variable [0055]

@> Show Picture: 1, 'example-picture', Variable [0057][0058], 100%, 0%, M1

@> Comment: ------------------------------------------------------------
This particular example has no vertical scrolling, so the "Picture Y calc" variable's value is always 7 (15 - 8 = 7, after all). If it did, though, the "Picture Y calc" variable would need different minimum and maximum values!
---
That about wraps it up! Your Picture should now show at the coordinates where you want it to go.
I hope this tutorial has been useful to you! Please leave a comment with constructive feedback if you see anything that could be improved or reworded for clarity, I'd really appreciate it!
Posts 

Pages:
1

Cesarp and more people found a way to fix pictures and it's very easy.
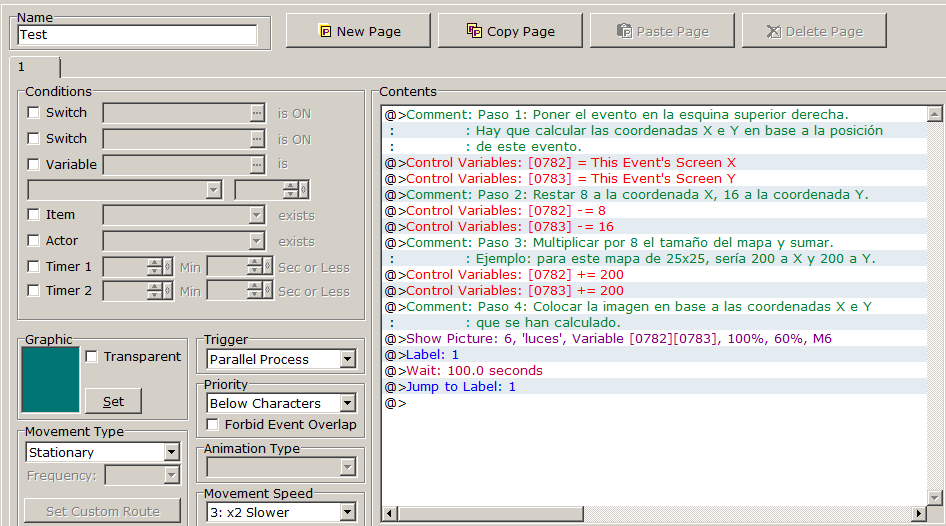
1 Put event in upper-left corner.
2 Check the x y resolution of picture, use this value each and multiply by 8.
3 The event make all and the picture is fixed for make shadows or anything
Sample:
https://app.box.com/s/blh3sngqzsgytrmd1tcxdpugyen33jpt
Its in spanish but only change after 3 info, variable x and y values. X8 of the px image
author=gadesx
Cesarp and more people found a way to fix pictures and it's very easy.
Why not use the "Scroll Picture with Map" option in the Show Picture command instead?

Pages:
1

