


RPGMAKER 2003, A BEGINNER'S GUIDE, PART ONE: STARTING A PROJECT!
Tutorial on Basics
 AznChipmunk
- 07/30/2010 12:28 AM
- 58963 views
Hello there! So you've picked up a copy of RPGMaker 2003, maybe played a few games, and now you're ready to start making your own game! And you've maybe opened up the editor a bit, poked around, and wondered one thing: how exactly do I use this program?
Well, I'm here to lead you around the basics of just that. It's easy, really, once you get the hang of it.
So let's get started shall we? First, I'd like to establish a few things you need to know before getting a bit more serious with the program.
1. Time. Game making is a time consuming process. It takes people many months to complete their projects'usually at least a year. Don't expect to be able to finish creating a good game within a few weeks'in fact, many experienced users of the program never finish their projects. Strive to finish what you start and you may create something awesome.
2. Effort. Game making takes effort and practice to develop good design skills.
3. Failure. Your first project will not be liked by other people, besides people you know. More than likely, your first few projects will be utter failures. However, if you want to produce something awesome, don't let that get you down'your failures are just your stepping stones.
4. Creativity. Game making really, is an art form, no matter what people say. You can argue that games aren't art or not, but it is undeniable that more or less everything that goes into a game is an art form: from music, directing, writing, character design, graphics, etc. This all takes what they call 'creative juices.' If you don't produce something original within your work, your game will probably be overlooked! So get those creative juices flowing!
These principles are pretty obvious really, but if you've never made a game before, keep them in mind.
Anyways, this next step is something you'll only have to do once, unless you switch to another computer.
Take a look at this:

Those are font samples from 3 differing games. Now, only one of those 3 games has a font that is easily legible and pleasing to the eyes. Which one is it?
That's right, it's B! (Well, I hope you got that anyways.) Font sample B is the only one where the letters are smoothly and evenly spaced out. If you look at samples A and C, you can see awkward spacing between letters in words like 'tutorial,' 'system,' 'fight,' and 'blessing.' So how do you fix this? Simply download and install this:
http://rpgmaker.net/users/AznChipmunk/locker/fontpatch.exe
You'll probably have to restart your computer after installation.
So now we've got all that stuff out of the way, it's time to open up the editor! So do just that.
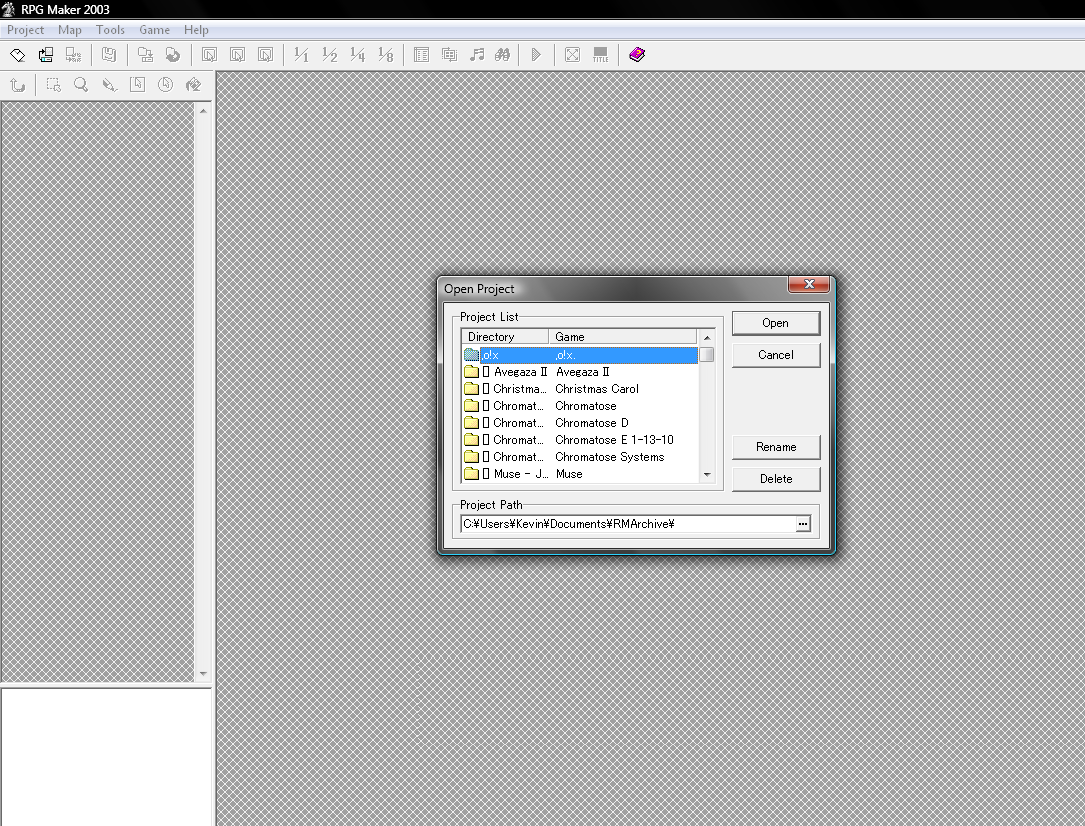
You'll see a screen that more or less resembles this. In the middle you can see a list of games that are in the specified directory, and you shouldn't have any of the same text as me there. Don't worry about that. If you don't see a box in the middle, don't worry either!
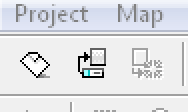
In the upper left-hand corner of the screen are these screen icons. From left to right they are:
1. New Project
2. Open Project
3. Close Project (it is grayed out right now)
If you didn't see a box of games in the middle, you can go ahead and make it show up by clicking the obvious: open project. If close project is the only one that you CAN click on, go ahead and click it. Anyways, we're going to want to go ahead and have the open project box open. On the bottom, you can see where it says 'Project Path.' Click the button at the right end and specific a folder. (You might already have it set to a folder of games, if you do, that's okay to just leave it there.) Wherever you specify it to, that's where all your game project files will be saved, so make sure it's an easily accessible folder! You'll be working in there a lot eventually.
After that, go ahead and hit cancel, then press the 'New Project' button. Time to finally get started!
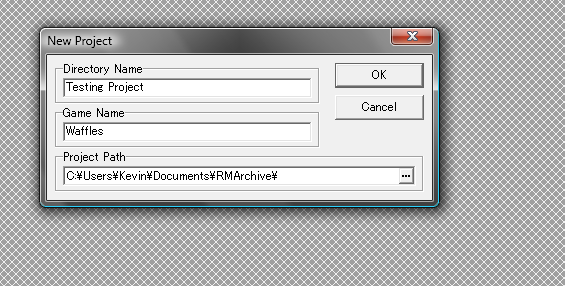
Go ahead and put whatever you want in both fields. The project path should already be the same as the one you previously specified. Generally, you probably want to put the same title in both fields, like 'Testing Project #1' or something, but it doesn't matter a difference. The first field is the name of the folder within your set path that all your files will go into, and the second one is the actual name of your game. Hit OK afterwards. You'll see something like this. (Except without the big red numbers I drew everywhere.)
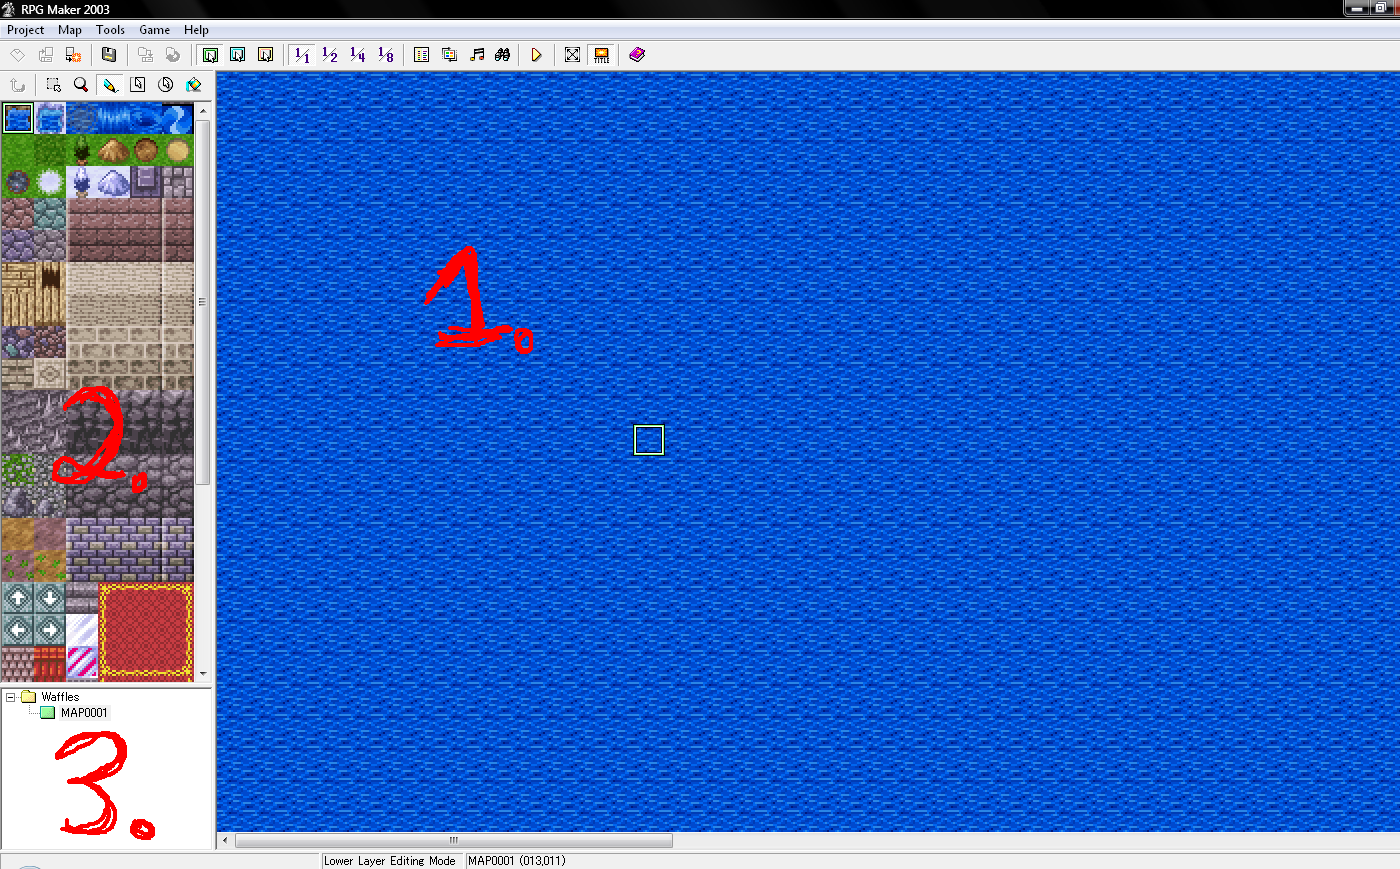
Anyways, at this point, now you can hit the close project button in the upper left hand corner, and then use the open project to find your project again whenever you want to work on it! (It will be organized according to what you put in the fields earlier, which can be adjusted with the rename button.)
So, now we're actually in the editor for your own project. I've numbered 3 important areas for now. They are:
1. The Map Area
2. The Tile Area
3. The Map Tree
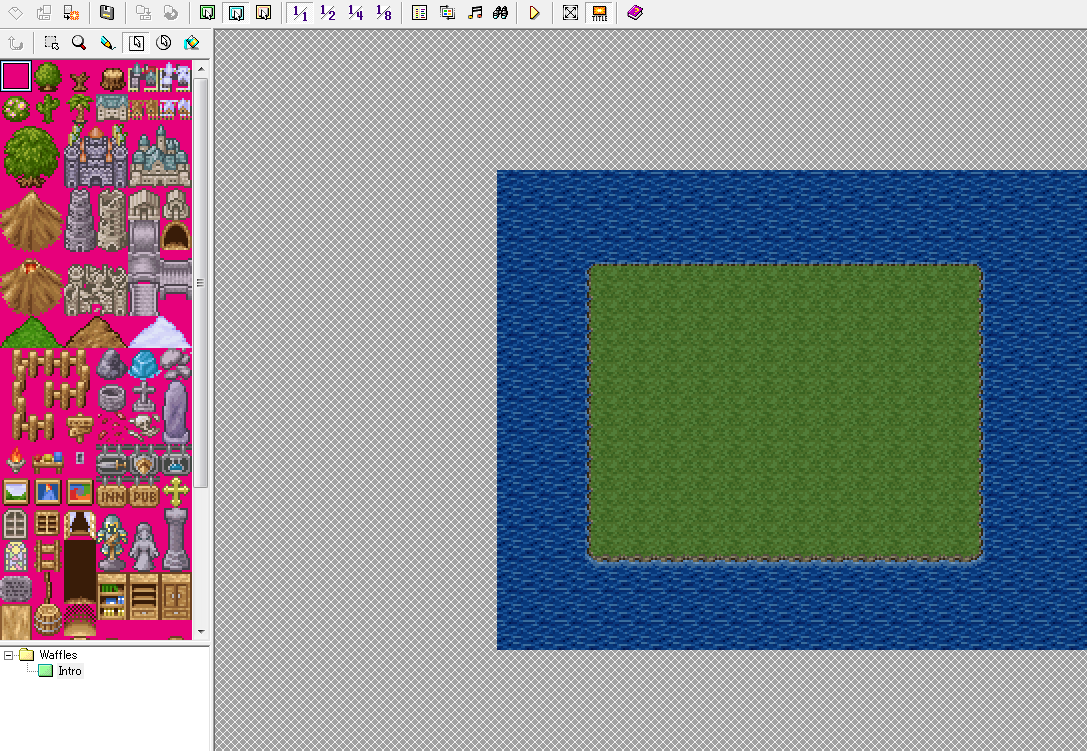
Area 1, the Map Area, is where you actually draw all the tiles that your game shows. Area 2, is where you can select a tile to draw with. Go ahead, click any tile in area 2 (except the water tile since the map already is that water tile) and drag your mouse around in area 1. You'll draw a random line of whatever you picked. It's pretty easy to use.
Area 3 is the Map Tree. This is where you'll go to if you want to make more maps, organize them, change their properties, etc. You can see the map we're on right now is called 'MAP0001.' So how about we change that? Right click on 'MAP0001' and click 'Map Properties.' You'll see this:
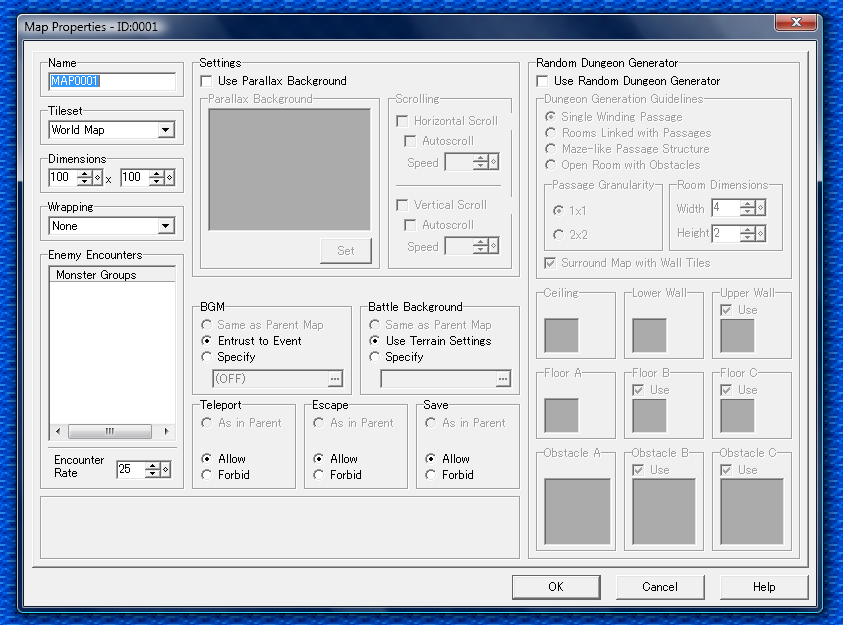
So, let's rename the map to something else, Hmm. What does a game start with? That's right, games start with an intro. (Actually they start with the title screen but that goes elsewhere.) So go ahead and type in 'Intro' in the 'Name' field. Then, look down at the dimensions box. You'll see 100 x 100, which is what basic new projects start off with. This just means the map is 100 tiles wide by 100 tiles high. The smallest you can set it as is 20 x 15 and the largest is 500 x 500. However, you rarely ever use such massive maps'I generally like to keep my maps within 30 x 30, and use 20 x 15 whenever possible. So let's go ahead and set it to 20 x 15 for now. Then go ahead and hit OK. Things will now look a little bit more like this:
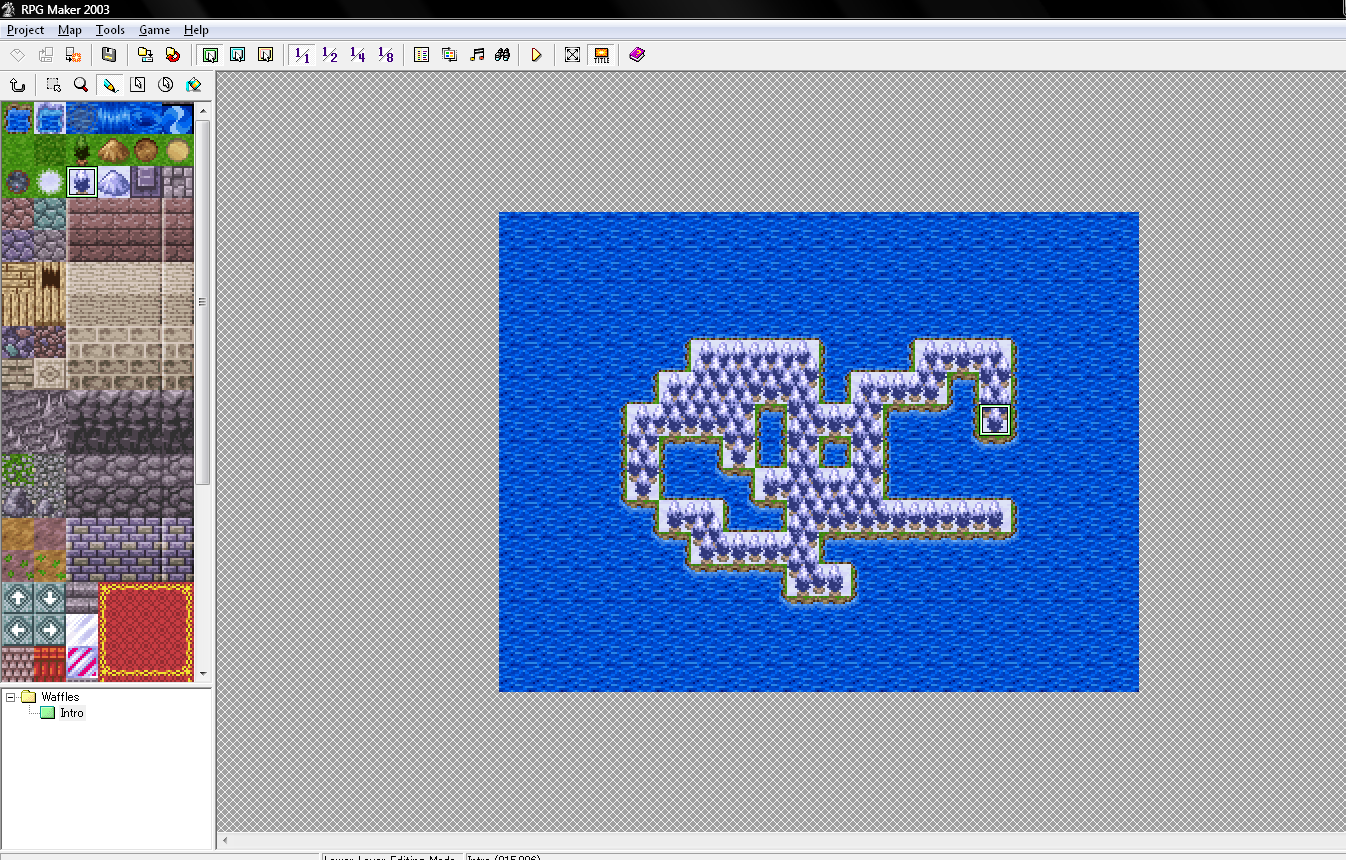
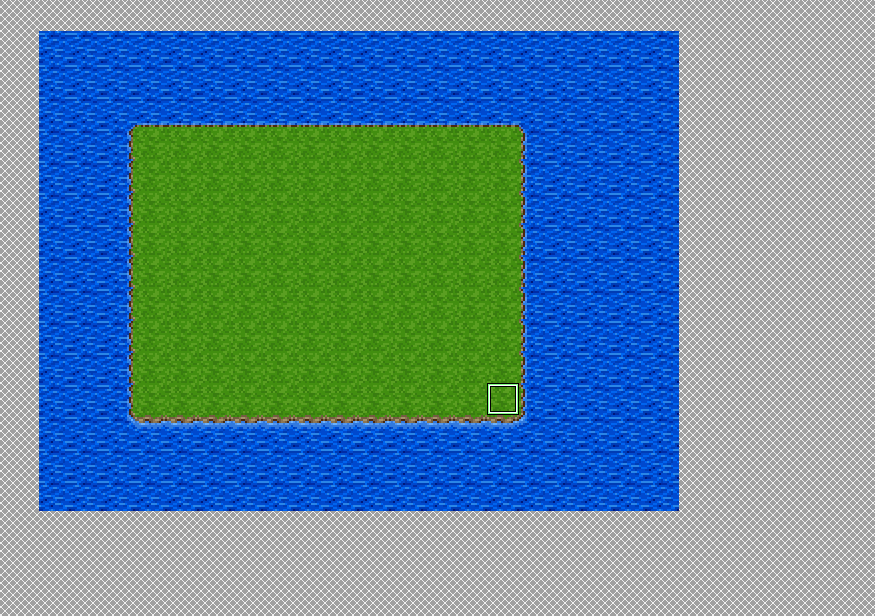
The map is a lot smaller, but that's okay, we cropped it like that on purpose. Now, in order to make more stuff, let's take a look at some of the other buttons:
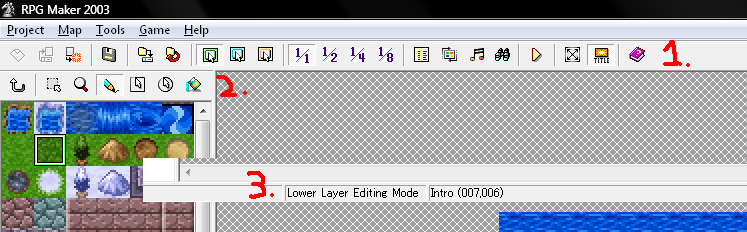
Row 1 is at the very top, Row 2 is slightly below it, and the thing with the number 3 is at the bottom of the screen.
I'll explain the usage of each button in a moment, but let's go over 3 first. You can see 'Lower Layer Editing Mode' ' that's where you were just drawing. The lowest layer is the bottom layer, obviously. This includes stuff like water, ground, grass. Then, there's the upper layer, which we will get to in a moment. That layer includes stuff like trees, bushes, fences, etc. Then, there's the most complex layer, the event layer. I'll get into that in detail later, but you should know that the event layer is the most important.
On the right of that, you can see Intro (007, 006). 'Intro' is simply the name of the map and the numbers simply designated what tile your cursor is currently on. It's kind of like one of those coordinate planes, or graphs, or whatever that you learned sometime in school hopefully,
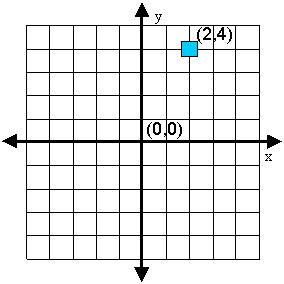
Kinda like this, except that (0, 0) is in the upper left. If you move your mouse around, it will track the tile you are on.
In Row 2 (I know I'm going backwards =P), from left to right, you have:
Undo, the selector, magnifying glass, pencil, rectangle tool, ellipse tool, and paint tool. These are all part of the tile editor. For example you can take the rectangle tool, select the grass tile and draw a rectangle of grass, or use the ellipse tool to draw the ellipse, Play around with it, it's easy to use. The selector tool (arrow pointing to a dotted-line box) allows you to drag and select an area on the map and then do things like copy and paste using your right click. Also, the selector tool selects both lower AND upper layer tiles ' we'll get to that momentarily.

So, finally, Row 1, with a ton of buttons.
I've already gone over the first 3, the new/open/close project buttons. The floppy disk button allows you to package your game to send around, but you should never actually use it. There are more convenient methods, but I'll get to that at a later time. After that are save and revert. Save simply saves, revert undoes all changes since the last save (excluding database changes'we'll get to that later too). You'll notice that if you try to close the program or anything, it'll automatically ask you to save, which is handy'but always remember to save your work, or you might lose it!
The three buttons after that are the lower layer, upper layer, and event editing buttons. You click those to switch between the three. After that, the fraction buttons are simply buttons that change the magnification, 1/1 being closest, 1/8 being furthest. Then there's the database button, the import button, the music button, and the search button. I'll get more into what the database and import do later. You can use the music button to listen to music that is in the project folder'although it doesn't put it in the game, it just lets you listen.
You currently shouldn't have any music files except for the RTP music files'RTP, for 'Run Time Package' is basically the set of default resources you can use. (Hopefully you DO have it installed prior to reading this tutorial!) It includes music, graphics, sound effects, etc. Most people actually look down on using the RTP, but it's excellent for beginners to play around with. Anyways, whether or not you choose to listen to some of the music, continuing on!
The search button lets you search through events'I rarely ever use it and you shouldn't worry about that right now. On the right of that is the yellow arrow button. This is the playtest button. Basically it lets you play your game, with a few added functions for testing. You'll notice if you click it that the editor will ask you to save (unless you already clicked the save button.) Whenever you playtest, you must save first, and it will prompt you to do so. On the right of that are the full screen and title screen buttons. These are simply up to you. The title screen button will stop the title screen image from appearing (merely text will show) and I've never seen any reason to turn it off. Windowed mode can be useful sometimes though'that's a personal preference. On the right edge is the help file. It's never worked for me so I can't say much about it!
So, now let's go back and go over some of the stuff I glossed over. Go back to the 3 layer buttons. You'll see right now you should be on the green box for the lowest level. So, let's draw something on the lowest level, shall we? A rectangular grassy island.
Now, go ahead and click the button with the blue box for the upper layer. Things should look a little different now!
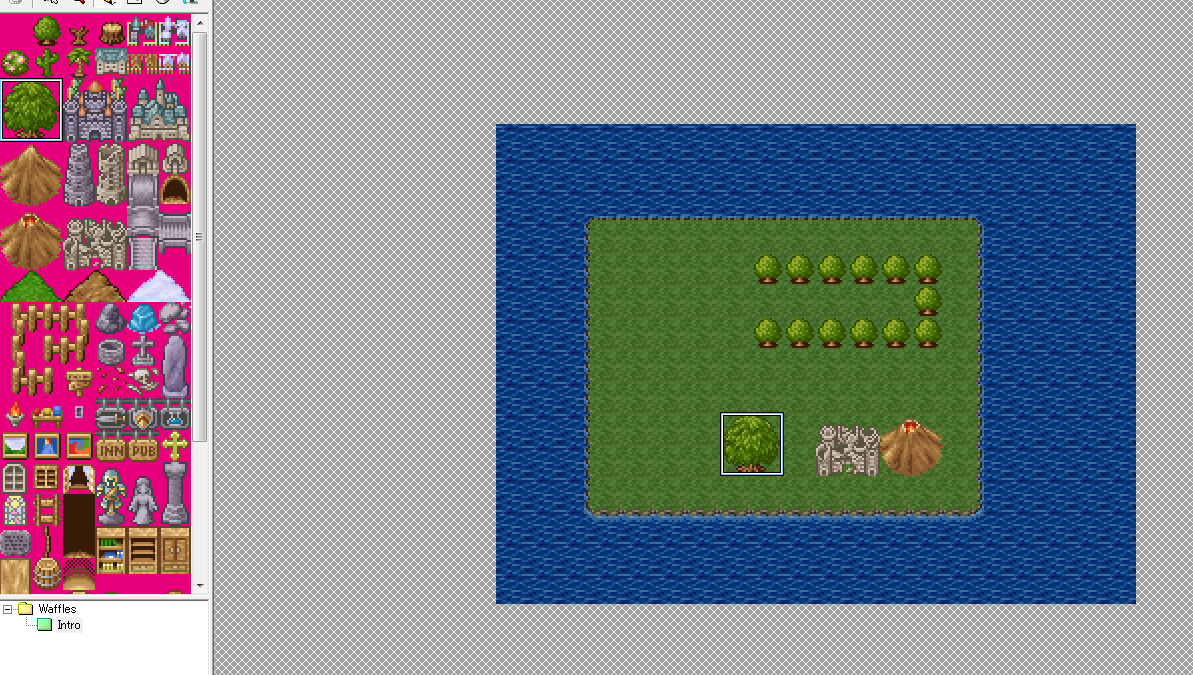
You should first notice that your tile area on the left looks completely different! And there's a lot of pink! But don't worry. In the actual map area, you'll see what you drew before got a little darker'that's because what you drew before was on the lower layer and isn't in focus anymore. So, go back to the tile choosing area and select the pencil tool. Let's go ahead and draw some trees. But wait, what about the pink stuff? Don't worry, the pink will come out all transparent. So let's draw a little bit. Put down a few small trees, maybe a big tree, volcano, and ruined castle or something. Don't draw too much, just keep it very simple. By the way, you'll see there are some objects like the volcano that isn't a single tile. It's 4 tiles, and you can drag around all 4 tiles to draw all 4 tiles at once'instead of having to click each tile and go back and forth several times. To erase, simply select the upper left tile (the all pink one) to draw transparency everywhere. Anyways, now you should have something like this.
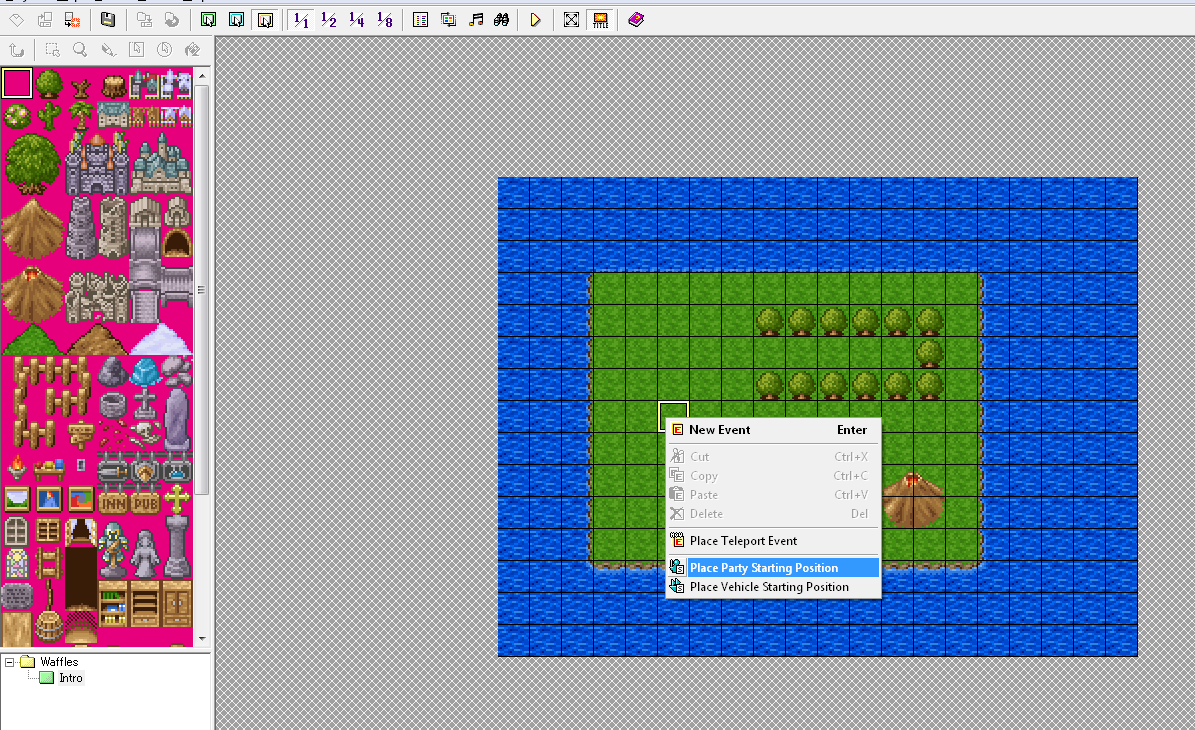
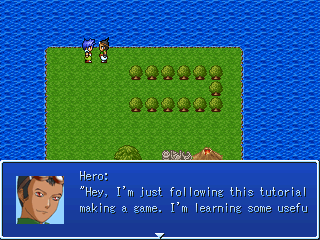
So now we have our map. It's quite a boring map, but it's just for testing so don't worry, but it's missing something. The hero! So go back to those 3 layer changing buttons and click the final one: the event editing button. A grid will appear on your map, and no tiles will be dark anymore. (By the way, if you were to switch to the lower level again, you'd notice your upper layer tiles were darkened automatically.) You'll also notice that on the left, all the upper level tiles stayed there. You'll also notice that if you select them, you can't drag your mouse around and draw! Well, things are a little different on this layer. The first thing you want to do is this: right click anywhere on the map that isn't water or an upper layer tile and select 'Place Party Starting Position.' This means, that after the title screen, this will be the first map to show. If you don't set the party starting position, you'll get an error when you try to run the game.
So, now that we've set it, let's do just that! Go ahead and click the yellow test play button! (You can also use F9 as a hotkey.) The game will start! (Use F4 to toggle fullscreen ingame. You can also use F5 to toggle resolution when in windowed mode.)
If you haven't played around yet, your basic controls are:
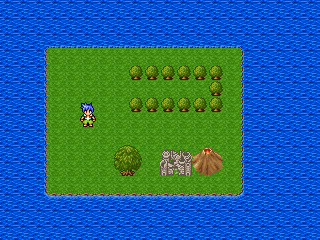
Arrow keys to move and select things, 'Z' as a decision key, and 'X' as a cancel key. There are other buttons you can use, like spacebar and such. Anyways, pick 'New Game' and you should get something like this, if you set the party starting position. If you didn't set it, you will get an error now.) Anyways, use the arrow keys to move the blue-haired dude around and use the cancel key to call up a menu. You can't really do much yet, so you'll want to quit. You can either quit through the menu, or press alt+F4. Pressing F12 will also return you to the title screen quickly (it's basically like resetting your game and it's very handy.) Either way, quit out.
So, obviously not much happened yet. All you can do is control some guy walking around a simple map, So, how about, let's give him someone to talk to?
Make sure you're on the event layer, and select the transparent pink tile in the upper left. Now, double click anywhere on the map (well at least, on a walkable area.) The event editor will pop up.
WHOA THIS IS SUPER COMPLICATED NOW! Well, what looks like a bunch of stuff popped up, but relax, it's nothing much. Anyways, take a look around what you've got.
This whole thing is an event. Events are pretty much everything in the game. For example, think about your own life. What events are in your life? Graduation, movies, whatever. Those could all be called 'events.' But think about it in a broader sense. Talking to anyone, doing pretty much anything, that could all be an event! So events are more or less the way you actually do stuff in the game.
So first, let's make an event of a guy you can talk to.
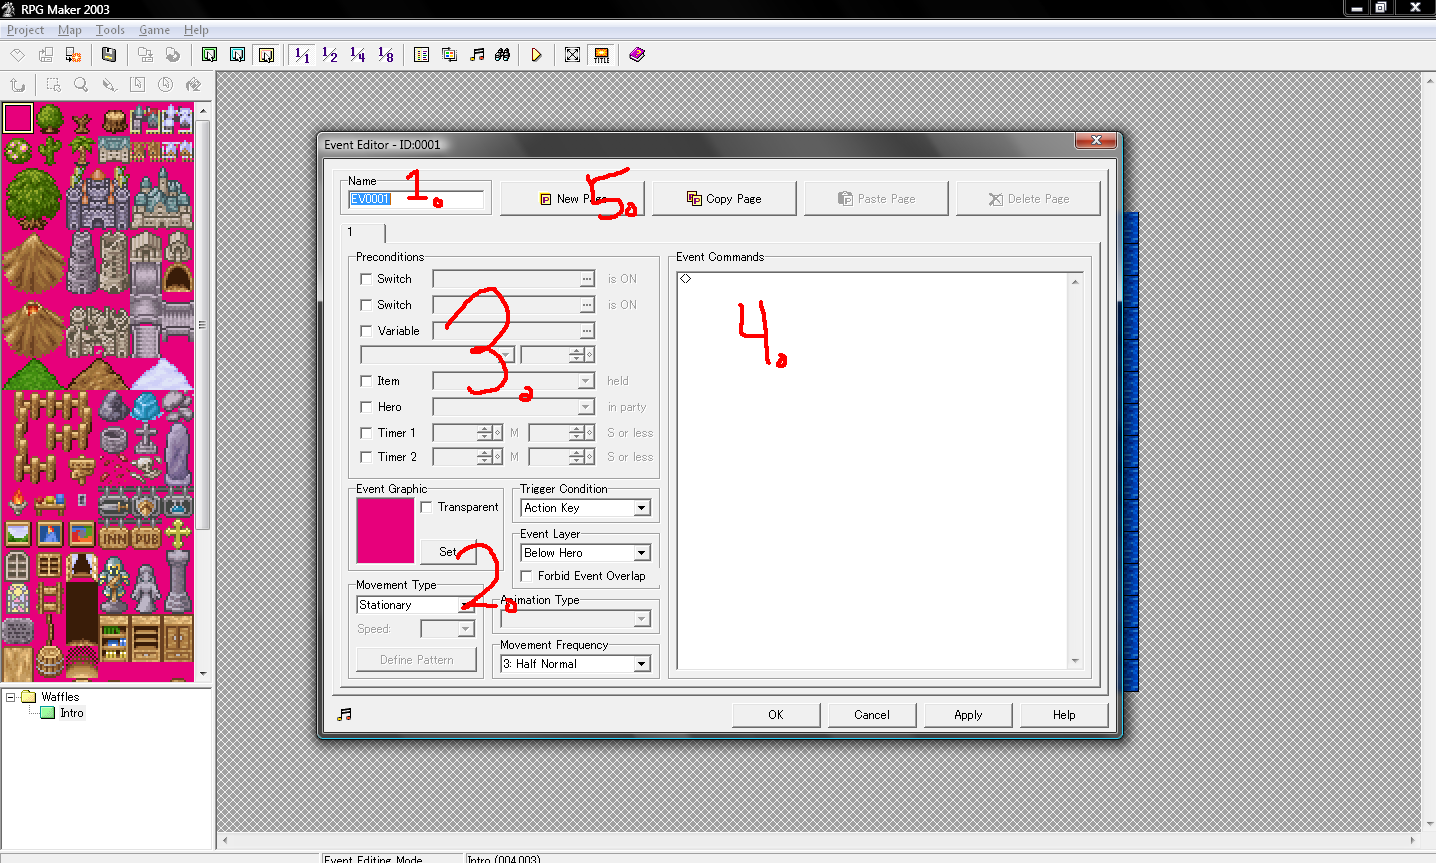
Area 1 is the event name. This doesn't actually matter and is only for organizational purposes. For example, you can name it 'Dude' and it will never show up ingame'it will only be shown in the editor. So you can leave it as 'EV0001', but I'm going to go ahead and rename it 'Dude.'
Anyways, go ahead and look at Area 2. This is where you pick the graphic for the event. The graphic box should be a pink rectangle right now, unless you had something selected in the tile box. Selecting something there is simply a way of setting a graphic for your events, but I never use it, so you should pretty much always set your events to the transparent pink box in the tile area. Anyways, hit 'Set' next to the pink box.
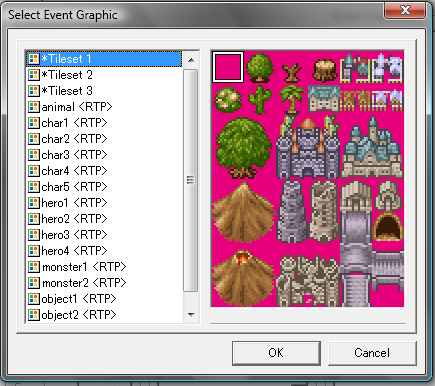
You'll see this. This is where you can scroll around and pick your event graphic. (You don't have to pick a graphic by the way.) On the left, the first three options are all '*Tileset' followed by a number'this is if you want your event graphic to be a graphic from the upper layer tiles, which you could have set already by picking something from the tile selection area. Anyways, scroll the cursor down past the *Tileset options and you'll start seeing animals and humans and whatnot. All the graphics should be marked, once again, with <RTP> meaning they are part of the default resources. Anyways, go ahead and pick anything. I went ahead and picked the guy third from the upper left on the 'hero2' graphics. The guy with the green shirt, pointed hair, and goggles. To specifically pick a graphic out of the set, simply double click on it. You can also set which direction they face: up, left, right, or down. You can pick any of those that you wish. You can also set the frame option but you should leave that alone for now. (Although you can click the options to see what it does'it animates the character.)
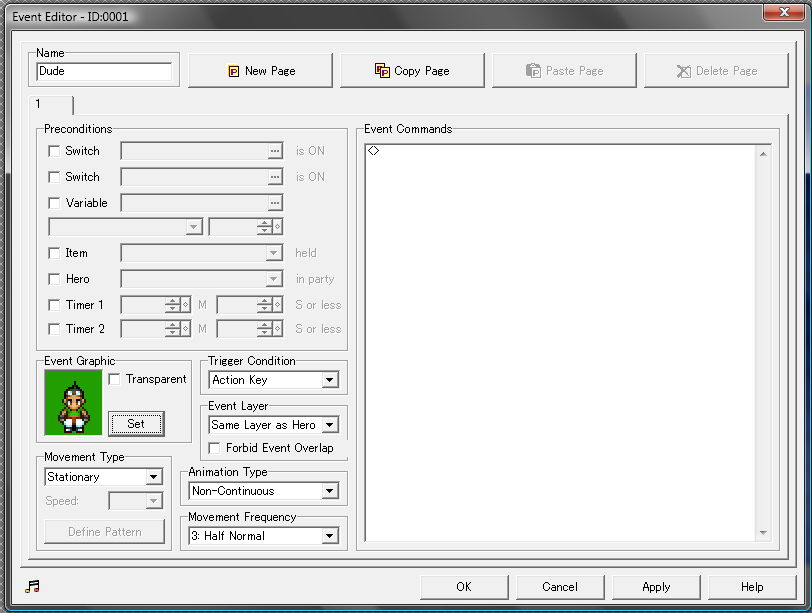
After hitting OK, your event editor now looks like this. You'll notice that to the right of the graphic box, the option for 'Event Layer' automatically changed from 'Below Hero' to 'Same Layer as Hero.' What times means is that it automatically detected the graphic you chose was not transparent. You'll also notice that the background color of the graphic was not pink, but green'so green was the transparent color for that specific graphic. (If you check the box that actually says transparent, the actual graphic will be see-through-ish, kind of like a ghost.) Anyways, 'Same Layer as Hero' means that your character will not be able to walk through the guy. If you set him to 'Below Hero' your hero will walk on top of him and if you set him to 'Above Hero' your hero will walk under him. Don't check the 'Forbid Event Overlap' box and leave the Trigger Condition as Action Key. Now, down below that, there are three options: 'Movement Type,' 'Animation Type,' and 'Movement Frequency.'
So let's get indepth with those a bit. If you left 'Movement Type' as stationary, the guy would simply stand still. The other options below more or less do the same thing, and the 'Custom Pattern' lets you choose a specific pattern for him to walk around. If you choose something like 'Random,' you'll see beneath that the Speed option is now available. Setting it to 8 means he will smoothly and continuously walk around randomly. If you set it to a lower value, it means he will pause between each step for a moment, and the lower the value, the longer that moment. Setting it to 8 would make him kind of hard to talk to though, because he would be in constant motion! So let's set him to something like 'Random' at speed 5.
If you were to test play now, you'd see a guy walking around randomly at whatever speed you set him to, although you cannot yet interact with him.
Next, is 'Animation Type.' If you want a guy just walking around, you're going to want to set him to 'Non-Continuous.' You can scroll through the rest of the options to see what they do. Fixed Dir (Direction) means that he will always face the way you set him to previously. Otherwise, when you talk to him, he will automatically face you. Setting him to Continuous means he will constantly animate by the frames he has (you could see those frames in the graphic chooser.) Fixed Graphic means that the graphic you chose will not change at all. Spin around makes him spin around.
Below that is 'Movement Frequency.' This is simply how fast they move around the tiles. '3: Half Normal' is an appropriate speed because your hero moves at speed 4, meaning that this NPC will move slightly slower. If the NPC were to move just as faster or faster, it would be annoying to try to talk to the NPC. Setting it to even slower is your choice.
That's the gist of those graphical options. To give some examples,
If you were to set the guy at a 'Stationary' Movement Type, you could also set a 'Spin Around' Animation Type to make him spin around in a single spot. Or you could set 'Random' Movement to make him spin around while also moving around the map randomly. Or you could set him to 'Stationary' and then 'Continuous' to make him move his feet while staying in one spot. (This could be an animation for say, something playing a piano.) To give an example of 'Fixed Graphic,' you could set him to 'Vertical' and 'Fixed Graphic.' He will move and down without animating, as if he were sliding on ice. Go ahead and play around with it. That's the best way to get the hang of it.
Now, let's get to the important part! Actually making him talk! That's where the area I labeled as '4' comes in! The big white, blank area. That's where all the 'commands' go. To explain, go ahead and double click in there. You'll get this box:
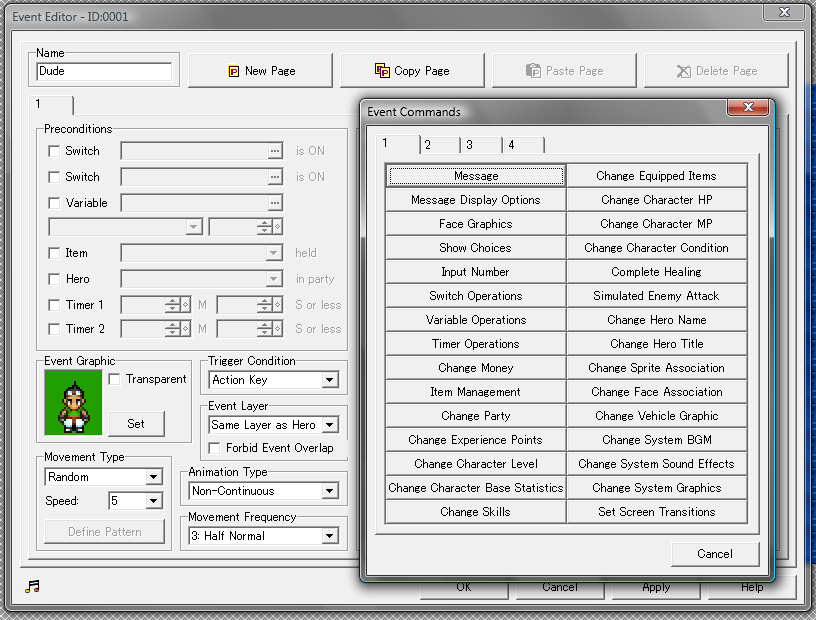
So, what does this do exactly? These are your options for interacting with the event. Remember earlier there was the 'Trigger Condition?' Well, that was set to 'Action Key.' Meaning that when you press the 'Action Key' with this event, the 'commands' you put in the white box will happen. The other Trigger Conditions include 'Touched by Hero,' 'Collision with Hero,' 'Auto-start,' and 'Parallel Process.' Auto-start and Parallel process are a bit more complicated than the others so don't worry about those right now. 'Touched by Hero' means if the player touches the event, while 'Collision with Hero' is if the event touches the player. (You usually won't use Collision with Hero.) The 'Event Layer' option makes a different here too. It works like this:
If the event layer is 'Below Hero':
-The player has to actually stand on TOP of the event for the event commands to happen. So if it's 'Action Key' the player must stand on the event and press a button while if it's 'Touched by Hero' the player must just step on it.
If the event layer is 'Same Layer as Hero':
-The player has to be next to the event as well as facing it, as the player cannot be on top of the event. So if it's 'Action Key,' the player has to face the guy and press the decision key to talk to him. (This is what we want, although it's already been set to this.) If it's 'Touched by Hero' the player has to walk up to the event and face it and the event commands will happen.
Anyways, hopefully that is cleared up a bit. So let's put some basic commands in! Double click in the command area again. There is a wide variety of commands here, and you can use any of them. I won't go through the use of ALL of them, since some of them aren't too useful, but I'll go through a few of them. Right now though, all you need to do is click the 'Message' command. Another box will pop up. Here is where you can type the text that will appear. Like so:
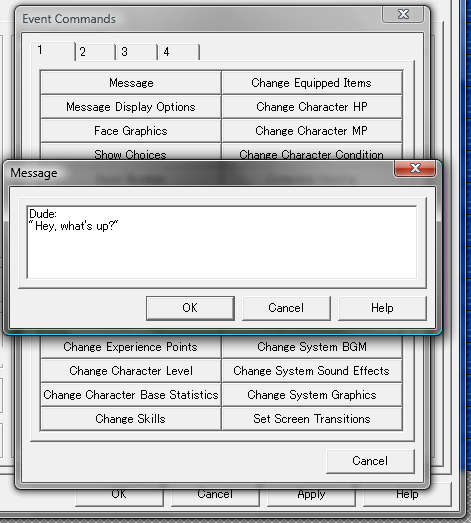
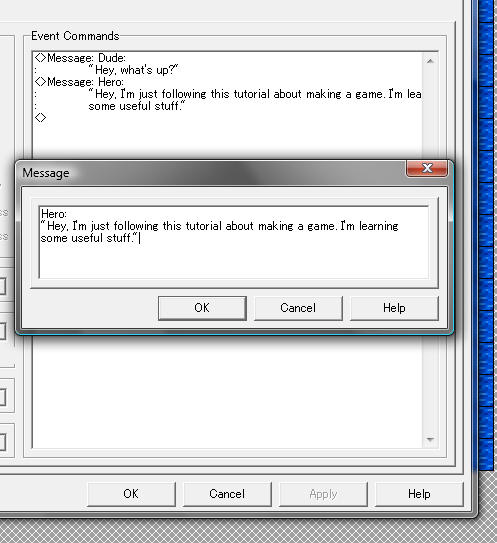
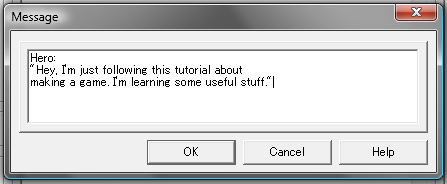
You can put anything you want there. Whether or not you put a name in front, like 'Dude' is up to you. Whether or not you put quotes around the text is also up to you. It's all up to preference. The only thing you should always do though, is use PROPER grammar and spelling (the only exception being accented speech, even still, that should be readable.) Don't use really bad writing skills. It's a bad habit and people won't like it! Anyways, click OK and you'll see the command show up in the event command box. If you want to edit it, you can highlight the command and right click and use edit, or you can highlight it and press spacebar. You can also see in front of each command is a <> symbol. Now, go below the command you put in, double click, and put in another message command. Let's put in another line of dialogue, this time a response from the player's character. Like so:
Now, let's testplay it again! Hit OK until you are out of the event editor, save your project file, and click the play button! (Or F9).
You can walk up to the guy, press a button and talk to him. This is pretty much the most basic thing you can do, er, wait a second,
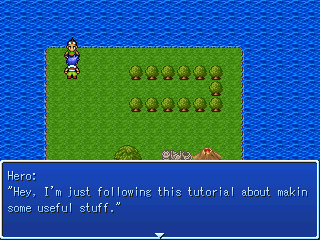
Did you see that? Even though I typed in the full sentence, it looks like it was cut off! That's one of the little nuances of the program that you have to learn. But it's easy to fix, Quit the game and go back into the event editor, then highlight that command and press spacebar to edit the dialogue, and then reorganize it a bit.
If you have a lot of dialogue, take notes while you testplay to go back and fix things like this. Anyways, let's add something else to the event commands. Right now we have two message commands, one after the other. If you noticed, the commands above execute first, and the lower ones follow afterwards. So let's stick something before the first message command. Right click the first command and hit 'Insert.' The command box should show up again. Now click 'Message Display Options.'
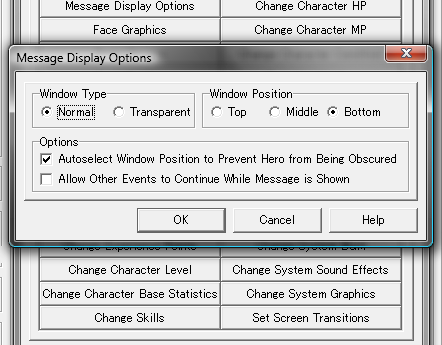
You'll see this. You can play around with this a bit, but basically what this does, is simply sets options for all messages afterwards. (Meaning you have to put it before the message commands.) You can set the box to be transparent, and to show on the top, middle, or bottom of the screen. You can also set if the textbox will automatically shift position so the player is not blocked. Generally you don't want that to happen (at least I don't) so I would uncheck 'Autoselect Window Position,' I generally never check the other box either. Now hit 'OK' and you'll see another command has appeared above your two message commands! If you wanted to, you could do something funky and stick in another message command box above the Hero's text to set his text to the top of the screen, so their dialogue boxes will alternate positions, but that kind of stuff gets annoying quickly. Anyways, let's add another basic command. Go ahead and right click on the first message command and click 'Insert,' just like before. This time, click the third option: 'Face Graphics.'
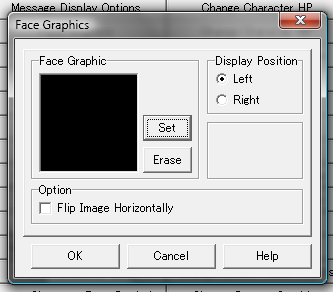
Click set, go ahead and find the one that matches the guy you're talking to. (Mine is on 'hero1' near the lower right. Click OK and go back to the main event editor. You'll see another command has appeared.
Also, look at the bottom, where it says 'OK,' 'Cancel,' 'Apply,' and 'Help.'
OK and Apply are similar'You can hit Apply after making a change and it will save the changes. OK will also save changes, but it will also exit out of the event editor. It's kind of like 'Save & Continue' vs. 'Save & Exit.' Cancel will undo everything and Help will pull up a help file.
Anyways, go ahead and testplay and then talk to the guy. His face graphic will appear for his dialogue, then you'll get this
Whoops! So exit out of the game and pop back into the editor! Two things happened there: the face graphic continued to show and the text was pushed off the edge!
So what this means is that things like setting message options or face graphics will always be set that way, for all messages'even messages in different events! So what you should do now is right click on the second message option, and hit 'Insert' and insert a 'Face Graphics' command. At this point you have two options: you can choose the face graphic of the hero so his face will appear when talking, or you can hit 'Erase' and then hit OK, meaning that no face graphic will show for future dialogues (until you set one again.) Remember that setting a face graphic will require you to reorganize the placement of the text again. Also, you have options for the face graphic: you can choose to set it on the left or right edge of the textbox, or to flip it. My end result commands looked like this:

Anyways, that's all for this first tutorial of the set! Hopefully you learned something if you've never had any experience with the program before, Next time, read about actually making an intro! Feel free to fill up your little island with a bunch of dudes you can talk to. =P
Posts 

Pages:
1

Yeah, this is what I think when I think "newb tutorial". You take it nice and slow, explaining everything.

I find a lacking of tutorials when it comes to RM2k3, but plenty for XP and VX, so great job here for providing material for this.
I will definately look for more. One thing that seems to be lacking in a lot of tutorials are complicated switches, although beginner levels are covered, and tutorials to dig deep into the branching/forking options, as well as using variables. Sure, there are a lot of explanations about variables, but visuals would definately help (perhaps a tutorial where the player can design the rpg/cutscene as he is following along).
And maybe an explanation about importing/exporting since I know 2k(3) uses a different format than .png.
Looking forward to what else you have.
I have that "A" fonts in my rm2k, I've downloaded your patch but it still didn't changed to "B". :(
Are there any patch fonts for rm2k for the B one?
Are there any patch fonts for rm2k for the B one?

Thumbs up on this tutorial. I wish I had had this opportunities to learn the basics years ago when I started messing around with Rm2003. Good work. :)
Okay, I don't now what I am doing wrong, but when I create a new project, everything is black. None of the components to make a game show up, just a black screen. What is happening? ITS DRIVING ME CRAZY!
Edit: Haha, never mind, I found out that I needed to import stuff xD
Edit: Haha, never mind, I found out that I needed to import stuff xD
This has nothing to do with anything but your picture scared the shit out of me because I'm literally watching breaking bad right now and I did not expect it XD
author=ivoryjones
I have that "A" fonts in my rm2k, I've downloaded your patch but it still didn't changed to "B". :(
Are there any patch fonts for rm2k for the B one?
Hey I have a small problem that maybe someone could help me with. I tried to add a message to a few items but when I test play the message doesn't work at all. I've set it right so that it cues on the action key but I don't know why its not working. If anyone could help that'd be great.
Pages:
1

