


MAKING YOUR CUSTOM MENU SYSTEM
A basic guide on how to get started when you make a custom menu.
 narcodis
- 12/10/2010 10:47 PM
- 58759 views
DESIGNING YOUR CUSTOM MENU
So you feel like you want to create a custom menu, do ya? Well, first you want to ask yourself, exactly what is it you want to do with this? Is there some feature you don't want to have only accessible through an item? Do you have an idea for a more accessible interface? Do you think you can honestly make something better than RM2k3's default menu?
Ask yourself these questions first. These are important things to know before going into this sort of thing, because it can quickly overwhelm you if you don't have a clear sense of exactly what you want your CMS to do.
Secondly, you need to have a solid understanding of basic RM2k3 event code. If you don't know how variables, switches, conditionals, key inputs, labels, or the show picture command works, take some time and figure out how these things work before trying to tackle something like this.
Thirdly, let's be clear that we're not making a map-based CMS. They're clunky and cause problems. We're going for pictures only.
Alright, now that we have THAT out of the way, let's start off with the basics! I'm going to start a brand new 2k3 project so you can follow along.
So what's going to happen is:
-Create a key detection event
-Design our menu
-Implement the interface
PART ONE: KEY DETECTION.
First things first. We need to create an event that allows us to access our soon-to-be CMS, something that will detect our keystroke. So, open up your common events. Create two events, one called Key Detection, and one called The Menu. Or call them whatever you want, so long as you remember which is which for further reference in this tutorial.
Now, before we get too ahead of ourselves, we need to make sure the player can't access the default menu. So what I like to do is create what I call an 'initializer' event. This event is an auto-start event, and erases itself at the end, so it never becomes a problem.
First, we're going to disable main menu access.
Second, we're going to turn on a switch, which I'll call 'Key Detection'.
And last, we erase the event.
There, now the player won't be able to access the default menu. No turning back now!
So now on to creating our key detection event. In RM2k3, it's usually best to make sure you have as few parallel processes running at the same time as possible. Our key detection event is going to be one of them.
So go back to our common events. Go to Key Detection, make it Parallel Process, and make the trigger switch the switch we turned on with our 'initializer' event .
Alright, step one:
Enter a Key Input Processing line that DOES wait for the key to be pressed before going (very important), and stores the value into a variable called . Make it detect whatever key you want to be used to access your menu. I'm going to use the 'Cancel' key, which has a value of 6.
Step two:
Create a conditional branch for when the variable 'Keystroke' is equal to 6.
Step three:
Inside the conditional branch, call the common event, 'The Menu', set the variable Keystroke to 0, and 'End Event Processing'.
In the end, your code should look something like this:
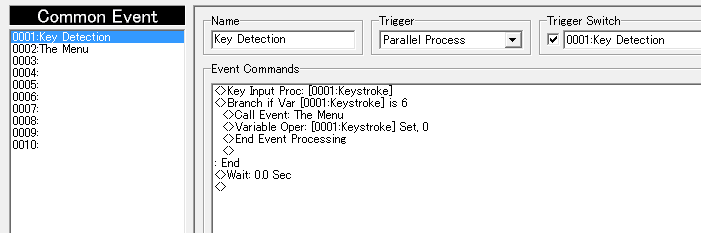
I put a 'Wait: 0.0 Sec' at the end for good measure. I'm not sure it actually does anything at all, but I hear it helps with potential lag problems that arise from a parallel process event running constantly.
EDIT: Apparently the added 'Wait: 0.0 Sec" function really doesn't do anything at all.
So now we've successfully created an event that will constantly check for when you press the cancel key, and then call our Menu event! So far so good.
PART TWO: DESIGNING THE MENU
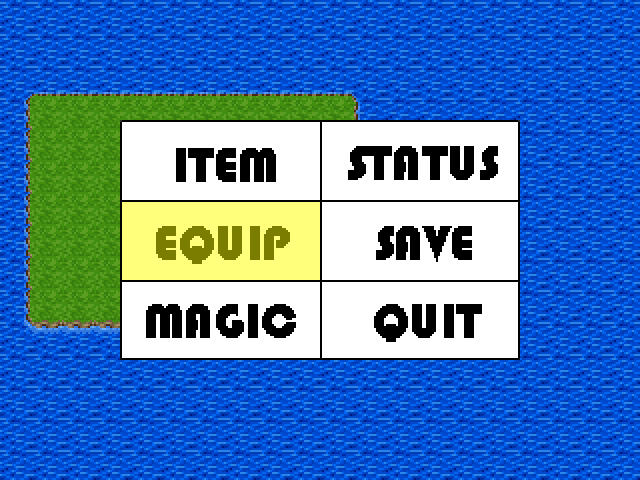
Alright, this part is where precise planning starts coming into play. I'm going to give my menu six different options. ITEM, EQUIP, MAGIC, STATUS, SAVE, and QUIT. These are all pretty arbitrary values, as I'm not really going to go into making any of these options functional.
So, since I have six options, I'm going to organize them into a neat two columns and three rows. It's important you make each menu option the same size. Well, I suppose you don't have to, but it will just make life easier for us when we go to code the menu itself. So I'm going to make my menu 200x120, making each option 100 wide and 40 tall.
It will look something like this:
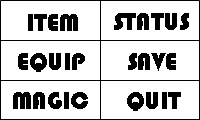
(Hopefully yours will look like even an ounce of effort was put into it)
And while you're at it, design a nice cursor to go along with our menu. I'm simply going to make a nice yellow rectangle, to serve as sort of a highlighter for the menu options.
So now we've got our menu. Pretty easy! But here is where it starts to get tricky.
PART THREE: IMPLEMENTATION (Really, what the tutorial is for)
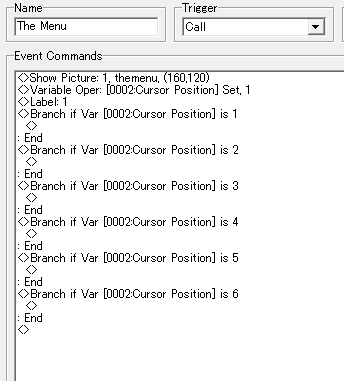
Alright, so back to our common events. Go to the one we so aptly named 'The Menu'. Make sure this one stays as a 'Call' event, with no switch to trigger it.
The idea is that we don't want any more parallel process events, since they do a number on most processors. But we're still going to loop this event over and over using labels. The menu event will consist of two parts. First, we will show the cursor and the menu itself. We need to determine where both items need to be. The second part will be another key detection code.
So lets make a flow chart.
THE MENU
The places it says "break" means this is where we'll make the event come to a halt. So here, if the player ever presses enter or cancel, our Menu event will come to an end. Otherwise, we're going to loop back to label 1 and repeat the whole thing over again. This is going to be a basic model for how we'll structure our code from here on out.
Alright, so the first part. To disable Hero control, create a "Move Event" command that moves the hero, with nothing but a "Wait" command, and set it to repeat endlessly. This will prevent the hero from moving around while our menu is open.
After that, Lets make the menu picture 1 and the cursor picture 2.Let's show the menu at 160,120. Make sure the picture does NOT use a transparent color and does NOT scroll with the map. This is the center of the screen and the coordinates that show up by default when using a show picture command.
Next, we need to figure out where the cursor is going to go. But lets not get too ahead of ourselves. First we need to define what each part of the menu is.
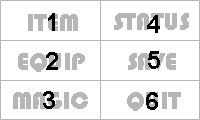
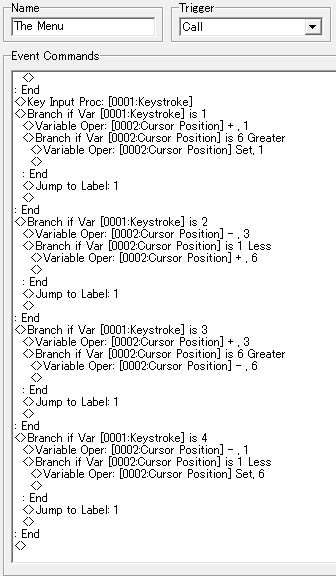
As you can see, I've marked each menu option with a number. Item will be 1, Equip will be 2, etc. So, lets make a new variable, called "Cursor Position", and set it to 1.
Remember, we're following the flowchart I made earlier. So according to that, right here we need to put a label, Label 1. We'll use it later.
Now we'll make a series of 6 conditional branches, one for each menu option, each determined by what number the variable 0002:Cursor Position is. If it is 1, if it is 2, ..., and if it is 6.
Your code should look something like this up to this point:
Alright, so now we need to determine exactly where our cursor needs to go. Since my cursor is nothing more than a highlighter, I need to determine the exact center spot of each option on the menu. This is a strenuous process, and I really don't think I've found the most efficient way of doing this, but if you don't have any tricky gadgets or anything to determine coordinates for you, this has to be done. Try to keep up here, now.
EDIT: Darken pointed out that there is a program that serves as a picture coordinator out there, so if you want, you can skip all this stuff about finding coordinates and such and just use this tool. But I'm keeping the coordinate finding info here for good measure. Download link here. http://rpgmaker.net/users/Darken/locker/ImagePositioner.exe
On the menu image itself, the center spot is 100,60 (remember, this is different than the actual coordinates we put into RM2k3). I've also determined that the center point on each menu item is as follows:
1.ITEM: 50,20
2.EQUIP: 50,60
3.MAGIC: 50,100
4.STATUS: 150,20
5.SAVE: 150,60
6.QUIT: 150,100
Now that we have the coordinates of each menu item on the menu image itself, we can now start to determine what the RM2k3 coordinates the cursor will need for each option. For this, we use some basic math, step by step.
The 2k3 coordinates of the menu are 160,120.
The Menu's center point is 100,60.
The difference is +60,+60.
Apply that to each option on our menu.
1. 50,20 = 110,80
2. 50,60 = 110,120
3. 50,100 = 110,160
4. 150,20 = 210,80
5. 150,60 = 210,120
6. 150,100 = 210,160
And we're done! If my math is right, those should be the exact coordinates of my cursor in each position. Easy shmeasy.
So lets go back to our code. Place a Show Picture(2) command for the cursor with the coordinates given for each corresponding conditional branch. Again, make sure it doesn't scroll with the map, and with this particular highlighter-type cursor, make sure it's transparent. Your code should look like this after all is said and done:

EDIT: Instead of having the show picture command for the cursor each time, it would be better to show the picture along with the menu, and simply move the cursor's picture to each position with a 0.0 wait time instead, in order to optimize performance. Thanks, Kazesui!
Alright, now on to part two of our flowchart. The Key detection. Much like our Key detection event from earlier on, except this time, we will mark the box that says "wait until key pressed", because we will be waiting for an input from the player. You can go ahead and re-use the variable Keystroke. We will also mark the keys Down, Left, Right, Up, Decision, and Cancel for processing.
Immediately after the KeyInputProcessing code, make another 6 conditional branches, each with the condition that the variable Keystroke is equal to a number 1, 2, 3, 4, 5, and 6, respectively, which will cover all our bases for whatever key the player presses.
The first four numbers will be the arrow keys:
1 is Down
2 is Left
3 is Right
4 is Up
The Down/1 and Up/4 conditions will work relatively the same. For down, we're going to add 1 to the 0002:Cursor Position variable. For Up, we'll subtract 1.
However, we need to take measures to make sure the variable doesn't go higher than 6 and less than one. So in the Down/1 conditional branch, make a safety net. Make another conditional branch for when 0002:Cursor Position is greater than 6, and within that, set 0002:Cursor Position to 1. Do the same for the Up/4 conditional branch, only making it so it doesn't go less than one, and if it does, set the variable as 6.
Still with me?
Alright, so with the Left/2 condition, we'll be subtracting 3 from Cursor Position, and with the Right/3 condition, we will be adding 3. We will make another safety net, except instead of setting the cursor position as a flat value, we will add or subtract 6.
So with Left/2:
Subrtract 3
If CursorPosition is < 1: Add 6
And with Right/3:
Add 3
If CursorPosition is > 1: Subtract 6
This will make it so the cursor goes horizontally across the menu when you press left or right.
At the end of every conditional branch we've just made, place a "Jump to Label", each one directing to Label 1. This will make sure the menu event continues.
Alright, your code should look something like this up to this point:
Okay! Almost done. Now to code in the conditions for a Decision or Cancel keypress.
For the decision keypress, you'll need to sort of figure out what you'll do with each menu option on your own. But basically you'll create a series of conditional branches within the conditional branch for the decision keypress (If Keystroke = 5) for each position the cursor could be in.
For example, within the Conditional for Keystroke=5, there will be a conditional for If Cursor Position = (1,2,3,4,5 or 6).
When Cursor Position is equal to 5 (our "SAVE" option), you could simply call the SAVE menu.
That's simply an example of what can be done. Ideally you'll have a separate menu for the ITEM, EQUIP, MAGIC, and STATUS options, but I'm not going to go quite into that much detail in this tutorial. You will probably want to erase the menu and things like that, but I'm sure you can get that.
For the Cancel keypress condition (If Keystroke=6), simply Erase pictures 1 and 2, Move Event Hero: Wait (NOT repeating this time), and then End Event Processing.
So lets look at our code.

This is it! This is the end of our code. This should give you a basic framework for making your own menu system.
Let's see how it looks in action.
Damn, is that ugly. Oh well. At least it's functional!
Enjoy! Let me know if you have questions or need clarification. I'm more than happy to make adjustments to the tutorial.
So you feel like you want to create a custom menu, do ya? Well, first you want to ask yourself, exactly what is it you want to do with this? Is there some feature you don't want to have only accessible through an item? Do you have an idea for a more accessible interface? Do you think you can honestly make something better than RM2k3's default menu?
Ask yourself these questions first. These are important things to know before going into this sort of thing, because it can quickly overwhelm you if you don't have a clear sense of exactly what you want your CMS to do.
Secondly, you need to have a solid understanding of basic RM2k3 event code. If you don't know how variables, switches, conditionals, key inputs, labels, or the show picture command works, take some time and figure out how these things work before trying to tackle something like this.
Thirdly, let's be clear that we're not making a map-based CMS. They're clunky and cause problems. We're going for pictures only.
Alright, now that we have THAT out of the way, let's start off with the basics! I'm going to start a brand new 2k3 project so you can follow along.
So what's going to happen is:
-Create a key detection event
-Design our menu
-Implement the interface
PART ONE: KEY DETECTION.
First things first. We need to create an event that allows us to access our soon-to-be CMS, something that will detect our keystroke. So, open up your common events. Create two events, one called Key Detection, and one called The Menu. Or call them whatever you want, so long as you remember which is which for further reference in this tutorial.
Now, before we get too ahead of ourselves, we need to make sure the player can't access the default menu. So what I like to do is create what I call an 'initializer' event. This event is an auto-start event, and erases itself at the end, so it never becomes a problem.
First, we're going to disable main menu access.
Main Menu Access: Forbid
Second, we're going to turn on a switch, which I'll call 'Key Detection'.
Switch Operation: [0001:Key Detection] ON
And last, we erase the event.
Erase Event
There, now the player won't be able to access the default menu. No turning back now!
So now on to creating our key detection event. In RM2k3, it's usually best to make sure you have as few parallel processes running at the same time as possible. Our key detection event is going to be one of them.
So go back to our common events. Go to Key Detection, make it Parallel Process, and make the trigger switch the switch we turned on with our 'initializer' event .
Alright, step one:
Enter a Key Input Processing line that DOES wait for the key to be pressed before going (very important), and stores the value into a variable called . Make it detect whatever key you want to be used to access your menu. I'm going to use the 'Cancel' key, which has a value of 6.
Step two:
Create a conditional branch for when the variable 'Keystroke' is equal to 6.
Step three:
Inside the conditional branch, call the common event, 'The Menu', set the variable Keystroke to 0, and 'End Event Processing'.
In the end, your code should look something like this:
I put a 'Wait: 0.0 Sec' at the end for good measure. I'm not sure it actually does anything at all, but I hear it helps with potential lag problems that arise from a parallel process event running constantly.
EDIT: Apparently the added 'Wait: 0.0 Sec" function really doesn't do anything at all.
So now we've successfully created an event that will constantly check for when you press the cancel key, and then call our Menu event! So far so good.
PART TWO: DESIGNING THE MENU
Alright, this part is where precise planning starts coming into play. I'm going to give my menu six different options. ITEM, EQUIP, MAGIC, STATUS, SAVE, and QUIT. These are all pretty arbitrary values, as I'm not really going to go into making any of these options functional.
So, since I have six options, I'm going to organize them into a neat two columns and three rows. It's important you make each menu option the same size. Well, I suppose you don't have to, but it will just make life easier for us when we go to code the menu itself. So I'm going to make my menu 200x120, making each option 100 wide and 40 tall.
It will look something like this:
(Hopefully yours will look like even an ounce of effort was put into it)
And while you're at it, design a nice cursor to go along with our menu. I'm simply going to make a nice yellow rectangle, to serve as sort of a highlighter for the menu options.
So now we've got our menu. Pretty easy! But here is where it starts to get tricky.
PART THREE: IMPLEMENTATION (Really, what the tutorial is for)
Alright, so back to our common events. Go to the one we so aptly named 'The Menu'. Make sure this one stays as a 'Call' event, with no switch to trigger it.
The idea is that we don't want any more parallel process events, since they do a number on most processors. But we're still going to loop this event over and over using labels. The menu event will consist of two parts. First, we will show the cursor and the menu itself. We need to determine where both items need to be. The second part will be another key detection code.
So lets make a flow chart.
THE MENU
Disable Hero control

Show Menu image

Define default cursor position

Label 1

Establish where cursor will go

 -Position 1, 2, 3, 4, 5, 6

Show cursor image

Key detection

-Keypress up, down, left, right

--Define cursor position

-Keypress enter (break)

-Keypress cancel (break)

Goto Label 1
The places it says "break" means this is where we'll make the event come to a halt. So here, if the player ever presses enter or cancel, our Menu event will come to an end. Otherwise, we're going to loop back to label 1 and repeat the whole thing over again. This is going to be a basic model for how we'll structure our code from here on out.
Alright, so the first part. To disable Hero control, create a "Move Event" command that moves the hero, with nothing but a "Wait" command, and set it to repeat endlessly. This will prevent the hero from moving around while our menu is open.
After that, Lets make the menu picture 1 and the cursor picture 2.Let's show the menu at 160,120. Make sure the picture does NOT use a transparent color and does NOT scroll with the map. This is the center of the screen and the coordinates that show up by default when using a show picture command.
Next, we need to figure out where the cursor is going to go. But lets not get too ahead of ourselves. First we need to define what each part of the menu is.
As you can see, I've marked each menu option with a number. Item will be 1, Equip will be 2, etc. So, lets make a new variable, called "Cursor Position", and set it to 1.
Remember, we're following the flowchart I made earlier. So according to that, right here we need to put a label, Label 1. We'll use it later.
Now we'll make a series of 6 conditional branches, one for each menu option, each determined by what number the variable 0002:Cursor Position is. If it is 1, if it is 2, ..., and if it is 6.
Your code should look something like this up to this point:
Alright, so now we need to determine exactly where our cursor needs to go. Since my cursor is nothing more than a highlighter, I need to determine the exact center spot of each option on the menu. This is a strenuous process, and I really don't think I've found the most efficient way of doing this, but if you don't have any tricky gadgets or anything to determine coordinates for you, this has to be done. Try to keep up here, now.
EDIT: Darken pointed out that there is a program that serves as a picture coordinator out there, so if you want, you can skip all this stuff about finding coordinates and such and just use this tool. But I'm keeping the coordinate finding info here for good measure. Download link here. http://rpgmaker.net/users/Darken/locker/ImagePositioner.exe
On the menu image itself, the center spot is 100,60 (remember, this is different than the actual coordinates we put into RM2k3). I've also determined that the center point on each menu item is as follows:
1.ITEM: 50,20
2.EQUIP: 50,60
3.MAGIC: 50,100
4.STATUS: 150,20
5.SAVE: 150,60
6.QUIT: 150,100
Now that we have the coordinates of each menu item on the menu image itself, we can now start to determine what the RM2k3 coordinates the cursor will need for each option. For this, we use some basic math, step by step.
The 2k3 coordinates of the menu are 160,120.
The Menu's center point is 100,60.
The difference is +60,+60.
Apply that to each option on our menu.
1. 50,20 = 110,80
2. 50,60 = 110,120
3. 50,100 = 110,160
4. 150,20 = 210,80
5. 150,60 = 210,120
6. 150,100 = 210,160
And we're done! If my math is right, those should be the exact coordinates of my cursor in each position. Easy shmeasy.
So lets go back to our code. Place a Show Picture(2) command for the cursor with the coordinates given for each corresponding conditional branch. Again, make sure it doesn't scroll with the map, and with this particular highlighter-type cursor, make sure it's transparent. Your code should look like this after all is said and done:
EDIT: Instead of having the show picture command for the cursor each time, it would be better to show the picture along with the menu, and simply move the cursor's picture to each position with a 0.0 wait time instead, in order to optimize performance. Thanks, Kazesui!
Alright, now on to part two of our flowchart. The Key detection. Much like our Key detection event from earlier on, except this time, we will mark the box that says "wait until key pressed", because we will be waiting for an input from the player. You can go ahead and re-use the variable Keystroke. We will also mark the keys Down, Left, Right, Up, Decision, and Cancel for processing.
Immediately after the KeyInputProcessing code, make another 6 conditional branches, each with the condition that the variable Keystroke is equal to a number 1, 2, 3, 4, 5, and 6, respectively, which will cover all our bases for whatever key the player presses.
The first four numbers will be the arrow keys:
1 is Down
2 is Left
3 is Right
4 is Up
The Down/1 and Up/4 conditions will work relatively the same. For down, we're going to add 1 to the 0002:Cursor Position variable. For Up, we'll subtract 1.
However, we need to take measures to make sure the variable doesn't go higher than 6 and less than one. So in the Down/1 conditional branch, make a safety net. Make another conditional branch for when 0002:Cursor Position is greater than 6, and within that, set 0002:Cursor Position to 1. Do the same for the Up/4 conditional branch, only making it so it doesn't go less than one, and if it does, set the variable as 6.
Still with me?
Alright, so with the Left/2 condition, we'll be subtracting 3 from Cursor Position, and with the Right/3 condition, we will be adding 3. We will make another safety net, except instead of setting the cursor position as a flat value, we will add or subtract 6.
So with Left/2:
Subrtract 3
If CursorPosition is < 1: Add 6
And with Right/3:
Add 3
If CursorPosition is > 1: Subtract 6
This will make it so the cursor goes horizontally across the menu when you press left or right.
At the end of every conditional branch we've just made, place a "Jump to Label", each one directing to Label 1. This will make sure the menu event continues.
Alright, your code should look something like this up to this point:
Okay! Almost done. Now to code in the conditions for a Decision or Cancel keypress.
For the decision keypress, you'll need to sort of figure out what you'll do with each menu option on your own. But basically you'll create a series of conditional branches within the conditional branch for the decision keypress (If Keystroke = 5) for each position the cursor could be in.
For example, within the Conditional for Keystroke=5, there will be a conditional for If Cursor Position = (1,2,3,4,5 or 6).
When Cursor Position is equal to 5 (our "SAVE" option), you could simply call the SAVE menu.
That's simply an example of what can be done. Ideally you'll have a separate menu for the ITEM, EQUIP, MAGIC, and STATUS options, but I'm not going to go quite into that much detail in this tutorial. You will probably want to erase the menu and things like that, but I'm sure you can get that.
For the Cancel keypress condition (If Keystroke=6), simply Erase pictures 1 and 2, Move Event Hero: Wait (NOT repeating this time), and then End Event Processing.
So lets look at our code.
This is it! This is the end of our code. This should give you a basic framework for making your own menu system.
Let's see how it looks in action.
Damn, is that ugly. Oh well. At least it's functional!
Enjoy! Let me know if you have questions or need clarification. I'm more than happy to make adjustments to the tutorial.
Posts 

author=Fallen-Griever
Craze: "Use VX".
This is a good tutorial for making the front-end of your menu system, even if the harder part is the contents of each submenu!
Yes, exactly. There's just no tutorials in terms of custom menus or anything on RMN, so I thought I'd do something about it. If people are going to use 2k3, they might as well know what they're doing, eh?
Was thinking of making some similar tutorial myself at some point, but nice to see someone else beating me to it. Maybe I'll do some sub menu instead in the future.
I would not recommend calling the menu event from a parallell process though, since it doesn't stop any event without manually stopping them. Setting the menu to be on autostart when a switch "menu" is on (which is set to off when leaving the menu), easily stops everything.
as for the when you're showing the cursor, it would also be better to use "move picture" with 0.0 wait, than to keep using show picture as it costs considerably more to keep loading the picture. This applies to anytime a picture is being used btw. If the picture isn't changing, it's better to move it with move picture.
and @the code in the first picture, you're right in doubting the wait doing anything, as it doesn't.
Since you only one box is checked in the key event process, the only possible value of the variable will be 6, thus making the branch unneccessary, and always happening.
apart from the auto-start thing, this is all very nit-picking though, as it's very unlikely that you will have to optimize a cms code to this degree to not make it lag.
and this is one of the better cms tutorials I've seen in terms of keeping it simple and reable, so good work!

I think this program useful for picture coordination if anyone's having trouble with it.
http://rpgmaker.net/users/Darken/locker/ImagePositioner.exe
http://rpgmaker.net/users/Darken/locker/ImagePositioner.exe
author=Kazesui
as for the when you're showing the cursor, it would also be better to use "move picture" with 0.0 wait, than to keep using show picture as it costs considerably more to keep loading the picture. This applies to anytime a picture is being used btw. If the picture isn't changing, it's better to move it with move picture.
This I did not even think about. Good call. I'll make a revision right away.
and @the code in the first picture, you're right in doubting the wait doing anything, as it doesn't.
Good to know! Another revision.
Since you only one box is checked in the key event process, the only possible value of the variable will be 6, thus making the branch unneccessary, and always happening.
While this is true, I created this with the idea that people might also want to keep other keeps open to do other things, like maybe hit Shift to swing their sword, or press a number to use an item or something like that, in which case forks would be necessary anyway.
author=Darken
I think this program useful for picture coordination if anyone's having trouble with it.
http://rpgmaker.net/users/Darken/locker/ImagePositioner.exe
Awesome, I'll put that in right away.
Thanks for the comments!

brings back memories. terrible, wonderful memories.
great job! you gonna do a scrolling menu eventually?
great job! you gonna do a scrolling menu eventually?

My only issue so far is that sometimes I have to press a button twice to get the cursor moving.
*scratches head*
I just can't figure it out.
*scratches head*
I just can't figure it out.
author=Feldschlacht IV
Got things working! Thanks guys, and thanks for this tutorial! Saved my ass, it did.
Glad to know it helped!

Very useful tutorial, a lot of people judge games by their images before they play. If you have a good custom menu that looks good and user friendly, you can almost guarantee a download.
Very useful tutorial, a lot of people judge games by their images before they play. If you have a good custom menu that looks good and user friendly, you can almost guarantee a download.
Very useful tutorial, a lot of people judge games by their images before they play. If you have a good custom menu that looks good and user friendly, you can almost guarantee a download.

Ah, because I can't seem to find "Erase Event" option on RM2k, I assume you can't do this in RM2k, huh?
author=Saya
Ah, because I can't seem to find "Erase Event" option on RM2k, I assume you can't do this in RM2k, huh?
I'm not sure if RM2k does or not... most likely not. RM2k3 did a lot more with the engine in little subtleties like that.
But if you want a work around, you can turn on a switch at the end of the "initializer" event that leads to a blank page that isn't auto-start. Effectively would do the same thing.
author=narcodisauthor=SayaI'm not sure if RM2k does or not... most likely not. RM2k3 did a lot more with the engine in little subtleties like that.
Ah, because I can't seem to find "Erase Event" option on RM2k, I assume you can't do this in RM2k, huh?
But if you want a work around, you can turn on a switch at the end of the "initializer" event that leads to a blank page that isn't auto-start. Effectively would do the same thing.
Thanks.=)
I've made a tutorial for how to implement the item sub menu here

