


TACTICAL BATTLE SYSTEM MOVEMENT
How to move in similar fashion of a TBS
 Kazesui
- 07/20/2011 02:02 AM
- 25589 views
This is going to be the first part of a series on how to build a basic Tactical Battle System in rm2k3. It will include stuff how to deal with the health, some simple AI and more. In this part I'm going to show you how you can make your heroes (or whatever else you'd like) move within a given range of tiles.
A tiny warning: this will assume at least intermediate experience with rm2k3, so if you're new to the engine and find this quite baffling, it's because this tutorial isn't suited for beginners. This tutorial will require knowledge of Pointers as well as basic understanding of how coordinates work among other things.
This is going to be a lengthy tutorial. If you just want to look at the code you can do so by downloading the sample project: Download
The tutorial is divided into these sections:
- How to approach the problem
- How to create a basic field for movement
- How to apply these fields to events
- How to expand on the move field to take different terrain into consideration
How to approach the problem
This section is purely theoretical and about how to think about approaching custom systems in general and this one in specific. If you're only interested in the implementation you can skip this part and continue to the next section.
This is a kind of system where you simply can't just start coding without a plan of how it should work. The first thing you do when trying to create a system like this is to try to think of the requirements the system should fulfill, and then give some thought to what problems could arise which makes this difficult. So let's look at how a move system like this would normally look. Something like this, right?
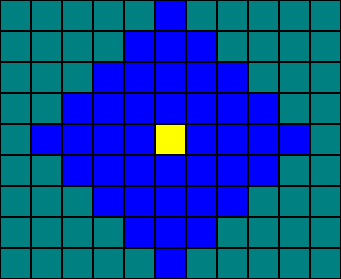
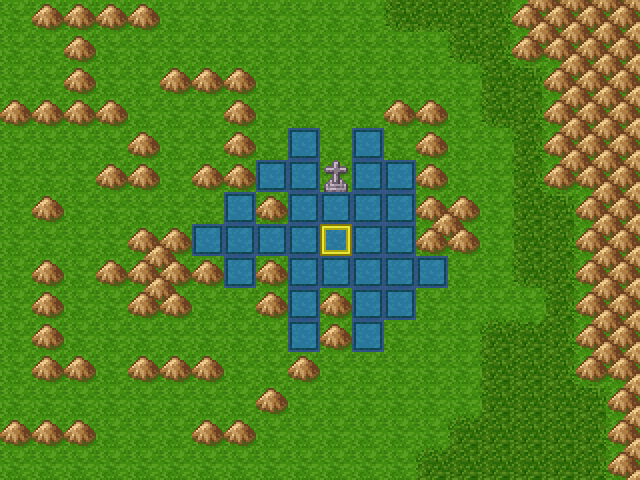
The yellow square marks the player and the blue fields the possible locations it can move to if it can move 4 tiles during it's move. And this shape looks relatively simple to recreate if you know a little about eventing. Heck, maybe it would be as simple as taking the coordinates of the start position, and then start moving the event around, subtracting it's new coordinates with the old ones, then multiplying any negative answer with -1 and add them together. That would allow the player to move within the same pattern, and that should work... right?
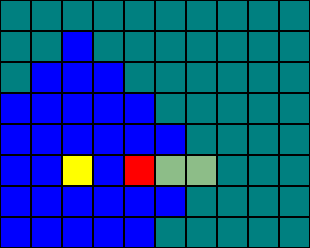
However if the red square marks an obstacle, then we would only want the player to only be able to move within the blue area, but with the above method you'd still be able to move at the green area, since the coordinates would still want to create the shape, and simply just preventing the player to move onto obstacles won't be enough. And thus we've located a problem which we need to handle. Ideally you want to find think of all problems before you even start eventing. Ideally. Of course, that's rarily how it will work when you're creating custom systems and you shouldn't dwell too long on trying to think of all possible problems which can occur, but you should try to think of as many as possible, so that you can consider them when trying to event a solution. This will generally lead to cleaner code which is easier to read and change if a problem do occur. In rm2k3 this is also important in terms of organizing your variables properly, since all are global, and it's a pain to use them if they're scattered all over the array.
So what we want for this event, is to show the possible tiles the hero can move to while keeping the obstacle problem in mind. Since we'll start with a basic version, that's all we'll be looking at for starts, and we'll expand on it afterwards.
To do this, we could use events to "seek out" the possible tiles while they double as graphics as well, which is probably the most practical solution when physically showing where the player can move. This gives rise to another problem though. In rm2k3 we can't create new events at runtime, meaning they will have to be present at the map the game starts and with that in mind we will have to think how far it maximally should be possible to move, since this will decide how many events we'll need to have ready given a total free area. The formula for amount of tiles needed for a shape like that is given by:
f(n) = 2n(n + 1) + 1
with n being the range in question. This means that for a range of 4 we'd need 41 events (if we include the tile on which the player is standing, which we will be doing later on as well). This does however also mean that for a range of 20 we'd need as many as 841 events for the possibility of having a totally free area to move within.
841 is a pretty high number in terms of having that many events on the map, So we should probably consider having a considerably lower maximum. A maximum range of 6 requires up to 85 events, and is the highest range we can get without needing more than 100 events, so we will be going for that in this tutorial. This is of course something you can adjust yourself later on, the point is just to be aware of the limitation decide where the limits should be set.
Let's head back to the idea of having the events "seek out" the possible tiles for movement. This could be achieved by doing several iterations where the event tries to lay other events around itself if the range hasn't been "used up" yet. We could start at the hero position, place an event there which looks above, checks if there are any obstacles or ill terrain there or perhaps already an event which marks it possible to move there. If not, it will place a new tile there and then look to the right, then down, then left. Then the first iteration will be done and you could reduce the range by 1, since now we have placed all the tiles you could move to with a range of 1. We'd then move onto the next iteration where we'd use the events we just spawned to spawn new events. Once we've let all those events tried to spawn once, we'd have completed the second iteration and have all possible tiles to move at with a range of 2. And thus we continue to the next iteration, and then the next one, until we've reached the maximum range. Usually it takes a couple of tries to arrive at an idea like this (depending on how experienced one is), but one shouldn't be discouraged by ideas not working, and try to learn from them instead and then start over if it doesn't work out (maybe even ask in the help section of the forum if you're really stuck).
How to create a basic field for movement
Okay, so we have an idea of what we want the solution to do, but how do we implement it in terms of event code? Well, we can start with the building blocks of the field which will be used to display movement. They're going to consist of several pages which we will be using for doing stuff to that specific event.
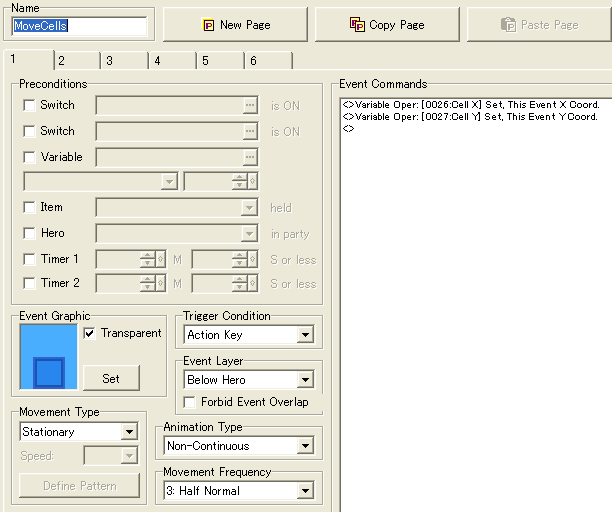
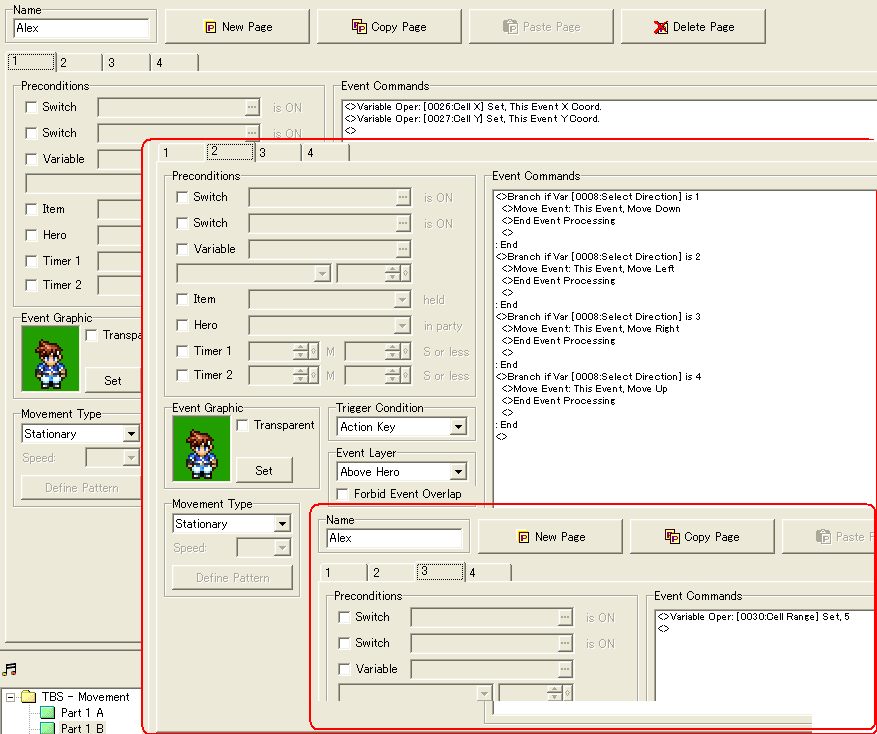
The first page will look like this. Calling this page will return the coordinates of this event to some temporary variables called Cell X and Cell Y. The keyword here is the use of "this". By calling events directly we can control them more easily with variables. There is support for making variables point at the coordinates of an event, but would require some other event to store all the coordinates by hand into variables, and this would also make it harder to tell which event's coordinate is relevant for this particular case. In other words, the use of "this" is a powerful tool we'll make much use of.
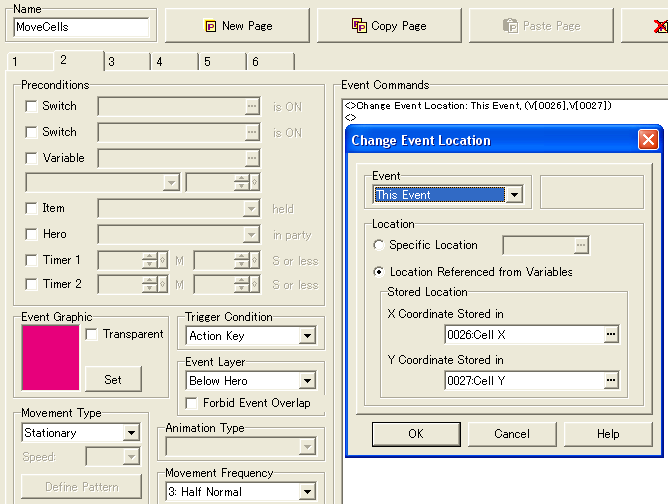
This is the second page which again makes use of "this" to move the event to a desired location, given by the same variables used in the previous page.
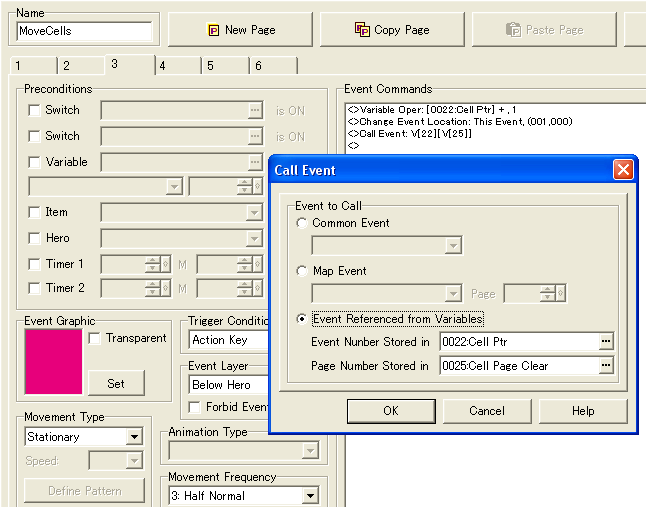
And this page causes a recursive like behaviour. It's called with a similar call, and then adding 1 to the Cell Ptr which decides which event to call by it's ID. The Cell Page Clear variable is set to 3 so that it always call this page. The event itself moves back to an initial position, effectively removing it from the play area, before calling the next of it's kind until reaching a designated "stop event" which is completely empty at page 3, making this chain of calls come to an end.
The above page is empty, so that action key won't trigger any event script, and the two above that again are only for graphic representation. And that's how are events for the moving tiles will look. The good thing about them is that there's no special variable set to any of them, meaning you can copy once and paste as many as you want without having to fiddle with them further, which is especially good considering the potentially large amount of them we'll be having when wanting to move longer than 6 tiles during a turn.
Something important is that they all need to form a consecutive sequence in terms of event ID's in order for us to be able to call them properly, and also for not making the chain of call events which resets their position go awry. Also, there's need for an empty event with 3 pages with the event ID following the last move tile, so that the clear chain will come to an stop and not end up trying to call some non existing event page.
And now we need to make use of these events. The idea is to place an event at the player location, which then checks the tile above, then right, then below and finally left. If these tiles are free it'll spawn new move events onto these, and we'll continue a new iteration. This means that the events will should be spawning in the following order:
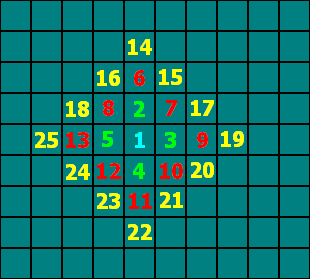
The different colours denote different iterations and the numbers at which point they are spawned starting at 1, which is where the player will be located. Try to follow the sequence and make sure you understand why they are spawned in that order and try to figure out how the sequence would continue for the next iteration.
There are two key variables needed for producing this pattern. One variable which points to the current event which is to spawn new events, and the variable which points to which event to spawn, based on the event ID's. In the sample code, variable 0022 Cell Ptr handles the current event tile, while 0021 Cell New handles which event to spawn.
In the sample code, the ID of the first move tile starts at 2 and continues to 89, with 90 being the "stopper event". As thus, we start by setting both Cell Ptr and Cell New to 2, since this is the starting point. When then set a variable Cell Check. This one marks at what ID Cell Ptr should be to indicate that the current iteration is over. Since the first iteration start and end at the first event, that is at event ID 2, this is what we'll set it at as initial value. If the Cell Ptr is at the same event as the one given in Cell Check, Cell Check will take the value of Cell New at the end of spawning all events nearby that event, since Cell New will contain the ID of the last spawned event.
Around now, it will probably be a bit difficult to keep track. If this is the case, then you should use the grid above showing in what order they are spawned to help you understanding how this works. In the Grid, Cell Check would first have been one, and then set to 5 since that's the last value Cell New had upon having spawned tiles at all neighbour spaces. Then it would spawn events at all free tiles around #2, then #3 and such until #5, which is the same as Cell Check, and means that it will updated again, this time to 13, since that's the current value of Cell New.
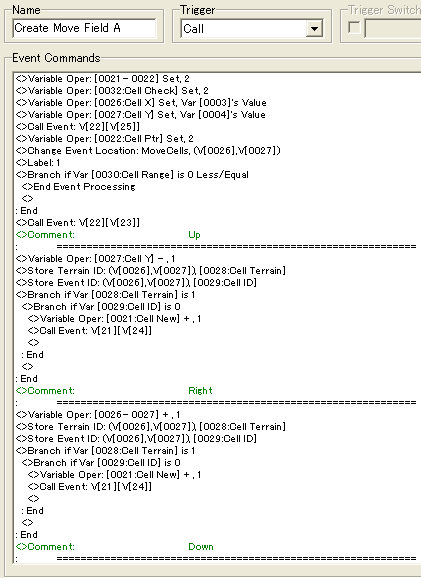
For each iteration, we will subtract the Range variable with 1, and as soon as it reaches 0 the event ends. This is done by the branch right below label 1. The next step is to retrieve the coordinates of the current event. This is done by calling on the event with Cell Ptr as ID and as variable Cell Page Coordinate as page. Cell Page Coordinate is set to 1, which equals the page returning the coordinates of the current event. Once this is done it starts checking the tiles around it.
Remember that the coordinate system in a computer normally has a reversed y-axis, meaning that subtracting by 1 to the y coordinate means you'll go up. This is what we want, so we subtract the current y value by one, then use the commands Store Event ID and Store Terrain ID to figure out if the tile is free. If the terrain = 1 and Cell ID = 0, that means there's nothing standing in your way so with that, we'll add 1 to Cell New and use it to call an event with same ID and at page 2, which we remember to change it's location to that given in Cell X and Y, which at this point is right above the current event.
Following this, we add 1 to both Cell X and Y to get the tile to the right and repeat the process.
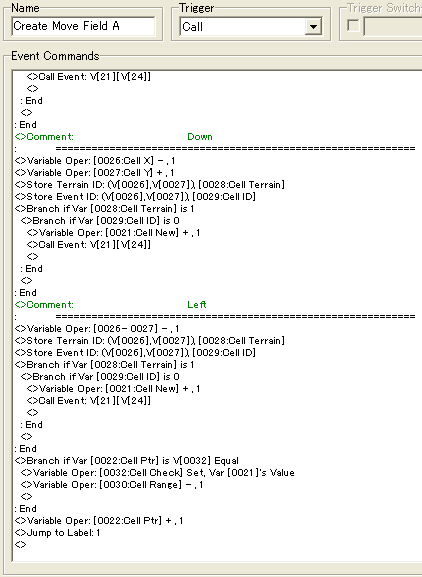
The only difference for the different directions is that we adjust the coordinates accordingly. At the end we check if Cell Ptr equals Cell Check as explained above, and set Cell Check to Cell New if so, as well as reducing the range by one. At the end, we increase Cell Ptr by 1 in order to continue to the next event, and we then go back to label 1, thus looping until the range is reduced to one. Something you'd might consider adding is an additional branch which would ensure that Cell Ptr never goes above 89 due to some bug, which would probably end in an error message.
There might not be any need to, but extra safety doesn't hurt, especially if something goes unnoticed and a player somehow manages to find that bug. Maybe adding a message saying something along the lines of "something which shouldn't have happened occured at event xyz". (There is in fact one bug which can occur given the right circumstances with the current event. I challenge YOU to figure out what it is)
This is all we need to create a basic field for movement. Adding a trivial event running on parallel process which checks for key input and then calling this event will create something like this:
Just remember that you will have to set the Cell Range variable to a value as well as setting Cell X and Cell Y to the coordinates of the player prior to calling the event.
How to apply these fields to events
Now we can create a field allowing us to move n amount of tiles, but that's no good unless we have some way of applying it to the events we want to move. As such we'll add two events which will want to make move. Alex and a Demon.
Again, we make use of events pages and "this" for the sake of retrieving data we may want. Both Alex and the Demon are alike event wise, almost only differing in terms of graphics. Page 1 returns the coordinates, page 2 makes the event walk one step in a direction given by a variable and the last picture sets the range for this event. Alex has been given the range of 5, while the Demon only has 3. The last page is empty to prevent interference by triggering of action key at the event. Also notice that they are set to "above". This is for aesthetic reasons making the hero, in the form of a cursor, appear below them.
We want to be able to trigger their move ranges upon clicking on them, and not otherwise, so we'll need an event which handles key input.
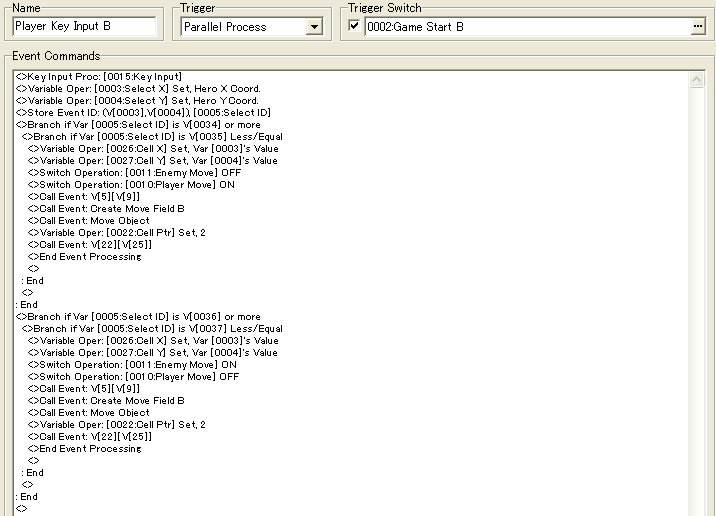
At first, we await key input from the player. One the action key is been pushed, the coordinates are stored into Select X and Select Y, which will remember the original position, and we then store the event ID of that position. If there's no event there. Now we'll need 4 new variables. Ally ID Start, Ally ID End, Foe ID Start and Foe ID End. Ally ID Start will contain the lowest ID of the events which make up the player events, and Ally ID End the highest. The Foe ID's works the same just for the Foe's. This means that also their ID's has to be arranged to form a consecutive sequence. Scattering their ID's about will make it considerably harder to check for their ID's, especially if there are many of them. If you're unsure whether you might need more, just make space ahead of time by creating some empty events working as placeholders. Also remember you'll be able to adjust the ID's whenever you want by variable operations.
If the position where you pressed the action button at contained a playable movable event, the Select coordinates will be stored in Cell Coordinates in preparation for calling Create Move Field. We also have two switches Enemy Move and Player Move. These control the colour of the move tiles. Blue for the Alex and red for the Demon. The Call event in there calls the page which sets the range variable. We'll use Select ID for to refer to the event, and another variable containing a constant equaling the page we want.
After this, we may call Create Move Field, then we call an event to handle moving the events about and afterwards we set Cell Ptr to 2 and calls it's Clear Page, so that we can remove all the move tiles after having moved the event. Now let's take a closer look at the event moving the the player (and demon) about:
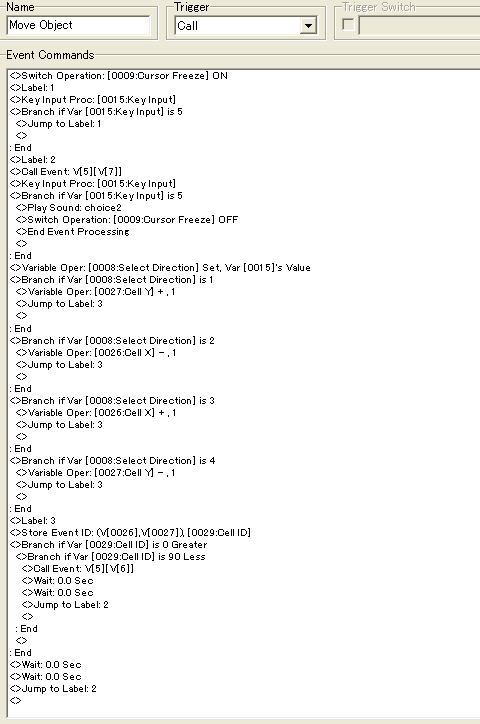
At the top, I've set a switch on which prevents triggers a parallel process which prevents the hero from moving as long as the parallel process is active. This is followed by a key input which checks if the action button is being held down by not waiting for the key to be pressed, and goes to the next loop once it's not held down anymore. This is done so that there won't be a need to check the "wait until key is pressed" for the second key input as well without instantly ending the event (since action button has been set as trigger to end movement).
The reason why we'd want the wait for keypress to be unchecked is to allow for more soft movement of the events by not having to constantly press in the direction they wish to go. Once a direction is pressed, it is stored in the variable Select Direction, and if you payed attention to page 2 in the Alex event, you'd see that the directions it'd move at for the different values corresponds to the values retrieved by the key inputting process. The value is stored into another variable to allow for ease if the another instance would have use for moving the events by their event pages. In this case it would make more sense to use a temporary variable rather than using the key input variable again, though it would save us one variable operation in this particular instance.
Following this, we adjust the coordinates of the events current position for it's direction by a bunch of branches and then jump to a label below. When you have a lot of branches in a row like this while still having more code to execute after it, it would be beneficial to add a label at the end of the branches and jump to it once one of the branches is taken since only one can be taken anyway in this case.
After jumping to the label, we Store the event ID of that position and check if it equals an event ID higher than 0 and lower than 90, meaning that it'd be one of the movable tiles. This ensures that the event can't move outside of it's move field. It's move page (i.e. page 2) is called making it move in the given direction, waits a little to prevent lag, and then jumps back to the top, making it loop until action is pressed. And thus the events can move freely to any of the positions within their move field.
This IS a clumsy method for moving the events about, but it's very simple. In the next tutorial, we'll be looking at an alternative method for moving the events about.
Expanding on the Move Field
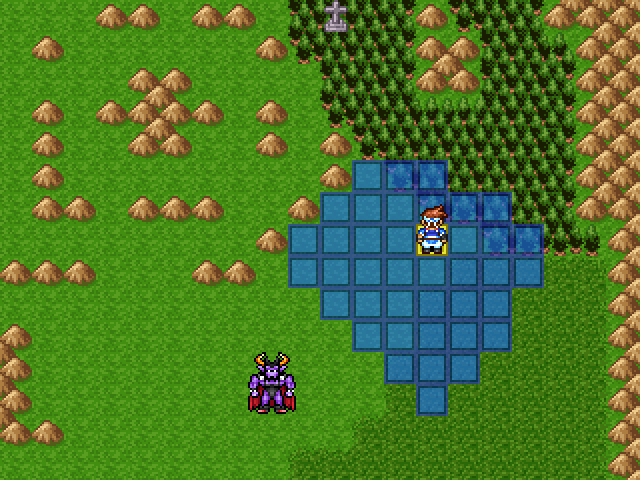
The move field we have right now is very basic, and we might want terrain to make a difference in the same way as Advance Wars did, that is, making some areas require more "steps" to cross than others. In this section we will add woods, taking two steps to cross rather than just one like normal grass will. To do this, we'll have to change our Create Move Field event. The picture above illustrates how this works in action. And now we'll take a look at how it works behind the scenes.
For this system, we can't just rely on subtracting the range for each iteration, because it will vary depending on the terrain standing in the way, so we'll have to modify the event so that it takes into account how many steps you'll have left at each of the events.
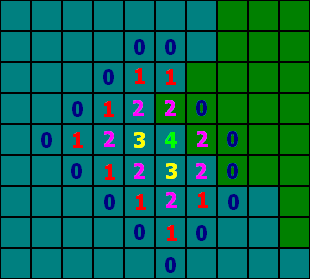
This graph basically illustrates how it would work. The Green cells signify woods and the numbers the amount of steps left from that tile. The cells with 0 are also tiles you'll be able to move to, they just mean that they have 0 range left to spawn more area for the player to move onto. So with a solution like this, we'll need as many variables as the maximum amount of move tiles we can have. In our case that would be around 88, though 100 sounds nicer, so in the sample project variables 101 to 200 is set aside for storing the range of left at the different tiles.
To deal with these we'll need 2 additional pointers. One to retrieve the range left at the current tile, and one to store the range in the newly spawned tiles. Others than that the principle is still much the same.
As you might notice, Cell Check is now gone, since it no longer serves any purpose.
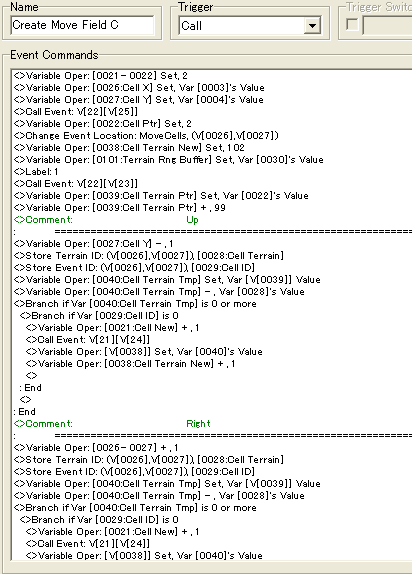
Instead we now set Cell Terrain New to 102 as to point to the second cell to be created and with variable 101 being set to the range for the current event. We then load Cell Ptr into the variable containing the value of the current event ID and then add 99 to get the equivalent range variable for that event.
To decide how many steps terrain takes, we use the terrain values. Earlier any value apart from 1 would be impossible to walk on, now they indicate how many steps you have left instead. To make certain terrain unpassable it's convenient to just give them a very high terrain ID so that it wouldn't be possible to walk on them without having to create a special condition.
As before we get the Event and Terrain ID from the position we want to spawn another move tile onto. We then get the range left for the current tile, subtracts the terrain ID we just got and check if it's 0 or larger. If yes and there is no event blocking the way, we can move there and we store the result of Cell Terrain Tmp into the variable corresponding the new tile's range value through the Cell Terrain New pointer. Afterwards it's increased by one so that it's ready to set the range left for the next tile.
Since we don't have range left in the same way as earlier, we have to find a new criteria to stop the loop, And in this case, it will have to be once Cell Ptr has reached the same value as Cell New. This would mean that no new move tiles could be created and as such the loop will be terminated.
And with that, we'll have managed to adjust the event to take terrain into consideration as well. This concludes this tutorial. For the next one we'll look at how to make an object find a path from a point A to a point B within a given range while navigating through any kind of obstacle.
You can find the next tutorial here Path Finding Tutorial
A sample project containing the code from this tutorial can be found here:
Sample Project
A tiny warning: this will assume at least intermediate experience with rm2k3, so if you're new to the engine and find this quite baffling, it's because this tutorial isn't suited for beginners. This tutorial will require knowledge of Pointers as well as basic understanding of how coordinates work among other things.
This is going to be a lengthy tutorial. If you just want to look at the code you can do so by downloading the sample project: Download
The tutorial is divided into these sections:
- How to approach the problem
- How to create a basic field for movement
- How to apply these fields to events
- How to expand on the move field to take different terrain into consideration
How to approach the problem
This section is purely theoretical and about how to think about approaching custom systems in general and this one in specific. If you're only interested in the implementation you can skip this part and continue to the next section.
This is a kind of system where you simply can't just start coding without a plan of how it should work. The first thing you do when trying to create a system like this is to try to think of the requirements the system should fulfill, and then give some thought to what problems could arise which makes this difficult. So let's look at how a move system like this would normally look. Something like this, right?
The yellow square marks the player and the blue fields the possible locations it can move to if it can move 4 tiles during it's move. And this shape looks relatively simple to recreate if you know a little about eventing. Heck, maybe it would be as simple as taking the coordinates of the start position, and then start moving the event around, subtracting it's new coordinates with the old ones, then multiplying any negative answer with -1 and add them together. That would allow the player to move within the same pattern, and that should work... right?
However if the red square marks an obstacle, then we would only want the player to only be able to move within the blue area, but with the above method you'd still be able to move at the green area, since the coordinates would still want to create the shape, and simply just preventing the player to move onto obstacles won't be enough. And thus we've located a problem which we need to handle. Ideally you want to find think of all problems before you even start eventing. Ideally. Of course, that's rarily how it will work when you're creating custom systems and you shouldn't dwell too long on trying to think of all possible problems which can occur, but you should try to think of as many as possible, so that you can consider them when trying to event a solution. This will generally lead to cleaner code which is easier to read and change if a problem do occur. In rm2k3 this is also important in terms of organizing your variables properly, since all are global, and it's a pain to use them if they're scattered all over the array.
So what we want for this event, is to show the possible tiles the hero can move to while keeping the obstacle problem in mind. Since we'll start with a basic version, that's all we'll be looking at for starts, and we'll expand on it afterwards.
To do this, we could use events to "seek out" the possible tiles while they double as graphics as well, which is probably the most practical solution when physically showing where the player can move. This gives rise to another problem though. In rm2k3 we can't create new events at runtime, meaning they will have to be present at the map the game starts and with that in mind we will have to think how far it maximally should be possible to move, since this will decide how many events we'll need to have ready given a total free area. The formula for amount of tiles needed for a shape like that is given by:
f(n) = 2n(n + 1) + 1
with n being the range in question. This means that for a range of 4 we'd need 41 events (if we include the tile on which the player is standing, which we will be doing later on as well). This does however also mean that for a range of 20 we'd need as many as 841 events for the possibility of having a totally free area to move within.
841 is a pretty high number in terms of having that many events on the map, So we should probably consider having a considerably lower maximum. A maximum range of 6 requires up to 85 events, and is the highest range we can get without needing more than 100 events, so we will be going for that in this tutorial. This is of course something you can adjust yourself later on, the point is just to be aware of the limitation decide where the limits should be set.
Let's head back to the idea of having the events "seek out" the possible tiles for movement. This could be achieved by doing several iterations where the event tries to lay other events around itself if the range hasn't been "used up" yet. We could start at the hero position, place an event there which looks above, checks if there are any obstacles or ill terrain there or perhaps already an event which marks it possible to move there. If not, it will place a new tile there and then look to the right, then down, then left. Then the first iteration will be done and you could reduce the range by 1, since now we have placed all the tiles you could move to with a range of 1. We'd then move onto the next iteration where we'd use the events we just spawned to spawn new events. Once we've let all those events tried to spawn once, we'd have completed the second iteration and have all possible tiles to move at with a range of 2. And thus we continue to the next iteration, and then the next one, until we've reached the maximum range. Usually it takes a couple of tries to arrive at an idea like this (depending on how experienced one is), but one shouldn't be discouraged by ideas not working, and try to learn from them instead and then start over if it doesn't work out (maybe even ask in the help section of the forum if you're really stuck).
How to create a basic field for movement
Okay, so we have an idea of what we want the solution to do, but how do we implement it in terms of event code? Well, we can start with the building blocks of the field which will be used to display movement. They're going to consist of several pages which we will be using for doing stuff to that specific event.
The first page will look like this. Calling this page will return the coordinates of this event to some temporary variables called Cell X and Cell Y. The keyword here is the use of "this". By calling events directly we can control them more easily with variables. There is support for making variables point at the coordinates of an event, but would require some other event to store all the coordinates by hand into variables, and this would also make it harder to tell which event's coordinate is relevant for this particular case. In other words, the use of "this" is a powerful tool we'll make much use of.
This is the second page which again makes use of "this" to move the event to a desired location, given by the same variables used in the previous page.
And this page causes a recursive like behaviour. It's called with a similar call, and then adding 1 to the Cell Ptr which decides which event to call by it's ID. The Cell Page Clear variable is set to 3 so that it always call this page. The event itself moves back to an initial position, effectively removing it from the play area, before calling the next of it's kind until reaching a designated "stop event" which is completely empty at page 3, making this chain of calls come to an end.
The above page is empty, so that action key won't trigger any event script, and the two above that again are only for graphic representation. And that's how are events for the moving tiles will look. The good thing about them is that there's no special variable set to any of them, meaning you can copy once and paste as many as you want without having to fiddle with them further, which is especially good considering the potentially large amount of them we'll be having when wanting to move longer than 6 tiles during a turn.
Something important is that they all need to form a consecutive sequence in terms of event ID's in order for us to be able to call them properly, and also for not making the chain of call events which resets their position go awry. Also, there's need for an empty event with 3 pages with the event ID following the last move tile, so that the clear chain will come to an stop and not end up trying to call some non existing event page.
And now we need to make use of these events. The idea is to place an event at the player location, which then checks the tile above, then right, then below and finally left. If these tiles are free it'll spawn new move events onto these, and we'll continue a new iteration. This means that the events will should be spawning in the following order:
The different colours denote different iterations and the numbers at which point they are spawned starting at 1, which is where the player will be located. Try to follow the sequence and make sure you understand why they are spawned in that order and try to figure out how the sequence would continue for the next iteration.
There are two key variables needed for producing this pattern. One variable which points to the current event which is to spawn new events, and the variable which points to which event to spawn, based on the event ID's. In the sample code, variable 0022 Cell Ptr handles the current event tile, while 0021 Cell New handles which event to spawn.
In the sample code, the ID of the first move tile starts at 2 and continues to 89, with 90 being the "stopper event". As thus, we start by setting both Cell Ptr and Cell New to 2, since this is the starting point. When then set a variable Cell Check. This one marks at what ID Cell Ptr should be to indicate that the current iteration is over. Since the first iteration start and end at the first event, that is at event ID 2, this is what we'll set it at as initial value. If the Cell Ptr is at the same event as the one given in Cell Check, Cell Check will take the value of Cell New at the end of spawning all events nearby that event, since Cell New will contain the ID of the last spawned event.
Around now, it will probably be a bit difficult to keep track. If this is the case, then you should use the grid above showing in what order they are spawned to help you understanding how this works. In the Grid, Cell Check would first have been one, and then set to 5 since that's the last value Cell New had upon having spawned tiles at all neighbour spaces. Then it would spawn events at all free tiles around #2, then #3 and such until #5, which is the same as Cell Check, and means that it will updated again, this time to 13, since that's the current value of Cell New.
For each iteration, we will subtract the Range variable with 1, and as soon as it reaches 0 the event ends. This is done by the branch right below label 1. The next step is to retrieve the coordinates of the current event. This is done by calling on the event with Cell Ptr as ID and as variable Cell Page Coordinate as page. Cell Page Coordinate is set to 1, which equals the page returning the coordinates of the current event. Once this is done it starts checking the tiles around it.
Remember that the coordinate system in a computer normally has a reversed y-axis, meaning that subtracting by 1 to the y coordinate means you'll go up. This is what we want, so we subtract the current y value by one, then use the commands Store Event ID and Store Terrain ID to figure out if the tile is free. If the terrain = 1 and Cell ID = 0, that means there's nothing standing in your way so with that, we'll add 1 to Cell New and use it to call an event with same ID and at page 2, which we remember to change it's location to that given in Cell X and Y, which at this point is right above the current event.
Following this, we add 1 to both Cell X and Y to get the tile to the right and repeat the process.
The only difference for the different directions is that we adjust the coordinates accordingly. At the end we check if Cell Ptr equals Cell Check as explained above, and set Cell Check to Cell New if so, as well as reducing the range by one. At the end, we increase Cell Ptr by 1 in order to continue to the next event, and we then go back to label 1, thus looping until the range is reduced to one. Something you'd might consider adding is an additional branch which would ensure that Cell Ptr never goes above 89 due to some bug, which would probably end in an error message.
There might not be any need to, but extra safety doesn't hurt, especially if something goes unnoticed and a player somehow manages to find that bug. Maybe adding a message saying something along the lines of "something which shouldn't have happened occured at event xyz". (There is in fact one bug which can occur given the right circumstances with the current event. I challenge YOU to figure out what it is)
This is all we need to create a basic field for movement. Adding a trivial event running on parallel process which checks for key input and then calling this event will create something like this:
Just remember that you will have to set the Cell Range variable to a value as well as setting Cell X and Cell Y to the coordinates of the player prior to calling the event.
How to apply these fields to events
Now we can create a field allowing us to move n amount of tiles, but that's no good unless we have some way of applying it to the events we want to move. As such we'll add two events which will want to make move. Alex and a Demon.
Again, we make use of events pages and "this" for the sake of retrieving data we may want. Both Alex and the Demon are alike event wise, almost only differing in terms of graphics. Page 1 returns the coordinates, page 2 makes the event walk one step in a direction given by a variable and the last picture sets the range for this event. Alex has been given the range of 5, while the Demon only has 3. The last page is empty to prevent interference by triggering of action key at the event. Also notice that they are set to "above". This is for aesthetic reasons making the hero, in the form of a cursor, appear below them.
We want to be able to trigger their move ranges upon clicking on them, and not otherwise, so we'll need an event which handles key input.
At first, we await key input from the player. One the action key is been pushed, the coordinates are stored into Select X and Select Y, which will remember the original position, and we then store the event ID of that position. If there's no event there. Now we'll need 4 new variables. Ally ID Start, Ally ID End, Foe ID Start and Foe ID End. Ally ID Start will contain the lowest ID of the events which make up the player events, and Ally ID End the highest. The Foe ID's works the same just for the Foe's. This means that also their ID's has to be arranged to form a consecutive sequence. Scattering their ID's about will make it considerably harder to check for their ID's, especially if there are many of them. If you're unsure whether you might need more, just make space ahead of time by creating some empty events working as placeholders. Also remember you'll be able to adjust the ID's whenever you want by variable operations.
If the position where you pressed the action button at contained a playable movable event, the Select coordinates will be stored in Cell Coordinates in preparation for calling Create Move Field. We also have two switches Enemy Move and Player Move. These control the colour of the move tiles. Blue for the Alex and red for the Demon. The Call event in there calls the page which sets the range variable. We'll use Select ID for to refer to the event, and another variable containing a constant equaling the page we want.
After this, we may call Create Move Field, then we call an event to handle moving the events about and afterwards we set Cell Ptr to 2 and calls it's Clear Page, so that we can remove all the move tiles after having moved the event. Now let's take a closer look at the event moving the the player (and demon) about:
At the top, I've set a switch on which prevents triggers a parallel process which prevents the hero from moving as long as the parallel process is active. This is followed by a key input which checks if the action button is being held down by not waiting for the key to be pressed, and goes to the next loop once it's not held down anymore. This is done so that there won't be a need to check the "wait until key is pressed" for the second key input as well without instantly ending the event (since action button has been set as trigger to end movement).
The reason why we'd want the wait for keypress to be unchecked is to allow for more soft movement of the events by not having to constantly press in the direction they wish to go. Once a direction is pressed, it is stored in the variable Select Direction, and if you payed attention to page 2 in the Alex event, you'd see that the directions it'd move at for the different values corresponds to the values retrieved by the key inputting process. The value is stored into another variable to allow for ease if the another instance would have use for moving the events by their event pages. In this case it would make more sense to use a temporary variable rather than using the key input variable again, though it would save us one variable operation in this particular instance.
Following this, we adjust the coordinates of the events current position for it's direction by a bunch of branches and then jump to a label below. When you have a lot of branches in a row like this while still having more code to execute after it, it would be beneficial to add a label at the end of the branches and jump to it once one of the branches is taken since only one can be taken anyway in this case.
After jumping to the label, we Store the event ID of that position and check if it equals an event ID higher than 0 and lower than 90, meaning that it'd be one of the movable tiles. This ensures that the event can't move outside of it's move field. It's move page (i.e. page 2) is called making it move in the given direction, waits a little to prevent lag, and then jumps back to the top, making it loop until action is pressed. And thus the events can move freely to any of the positions within their move field.
This IS a clumsy method for moving the events about, but it's very simple. In the next tutorial, we'll be looking at an alternative method for moving the events about.
Expanding on the Move Field
The move field we have right now is very basic, and we might want terrain to make a difference in the same way as Advance Wars did, that is, making some areas require more "steps" to cross than others. In this section we will add woods, taking two steps to cross rather than just one like normal grass will. To do this, we'll have to change our Create Move Field event. The picture above illustrates how this works in action. And now we'll take a look at how it works behind the scenes.
For this system, we can't just rely on subtracting the range for each iteration, because it will vary depending on the terrain standing in the way, so we'll have to modify the event so that it takes into account how many steps you'll have left at each of the events.
This graph basically illustrates how it would work. The Green cells signify woods and the numbers the amount of steps left from that tile. The cells with 0 are also tiles you'll be able to move to, they just mean that they have 0 range left to spawn more area for the player to move onto. So with a solution like this, we'll need as many variables as the maximum amount of move tiles we can have. In our case that would be around 88, though 100 sounds nicer, so in the sample project variables 101 to 200 is set aside for storing the range of left at the different tiles.
To deal with these we'll need 2 additional pointers. One to retrieve the range left at the current tile, and one to store the range in the newly spawned tiles. Others than that the principle is still much the same.
As you might notice, Cell Check is now gone, since it no longer serves any purpose.
Instead we now set Cell Terrain New to 102 as to point to the second cell to be created and with variable 101 being set to the range for the current event. We then load Cell Ptr into the variable containing the value of the current event ID and then add 99 to get the equivalent range variable for that event.
To decide how many steps terrain takes, we use the terrain values. Earlier any value apart from 1 would be impossible to walk on, now they indicate how many steps you have left instead. To make certain terrain unpassable it's convenient to just give them a very high terrain ID so that it wouldn't be possible to walk on them without having to create a special condition.
As before we get the Event and Terrain ID from the position we want to spawn another move tile onto. We then get the range left for the current tile, subtracts the terrain ID we just got and check if it's 0 or larger. If yes and there is no event blocking the way, we can move there and we store the result of Cell Terrain Tmp into the variable corresponding the new tile's range value through the Cell Terrain New pointer. Afterwards it's increased by one so that it's ready to set the range left for the next tile.
Since we don't have range left in the same way as earlier, we have to find a new criteria to stop the loop, And in this case, it will have to be once Cell Ptr has reached the same value as Cell New. This would mean that no new move tiles could be created and as such the loop will be terminated.
And with that, we'll have managed to adjust the event to take terrain into consideration as well. This concludes this tutorial. For the next one we'll look at how to make an object find a path from a point A to a point B within a given range while navigating through any kind of obstacle.
You can find the next tutorial here Path Finding Tutorial
A sample project containing the code from this tutorial can be found here:
Sample Project
Posts 

Pages:
1


This is awesome, though I don't understand more than 50%.
I have tried this once, different method, ignoring the obstacles issue. There are commands I had never used, like "call event - variable reference" and get terrain id. Now I see how they can come in handy.
I have tried this once, different method, ignoring the obstacles issue. There are commands I had never used, like "call event - variable reference" and get terrain id. Now I see how they can come in handy.
I absolutely wish I had this handy when making my tactical system in Rm2k3. For many of these very concise steps, I took a very long way around.
Most interesting but it would require me to read over and over again but I found this useful in some aspects, this is the first TBS tutorial on Rm2k3 I have ever seen.
BINGO! I've had a breakthrough after reading your tutorial continuously and I was able to develop my own idea! I have a problem though, I'm not able to generate a move field the same way as yours, I was wondering if I could use your assistance for this.
I can change event location to where I want but I want to develop a pattern like yours in the tutorial, I'm assuming you used that 2n(n+1)+1 formula?
I can change event location to where I want but I want to develop a pattern like yours in the tutorial, I'm assuming you used that 2n(n+1)+1 formula?
The f(n) = 2n(n+1)+1 formula is only to determine how many events you'll need to move a maximum of of n steps, which is important to know upfront since you can't create new events at runtime, so you need to create them at the maps first, and with consecutive ID's, meaning it could get tricky to try an add more right afterwards if you figure you don't have enough.
if you want a unit which can move the furthest of all units in the game, and it should be able to move 10 steps, then you can use the formula to figure out that you need 221 events to be able to fully represent a move field for that event, in case of it walking in a totally obstacle free area.
As for the algorithm I'm using for actually generating the field, it's basically like this:
1. Place first event at hero
2. Check if there's the range steps has all been used up, if yes terminate algorithm.
3. Check above event for free space to place new move event
4. Check to the right + same as above
5. Check below + same
6. Check to the left
7. Check if the ID of the current event created at last for that "step iteration", and if so, reduce range by 1.
8. Point to the next ID of the next move event and go back to 2.
This is principle of how the basic algorithm works. For the second one, you add a set of pointers which tell you how many steps you have left at the different event ID's, which you store into some variable as soon as you switch event you're working with (i.e. once you point to another event ID)
The plan so far is to look on "player interfacing" in the next part of the TBS tutorial series. This includes how to make players attack, to make enemies lose hp and stuff like that.
After that, I'm planning on concluding the series with how to implement a "simple" enemy AI, which will be using something similar to the dijkstra algorithm from the other tutorial to determine where to go (which is important if the enemy is far away from the player and there are lot of obstacles on the map).
That's the plan at least.
The combat won't look very fancy though. Think advance wars without the scene showing the units attack each other.
author=KazesuiFancy isn't essential, I'm looking for functionality, looking forward to the rest of the tutorials!
The plan so far is to look on "player interfacing" in the next part of the TBS tutorial series. This includes how to make players attack, to make enemies lose hp and stuff like that.
After that, I'm planning on concluding the series with how to implement a "simple" enemy AI, which will be using something similar to the dijkstra algorithm from the other tutorial to determine where to go (which is important if the enemy is far away from the player and there are lot of obstacles on the map).
That's the plan at least.
The combat won't look very fancy though. Think advance wars without the scene showing the units attack each other.
This is how the TBS will look in the end: youtube link
No idea when I'll write the two remaining tutorials yet, but at least the system is done so it's only a matter of sitting down and writing the tutorials
No idea when I'll write the two remaining tutorials yet, but at least the system is done so it's only a matter of sitting down and writing the tutorials
What, I have to make game too?
initially, I had no plan of making a game with the system, but having worked with it, an idea did pop into my mind. But I also have lot of other stuff to do, so only time will tell if I'll make something out of the idea.
initially, I had no plan of making a game with the system, but having worked with it, an idea did pop into my mind. But I also have lot of other stuff to do, so only time will tell if I'll make something out of the idea.
I wouldn't mind a short 5 mission or whatever tactics game in its current simplicity. IDK I've always wanted to make a game similar to advance wars but really stripped down (less units, less mechanics etc.) just because I like the cool factor of ordering your troops around while they make little footstep noises. Or even those ambush cutscenes where empire soldiers come out of forest tiles and the enemy general yells "HAHA WE GOT YOU NOW" in a cheesy way. Anything beyond that is probably a HUGE task even if you're not using RPG Maker though.
Been using this tutorial to help me with a non-rpgmaker, non-tactics but still kinda grid based game lol
Pages:
1

