


LIGHTING BY LOTUS GAMES
Create atmospheric maps using lighting effects for your game!
 Lotus_Games
- 02/17/2012 06:07 AM
- 29131 views


Objective: To provide knowledge on the fundamentals of adding atmospheric lighting effects to your game maps in order to achieve a greater sense of atmosphere and to give individual maps a more distinct and aesthetically pleasing visuals.
Effect:
Pre-Requisites:
-You must have Photoshop or an image editing tool.
-You must have your map made before you can add lighting effects on top.
-Be creative!
How to Get the Effect:
Step 1: You must import a map you have already created OR you can create one from scratch using Adobe Photoshop or another image editing tool. For this example I opened up Photoshop, pressed Control + N for "New" and entered in the dimensions:
320X240 which is the standard resolution for Rpg Maker 2003. I set the resolution to 250.
Note: A higher resolution will result in a higher file size.
I then went on to create my map using various chipsets pieces(Rpg Maker mapping graphics) as well as various textures that I applied to the floor and ceiling.
Step 2: Create Your Shadows. I took each individual object that I used (Note: Each object is placed in it's own Photoshop layer), and made a duplicate by pressing Control + J, then I went to "Edit" then "Transform" and finally "Flip Vertical."
Next I pressed Control + U and changed the "Lightness" all the way to the left or black. Next I changed the transparency of that layer...or object to anywhere from 25-50% depending on where I imagined the light source to be.
Step 3: Add an SFX. After the shadows were added I took a special effects image from my rpg game folder and applied it to it's own layer. I reduced the transparency to something similar to what I may use in the engine itself. This is to give you an idea of what your map will look like while you are playing it.

Step 4: Add a Tint. Next I added a tint to the map on a layer on top of the SFX image. This is to further test the ambiance you want to go for. In order to do this create a new layer, click on the Paint Bucket Tool OR hit "G" then select a color of your choice, I choose black. Paint over the entire image and afterwards reduce your transparency to whatever your like (A deep dungeon will have a higher opacity while a forest might have less)I set my transparency to about 15% for this layer.

Step 5: Adding Lighting Effects. This step is the "Holy Grail" of the Lighting Tutorial. What you need to do is select a Brush by pressing "B" and make sure it is on the Brush tool and not the Pencil tool. Next you want to choose a brush type. You want one with a fading opacity, one that starts visible in the middle and than fades as the size increases. Choose any of the "Soft Round" brushes from the brush drop down selection at the top left of your Photoshop window (It is located right under "Edit" next to a paint brush icon). Now what you want to do is start off with a SMALL brush and a HIGH opacity. This will indicate the light source when you apply it to a NEW LAYER. You than want to increase your Brush Size while DECREASING your Opacity and each time adding/applying the brush to a NEW layer. This will give you a lighting effect that fades as it moves away from the source.

Step 6: Continue to build your lighting layers on top of your map. With each layer you make, adjust your Blend Mode for that layer with either: "Overlay" "Soft Light" or "Color Dodge". Play around with it and use trial and error to see what works best for your map.


Step 7: After your light sources have been placed. Look to see what more you can add to adjust the effect. Play around with Brush Size and Opacity and touch up on the lighting effect, once again adding a new layer every time you use the brush on your map.
Note:The reason you want a new layer every time you click on your map with your brush is so that if you need to adjust something later on, you can adjust that individual layer. If instead you do everything on just one layer, you may have to delete all your work and start over if even one bit of the effect is off.


Step 8: Final Touch Ups. For this step I added more shadows by duplicating an individual lamp shadow layer (This is why multiple layers are helpful) and than rotating it to the left and right. I than changed the rotated shadows to a lower opacity and placed them so they come off of the light source. I also updated the positioning of the shadows to better match the light source. I also added some light on the bottom of the lamps using a brush with color: white and low opacity. Finally I adjusted the tint to make the room darker and finished off by adding "Movie-esq" borders to my screenshot giving the map a cinematic feel.
For RPG Maker Users: If you are using 2003 or below you do not have access to alpha channels for your image. Therefore you need to merge all of your lighting layers with a colored background...if you want your map to be tinted, the color can be pretty much anything (Yes even black, all you have to do is copy your image and put it into your "Picture" folder instead of importing it from RPG Maker, that way the black tint will show and it won't appear transparent) Or if you want say a blue tint you can merge all of your lighting effects layers on top of a blueish background and import it. If you don't want a background but just want the lighting effects, make sure you merge your lighting layers onto a black background and import it in RPG Maker 2003. Also make sure your picture is indexed by by going to "Image" on your tool bar in Photoshop and then "Mode" and finally "Index Color". And you are all set!
For RPG Maker XP or VX users, alpha channels are supported so you don't need to worry about transparencies, just import your lighting effects picture like any other resource.
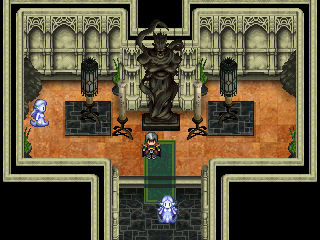
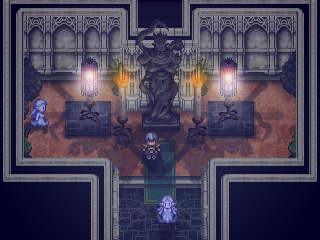
Final Results:
We went from this-
to this-
You can always adjust each shadow and each tint depending on what you want your map to look like, that is why I always recommend using multiple layers. If you feel the effect is too strong, you can dim it down by decreasing the opacity...if it is hardly noticeable you can always increase your opacity for each layer.
This Lighting Tutorial gives you the foundation of what you need in order to achieve a unique and interesting look for your game using lighting techniques to enhance your already stellar maps.
-Lotus Games
About the Author:
Hello, I'm Kannes a budding entrepreneur. I am an avid designer of many things creative. I am an enthusiast of game design, music, performance art, and even martial arts. I find a great freedom of expression and self through my work and find pleasure in learning and it's a pleasure to have "met" you.
Posts 

author=JosephSeraph
Yep, but I disregard everything you said about RM2k's engine being poorer than the SNES. The userbase? They do it for hobby, not for profit. Of course there'll be My Rtp Adventures.
But it's quite obvious that SNES is more limited in a lot of stuff than 2k, starting straight down with the resolution, wich is a big, big deal.
I just said that you can pay a little more atention and not blame it on the engine hahaha
The main difference between RM2k/3 and the SNES is the power of the machine it's running on. Run on the same hardware as the SNES, RM2k/3 would be subject to the same graphical limitations before lagging. But as any computer put out in the last 10-15 years greatly dwarfs the power of the SNES, RM2k/3 can do things that the SNES couldn't dream of doing for fear of lagging out the hardware. Between creative eventing and good use of exterior graphics programs, RM2k/3 can make games that look BETTER than the SNES' games - and on par with some of the early Playstation games (ever played Beyond the Beyond?). Is it easy? Not necessarily. Can it be done? For sure.

This is exactly where I was trying to get <3
Stuff like SaGa Frontier & SaGa Frontier 2 is fully doable in rm2k/3, for instance.
Or Pre-Rendered 3D, so many times used in PS1, can even be used to recreate Resident Evil-ish styled stuff. (And there's Nemesis for rm2k3, wich serves as Proof of Concept)
Stuff like SaGa Frontier & SaGa Frontier 2 is fully doable in rm2k/3, for instance.
Or Pre-Rendered 3D, so many times used in PS1, can even be used to recreate Resident Evil-ish styled stuff. (And there's Nemesis for rm2k3, wich serves as Proof of Concept)

I think both have flaws, and regardless of my own technical prowess, I still haven't full implemented the level of lighting or AI that I would like too. regardless if this tutorial helps anyone or just a few people, I believe that it's a great tutorial and it helped me. Gave me something to think about at least. As an up and coming game developer I have to admit this engines flaws and draw backs, but honestly, that's been my biggest drive and inspiration. My game, would not be nearly as an impressing feat (for myself and my standards) if the engine was more robust. It's been a labor of love and a way to share my stories with other people. The journey, regardless the engine, has been more than worth it. I have made truly amazing friends and the doors keep opening. This is only a step, and if anything is a great way to jump start your portfolio for your future. Those are my thoughts.
I still have no clue on how to do lighting I'm confused on how to get the correct image size to overlay the lighting picture over my maps.
Is there anyone out there that can do it professionally on these forums ?
I don't even know how to draw the lighting using a photoshop program , I mean what is the best photoshop software to use for rpg maker 2003 lighting imagery ?
can anyone make a beginners guide on youtube ? might make it better to learn if I can actually see how people do it.
I still have no clue on how to do lighting I'm confused on how to get the correct image size to overlay the lighting picture over my maps.
Is there anyone out there that can do it professionally on these forums ?
I don't even know how to draw the lighting using a photoshop program , I mean what is the best photoshop software to use for rpg maker 2003 lighting imagery ?
can anyone make a beginners guide on youtube ? might be better to learn if I can actually see how people do it.
Can you use this method for directional lighting like a flashlight effect or is it a different method entirely?

