


MAPS AS TITLE SCREENS...
A mostly simple tutorial on making highly customizable title screens
 giaks
giaks- 08/29/2013 09:43 PM
- 29484 views
Want to see more examples of title screens you could make using this tutorial?
Today I'm going to cover a quick easy way to get your game's title screen to potentially stand out from the rest. Using this technique and your creativity, you will be able to achieve a high level of customization without using any pre-made scripts. We will however be using the script editor to do some very simple modifications to how the current title screen works. So let's begin...
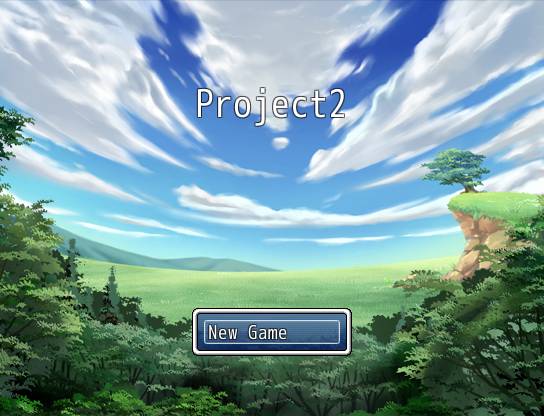
If you manage to make it all the way through this entire tutorial, you will have created a title screen that looks something like this:
GOALS:
1) Modify how the current title screen works so it acts more as a splash screen.
2) Move the game's title screen to a map so we can unlock all the beautiful features of events and scripts.
Tutorial:
Part 1 - Step 1
Eliminate the continue and shutdown options on the title screen.
We are going to jump right into this by opening up the Script Editor (F11)
On the left side scroll down until you find:
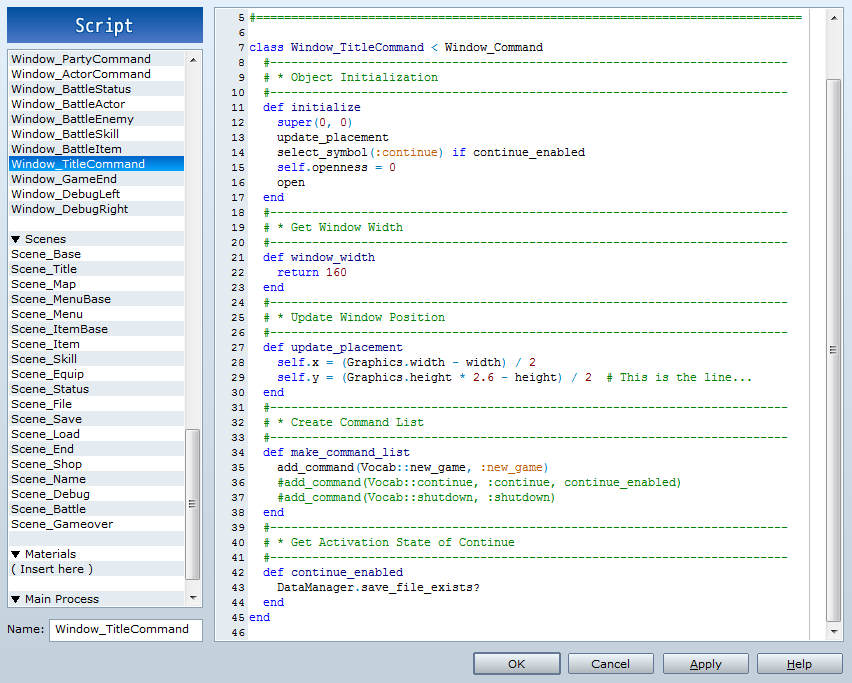
Window_TitleCommand
When you click on it, you will see the right side of the editor now displays the Window_TitleCommand script. You will notice that there is green text throughout the script, and always at the beginning of this text you will see a hash mark '#'. This mark indicates a comment, and the game will 'skip' over these lines because they are not considered executable code.
On the right side of the editor find the comment 'Create Command List'.
In the command list you will probably notice the words 'new game', 'continue' and 'shutdown'. These are the same commands you are offered at the default title screen. What we want to do, is get rid of the continue and shutdown options.
To do this, simply add a hash mark at the very beginning of the lines that say 'continue' and 'shutdown'. This will make the game think that those lines are comments and it will not run them as code.
If done correctly, your title screen should now look like this:
Part 1 - Step 2
Hide the new game window.
Let's go back into the Script Editor (F11)
You should still be on the Window_TitleCommand script, if not find it again on the left side of the editor and click on it.
Now on the right side find the comment 'Update Window Position'. This is the code that tells the game where to place the menu window for the title screen. We are simply going to push the window off the screen, so the player can't see it.
To do this simply find the number:
1.6
It should be only a few lines below the 'Update Window Position' comment.
Once you find it, change it from '1.6' to '2.6'
That will push the window down and off of the viewable area of the screen.
When you are finished your script editor should look something like this:
and your title screen should look something like this:
--------------------------------------------------------------------------------------
Want to skip any sort of user input? Want to make your 'Splash screen' disappear on it's own? Want to skip the title screen altogether and go straight to a map/map title screen?
That is a very good question Rave! :) I'm glad you asked. This can be accomplished with 4 very simple script edits...
----------------------------------------------------------------------------------
We are going to start by going back into the Script Editor (F11).
On the left side, scroll down until you see Scene_Title.
We will be working entirely within this section of script.
On the right side, we need to find the * Start Processing section.
Just below that we will find "create_command_window" (it should be roughly line 17).
We need to add a Hash tag '#' in front of it, so the engine does not run that section of the script.
When you finish it should look green, like this: #create_command_window
Now go to the end of line 17 and press enter.
This should add a blank space at line 18. Here we are going to type 'command_new_game'. This tells the script to automatically run the new game command without any user input.
We are half way done, however before you can run it we still need to change up 2 lines of code.
Next find the * Termination Processing section.
In this section, just under the word: super
add the line: 800.times { Graphics.freeze }
This is basically how we get the "Splash Screen" to pause for a few seconds before continuing to the title. It seems that about every 200.times = 1 second. So 800.times = 4 seconds, 1200.times = 6 seconds...and so one. This will be how long your "Splash Screen" will display until moving on.
If you didn't want a splash screen you could leave this line out and set your title graphics to 'None' in the database.
To finish this off, on the right side find the * New Game Command section.
It should be down around line 105ish
Within this section find the line that says 'close_command_window'.
As we aren't running the command window, we can't close it. So put a Hash tag '#' in front of this line to make it appear as a comment so the engine won't run it as code.
It should turn green and end up looking like: #close_command_window
----------------------------------------------------------------------------------
...and that's it! Now you can run a Splash Screen(or not) to your map title menu without the need for any pesky user interaction. I hope this helped Rave. If I can ever assist, let me know. :)
--------------------------------------------------------------------------------------
Moving on to our second goal...
This is where your creativity comes into play. I will present the basic concepts of how to emulate the title screen on a map, however because you will have access to all the functions of events, it's all up to you as to how your title screen really turns out.
Part 2 - Step 1
Create a map we will use as the title screen and make events to emulate the title screen options.
In your project create a new map.
If you don't know how to do this, you may be reading the wrong tutorial...
On this map we are going to make 4 events...
EVENT 1-
Make an Autorun event that disables save and menu access. We are trying to emulate a title screen, so you don't want the player being able to hit 'ESC' and access the menu. You will find those event commands on...
Tab 3 - under 'System Settings'
Once you have disable those, head to...
Tab 1 - under 'Game Progression' - 'Control Self Switch...'
Turn self switch A - ON.
Now on the same event, make a New Event Page and under conditions click the box that says Self Switch next to it. Make sure that it reads that Self Switch A is ON.
EVENT 2-
This is our 'New Game' event. So go ahead and rename it to new game.
Now in this event re-enable save and menu access.
We will also want to erase all of the pictures we have used to create our title screen.
Tab 2 - under 'Picture and Weather' - 'Erase Picture...'
For this example make sure to erase pictures 1 through 5.
Set the destination of the transfer to be where you want the player to start your game.
Tab 2 - under 'Movement' - 'Transfer Player'
At the end of this tutorial we will be making the character transparent by default, so we want to make sure the Player will be able to see the character on the screen once they start a new game.
Tab 2 - under 'Character' - 'Change Transparency...'
Transparency = OFF
EVENT 3-
For this event we are going to go back into our Script Editor (F11).
On the left side scroll down until you find:
Scene_Title
Once you have clicked on it, on the right side scroll down until you find the comment '(Continue) Command'.
Below that you will see a line that starts with 'SceneManager.call', Highlight and copy that entire single line.
Yes, I could have just typed it out here, and you could have copied it off of this tutorial. However I feel that it is important to get comfortable navigating the Script Editor.
Let's make our third event on our map, this is our 'Load Game' event. So go ahead and rename it to load game.
In the Event Commands...
Tab 3 - under 'Advanced' - 'Script...'
Here we are going to paste that single line of code we have just copied from the script editor.
EVENT 4-
Again open up the Script Editor (F11) and again find:
Scene_Title
On the right side scroll down until you find the comment '(Shut Down) Command'
Once again a few lines below it is another 'SceneManager' this one says exit rather then call. Highlight and copy this entire single line. Then head back out to our map and create our fourth event. Much like the load game event we are going to go into the Event Commands and head to...
Tab 3 - under 'Advanced' - 'Script...'
Paste the single line of code here.
As a final note about events 2-4 in this example, you will want to make sure that the 'Priority = Same as Characters' and the 'Trigger = Action Button'
Part 2 - Step 2
It's time to make the title screen.
We now have the basic frame work for our title screen, this is the part that requires your creativity. How do you want to use these events? Are you going to make them into NPC's that will allow you to start, load or exit your game? Are you going to make them into doors that the player can enter to access start, load and exit? Are you going to limit the players movement and make a cut scene happen while they choose what to do? The options are nearly endless, however for this tutorial I'm going to use the 'Show Picture...' and 'Conditional Branch...' commands to make my simple custom title screen.
If you aren't quite sure what the next steps to turning this map into a title screen are, please continue this tutorial. However at this point the foundation has been laid and I consider the next part of the tutorial more an example then a tutorial, though I will try to present it as a tutorial.
If you want to follow along I have uploaded the images I made for this tutorial here:
CLICK HERE TO DOWNLOAD THE IMAGES USED IN THIS TUTORIAL
Click the Show button to continue this tutorial...
Today I'm going to cover a quick easy way to get your game's title screen to potentially stand out from the rest. Using this technique and your creativity, you will be able to achieve a high level of customization without using any pre-made scripts. We will however be using the script editor to do some very simple modifications to how the current title screen works. So let's begin...
If you manage to make it all the way through this entire tutorial, you will have created a title screen that looks something like this:
GOALS:
1) Modify how the current title screen works so it acts more as a splash screen.
2) Move the game's title screen to a map so we can unlock all the beautiful features of events and scripts.
Tutorial:
Part 1 - Step 1
Eliminate the continue and shutdown options on the title screen.
We are going to jump right into this by opening up the Script Editor (F11)
On the left side scroll down until you find:
Window_TitleCommand
When you click on it, you will see the right side of the editor now displays the Window_TitleCommand script. You will notice that there is green text throughout the script, and always at the beginning of this text you will see a hash mark '#'. This mark indicates a comment, and the game will 'skip' over these lines because they are not considered executable code.
On the right side of the editor find the comment 'Create Command List'.
In the command list you will probably notice the words 'new game', 'continue' and 'shutdown'. These are the same commands you are offered at the default title screen. What we want to do, is get rid of the continue and shutdown options.
To do this, simply add a hash mark at the very beginning of the lines that say 'continue' and 'shutdown'. This will make the game think that those lines are comments and it will not run them as code.
If done correctly, your title screen should now look like this:
Part 1 - Step 2
Hide the new game window.
Let's go back into the Script Editor (F11)
You should still be on the Window_TitleCommand script, if not find it again on the left side of the editor and click on it.
Now on the right side find the comment 'Update Window Position'. This is the code that tells the game where to place the menu window for the title screen. We are simply going to push the window off the screen, so the player can't see it.
To do this simply find the number:
1.6
It should be only a few lines below the 'Update Window Position' comment.
Once you find it, change it from '1.6' to '2.6'
That will push the window down and off of the viewable area of the screen.
When you are finished your script editor should look something like this:
and your title screen should look something like this:

--------------------------------------------------------------------------------------
Want to skip any sort of user input? Want to make your 'Splash screen' disappear on it's own? Want to skip the title screen altogether and go straight to a map/map title screen?
author=Rave
How to make it so "current" title screen would disappear after some time so user won't have to press space?
That is a very good question Rave! :) I'm glad you asked. This can be accomplished with 4 very simple script edits...
----------------------------------------------------------------------------------
We are going to start by going back into the Script Editor (F11).
On the left side, scroll down until you see Scene_Title.
We will be working entirely within this section of script.
On the right side, we need to find the * Start Processing section.
Just below that we will find "create_command_window" (it should be roughly line 17).
We need to add a Hash tag '#' in front of it, so the engine does not run that section of the script.
When you finish it should look green, like this: #create_command_window
Now go to the end of line 17 and press enter.
This should add a blank space at line 18. Here we are going to type 'command_new_game'. This tells the script to automatically run the new game command without any user input.
We are half way done, however before you can run it we still need to change up 2 lines of code.
Next find the * Termination Processing section.
In this section, just under the word: super
add the line: 800.times { Graphics.freeze }
This is basically how we get the "Splash Screen" to pause for a few seconds before continuing to the title. It seems that about every 200.times = 1 second. So 800.times = 4 seconds, 1200.times = 6 seconds...and so one. This will be how long your "Splash Screen" will display until moving on.
If you didn't want a splash screen you could leave this line out and set your title graphics to 'None' in the database.
To finish this off, on the right side find the * New Game Command section.
It should be down around line 105ish
Within this section find the line that says 'close_command_window'.
As we aren't running the command window, we can't close it. So put a Hash tag '#' in front of this line to make it appear as a comment so the engine won't run it as code.
It should turn green and end up looking like: #close_command_window
----------------------------------------------------------------------------------
...and that's it! Now you can run a Splash Screen(or not) to your map title menu without the need for any pesky user interaction. I hope this helped Rave. If I can ever assist, let me know. :)
--------------------------------------------------------------------------------------
Moving on to our second goal...
This is where your creativity comes into play. I will present the basic concepts of how to emulate the title screen on a map, however because you will have access to all the functions of events, it's all up to you as to how your title screen really turns out.
Part 2 - Step 1
Create a map we will use as the title screen and make events to emulate the title screen options.
In your project create a new map.
If you don't know how to do this, you may be reading the wrong tutorial...
On this map we are going to make 4 events...
EVENT 1-
Make an Autorun event that disables save and menu access. We are trying to emulate a title screen, so you don't want the player being able to hit 'ESC' and access the menu. You will find those event commands on...
Tab 3 - under 'System Settings'
Once you have disable those, head to...
Tab 1 - under 'Game Progression' - 'Control Self Switch...'
Turn self switch A - ON.
Now on the same event, make a New Event Page and under conditions click the box that says Self Switch next to it. Make sure that it reads that Self Switch A is ON.
EVENT 2-
This is our 'New Game' event. So go ahead and rename it to new game.
Now in this event re-enable save and menu access.
We will also want to erase all of the pictures we have used to create our title screen.
Tab 2 - under 'Picture and Weather' - 'Erase Picture...'
For this example make sure to erase pictures 1 through 5.
Set the destination of the transfer to be where you want the player to start your game.
Tab 2 - under 'Movement' - 'Transfer Player'
At the end of this tutorial we will be making the character transparent by default, so we want to make sure the Player will be able to see the character on the screen once they start a new game.
Tab 2 - under 'Character' - 'Change Transparency...'
Transparency = OFF
EVENT 3-
For this event we are going to go back into our Script Editor (F11).
On the left side scroll down until you find:
Scene_Title
Once you have clicked on it, on the right side scroll down until you find the comment '(Continue) Command'.
Below that you will see a line that starts with 'SceneManager.call', Highlight and copy that entire single line.
Yes, I could have just typed it out here, and you could have copied it off of this tutorial. However I feel that it is important to get comfortable navigating the Script Editor.
Let's make our third event on our map, this is our 'Load Game' event. So go ahead and rename it to load game.
In the Event Commands...
Tab 3 - under 'Advanced' - 'Script...'
Here we are going to paste that single line of code we have just copied from the script editor.
EVENT 4-
Again open up the Script Editor (F11) and again find:
Scene_Title
On the right side scroll down until you find the comment '(Shut Down) Command'
Once again a few lines below it is another 'SceneManager' this one says exit rather then call. Highlight and copy this entire single line. Then head back out to our map and create our fourth event. Much like the load game event we are going to go into the Event Commands and head to...
Tab 3 - under 'Advanced' - 'Script...'
Paste the single line of code here.
As a final note about events 2-4 in this example, you will want to make sure that the 'Priority = Same as Characters' and the 'Trigger = Action Button'
Part 2 - Step 2
It's time to make the title screen.
We now have the basic frame work for our title screen, this is the part that requires your creativity. How do you want to use these events? Are you going to make them into NPC's that will allow you to start, load or exit your game? Are you going to make them into doors that the player can enter to access start, load and exit? Are you going to limit the players movement and make a cut scene happen while they choose what to do? The options are nearly endless, however for this tutorial I'm going to use the 'Show Picture...' and 'Conditional Branch...' commands to make my simple custom title screen.
If you aren't quite sure what the next steps to turning this map into a title screen are, please continue this tutorial. However at this point the foundation has been laid and I consider the next part of the tutorial more an example then a tutorial, though I will try to present it as a tutorial.
If you want to follow along I have uploaded the images I made for this tutorial here:
CLICK HERE TO DOWNLOAD THE IMAGES USED IN THIS TUTORIAL
Click the Show button to continue this tutorial...
First I have laid out what I want my title screen to look like in a image editor, in my case GIMP.
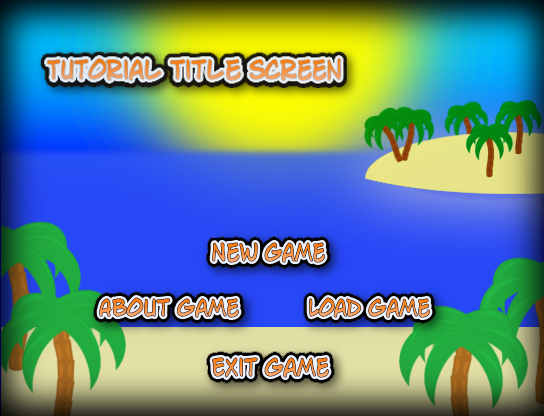
You will note that I have added an 'About Game' Option to the menu. I did this because I am going to be using the direction the player is facing to determine what option is selected, however there are many ways to do this depending on how you want your title screen setup.
Next I have saved the different components of my title screen as individual .PNG images and imported them into the project. The image 'title_para.png' I have imported as a parallax background, 'tut_splash.png' I have imported to Title 1, everything else I have imported as a Picture.
*If you don't know how to import into VX Ace, you may be reading the wrong tutorial.
Now that the images are in our project we need to display them on the screen. To do this we are going to edit our first event. On Page 1 of our first event we are going to add these Event Commands:
Tab 2 - Under 'Picture and Weather' - 'Show Picture'
Number: 1 - Picture Graphic: title_foreground - Display Position - Constant X: 0, Y: 0
Number: 2 - Picture Graphic: new_game - Display Position - Constant X: 200, Y: 240
Number: 3 - Picture Graphic: load_game - Display Position - Constant X: 290, Y: 290
Number: 4 - Picture Graphic: about_game - Display Position - Constant X: 80, Y: 290
Number: 5 - Picture Graphic: exit_game - Display Position - Constant X: 190, Y: 340
Tab 3 - under 'Map' - 'Change Parallax Back...'
Graphic: title_para
Check the box next to 'Loop Vertical'
Auto Scroll: 2
By default the player is facing down, and because we will be using the direction the player is facing as our indication for what option is select we want them to be facing up when our title screen loads. So we must turn the player to be facing up. To do this head to...
Tab 2 - under 'Movement' - 'Set Move Route...'
Make sure you have the Player selected and not 'This event'
---------------------------------------------------------------------------------------
Now lets head to Page 2.
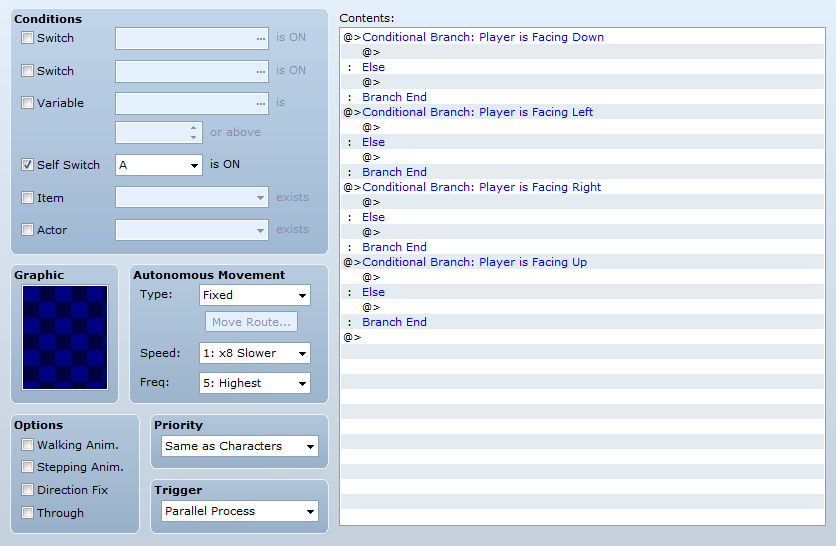
First set the 'Trigger' to Parallel Process.
Next we need to determine what direction the player is facing. To do this simply head to...
Tab 1 - under 'Flow Control' - 'Conditional Branch...'
This will open another window with 4 more tabs and a bunch of fuzzy options. For right now head to...
Tab 3
Mark the circle next to 'Character' and make sure 'Player' is selected.
Also make sure the check box at the bottom that reads 'Set handling when conditions do not apply' is selected.
We need to add four of these 'Conditional Branch...' commands, Facing Down, Up, Left and Right.
At this point the second page of this event should look something like this:
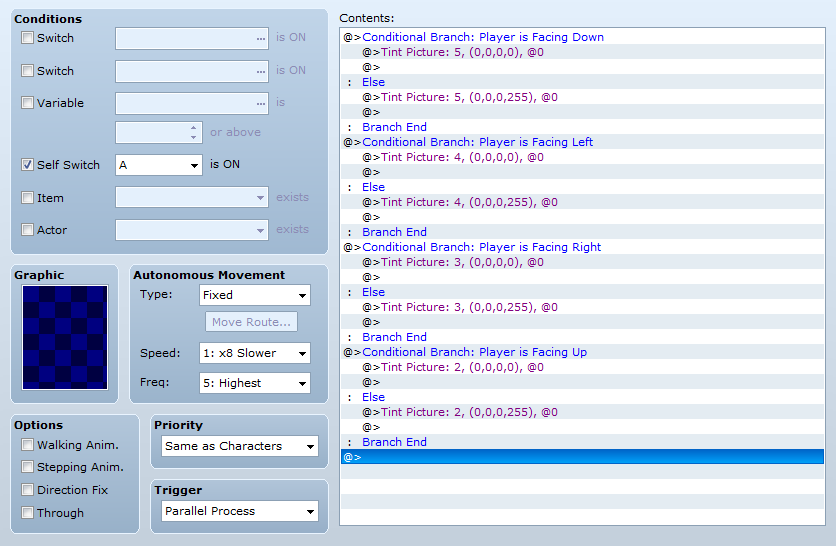
Finally, we need to indicate to the player what option is currently being selected. To do this we are going to change the tint of our option pictures. The 'Tint Picture...' Event Command can be found in...
Tab 2 - under 'Picture and Weather'
Facing UP = New Game
Facing Down = Exit Game
Facing Left = About Game
Facing Right = Load Game
I used the default tint while an option was selected, and simple put the Gray Color Tone slider all the way up when that same option was not selected. Your second page will end up looking something like this:
---------------------------------------------------------------------------------------
Part 3 - Step 1
Let's finish this sucker off!
We need to set the players start position to be on our new title screen map.
Next surround the player on all 4 sides with our events. Make sure the 'New Game' event is above the player, the 'Load Game' event is to the right of the player, the 'Exit Game' event is below the player and the 'About Game' event is to the left of the player...this is of course assuming you have made a 5th event on your map for the 'About Game' Option. This is what my 'About Game' Event looks like...
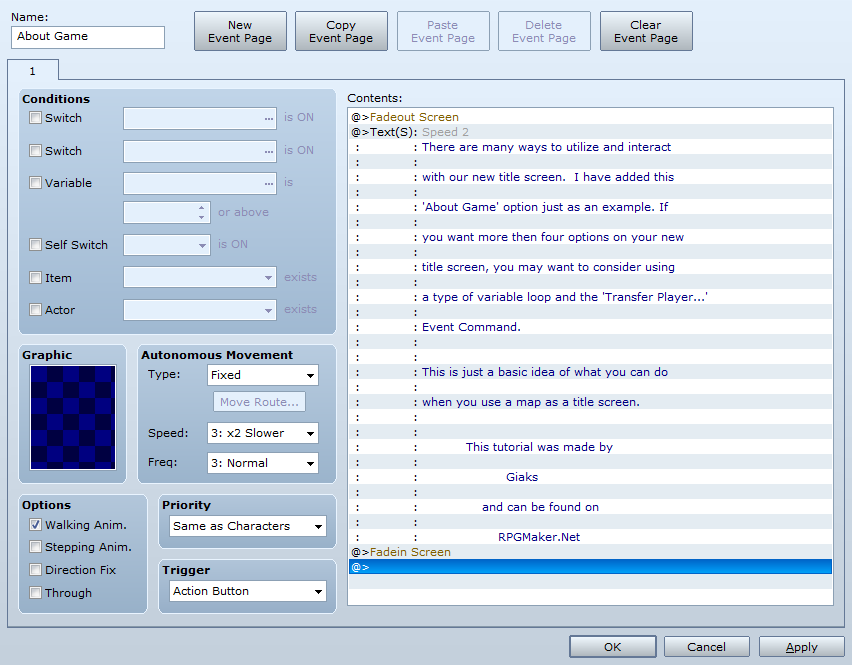
...however as I've said before this entire title screen is just a simple example, and you could do much more or even less if you wanted.
Finally open up the Database (F9).
and head to the 'System' Tab
Under 'Options' check the box next to 'Transparent ON'
Under 'Music' make sure no music is selected for 'Title Screen'
Under 'Title Screen' Select the 'Graphic' - tut_Splash, None and make sure 'Draw Game Title' is not checked.
Your tutorial title screen is now ready to be tested. With any luck it should turn out very close to the video at the beginning of this tutorial. A few suggestions that I didn't cover in this tutorial are:
Background music
Sound effects
Animated Events
and all the other great things you can do with events and even scripts when deal with maps.
You will note that I have added an 'About Game' Option to the menu. I did this because I am going to be using the direction the player is facing to determine what option is selected, however there are many ways to do this depending on how you want your title screen setup.
Next I have saved the different components of my title screen as individual .PNG images and imported them into the project. The image 'title_para.png' I have imported as a parallax background, 'tut_splash.png' I have imported to Title 1, everything else I have imported as a Picture.
*If you don't know how to import into VX Ace, you may be reading the wrong tutorial.
Now that the images are in our project we need to display them on the screen. To do this we are going to edit our first event. On Page 1 of our first event we are going to add these Event Commands:
Tab 2 - Under 'Picture and Weather' - 'Show Picture'
Number: 1 - Picture Graphic: title_foreground - Display Position - Constant X: 0, Y: 0
Number: 2 - Picture Graphic: new_game - Display Position - Constant X: 200, Y: 240
Number: 3 - Picture Graphic: load_game - Display Position - Constant X: 290, Y: 290
Number: 4 - Picture Graphic: about_game - Display Position - Constant X: 80, Y: 290
Number: 5 - Picture Graphic: exit_game - Display Position - Constant X: 190, Y: 340
Tab 3 - under 'Map' - 'Change Parallax Back...'
Graphic: title_para
Check the box next to 'Loop Vertical'
Auto Scroll: 2
By default the player is facing down, and because we will be using the direction the player is facing as our indication for what option is select we want them to be facing up when our title screen loads. So we must turn the player to be facing up. To do this head to...
Tab 2 - under 'Movement' - 'Set Move Route...'
Make sure you have the Player selected and not 'This event'
---------------------------------------------------------------------------------------
Now lets head to Page 2.
First set the 'Trigger' to Parallel Process.
Next we need to determine what direction the player is facing. To do this simply head to...
Tab 1 - under 'Flow Control' - 'Conditional Branch...'
This will open another window with 4 more tabs and a bunch of fuzzy options. For right now head to...
Tab 3
Mark the circle next to 'Character' and make sure 'Player' is selected.
Also make sure the check box at the bottom that reads 'Set handling when conditions do not apply' is selected.
We need to add four of these 'Conditional Branch...' commands, Facing Down, Up, Left and Right.
At this point the second page of this event should look something like this:
Finally, we need to indicate to the player what option is currently being selected. To do this we are going to change the tint of our option pictures. The 'Tint Picture...' Event Command can be found in...
Tab 2 - under 'Picture and Weather'
Facing UP = New Game
Facing Down = Exit Game
Facing Left = About Game
Facing Right = Load Game
I used the default tint while an option was selected, and simple put the Gray Color Tone slider all the way up when that same option was not selected. Your second page will end up looking something like this:
---------------------------------------------------------------------------------------
Part 3 - Step 1
Let's finish this sucker off!
We need to set the players start position to be on our new title screen map.
Next surround the player on all 4 sides with our events. Make sure the 'New Game' event is above the player, the 'Load Game' event is to the right of the player, the 'Exit Game' event is below the player and the 'About Game' event is to the left of the player...this is of course assuming you have made a 5th event on your map for the 'About Game' Option. This is what my 'About Game' Event looks like...
...however as I've said before this entire title screen is just a simple example, and you could do much more or even less if you wanted.
Finally open up the Database (F9).
and head to the 'System' Tab
Under 'Options' check the box next to 'Transparent ON'
Under 'Music' make sure no music is selected for 'Title Screen'
Under 'Title Screen' Select the 'Graphic' - tut_Splash, None and make sure 'Draw Game Title' is not checked.
Your tutorial title screen is now ready to be tested. With any luck it should turn out very close to the video at the beginning of this tutorial. A few suggestions that I didn't cover in this tutorial are:
Background music
Sound effects
Animated Events
and all the other great things you can do with events and even scripts when deal with maps.
Posts 

Great it Worked....
I had put all my events in a line at the top of the map, not thinking they need to be touched to activate them..Doh my brain must need oiling a bit lol.
Keep up the excellent work im loving the tutorials and learning loads.
Mike
I had put all my events in a line at the top of the map, not thinking they need to be touched to activate them..Doh my brain must need oiling a bit lol.
Keep up the excellent work im loving the tutorials and learning loads.
Mike

How to make it so "current" title screen would disappear after some time so user won't have to press space?

author=Rave
How to make it so "current" title screen would disappear after some time so user won't have to press space?
That is a very good question Rave! :) I'm glad you asked. This can be accomplished with 4 very simple script edits...
----------------------------------------------------------------------------------
We are going to start by going back into the Script Editor (F11).
On the left side, scroll down until you see Scene_Title.
We will be working entirely within this section of script.
On the right side, we need to find the * Start Processing section.
Just below that we will find "create_command_window" (it should be roughly line 17).
We need to add a Hash tag '#' in front of it, so the engine does not run that section of the script.
When you finish it should look green, like this: #create_command_window
Now go to the end of line 17 and press enter.
This should add a blank space at line 18. Here we are going to type 'command_new_game'. This tells the script to automatically run the new game command without any user input.
We are half way done, however before you can run it we still need to change up 2 lines of code.
Next find the * Termination Processing section.
In this section, just under the word: super
add the line: 800.times { Graphics.freeze }
This is basically how we get the "Splash Screen" to pause for a few seconds before continuing to the title. It seems that about every 200.times = 1 second. So 800.times = 4 seconds, 1200.times = 6 seconds...and so one. This will be how long your "Splash Screen" will display until moving on.
If you didn't want a splash screen you could leave this line out and set your title graphics to 'None' in the database.
To finish this off, on the right side find the * New Game Command section.
It should be down around line 105ish
Within this section find the line that says 'close_command_window'.
As we aren't running the command window, we can't close it. So put a Hash tag '#' in front of this line to make it appear as a comment so the engine won't run it as code.
It should turn green and end up looking like: #close_command_window
----------------------------------------------------------------------------------
...and that's it! Now you can run a Splash Screen(or not) to your map title menu without the need for any pesky user interaction. I hope this helped Rave. If I can ever assist, let me know. :)
Thanks! Anyway, maybe you could make this part of the tutorial? It would help people who want something similar and don't have time to read comments.
Maybe I'll add it in. I feel like the tutorial is already pretty long. I'm not sure how many people make it through it because of that. maybe I can add it somewhere as a 'SHOW' button or something like the second half of the tutorial. I'd be excited to see the title you made out of a map. I have made a lot of them(not many of them find their way into the public eye though). The most recent one was on All Hallows Event '13 here at RMN. Once you understand the concept behind making maps into title screens, it really does feel like it opens up a lot of possibilities(of course scripting opens up those same possibilities :p ). Anyway, here's the video of the title I made for the contest, don't watch it all just the beginning for the title haha.
I understand concept behind maps as title screen pretty well - my previous project which ended only as demo (it's in Polish and I'd need translator to show it here) was made in 2k3 using BetterAEP by Cherry to make map as title screen. In the past I've even made RGSS script for XP that basically allowed for titlescreen made with events.
But yeah, you can do some really cool stuff with events that would be hard to achieve with pure RGSS. I think I'll record titlescreen of that 2k3 game I was talking about and post it here.
//edit:
But yeah, you can do some really cool stuff with events that would be hard to achieve with pure RGSS. I think I'll record titlescreen of that 2k3 game I was talking about and post it here.
//edit:
That's awesome! In 2k3 no less. You really can do some need things with maps as title screens, and imagine in the new RPG makers...not only are you unlocking events but also other scripts. You must have put a lot of work into getting that menu.
Could someone tell me how to add the "New Game", "Load Game", and "Shutdown" functions in a map title screen in RPG Maker XP?
Just my two cents: I was able to make a title screen perfectly using only this tutorial. And I've figured out different ways of making it just from the info this tutorial gives. For example, you could block the sprite so it can only walk up and down on a certain number of squares and each one he walks on selects an option. You could even turn him into a cursor and put him over the picture. I don't know what all the butthurt is about.
Edit:
@snehkstehr, I wish I could help, but I don't know how XP works.
I have something useful to add! If you want your cursors to make noise whenever you switch options, simply create a new event and set to parallel process. Create four conditional branches, each set to trigger for one of the arrow keys. Put your chosen sound effect in the trigger portion of each branch (add a short wait after each; 10 frames is good.). That's all there is to it.

