CHIPSET HANDELING BY RPG MAKER 2003
An explanation of how RM2K3 handles (custom) chipsets.
 Trujin
- 05/01/2014 11:38 AM
- 46559 views
About one year ago, a question emerged in topic asking for help about a specific problem regarding a custom chipset used by a RM2k3 beginner. I tried to explain the solution to his problem in as much detail as I could, and it ended up being a pretty nice picture tutorial about the handling of chipsets (also called tilesets). Some months ago, Kentona asked me if I could write up a tutorial about it so the information wouldn't be lost forever in the big sea of topics. Fortunately, I finally got some time to write the tutorial up. I hope this will have some educational value for the reader and I would like to apologise for my English in advance. English is not my mother language and as such, you will probably find some typos or grammar mistakes while reading this.
Anyway, introduction:
A forum member posted a screenshot of his Editor, which showed that his custom chipset wasn't doing what it was supposed to do. The first thing that came to my mind was a mistake I made in my own early days: Simply copying the file to my game file without properly importing it (thus the transparent colour you intended isn't the transparent colour in the editor).
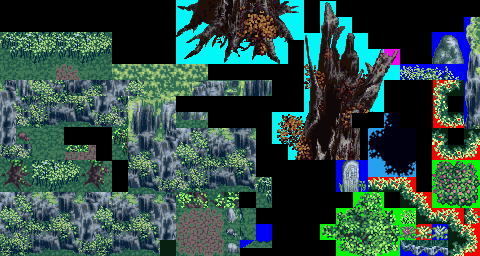
However, when he posted his custom chipset the problem became clear. The chipset didn't work because he didn't arrange his tiles in a manner that could be properly read by RM2k3. The custom "bugged" chipset looked like this:

The solution:
To fix his chipset he had to rearrange a lot of his chipsets. I also decided that it would be a better idea to make a separate charset of the tree he used. He could also use a picture for this (which is my preferred method of solving this problem), but is more suited for advance users - thus the charset.
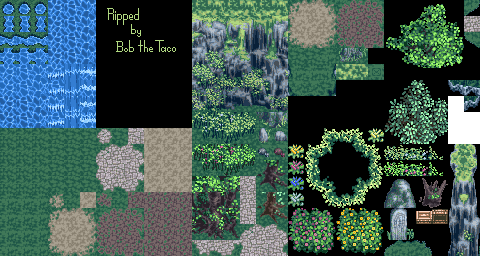
I ended up giving him these two files to use, the chipset (already existing, but basically what he needed) and the charset:


I accompanied the charset with the following post. It explains a bit about charset usage and why one would prefer it over pictures:
First off: here is the tree. I made it into a charset instead of a picture, because you would have to use a charset anyway to create the lower part of the three (pictures are always above the hero and that would look weird).
Anyways, be sure that you keep an image of the charset at hand when you try to use this in the editor. In the editor you have to place an event and set the graphic for it. Be sure to look for the part of the tree you want to show and click that piece of the character. After that, be sure to set the event's "Animation Type" to "Fixed Graphic". If you don't do this it will not show the piece of the charset you wanted to show.
The explanation:
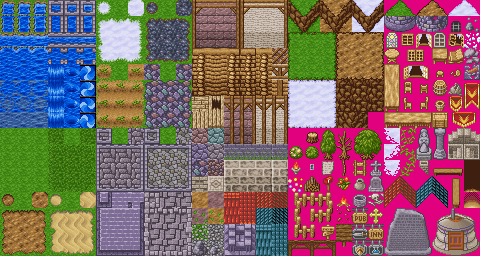
One of the standard RTP files look like this:

In the RM2K3 editor these will appear as the lower and upper layer. It isn't a direct copy from the chipset file though, since 2/5th of the chipset file is filled with autotiles. Now look at how the editor reads the chipset file:

Now compare that to the "bugged" and the "fixed" chipset files described earlier. Still don't understand why it didn't work and why a chipset file looks so "empty" in the editor and why your transparent colour isn't there? Don't worry, I made an even more in-depth picture description of chipset handling:

After this picture explanation, you might still be wondering some things. As a beginner ripper you might wonder where to find the following stuff: icon, dummy and inner (for autotiles).
I explained that with this (last) post:
Well I must honestly say that from this point you just have to experiment with the information that was given to you. Nobody, including me, has done this properly in the first run.
If we are talking about ripping from games, you sometimes just have to sprite certain tiles yourself, leave them gone, or be intuitive with the rips you do have.
The icon isn't to be found in any game: It's just there to tell you which tile it is. It isn't even important for in-game graphics. Most people just tend to put a middle tile in there.
As for the dummy, they did put it in the RTP but it has absolutely no use whatsoever in the editor or in the game, you can leave this transparent, black, other tile etc, it just doesn't matter.
Inner corners are not used very much, so you have to look carefully. In this example you have to take part 4 from the top left tile (1 tile = block of 4 numbers):
{11}{33}
{12}{33}
{44}
{44}
So now your homework:
- Reread the info and look carefully at how the RTP handled this situation.
- Look at some other ripped tilesets available and see how people handled the tiles.
- Start small and try to do some stuff on your own, correct any issues and learn from your experiences.
Good luck =)!
Conclusion
The way RM2K3 handles chipsets is a bit weird. It's easy to make errors and this is all because of the fact that RM2K3 forces you to put a lot of information in one chipset (in RMXP, there is la lot more separation, and thus less room for error).
However, if you manage to do this right you will notice how much fun it is to start editing your own chipsets - even if it is something easy like putting that one tile in a downloaded chipset that you were missing.
Have fun doing so and I hope this tutorial helped you guys out a bit =). Here is another gift btw: Your own chipset template to fill with rips =D:

Anyway, introduction:
A forum member posted a screenshot of his Editor, which showed that his custom chipset wasn't doing what it was supposed to do. The first thing that came to my mind was a mistake I made in my own early days: Simply copying the file to my game file without properly importing it (thus the transparent colour you intended isn't the transparent colour in the editor).
However, when he posted his custom chipset the problem became clear. The chipset didn't work because he didn't arrange his tiles in a manner that could be properly read by RM2k3. The custom "bugged" chipset looked like this:

The solution:
To fix his chipset he had to rearrange a lot of his chipsets. I also decided that it would be a better idea to make a separate charset of the tree he used. He could also use a picture for this (which is my preferred method of solving this problem), but is more suited for advance users - thus the charset.
I ended up giving him these two files to use, the chipset (already existing, but basically what he needed) and the charset:


I accompanied the charset with the following post. It explains a bit about charset usage and why one would prefer it over pictures:
First off: here is the tree. I made it into a charset instead of a picture, because you would have to use a charset anyway to create the lower part of the three (pictures are always above the hero and that would look weird).
Anyways, be sure that you keep an image of the charset at hand when you try to use this in the editor. In the editor you have to place an event and set the graphic for it. Be sure to look for the part of the tree you want to show and click that piece of the character. After that, be sure to set the event's "Animation Type" to "Fixed Graphic". If you don't do this it will not show the piece of the charset you wanted to show.
The explanation:
One of the standard RTP files look like this:

In the RM2K3 editor these will appear as the lower and upper layer. It isn't a direct copy from the chipset file though, since 2/5th of the chipset file is filled with autotiles. Now look at how the editor reads the chipset file:

Now compare that to the "bugged" and the "fixed" chipset files described earlier. Still don't understand why it didn't work and why a chipset file looks so "empty" in the editor and why your transparent colour isn't there? Don't worry, I made an even more in-depth picture description of chipset handling:

After this picture explanation, you might still be wondering some things. As a beginner ripper you might wonder where to find the following stuff: icon, dummy and inner (for autotiles).
I explained that with this (last) post:
Well I must honestly say that from this point you just have to experiment with the information that was given to you. Nobody, including me, has done this properly in the first run.
If we are talking about ripping from games, you sometimes just have to sprite certain tiles yourself, leave them gone, or be intuitive with the rips you do have.
The icon isn't to be found in any game: It's just there to tell you which tile it is. It isn't even important for in-game graphics. Most people just tend to put a middle tile in there.
As for the dummy, they did put it in the RTP but it has absolutely no use whatsoever in the editor or in the game, you can leave this transparent, black, other tile etc, it just doesn't matter.
Inner corners are not used very much, so you have to look carefully. In this example you have to take part 4 from the top left tile (1 tile = block of 4 numbers):
{11}{33}
{12}{33}
{44}
{44}
So now your homework:
- Reread the info and look carefully at how the RTP handled this situation.
- Look at some other ripped tilesets available and see how people handled the tiles.
- Start small and try to do some stuff on your own, correct any issues and learn from your experiences.
Good luck =)!
Conclusion
The way RM2K3 handles chipsets is a bit weird. It's easy to make errors and this is all because of the fact that RM2K3 forces you to put a lot of information in one chipset (in RMXP, there is la lot more separation, and thus less room for error).
However, if you manage to do this right you will notice how much fun it is to start editing your own chipsets - even if it is something easy like putting that one tile in a downloaded chipset that you were missing.
Have fun doing so and I hope this tutorial helped you guys out a bit =). Here is another gift btw: Your own chipset template to fill with rips =D:

Posts 

Pages:
1
Well explained, it can be useful for new users. You could edit that one big picture though, the long lines of text doesn't fit well on the page.
Thank you for your positive feedback.
The picture was used in the original explanation and indeed doesn't fit that well. I decided when posting this tutorial that if somebody really had a problem with it I would edit it, but I guess it's clear enough. I don't think I could do it in less space (other than changing the font size).
Anyways, thank you =).
Why is it when i try to inport my custom chipset into RPG maker 2003 it says "Unsupported PNG Image"? Am I not suppost to save the chipset as a PNG or what?
It need to be indexed first, which is kind of a different modus. You can do this in programms like Gimp.
And if only I found this earlier .. oh well.
And if only I found this earlier .. oh well.
author=eCatYouTube
Why is it when i try to inport my custom chipset into RPG maker 2003 it says "Unsupported PNG Image"? Am I not suppost to save the chipset as a PNG or what?
Most of the time two problems accur:
1. The png file you want to import is to big or to small (aka not the right size).
2. (More common) The png file isn't 256 colours.
I might just be an idiot, But I'm having a very tiring time trying to figure out what is wrong with my Chipset. It imports without problems, and then the entire screen goes to a shaded pink. I test play the game, and the entire game screen is Pink. Help would be appreciated. (:
author=copperseamonster
I might just be an idiot, But I'm having a very tiring time trying to figure out what is wrong with my Chipset. It imports without problems, and then the entire screen goes to a shaded pink. I test play the game, and the entire game screen is Pink. Help would be appreciated. (:
Your timing is spot on. I haven't checked this site for 2 months haha.
Anyways to awnser your question: When you import your chipset you have to set the transparant colour. While importing it you select the colour and it will start flashing. If this won't help you probably have two slots of the same pink in your 256 colourpalette.
author=Trujinauthor=copperseamonsterYour timing is spot on. I haven't checked this site for 2 months haha.
I might just be an idiot, But I'm having a very tiring time trying to figure out what is wrong with my Chipset. It imports without problems, and then the entire screen goes to a shaded pink. I test play the game, and the entire game screen is Pink. Help would be appreciated. (:
Anyways to awnser your question: When you import your chipset you have to set the transparant colour. While importing it you select the colour and it will start flashing. If this won't help you probably have two slots of the same pink in your 256 colourpalette.
Thank you soooo muchhhhh!!!! Youre a Saint. :D
I have a quick question, how do you make sure it registers the first tile as transparent? When i enter a tile set it usually makes the whole map the background color of the tileset picture.
I might be pretty dumb asking this but i've been trying to figure it out for a few hours now.
EDIT: nevermind... i don't know what i did but it works now...
I might be pretty dumb asking this but i've been trying to figure it out for a few hours now.
EDIT: nevermind... i don't know what i did but it works now...
If I understand you correctly all you have to do is click on the desired transparant colour when importing the tileset.
I come back to this post really often, it was and still is quite helpful, so thanks for posting it.
I still don't understand what the square icon means in the "Passability" tab. Anyone know what this is? I know this post is extremely old, but I'm curious, and the information isn't urgent by any means.
I still don't understand what the square icon means in the "Passability" tab. Anyone know what this is? I know this post is extremely old, but I'm curious, and the information isn't urgent by any means.
I'm glad it's still helpfull for some people! I login at this site once in a few months, so I guess I could help you out with this one.
I actually had to think hard about this one, it has been a long time since I worked with the program, but I do have an awnser for you!
The square icon is an option you mainly use for ceiling tiles. It makes you walk under the top tiles of the ceiling. So if you for example made a house and use a ceilingtile as a flat roof, you can walk under the 1 tile strip back part of the house. It's basicly a 'star' and 'cross' combined.
A more visual example:
G = grass (at "circle")
C = ceiling (at "square", but acting as "star")
R = same ceiling (at "square", but acting as "cross")
W = wall (at "cross").
G G G G G G G G G G G G G G G G G G G G
G G G G G G G G G G G G G G G G G G G G
G G G G C C C C C C C C G G G G G G G G
G G G G R R R R R R R R C C C C G G G G
G G G G R R R R R R R R R R R R G G G G
G G G G R R R R R R R R R R R R G G G G
G G G G W W W W W W R R R R R G G G G
G G G G W W W W W W W W W W G G G G
G G G G G G G G G G G W W W W G G G G
G G G G G G G G G G G G G G G G G G G G
G G G G G G G G G G G G G G G G G G G G
Pages:
1


