


TRIGONOMETRY SCRIPT FOR RPG MAKER 2003
includes how to use it to make ring menus and more!
 Kazesui
- 05/27/2011 04:39 PM
- 35618 views
This tutorial will provide a rm2k3 project with some common events which you can paste into your own project and use for various purposes. The project also contains a few examples of what you can do with these trigonometric functions, like creating a ring menu.
This tutorial will explain how to use the event scripts, but will not go into great detail as to how they actually work (i.e. black magic, just accept it).
Also, this tutorial will require a minimum of intermediate level at eventing for you to be able to keep up.
The project template: http://rpgmaker.net/users/Kazesui/locker/Kazesui_Trigonometry_Scripts.zip
Don't know trigonometry? click here
I will explain shortly how the trigonometric functions themself work, and I feel that the best way to do it, is with an illustration:
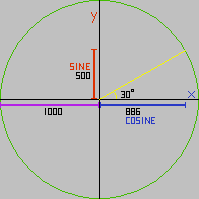
In a circle with radius 1000, if you have an angle rising from the x axis, the trigonometric functions will return the coordinates in x and y on the circle given the angle.
In this example, the angle is 30 degrees. with a 30 degree angle, the line generated from that will hit the circle at 866 along the x axis and 500 along the y axis.
if you multiply the radius of the circle sine of 30 degrees, i.e. 1000*sin(30) you get 500, and 1000*cos(30) will give you 866.
If we have a picture which will move instantly to coordinate x and y, and these are generated getting the sine and cosine for a angle, then increase the angle before moving the picture again, it will move around in a circle. This is one way to understand trigonometry for some uses, and it can be pretty useful
If you still don't get angles to well and stuff, you could give this little game a try: Trigonometry game
The project includes 5 common event scripts. They require the variables 101 to 160 to work properly. There are a few here and there among them which aren't being used, and some could be repositioned without too much trouble, but most likely it will be easier just to keep those variables free when using these events.
So let's look at the event scripts, the first being "CreateTrigTable".
it looks like this:
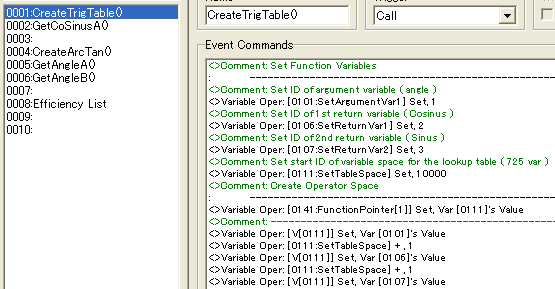
The first variable operation has a comment above it saying "Set ID of argument variable (angle)". What this means, is that the number you set that variable equal to, will be ID of the variable used as the angle for determining the value of the sine and cosine. At default, it's set to 1, meaning that you're very first variable in the list will be used unless you set it to something else.
Remember, it's the number you should change, not the variable itself.
Same deal for the next two variable operations. These signify in which variables the result should be placed. The first is which variable the cosine should be returned to, and the second which variable to sine should be returned to.
The next variable operation deals with where you want the variables containing the "lookup table" to be. it's set to be stored from variable 10000 to 10724 by default, i.e. outside the normal variable array range, so it's less likely that you have to do anything with this variable.
Once these four variables are set, you don't have to do anything more with the event. Just call it once, and then you can call the event "GetCoSinusA()" to get the trigonometric values.
Let's do an example: let's say the variable 0001 contains the value 60, and you've called upon "CreatTrigTable" with it's default values. Then variable 0002 and 0003 will now have the values 500 and 866. The trigonometric values are multiplied by 1000 to avoid the problem of having no decimal point numbers. And that's all there is to using it.
If you're fine by just knowing how to use it move on, if you want to know a bit more about it works click here:
CreateTrigTable does, as said, create a lookup table. What this means is that it stores the values of sine and cosine for all angles from 0 to 359, and the GetCoSinus converts whatever angle you used to one ranging from 0 to 359, and then does take the startID of the lookup table and add the angle as offset so that it points to variable with the correct trigonometric value, so that it can send it to the designated "return" variables.
It's done this way since doing a lookup like this is simply considerably faster than any alternative way and is sane enough when you only have 720 values to store anyway. The 4 extra variables are used for storing information from which variable it should get the angle, and where it should return the sine and cosine and the last is just 0 to signify end of info and beginning of lookup table.
And now we'll look at the 3 other scripts. Again we have a "create" event, this time for ArcTan:
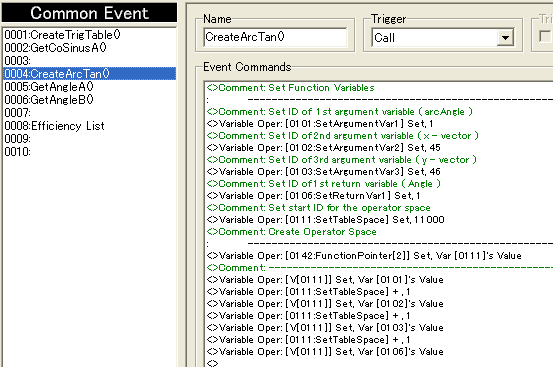
And this works much in the same way as last time. First 3 variables here define from where the "arguments" should come, like the angle in "GetCoSinus".
First variable is the value you would normally put in a arctan to return the angle in degrees.
Second variable is a length in the x direction, and the third a length in the y direction.
the fourth variable is where the result should be returned to, and the fifth is where to store some information used.
Once the create has been called once, you can start use GetAngleA and GetAngleB.
GetAngleA only uses the first argument and returns a positive angle from 0 to 90.
GetAngleB uses the argument two and three and returns a positive angle from 0 to 359
I know this can be a little hard to process, if you don't already know too much about trigonometry, and the terms might be a bit difficult as well. So I will now show a few examples to demonstrate how it works and how it can be used.
Basic ring menu

This example shows how to make a simple ring menu, which rotates when you click to either side.
First off, you need to call upon CreateTrigTable to allow the usage of GetCoSinus.
Remember, it GetCoSinus won't work without CreateTrigTable having been called once, but we only need to call it a single time in the game, so it shouldn't be called more than once either.
In this example this is done by letting the upper left event called "Button Handler" being set to autostart and then calling a switch when it's done, which runs on parallel process and waits for the player to hit the cancel key.
Once that happens it sets on a switch which activates a auto-start event controlling the menu which looks a bit like this:
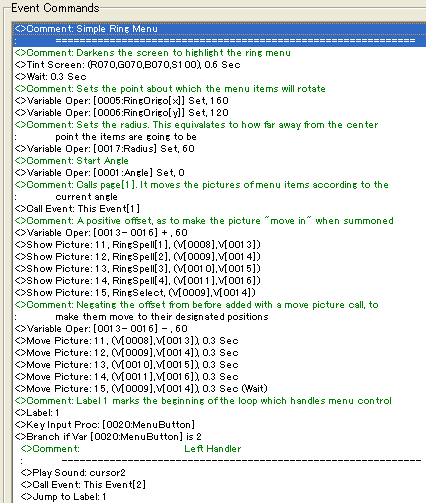
Hero we can see two variables RingOrigo x and y. They mark the center point of a circle in screen relative coordinates and are currently set to the middle of the screen. Next, there's a variable Radius sets how big the circle should be. The menu items will follow along the lines of the circle, so the bigger the radius, the further away from each other they will be.
the Angle variable is set to 0, so that the items will always created in the same order when the menu is opened.
After this, this event's page 1 is called:
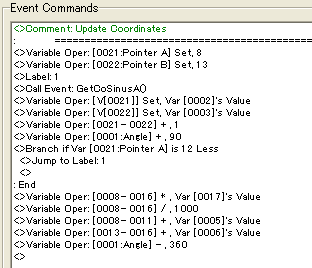
Here we can see the "GetCoSinus" being used. It takes the current angle and returns the cosine and sine in variable 2 and 3, which are set to variables for the different menu items (through pointers) with 90 degrees between them.
After the variables have been set, they are multiplied by the radius, and then divided by 1000 since the sine and cosine are already 1000 times bigger than normal. finally x coordinates are added the x coordinate of origo, and same for y.
the angle is subtracted by 360 to return it to it's orginal value before calling this page.
Back in the page handling the flow of the menu, you can now press left or right to rotate the menu. This is done by calling page 2:
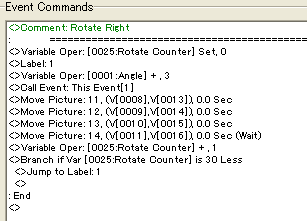
This page sets up a label loop and a variable which counts the amount of times you've looped. The angle is increased by 3 for each time, and this is something you can increase or decrease to make it spin faster or slower. You should just make sure that you scale the amounts of iteration done in the loop accordingly by adjusting the number in the branch. It then calls page 1 which gets coordinates given any spesific angle and repeats until the loop has done 30 iterations, meaning a total increase of 90 degrees.
The Rotate Left event is pretty much the same, except that it decreases the angle by -3 instead.
And that's pretty much all there is to this basic ring menu. You can inspect it more closely by looking at the project in the maker.
There you can also find a more Fancy ring menu.

This ring menu, takes it a step further and scales the sizes of the items depending on their angle, as well as it rotates in an ellipse rather than a circle.
It also grays out the other items which aren't currently selected.
All in all, most code is the same, except we now have 2 radiuses. One for the x direction and one for the y direction, with the y one being quite smaller. This creates the ellipse shape. Also instead of calling "move picture" directly, it now goes through other event pages which have quite a few branches which will trigger different move picture depending on the angle.
Stealth System
Trigonometry can also be used to create guards which look in a certain direction, but who can't see through walls. For this, we need both CreateTrigTable and CreateArcTan to have been called, so a similar event for initializing both of them like with the ring menu would be neccessary.
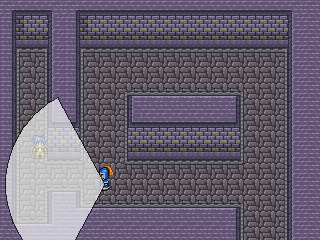
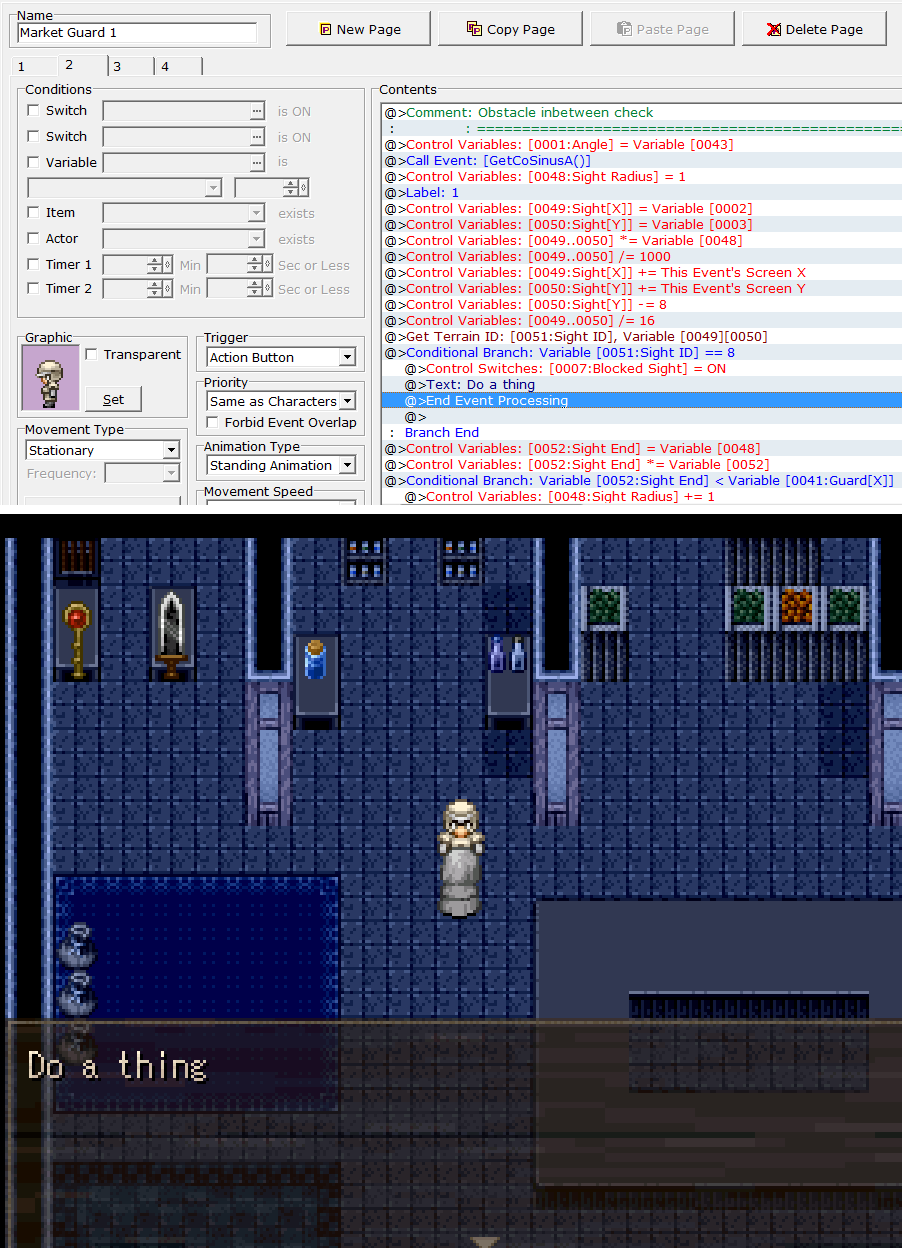
You're within the sight range of this guard, but since you're hiding behind a wall, he can't see you. But when you're out in the open like this:
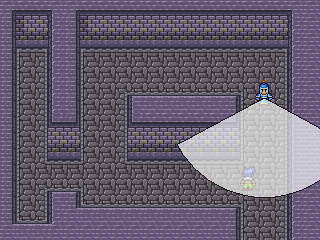
You're spotted. So let's take a look at the code which the guard has to detect wether he sees you or not.
First, we get the screen relative coordinates of the guard. Tile based should work too, but since we need to move the picture with screen relative ones anyway, we might as well. Screen relative coordinates are more accurate as well, so wouldn't be stupid to get accustomed to using them. the -8 before the move picture is just for aesthetical reasons (as long as followed by +8 afterwards).
We then subtract the the hero coordinates from the guard coordinates (important, the object which "looks" need to be the one which gets subtracted).
Once we have the differences we store them in the variables we'll use as argument 2 and 3 for GetAngleB, but we won't call it yet. First we'll multiply the guard coordinates with themselves and add both of them into a variable and the check if it's less than the radius timed itself.
In this example a radius of 100 pixels is used, so if the difference in coordinates multiplied by themself and added into one is less than 10000, we know that the hero is in a circle of radius 100 of the guard.
We then call GetAngleB to get the angle between them and call Page 1 which does a few branches to check the angle. If the guard is facing down, then the hero is in visible range is the angle between them is between 30 and 150 degrees, if the guard has a 120 degree wide sight range.
notice that since this is on a computer the y axis is positive downwards, meaning the the angles go clockwise rather than counterclockwise.
With this, we'll know if the hero is within the normal sight range, but we still don't know if the hero is hiding between a wall or not, so to check that, we call another event page.
We now take the angle between the hero and the guard, and call on GetCoSinus to get the cosine and sine values for that angle. And we then create a label loop.
Hero we take 2 variables, x with cosine value, and y with the sine value. we multiply them by the radius then divide by 1000 to get the pixel coordinates, we add the coordinates of the guard which is the center of this circle, we then divide by 16 to get the tile coordinates and then stores the terrain ID at those coordinates. By setting the terrain ID of the tiles on the chipset we don't want the guard to be able to look through to a spesific value, we can now if there's something in the way of sight. Here we've chosen 8 as the spesific value to be checked for.
If it doesn't fit a variable SightEnd will be set to the radius and multiplied by itself, and then checked with a branch if it's bigger than "guard x" which contains the length between guard and hero calculated earlier. If not, radius is added by one and another iterations start. I it's bigger, a switch BlockedSight will be set to off, meaning there was no obstacle blocking the view of the guard.
And thus, we have a system which tells if guards can see the hero, limited by the view. Using the trigonometric scripts, you could also make a rotating camera which checks for intruders. There's lot of stuff for which you can use trigonometry, so download the project template and have fun :3
http://rpgmaker.net/users/Kazesui/locker/Kazesui_Trigonometry_Scripts.zip
This tutorial will explain how to use the event scripts, but will not go into great detail as to how they actually work (i.e. black magic, just accept it).
Also, this tutorial will require a minimum of intermediate level at eventing for you to be able to keep up.
The project template: http://rpgmaker.net/users/Kazesui/locker/Kazesui_Trigonometry_Scripts.zip
Don't know trigonometry? click here
I will explain shortly how the trigonometric functions themself work, and I feel that the best way to do it, is with an illustration:
In a circle with radius 1000, if you have an angle rising from the x axis, the trigonometric functions will return the coordinates in x and y on the circle given the angle.
In this example, the angle is 30 degrees. with a 30 degree angle, the line generated from that will hit the circle at 866 along the x axis and 500 along the y axis.
if you multiply the radius of the circle sine of 30 degrees, i.e. 1000*sin(30) you get 500, and 1000*cos(30) will give you 866.
If we have a picture which will move instantly to coordinate x and y, and these are generated getting the sine and cosine for a angle, then increase the angle before moving the picture again, it will move around in a circle. This is one way to understand trigonometry for some uses, and it can be pretty useful
If you still don't get angles to well and stuff, you could give this little game a try: Trigonometry game
The project includes 5 common event scripts. They require the variables 101 to 160 to work properly. There are a few here and there among them which aren't being used, and some could be repositioned without too much trouble, but most likely it will be easier just to keep those variables free when using these events.
So let's look at the event scripts, the first being "CreateTrigTable".
it looks like this:
The first variable operation has a comment above it saying "Set ID of argument variable (angle)". What this means, is that the number you set that variable equal to, will be ID of the variable used as the angle for determining the value of the sine and cosine. At default, it's set to 1, meaning that you're very first variable in the list will be used unless you set it to something else.
Remember, it's the number you should change, not the variable itself.
Same deal for the next two variable operations. These signify in which variables the result should be placed. The first is which variable the cosine should be returned to, and the second which variable to sine should be returned to.
The next variable operation deals with where you want the variables containing the "lookup table" to be. it's set to be stored from variable 10000 to 10724 by default, i.e. outside the normal variable array range, so it's less likely that you have to do anything with this variable.
Once these four variables are set, you don't have to do anything more with the event. Just call it once, and then you can call the event "GetCoSinusA()" to get the trigonometric values.
Let's do an example: let's say the variable 0001 contains the value 60, and you've called upon "CreatTrigTable" with it's default values. Then variable 0002 and 0003 will now have the values 500 and 866. The trigonometric values are multiplied by 1000 to avoid the problem of having no decimal point numbers. And that's all there is to using it.
If you're fine by just knowing how to use it move on, if you want to know a bit more about it works click here:
CreateTrigTable does, as said, create a lookup table. What this means is that it stores the values of sine and cosine for all angles from 0 to 359, and the GetCoSinus converts whatever angle you used to one ranging from 0 to 359, and then does take the startID of the lookup table and add the angle as offset so that it points to variable with the correct trigonometric value, so that it can send it to the designated "return" variables.
It's done this way since doing a lookup like this is simply considerably faster than any alternative way and is sane enough when you only have 720 values to store anyway. The 4 extra variables are used for storing information from which variable it should get the angle, and where it should return the sine and cosine and the last is just 0 to signify end of info and beginning of lookup table.
And now we'll look at the 3 other scripts. Again we have a "create" event, this time for ArcTan:
And this works much in the same way as last time. First 3 variables here define from where the "arguments" should come, like the angle in "GetCoSinus".
First variable is the value you would normally put in a arctan to return the angle in degrees.
Second variable is a length in the x direction, and the third a length in the y direction.
the fourth variable is where the result should be returned to, and the fifth is where to store some information used.
Once the create has been called once, you can start use GetAngleA and GetAngleB.
GetAngleA only uses the first argument and returns a positive angle from 0 to 90.
GetAngleB uses the argument two and three and returns a positive angle from 0 to 359
I know this can be a little hard to process, if you don't already know too much about trigonometry, and the terms might be a bit difficult as well. So I will now show a few examples to demonstrate how it works and how it can be used.
Basic ring menu
This example shows how to make a simple ring menu, which rotates when you click to either side.
First off, you need to call upon CreateTrigTable to allow the usage of GetCoSinus.
Remember, it GetCoSinus won't work without CreateTrigTable having been called once, but we only need to call it a single time in the game, so it shouldn't be called more than once either.
In this example this is done by letting the upper left event called "Button Handler" being set to autostart and then calling a switch when it's done, which runs on parallel process and waits for the player to hit the cancel key.
Once that happens it sets on a switch which activates a auto-start event controlling the menu which looks a bit like this:
Hero we can see two variables RingOrigo x and y. They mark the center point of a circle in screen relative coordinates and are currently set to the middle of the screen. Next, there's a variable Radius sets how big the circle should be. The menu items will follow along the lines of the circle, so the bigger the radius, the further away from each other they will be.
the Angle variable is set to 0, so that the items will always created in the same order when the menu is opened.
After this, this event's page 1 is called:
Here we can see the "GetCoSinus" being used. It takes the current angle and returns the cosine and sine in variable 2 and 3, which are set to variables for the different menu items (through pointers) with 90 degrees between them.
After the variables have been set, they are multiplied by the radius, and then divided by 1000 since the sine and cosine are already 1000 times bigger than normal. finally x coordinates are added the x coordinate of origo, and same for y.
the angle is subtracted by 360 to return it to it's orginal value before calling this page.
Back in the page handling the flow of the menu, you can now press left or right to rotate the menu. This is done by calling page 2:
This page sets up a label loop and a variable which counts the amount of times you've looped. The angle is increased by 3 for each time, and this is something you can increase or decrease to make it spin faster or slower. You should just make sure that you scale the amounts of iteration done in the loop accordingly by adjusting the number in the branch. It then calls page 1 which gets coordinates given any spesific angle and repeats until the loop has done 30 iterations, meaning a total increase of 90 degrees.
The Rotate Left event is pretty much the same, except that it decreases the angle by -3 instead.
And that's pretty much all there is to this basic ring menu. You can inspect it more closely by looking at the project in the maker.
There you can also find a more Fancy ring menu.
This ring menu, takes it a step further and scales the sizes of the items depending on their angle, as well as it rotates in an ellipse rather than a circle.
It also grays out the other items which aren't currently selected.
All in all, most code is the same, except we now have 2 radiuses. One for the x direction and one for the y direction, with the y one being quite smaller. This creates the ellipse shape. Also instead of calling "move picture" directly, it now goes through other event pages which have quite a few branches which will trigger different move picture depending on the angle.
Stealth System
Trigonometry can also be used to create guards which look in a certain direction, but who can't see through walls. For this, we need both CreateTrigTable and CreateArcTan to have been called, so a similar event for initializing both of them like with the ring menu would be neccessary.
You're within the sight range of this guard, but since you're hiding behind a wall, he can't see you. But when you're out in the open like this:
You're spotted. So let's take a look at the code which the guard has to detect wether he sees you or not.
First, we get the screen relative coordinates of the guard. Tile based should work too, but since we need to move the picture with screen relative ones anyway, we might as well. Screen relative coordinates are more accurate as well, so wouldn't be stupid to get accustomed to using them. the -8 before the move picture is just for aesthetical reasons (as long as followed by +8 afterwards).
We then subtract the the hero coordinates from the guard coordinates (important, the object which "looks" need to be the one which gets subtracted).
Once we have the differences we store them in the variables we'll use as argument 2 and 3 for GetAngleB, but we won't call it yet. First we'll multiply the guard coordinates with themselves and add both of them into a variable and the check if it's less than the radius timed itself.
In this example a radius of 100 pixels is used, so if the difference in coordinates multiplied by themself and added into one is less than 10000, we know that the hero is in a circle of radius 100 of the guard.
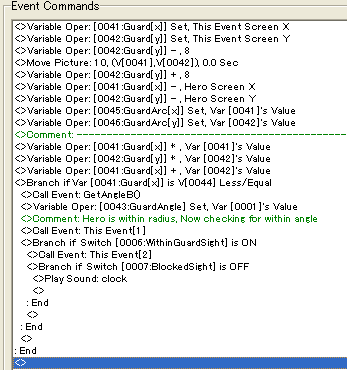
We then call GetAngleB to get the angle between them and call Page 1 which does a few branches to check the angle. If the guard is facing down, then the hero is in visible range is the angle between them is between 30 and 150 degrees, if the guard has a 120 degree wide sight range.
notice that since this is on a computer the y axis is positive downwards, meaning the the angles go clockwise rather than counterclockwise.
With this, we'll know if the hero is within the normal sight range, but we still don't know if the hero is hiding between a wall or not, so to check that, we call another event page.
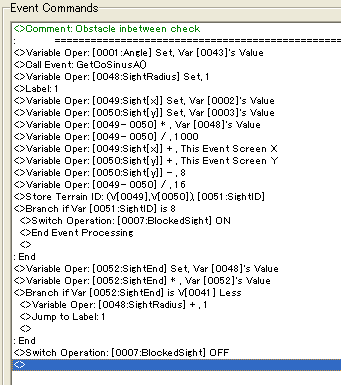
We now take the angle between the hero and the guard, and call on GetCoSinus to get the cosine and sine values for that angle. And we then create a label loop.
Hero we take 2 variables, x with cosine value, and y with the sine value. we multiply them by the radius then divide by 1000 to get the pixel coordinates, we add the coordinates of the guard which is the center of this circle, we then divide by 16 to get the tile coordinates and then stores the terrain ID at those coordinates. By setting the terrain ID of the tiles on the chipset we don't want the guard to be able to look through to a spesific value, we can now if there's something in the way of sight. Here we've chosen 8 as the spesific value to be checked for.
If it doesn't fit a variable SightEnd will be set to the radius and multiplied by itself, and then checked with a branch if it's bigger than "guard x" which contains the length between guard and hero calculated earlier. If not, radius is added by one and another iterations start. I it's bigger, a switch BlockedSight will be set to off, meaning there was no obstacle blocking the view of the guard.
And thus, we have a system which tells if guards can see the hero, limited by the view. Using the trigonometric scripts, you could also make a rotating camera which checks for intruders. There's lot of stuff for which you can use trigonometry, so download the project template and have fun :3
http://rpgmaker.net/users/Kazesui/locker/Kazesui_Trigonometry_Scripts.zip
Posts 


I think at this point it's best not to further this particular discussion anymore... Maybe carry it on in https://rpgmaker.net/engines/rt2k3/utilities/207/
much like the ring menu, talking to bulma is a matter of going in circles.
much like the ring menu, talking to bulma is a matter of going in circles.


Kazesui's trig scripts via lookup-table are great! I modified them a little to get a bit more flexibility.
Download Rm2k demo (number graphics originate from "Sternenkind Saga"):
testTrig.7z (v1.1)
Changes:
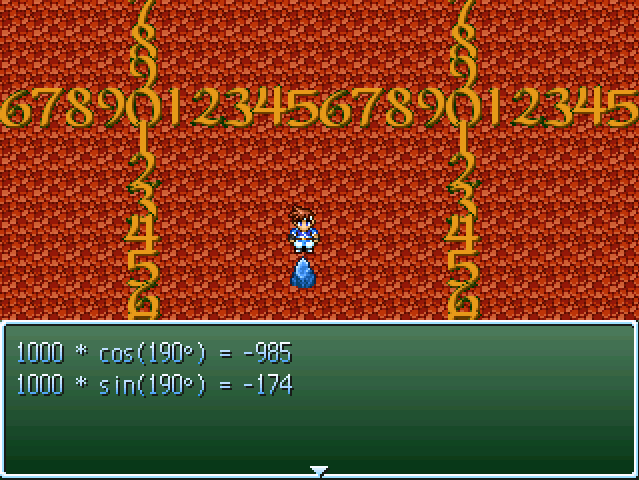
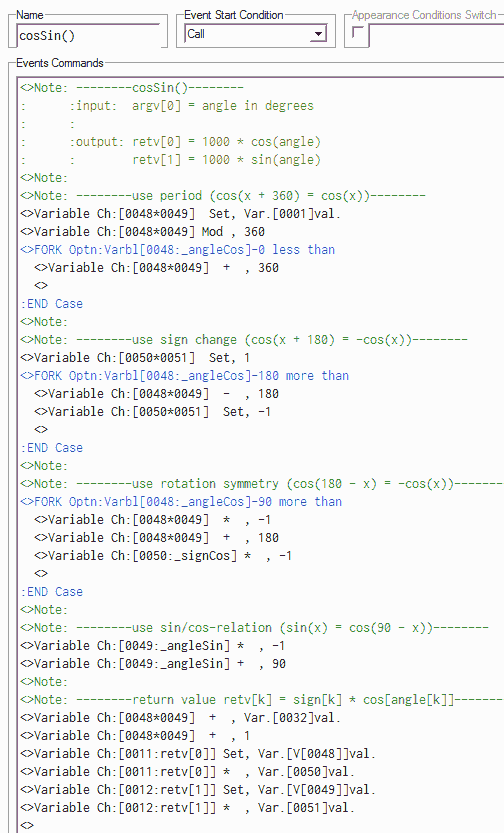
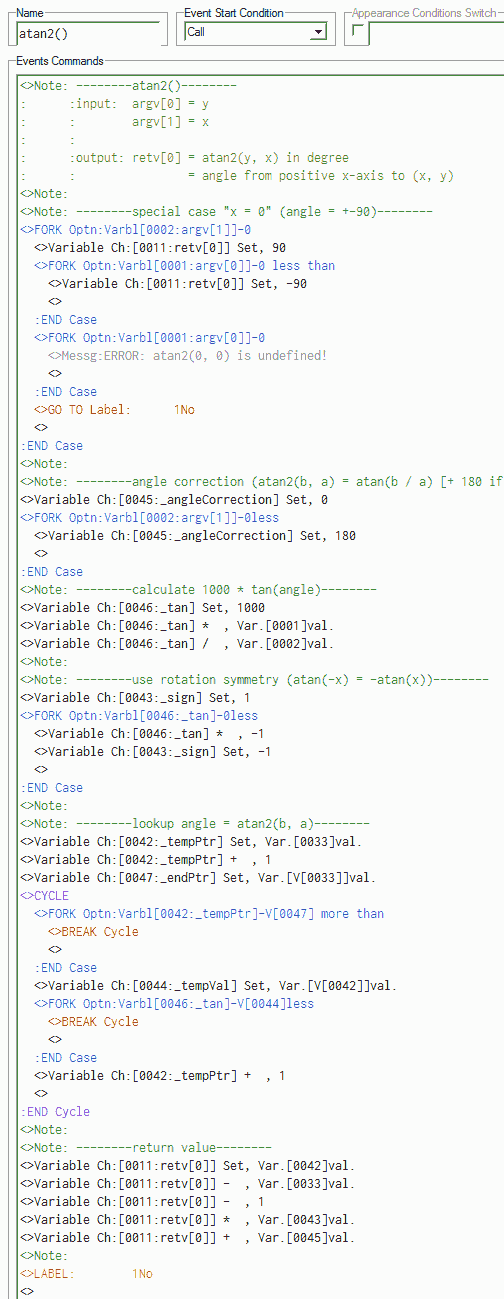
cosSin() and atan2() will overwrite the output variables retv(0), retv(1) and rev(0), respectively - save important values before you call them!
Screenshots:
Implementation details:
You'll find the main changes in the cosSin() and atan2() routine - using symmetries and the 360° period, you can get rid of all but the first 91 values of the cosine lookup table. With a 90° shift you can use cosine to implement sine.
All arrays have a pointer to the end of the array before the data - that's why we need to add _angle += 1 at the end. Check the common event initTrigPackage() to see how arrays are constructed.
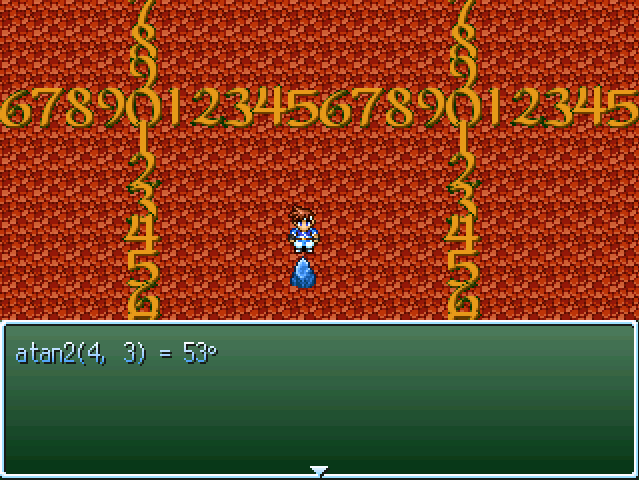
With a second lookup table, you can get rid of the fork-trees in GetAngleA,B(). Using rotation symmetry, you only need to store 90 values as a tangent lookup table. This table is used by atan2(), the replacement for GetAngleA,B():
The lookup tables were generated by

We need the offset of 0.5 degrees for the tangent lookup table to get intervals centered around integer values:

The values of the lookup tables were generated by a maxima script.
Download Rm2k demo (number graphics originate from "Sternenkind Saga"):
testTrig.7z (v1.1)
Changes:
- reduced lookup table size (only 91 cosine values, 90 tangent values and 2 pointers in range 0101:0283)
- simplify GetAngleA,B() into atan2(y, x)
- a simple version using linear search and another using recursive binary search (should be faster)
cosSin() and atan2() will overwrite the output variables retv(0), retv(1) and rev(0), respectively - save important values before you call them!
Screenshots:
Implementation details:
You'll find the main changes in the cosSin() and atan2() routine - using symmetries and the 360° period, you can get rid of all but the first 91 values of the cosine lookup table. With a 90° shift you can use cosine to implement sine.
All arrays have a pointer to the end of the array before the data - that's why we need to add _angle += 1 at the end. Check the common event initTrigPackage() to see how arrays are constructed.
With a second lookup table, you can get rid of the fork-trees in GetAngleA,B(). Using rotation symmetry, you only need to store 90 values as a tangent lookup table. This table is used by atan2(), the replacement for GetAngleA,B():
The lookup tables were generated by
We need the offset of 0.5 degrees for the tangent lookup table to get intervals centered around integer values:
The values of the lookup tables were generated by a maxima script.
Okay, yeah. The stealth system definitely won't work right in the legal version of 2k3. The sight block handler is refusing to acknowledge the terrain ID. I'm going to have to see if I can work around it.
EDIT: Oh! It's doing me one better! The system is using the blocked sight switch as the detection switch! I have no idea why it's doing that.
EDIT 2: Set all terrain to 1. And in case you're wondering, I spent three hours trying to get this work right. When I realized that I could copy paste the entire event system from Kazesui's sample directly into my project despite the fact that these are two different systems, I did it. I checked everything. I went through everything. All the variables are in the right place and even are named properly. I'm pretty sure it's not supposed to do this.
EDIT 3: So, it detects you if block sight is on. It detects you if block sight is off. The only thing I can figure is that block sight is both on and off. I wish I understood math this complex.
EDIT 4: So here's the quick and dirty fix. I removed the Blocked Sight handler entirely from the script and put tiles on the floor that turn it on when I stand on them and off when I leave. Which works.
A moment of dread came over me when I saw I had new notifications for this thread, but it turns out its because there's two people here doing good work updating a (by now) legendary script. Keep it up, and thanks.
This thread is eternal.
This thread is eternal.

Small update to the demo in my last post:
- Combined both versions (linear and binary search) into a single test project
- Combined cos() and sin() into a single common event cosSin()
- Turned binary search into inline code to remove the overhead of recursive event calls (according to Vanit's Performance Tutorial)
- Removed typos in the lookup table generation script
Sorry to necro this, but the example project file link must be dead or something. Or maybe I just haven't figured out how this website works yet... Any chance there is somewhere I can find this nowadays?
aminimal
Sorry to necro this, but the example project file link must be dead or something. Or maybe I just haven't figured out how this website works yet... Any chance there is somewhere I can find this nowadays?
Go to his locker. Page five. Simply click on Kazesui's name on top of this page, click on locker on the top right of his profile, and go to page five. It's around halfway down. Can't figure out why the link's not working here; it looks like it goes where it should, but his locker's working fine. I just checked.
author=pianotmaminimalGo to his locker. Page five. Simply click on Kazesui's name on top of this page, click on locker on the top right of his profile, and go to page five. It's around halfway down. Can't figure out why the link's not working here; it looks like it goes where it should, but his locker's working fine. I just checked.
Sorry to necro this, but the example project file link must be dead or something. Or maybe I just haven't figured out how this website works yet... Any chance there is somewhere I can find this nowadays?
Thank you! :D

I had to do a quick look-up of Kazesui's user ID, but...
https://rpgmaker.net/media/content/users/3355/locker/Kazesui_Trigonometry_Scripts.zip
...that should be the correct reference.
https://rpgmaker.net/media/content/users/3355/locker/Kazesui_Trigonometry_Scripts.zip
...that should be the correct reference.
author=pianotm
Okay, yeah. The stealth system definitely won't work right in the legal version of 2k3. The sight block handler is refusing to acknowledge the terrain ID. I'm going to have to see if I can work around it.
EDIT: Oh! It's doing me one better! The system is using the blocked sight switch as the detection switch! I have no idea why it's doing that.
EDIT 2: Set all terrain to 1. And in case you're wondering, I spent three hours trying to get this work right. When I realized that I could copy paste the entire event system from Kazesui's sample directly into my project despite the fact that these are two different systems, I did it. I checked everything. I went through everything. All the variables are in the right place and even are named properly. I'm pretty sure it's not supposed to do this.
EDIT 3: So, it detects you if block sight is on. It detects you if block sight is off. The only thing I can figure is that block sight is both on and off. I wish I understood math this complex.
EDIT 4: So here's the quick and dirty fix. I removed the Blocked Sight handler entirely from the script and put tiles on the floor that turn it on when I stand on them and off when I leave. Which works.
So, I was experiencing the same issue. Turns out to be due to copy/pasting the map from Kazesui's project (old version of rpgm) into my own newer version and the result being a bugged map. If you create a new map, copy paste the guard event and Map Ref event into your new map, set the tileset correctly, tiles with a Terrain ID of 8 will indeed block the guard's sight.
The elation I felt when the timer didn't go off as I hid behind a rock... it's the small things in life, eh?
Here is my Update+Fix of Kazeui's awesome work for anyone who may need. (I don't know how to do any of this trig business I just got it working in the newer version of rpgm2k3.)
Many thanks peoples.
Many thanks peoples.
author=Marrend
I had to do a quick look-up of Kazesui's user ID, but...
https://rpgmaker.net/media/content/users/3355/locker/Kazesui_Trigonometry_Scripts.zip
...that should be the correct reference.
Forgot to say thanks! :D

