


THE RMVX DATABASE: PART I "MAKING A HERO"
An introduction to the RMVX database, as well as an explanation of creating a playable character in RMVX.
 Ben_Random
- 09/18/2011 04:35 PM
- 6430 views
Before you get started...
You all know, or at least you should know, that RMVX (Role Playing Game Maker Vista&XP Edition) is used to create RPG's. Before reading this tutorial, play around with the "engine". To fully equip yourself for this tutorial you should do the following:
1. Play an RPG! Before making a Role Playing Game, you must familiarize yourself with them. If you are young and haven't enjoyed old RPG's like Dragon Quest or Final Fantasy, try some new games like the Pokemon Series.
2. Learn what RMVX is! A great way to do this is to play a game made in RMVX. Avadan's The Cartographer is a great way to get started!
3. Experiment with VX. Play around with the program a little. Try making a small, simple project. Don't go overboard by trying to make a heroic epic, just press some buttons and see what happens.
Why am I reading this anyway?
This tutorial is not only good for newbies who have never touched an RPG making program in their life. If you learned almost everything there is to know about RPG Maker 2003, or even RMXP, the database for VX can be very different. Hold on to your geeky computer-guy glasses, 'cause this is going to be a wild ride!
What is the RMVX database?
If you are new to VX, you may not have even heard of the RMVX database! This is, to put it simply, the area where the majority of your game's data is stored. In the database, you can create new characters and enemy's, weaponry and armor, and just about anything else in this game! Today, you will be reading about the creation of playable characters. To get to the database, click on the icon that looks like a stack of papers. It should be located next to an icon with some rainbow colored blocks.
I've reached the database! ...Now what to do with it?
When you open the database, a window should appear. In this window, there will be several tabs labeled in the following order: Actors | Classes | Skills | Items | Weapons | Armor | Enemies | Troops | States | Animations | Common Events | System | Terms |.
Each tab allows you to edit certain things in the game. In this tutorial, I will show you how to edit and change playable characters (referred to as "Actors").
Getting down to business, with actors!
As I have said before, actors are the playable characters in your game. Under the actors tab, you will see a list on the left of the window. This is the list of the current actors in your game. RMVX automatically creates 8 sample actors to work with.
Basic Functions
To add more characters, click the "change maximum" button, and type in the amount of characters you wish to add. For example, if you type in "12", twelve blank slots for actors will appear. To delete actors, simply select actors on the list, and hit delete on your keyboard.
Editing Specific Actors
Once you have selected an actor on the list, its name should appear highlighted in blue. Everything on the right of the window is now devoted to that specific actor. On the right side of the window, we have some drop-down boxes. The first one says "Name:" I think it is rather obvious that this is the place to type the name of that actor.
Next, we have "Class:". In most RPG's, different characters have classes. I will talk more about classes in a later tutorial, but in short, a class will determine what sort of attacks or weaponry/armory that a character can use. In some games, the class of a character will automatically determine the exp curves (see below) of characters, as well as there stat curves (see even further below), but in RMVX, that is not the case. If this is all to complicated for you, just wait, I will discuss classes in Part II of "The RMVX Database".
After "Class:", we come to a box called "Initial Level:". The number in this box determines which level the actor will start on in the game.
Getting stronger!
The next box we come to says "EXP Curve:". In the box, it will say something like this: "Basis:30, Inflation:35".
The "Basis" of an actors EXP curve is the base number used to calculate how many EXP points it will take for the actor to level up. The "Inflation" is a number used to calculate how many more EXP points it will take to level up to the next level.
This calculation prevents the following scenario: Say it takes 30 EXP to level up from level 1 to level 2. If there was no inflation, it would take 30 EXP to level up from level 2 to level 3, 30 EXP to level up from 3 to 4, and so on.
Looking at another scenario, where the inflation is set to 35 with the base at 30, it will take 30 EXP points to level up from level 1 to level 2, but it will take 57 EXP points to level up from level 2 to level 3. From level 3 to level 4, it will take 105 EXP points.
You can edit the Basis and Inflation of an actor with the slider bars at the bottom of the window. At the top of the window, you will see two tabs: To Next Level | Total. The first of the two is selected. These two tabs alter your view of the EXP curves. Under "To Next Level" tab, the center of the window should look something like this:
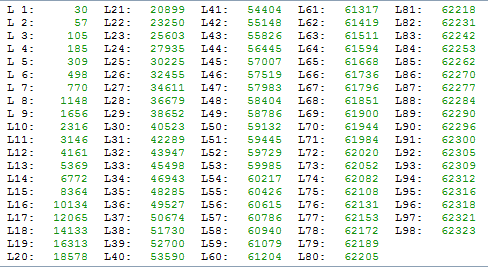
This is the default, "To Next Level" view. Next to "L 1:", it says "30". This means that it will take 30 EXP points to go from level one to the next. Next to "L 2:", it says "57". This means it will take 57 EXP points to get to the level after level 2. The same patter follows throughout level 98. There is no space for "L99", because there is no level after level 99, so it will take infinite EXP points to get to the next level.
If you click the "Total" tab, the view will change to something like this:
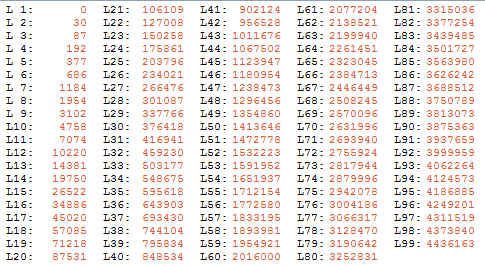
This now changes the view to display how many total EXP points the actor has at the displayed level. For example at level 1, the actor must have a minimum of 0 EXP points. That is displayed as "L 1: 0". At level 2, the actor must have a minimum of 30 EXP points, that is displayed "L 2: 30".
Remember, changing between the "To Next Level" and "Total" tabs will not change anything. It only edits the way you see the data. The only way to edit the EXP curves is to use the Basis and Inflation slider bars at the bottom of the window.
This thing may be complicated, but the best way to understand it is through experimentation. Play around with the numbers, see what comes up.
Options, equipment, and a pretty face
Let's take a break from that complicated EXP curve stuff and head into giving your character some style. You should see two blue-checkered boxes labeled "Character Graphic" and "Face Graphic". The "Character Graphic" is the image of your actor on the game screen, and the "Face Graphic" is the image that will appear in your menu screen. To edit either of these graphics, click the blue-checkered area and press the SPACEBAR. Here, you have a list of different graphics to place for your actor. There are various tutorials on importing graphics into VX, but I'm not going to go into that in this tutorial.
Options
Moving to the bottom right of the window, you should see a box, creatively labeled "Options". These are different options that you can have for the character in battle.
The first one, "Two Sword Style", allows the actor to hold two swords in battle, with the cost of not being able to use a shield. It also increases the actors attack stat.
The second option is labeled "Fix Equipment". If this option is checked, than the actor cannot remove any equipment. This is not extremely useful, but it can come in handy when you have an actor temporarily join you in the game, and you don't his/her equipment used on any other actors.
Next we have "Auto Battle". If this is checked, the given actor cannot be controlled by the player in battle. It will attack and defend on its own. This is useful for "helper" characters who, again, stay in the party temporarily.
After that, there is the "Super Guard" option. This, and other options, will be easier to understand if you are familiar with the way battles work in RMVX. If you haven't played a VX game with the default battle system, or one similar to the default battle system, I suggest you do so. In battle, you have a "Defend" option. This will reduce damage taken on that turn to .5 of the normal amount of damage that would be taken. If "Super Guard" is checked, it will reduce the damage taken on a turn by .25 of the normal amount, if the player uses the "Defend" option in battle.
"Pharmacology" is the next option, and if it is checked, the effect of recovery items used on the player (or allies) will double!
Finally, we have "Critical Bonus", which doubles the chance of that player attacking with critical hits. (Critical hits do more damage than a regular hit in battle).
Starting Equipment
That wraps up the different options that can be used in battle, to the left of the "Options" box, there should be a box labeled: "Starting Equipment". The idea behind "Starting Equipment" is pretty basic. This is the equipment that the actor will start with. If the option "Two Sword Style" is not checked, than there should be a slot for "Weapon", "Shield", "Helmet", "Body Armor", "Accessory". If "Two Sword Style" is checked, than the "Shield" slot will be replaced by one that says "Weapon 2". I will go into more detail about the difference between armor and weapons and whatnot in a later tutorial. You should also know that not all equipment in the database can be used by every character. The actor's class determines what equipment can be used. Again, Part II of this tutorial series will be about classes, so don't fret!
Stats and whatnot!
Ugh! More math stuff! Don't worry, parameter curves aren't that complex!
The majority of the right side of the database window should be taken up by a box that is labeled "Parameter Curves". Within this box are 6 more boxes with different colored "ramps" in them. They are labeled "MaxHP", "MaxMP", "Attack", "Defense", "Spirit", and "Agility". Double click on any one of these, and a window should appear. To stay on the same page as me, double click the "MaxHP" box for now.
This will open a window. In this window, there are 6 tabs labeled "MaxHP", "MaxMP", "Attack", "Defense", "Spirit", and "Agility" (sound familiar?). Switching between tabs allows you to edit different stats. Each stat can be edited in the exact same way. For example, to edit the "Defense" stat, you would go through the exact same process as editing the "Agility" stat.
Now, what is a parameter curve? A parameter curve is a graph. It shows how much a given stat has increased on the x axis. The y axis measure what level the player is currently at. Although actual labels aren't written on the various axises, you can think of it that way.
There are several ways to go about editing a parameter curve. One of the easiest is to use the "Quick Settings". There are 5 buttons in the "Quick Setting" box: A, B, C, D, and E. Each one will randomly generate a curve on the graph, within a preset range.
The easiest way to edit a parameter curve is to simply draw the graph. The majority of the window is taken up by a picture of the graph. You can use your mouse to literally draw a curve!
The final way to edit a parameter curve is to click the "Generate Curve" button. This will display a window. This window will have two boxes, one labeled "Level 1" and the other, "Level 99". The numbers that you enter into these boxes determine what the stats value is at level 1, and level 99. If you wanted your actor to start out with 2 as the MaxHP stat, type in "2" in the level 1 box. The same goes to editing what MaxHP stat the player will have at level 99.
At the bottom of the window, there is a slider bar with "Fast" at the left, "Middle", in the middle, and "Slow" on the right. Choosing the "speed" on the slider bar will determine how fast or slow the stat will increase with the levels between 1 and 99.
Remember that editing parameter curves is just editing the base stats. Weaponry, Armor, and different "Skills" can also change the stats of actors. All this stuff can get complicated, but don't worry about it to much. Just play around with different numbers and see what comes up!
Conclusion
At last, we have come to the end of this text wall! Note that I have not discussed all the different things that one can do with actors. Classes play a big part, and Part II of "The RMVX Database" will be about editing the classes of the actors that you just learned how to make! I also have not discussed how to determine what actors will start in the game, and that will be explained later in the series. I hope all of you succeed on you RPG-making endeavors, and if there was something that you didn't understand, just send me a message via-RMN or post a comment here!
You all know, or at least you should know, that RMVX (Role Playing Game Maker Vista&XP Edition) is used to create RPG's. Before reading this tutorial, play around with the "engine". To fully equip yourself for this tutorial you should do the following:
1. Play an RPG! Before making a Role Playing Game, you must familiarize yourself with them. If you are young and haven't enjoyed old RPG's like Dragon Quest or Final Fantasy, try some new games like the Pokemon Series.
2. Learn what RMVX is! A great way to do this is to play a game made in RMVX. Avadan's The Cartographer is a great way to get started!
3. Experiment with VX. Play around with the program a little. Try making a small, simple project. Don't go overboard by trying to make a heroic epic, just press some buttons and see what happens.
Why am I reading this anyway?
This tutorial is not only good for newbies who have never touched an RPG making program in their life. If you learned almost everything there is to know about RPG Maker 2003, or even RMXP, the database for VX can be very different. Hold on to your geeky computer-guy glasses, 'cause this is going to be a wild ride!
What is the RMVX database?
If you are new to VX, you may not have even heard of the RMVX database! This is, to put it simply, the area where the majority of your game's data is stored. In the database, you can create new characters and enemy's, weaponry and armor, and just about anything else in this game! Today, you will be reading about the creation of playable characters. To get to the database, click on the icon that looks like a stack of papers. It should be located next to an icon with some rainbow colored blocks.
I've reached the database! ...Now what to do with it?
When you open the database, a window should appear. In this window, there will be several tabs labeled in the following order: Actors | Classes | Skills | Items | Weapons | Armor | Enemies | Troops | States | Animations | Common Events | System | Terms |.
Each tab allows you to edit certain things in the game. In this tutorial, I will show you how to edit and change playable characters (referred to as "Actors").
Getting down to business, with actors!
As I have said before, actors are the playable characters in your game. Under the actors tab, you will see a list on the left of the window. This is the list of the current actors in your game. RMVX automatically creates 8 sample actors to work with.
Basic Functions
To add more characters, click the "change maximum" button, and type in the amount of characters you wish to add. For example, if you type in "12", twelve blank slots for actors will appear. To delete actors, simply select actors on the list, and hit delete on your keyboard.
Editing Specific Actors
Once you have selected an actor on the list, its name should appear highlighted in blue. Everything on the right of the window is now devoted to that specific actor. On the right side of the window, we have some drop-down boxes. The first one says "Name:" I think it is rather obvious that this is the place to type the name of that actor.
Next, we have "Class:". In most RPG's, different characters have classes. I will talk more about classes in a later tutorial, but in short, a class will determine what sort of attacks or weaponry/armory that a character can use. In some games, the class of a character will automatically determine the exp curves (see below) of characters, as well as there stat curves (see even further below), but in RMVX, that is not the case. If this is all to complicated for you, just wait, I will discuss classes in Part II of "The RMVX Database".
After "Class:", we come to a box called "Initial Level:". The number in this box determines which level the actor will start on in the game.
Getting stronger!
The next box we come to says "EXP Curve:". In the box, it will say something like this: "Basis:30, Inflation:35".
The "Basis" of an actors EXP curve is the base number used to calculate how many EXP points it will take for the actor to level up. The "Inflation" is a number used to calculate how many more EXP points it will take to level up to the next level.
This calculation prevents the following scenario: Say it takes 30 EXP to level up from level 1 to level 2. If there was no inflation, it would take 30 EXP to level up from level 2 to level 3, 30 EXP to level up from 3 to 4, and so on.
Looking at another scenario, where the inflation is set to 35 with the base at 30, it will take 30 EXP points to level up from level 1 to level 2, but it will take 57 EXP points to level up from level 2 to level 3. From level 3 to level 4, it will take 105 EXP points.
You can edit the Basis and Inflation of an actor with the slider bars at the bottom of the window. At the top of the window, you will see two tabs: To Next Level | Total. The first of the two is selected. These two tabs alter your view of the EXP curves. Under "To Next Level" tab, the center of the window should look something like this:
This is the default, "To Next Level" view. Next to "L 1:", it says "30". This means that it will take 30 EXP points to go from level one to the next. Next to "L 2:", it says "57". This means it will take 57 EXP points to get to the level after level 2. The same patter follows throughout level 98. There is no space for "L99", because there is no level after level 99, so it will take infinite EXP points to get to the next level.
If you click the "Total" tab, the view will change to something like this:
This now changes the view to display how many total EXP points the actor has at the displayed level. For example at level 1, the actor must have a minimum of 0 EXP points. That is displayed as "L 1: 0". At level 2, the actor must have a minimum of 30 EXP points, that is displayed "L 2: 30".
Remember, changing between the "To Next Level" and "Total" tabs will not change anything. It only edits the way you see the data. The only way to edit the EXP curves is to use the Basis and Inflation slider bars at the bottom of the window.
This thing may be complicated, but the best way to understand it is through experimentation. Play around with the numbers, see what comes up.
Options, equipment, and a pretty face
Let's take a break from that complicated EXP curve stuff and head into giving your character some style. You should see two blue-checkered boxes labeled "Character Graphic" and "Face Graphic". The "Character Graphic" is the image of your actor on the game screen, and the "Face Graphic" is the image that will appear in your menu screen. To edit either of these graphics, click the blue-checkered area and press the SPACEBAR. Here, you have a list of different graphics to place for your actor. There are various tutorials on importing graphics into VX, but I'm not going to go into that in this tutorial.
Options
Moving to the bottom right of the window, you should see a box, creatively labeled "Options". These are different options that you can have for the character in battle.
The first one, "Two Sword Style", allows the actor to hold two swords in battle, with the cost of not being able to use a shield. It also increases the actors attack stat.
The second option is labeled "Fix Equipment". If this option is checked, than the actor cannot remove any equipment. This is not extremely useful, but it can come in handy when you have an actor temporarily join you in the game, and you don't his/her equipment used on any other actors.
Next we have "Auto Battle". If this is checked, the given actor cannot be controlled by the player in battle. It will attack and defend on its own. This is useful for "helper" characters who, again, stay in the party temporarily.
After that, there is the "Super Guard" option. This, and other options, will be easier to understand if you are familiar with the way battles work in RMVX. If you haven't played a VX game with the default battle system, or one similar to the default battle system, I suggest you do so. In battle, you have a "Defend" option. This will reduce damage taken on that turn to .5 of the normal amount of damage that would be taken. If "Super Guard" is checked, it will reduce the damage taken on a turn by .25 of the normal amount, if the player uses the "Defend" option in battle.
"Pharmacology" is the next option, and if it is checked, the effect of recovery items used on the player (or allies) will double!
Finally, we have "Critical Bonus", which doubles the chance of that player attacking with critical hits. (Critical hits do more damage than a regular hit in battle).
Starting Equipment
That wraps up the different options that can be used in battle, to the left of the "Options" box, there should be a box labeled: "Starting Equipment". The idea behind "Starting Equipment" is pretty basic. This is the equipment that the actor will start with. If the option "Two Sword Style" is not checked, than there should be a slot for "Weapon", "Shield", "Helmet", "Body Armor", "Accessory". If "Two Sword Style" is checked, than the "Shield" slot will be replaced by one that says "Weapon 2". I will go into more detail about the difference between armor and weapons and whatnot in a later tutorial. You should also know that not all equipment in the database can be used by every character. The actor's class determines what equipment can be used. Again, Part II of this tutorial series will be about classes, so don't fret!
Stats and whatnot!
Ugh! More math stuff! Don't worry, parameter curves aren't that complex!
The majority of the right side of the database window should be taken up by a box that is labeled "Parameter Curves". Within this box are 6 more boxes with different colored "ramps" in them. They are labeled "MaxHP", "MaxMP", "Attack", "Defense", "Spirit", and "Agility". Double click on any one of these, and a window should appear. To stay on the same page as me, double click the "MaxHP" box for now.
This will open a window. In this window, there are 6 tabs labeled "MaxHP", "MaxMP", "Attack", "Defense", "Spirit", and "Agility" (sound familiar?). Switching between tabs allows you to edit different stats. Each stat can be edited in the exact same way. For example, to edit the "Defense" stat, you would go through the exact same process as editing the "Agility" stat.
Now, what is a parameter curve? A parameter curve is a graph. It shows how much a given stat has increased on the x axis. The y axis measure what level the player is currently at. Although actual labels aren't written on the various axises, you can think of it that way.
There are several ways to go about editing a parameter curve. One of the easiest is to use the "Quick Settings". There are 5 buttons in the "Quick Setting" box: A, B, C, D, and E. Each one will randomly generate a curve on the graph, within a preset range.
The easiest way to edit a parameter curve is to simply draw the graph. The majority of the window is taken up by a picture of the graph. You can use your mouse to literally draw a curve!
The final way to edit a parameter curve is to click the "Generate Curve" button. This will display a window. This window will have two boxes, one labeled "Level 1" and the other, "Level 99". The numbers that you enter into these boxes determine what the stats value is at level 1, and level 99. If you wanted your actor to start out with 2 as the MaxHP stat, type in "2" in the level 1 box. The same goes to editing what MaxHP stat the player will have at level 99.
At the bottom of the window, there is a slider bar with "Fast" at the left, "Middle", in the middle, and "Slow" on the right. Choosing the "speed" on the slider bar will determine how fast or slow the stat will increase with the levels between 1 and 99.
Remember that editing parameter curves is just editing the base stats. Weaponry, Armor, and different "Skills" can also change the stats of actors. All this stuff can get complicated, but don't worry about it to much. Just play around with different numbers and see what comes up!
Conclusion
At last, we have come to the end of this text wall! Note that I have not discussed all the different things that one can do with actors. Classes play a big part, and Part II of "The RMVX Database" will be about editing the classes of the actors that you just learned how to make! I also have not discussed how to determine what actors will start in the game, and that will be explained later in the series. I hope all of you succeed on you RPG-making endeavors, and if there was something that you didn't understand, just send me a message via-RMN or post a comment here!
Posts 

Pages:
1

If I were a math fiend, I'd point out that the "Exp to next level" graph is essentially the first derivative of the "Total exp earned" graph. However, since this tutorial is supposed to be for people who might not have the math background...

author=Marrend
If I were a math fiend, I'd point out that the "Exp to next level" graph is essentially the first derivative of the "Total exp earned" graph. However, since this tutorial is supposed to be for people who might not have the math background...
I know I didn't fully elaborate on all the graphs, but I'm pretty sure the majority of the RMN audience won't care one way or another.
On another note, do you think I should add screenshots to Part II?
Might be a good idea to have more screenshots in general for this particular series. This would accommodate for people who are more visual learners than a wall-of-text.
Besides, showing a screen of where one clicks literally shows them where to click, whereas writing "this is where you click" might garner some minor confusion to people who are absolutely new to the program. Which is not what this series of articles necessarily wants.
But that's just my two cents worth of opinion.
author=Marrend
Might be a good idea to have more screenshots in general for this particular series. This would accommodate for people who are more visual learners than a wall-of-text.
Besides, showing a screen of where one clicks literally shows them where to click, whereas writing "this is where you click" might garner some minor confusion to people who are absolutely new to the program. Which is not what this series of articles necessarily wants.
But that's just my two cents worth of opinion.
I got hurried and started writing Part II without an answer, but be warned, there will be screenshot's in future tutorials.

author=Marrend
If I were a math fiend, I'd point out that the "Exp to next level" graph is essentially the first derivative of the "Total exp earned" graph. However, since this tutorial is supposed to be for people who might not have the math background...
Hey, maybe the 1st graph is actually the just the integral of the curve from the 2nd graph.
Pages:
1

