


BASIC LINE PERSPECTIVE
When creating 2D images with depth and dimension, this is what you must know.
 pianotm
- 08/08/2017 12:00 AM
- 3759 views
Realism is an important element to any work concerned with portraying realism. Realism should never be a core objective. There is always a valid argument for surrealism and non-objectivity in any work of art. To desire and offer realism is a good thing. To demand realism is a narrow, limiting expectation that deadens creativity and makes the artistry irrelevant. Still, this is not a philosophical discussion; but an effort to understand certain basic principles in art. For the purposes of this article, we are going to assume that whether you are pursuing realism or surrealism, that you want your work to draw in the audience. This is going to be particularly important in video games as immersion is an essential element to the playability of a game.
Here, we are interested in drawing backgrounds and locations with depth, streets that look like you can walk down them, even if they are a bit cartoonish. The objective here is to create a location that your character appears to be standing in, unless you prefer your scenery to simply look like a picture that the character has been simply set upon. This would seem fine for a top down experience, and yet, even here, perspective seems to matter since we seem insistent on seeing both walls and roofs, and to even see ceilings, although we're looking down and this actually isn't necessary. It becomes apparent that immersion is an indispensable element of video games.
This discussion will be concerned with creating depth in a two dimensional image. This is a lesson in basic line perspective. For this lesson, a ruler, eraser, pencil, and paper are all you need. If you like, you can use crayons, pastels, coloring pencils, paint or any other medium to add color. However, given that we are concerned on this site with game make, you will much more likely prefer a drawing tablet with an appropriate vector program. I have found that Gimp and it's like are horrible for drawing by hand. I recommend Autodesk Sketchbook, which should offer a free trial with limited features (unlimited use), though it's been awhile since I've checked.
VANISHING POINT
Walk down the streets of your local neighborhood. Go for a picnic in a meadow. Navigate the traffic of bustling city. Look at picturesque paintings of landscapes and cities in your local museums. What do all of these have in common? Every one of them has a point that is so distant, you can't see beyond it. Now, this point may be covered in a painting by a building or some other object, but it's there, and every artist has relied in it. This is called the vanishing point, and it is where everything will lead. Even lines that do not point to it will be absolutely dependent on it. Open your sketch book or your program and prepare to mark your vanishing point.
When determining where you want the vanishing point, you need to think of the viewer's perspective. Do want to look down the street, at a store front or other object, or do you have your viewer looking into the middle distance? For the purposes of this lesson, we are simply walking down the road, so the vanishing point will be right in the middle of the paper.

That's it. Just a dot in the middle of the page. Now, what does this vanishing point represent here? For your next step, it is the level at which the horizon is. Using a straight edge, and lining up with your vanishing point, draw a flat plane from edge to edge of the paper.

You want the dot you used for your vanishing to remain visible. All objects are going to point to your vanishing point. When making a line perspective drawing, you want your primary focus to be that vanishing point. If the road you want the viewer to walk down to go in a different direction, then why aren't you using a vanishing point that goes in that direction? The point is that this image is being viewed from the direct perspective of the viewer. It's as if you're looking down the road with your own eyes; as if you're standing on that road. So since the road in this lesson is the focus of our image, why don't we make that the next thing you draw? Remember, you can see nothing beyond that vanishing point, so that's where the road must end. To draw anything that follows the vanishing point, use your straight edge and place it right on the dot. Any line you draw that isn't up and down or sideways must lead directly to this dot. Always use your straight edge or ruler to accomplish this.

So, this, so far is just three lines and a dot on your paper. It doesn't seem very interesting nor is there an indication of what we're looking at, yet. So let's make this look a little more like a road. That's going to take two more lines right down the center. Then we're going to make lined spaces along that central line getting progressively smaller leading to the horizon.

Followed by erasing the excess.

There! That looks more like a road. And there we are! You're walking down a road. Unfortunately, there's not a lot going on. You could end the project here, and it'd make a perfectly good artistic statement. Minimal effort, with a potentially harrowing message about endless journeys and unknown futures, but this might feel a little bland. You might want to add some scenery. I didn't add hills or trees anything because I honestly didn't think about and was more focused on the lesson, but there is really more to do. You've just learned the most basic point of line perspective, and now it's time to realize that everything in this 2D world has to follow the same rules. Buildings are built to follow roads and it seems a little odd that there just wouldn't be anything on this road, so, we're going to start adding a building. We will begin by adding the relevant parts of the structure that will follow the road to the vanishing point. The additions are to the right of the road.

For this, I've drawn a set of simple lines that denote various parts of the building's structure. You can't figure out what it is yet, but I've drawn a roof overhang, a walking path under that overhang, and a sidewalk by the road. Now, since these follow the road, they all must point to the vanishing point, directly. Lines to make walls have to be up and down in a 90 degree angle to the horizon. Likewise anything facing you, the lines that make the base must be in the same direction of the horizon. If you want something offset from the road, drawing something like that follows a slightly more advanced rule that we will discuss later in this lesson. So with these rules in mind, let's continue our structure.

Now, the sidewalk has clearly become a driveway and parking lot, but what's it for. This image is still a bit boring. Let's give this building an identity. I know, let's make it a gas station!

Erase the excess.

Here, you should now have a very good idea of how line perspective works. These rules are crucial for creating depth. So, now we have our basic boxes! Let's make them look like something!
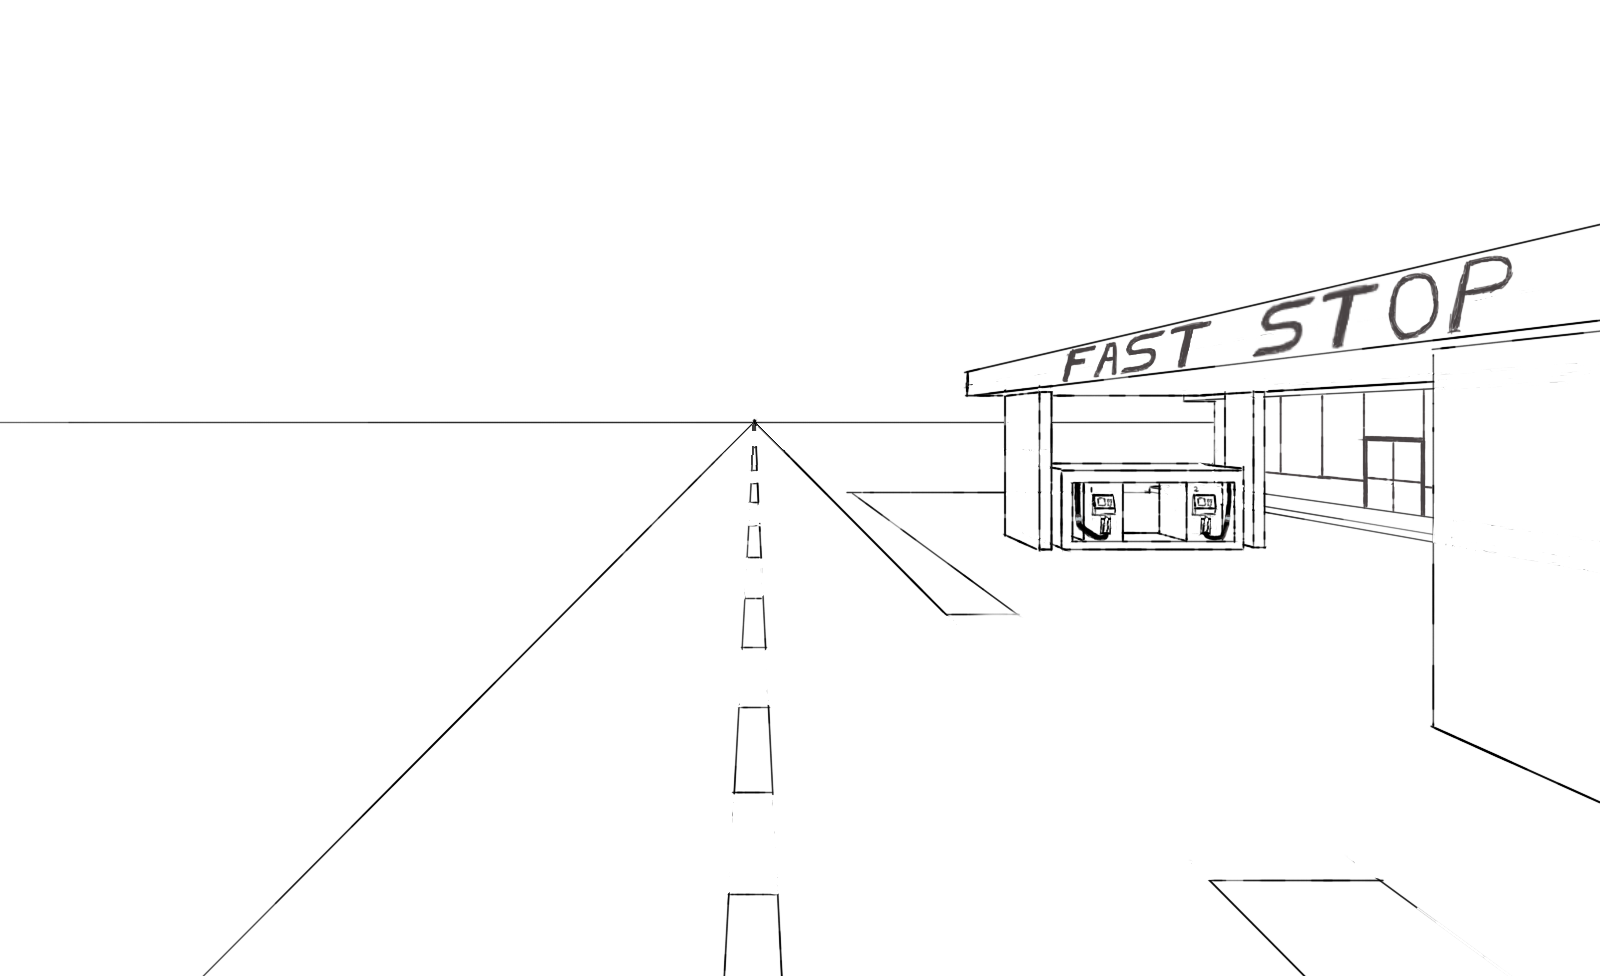
Hmm...Something's still missing! A gas station would have a sign! That's easy enough to fix. Remember, follow the rules. Even those little sign edges are going to follow to the vanishing point.

If you think the angles are going to be too sharp, look again. Now, that sign needs a little bit of clean up.

There! But that left side is really bland. I know! Let's do something a bit more advanced! "But, Tom!" you all shout with booming voices, shattering eardrums, "not everything in view will follow to the vanishing point! What if there's something in my view that's not following my line of perspective?" Well, that is an interesting question. You know what might do that? A billboard. They're made along the road, but they're angled in such a way that they can be viewed by the driver without distracting from the road too much. That means their construction doesn't follow the road, but it isn't exactly flat with horizon either. So what does that mean? It means, that in life and in art, there is never just one perspective. Just as you and I will have different perspectives on different things, you'll find that everything else always follows different perspectives. So what are we going to need to draw that billboard? We're going to need a second vanishing point. Now, to show this billboard at realistic angle, we've placed our second vanishing point off of the page, a little bit to the right. To do this, make sure the paper you are working with is fastened in place, and set a point for the ruler off page. This is much easier with vector program, but it's simple enough with regular paper. Just make sure you're vanishing point doesn't move. If you can't draw it on the table, then use a piece of scotch tape or something. Just something that won't move. As always, with this, follow the rules using the new vanishing point.

As you can see, while this object is on the road and seems to follow it, it's clearly pointing at a different perspective and vanishing point.
Now, let's make this look like a little better.


Then let's clean up our lines and add some color.

Line perspective is very simple on these basic and is essential to creating the illusion of depth in an image. As you get more advanced, you'll find that these same principles apply to everything from landscapes to individual figure study, though it may not always seem that way. Though, you can forget these rules for a lot of images you make, you'll find that it's necessary to keep them handy when creating depth, and they're indispensable for creating illusions. How much you're going to need these rules, I'll leave to your perspective.
"There's no single vanishing point to get sucked into but rather a plane to linger over with different perspectives and focal points." ~ Alexander Gorlizki
Here, we are interested in drawing backgrounds and locations with depth, streets that look like you can walk down them, even if they are a bit cartoonish. The objective here is to create a location that your character appears to be standing in, unless you prefer your scenery to simply look like a picture that the character has been simply set upon. This would seem fine for a top down experience, and yet, even here, perspective seems to matter since we seem insistent on seeing both walls and roofs, and to even see ceilings, although we're looking down and this actually isn't necessary. It becomes apparent that immersion is an indispensable element of video games.
This discussion will be concerned with creating depth in a two dimensional image. This is a lesson in basic line perspective. For this lesson, a ruler, eraser, pencil, and paper are all you need. If you like, you can use crayons, pastels, coloring pencils, paint or any other medium to add color. However, given that we are concerned on this site with game make, you will much more likely prefer a drawing tablet with an appropriate vector program. I have found that Gimp and it's like are horrible for drawing by hand. I recommend Autodesk Sketchbook, which should offer a free trial with limited features (unlimited use), though it's been awhile since I've checked.
VANISHING POINT
Walk down the streets of your local neighborhood. Go for a picnic in a meadow. Navigate the traffic of bustling city. Look at picturesque paintings of landscapes and cities in your local museums. What do all of these have in common? Every one of them has a point that is so distant, you can't see beyond it. Now, this point may be covered in a painting by a building or some other object, but it's there, and every artist has relied in it. This is called the vanishing point, and it is where everything will lead. Even lines that do not point to it will be absolutely dependent on it. Open your sketch book or your program and prepare to mark your vanishing point.
When determining where you want the vanishing point, you need to think of the viewer's perspective. Do want to look down the street, at a store front or other object, or do you have your viewer looking into the middle distance? For the purposes of this lesson, we are simply walking down the road, so the vanishing point will be right in the middle of the paper.
That's it. Just a dot in the middle of the page. Now, what does this vanishing point represent here? For your next step, it is the level at which the horizon is. Using a straight edge, and lining up with your vanishing point, draw a flat plane from edge to edge of the paper.
You want the dot you used for your vanishing to remain visible. All objects are going to point to your vanishing point. When making a line perspective drawing, you want your primary focus to be that vanishing point. If the road you want the viewer to walk down to go in a different direction, then why aren't you using a vanishing point that goes in that direction? The point is that this image is being viewed from the direct perspective of the viewer. It's as if you're looking down the road with your own eyes; as if you're standing on that road. So since the road in this lesson is the focus of our image, why don't we make that the next thing you draw? Remember, you can see nothing beyond that vanishing point, so that's where the road must end. To draw anything that follows the vanishing point, use your straight edge and place it right on the dot. Any line you draw that isn't up and down or sideways must lead directly to this dot. Always use your straight edge or ruler to accomplish this.
So, this, so far is just three lines and a dot on your paper. It doesn't seem very interesting nor is there an indication of what we're looking at, yet. So let's make this look a little more like a road. That's going to take two more lines right down the center. Then we're going to make lined spaces along that central line getting progressively smaller leading to the horizon.
Followed by erasing the excess.
There! That looks more like a road. And there we are! You're walking down a road. Unfortunately, there's not a lot going on. You could end the project here, and it'd make a perfectly good artistic statement. Minimal effort, with a potentially harrowing message about endless journeys and unknown futures, but this might feel a little bland. You might want to add some scenery. I didn't add hills or trees anything because I honestly didn't think about and was more focused on the lesson, but there is really more to do. You've just learned the most basic point of line perspective, and now it's time to realize that everything in this 2D world has to follow the same rules. Buildings are built to follow roads and it seems a little odd that there just wouldn't be anything on this road, so, we're going to start adding a building. We will begin by adding the relevant parts of the structure that will follow the road to the vanishing point. The additions are to the right of the road.
For this, I've drawn a set of simple lines that denote various parts of the building's structure. You can't figure out what it is yet, but I've drawn a roof overhang, a walking path under that overhang, and a sidewalk by the road. Now, since these follow the road, they all must point to the vanishing point, directly. Lines to make walls have to be up and down in a 90 degree angle to the horizon. Likewise anything facing you, the lines that make the base must be in the same direction of the horizon. If you want something offset from the road, drawing something like that follows a slightly more advanced rule that we will discuss later in this lesson. So with these rules in mind, let's continue our structure.
Now, the sidewalk has clearly become a driveway and parking lot, but what's it for. This image is still a bit boring. Let's give this building an identity. I know, let's make it a gas station!
Erase the excess.
Here, you should now have a very good idea of how line perspective works. These rules are crucial for creating depth. So, now we have our basic boxes! Let's make them look like something!
Hmm...Something's still missing! A gas station would have a sign! That's easy enough to fix. Remember, follow the rules. Even those little sign edges are going to follow to the vanishing point.
If you think the angles are going to be too sharp, look again. Now, that sign needs a little bit of clean up.
There! But that left side is really bland. I know! Let's do something a bit more advanced! "But, Tom!" you all shout with booming voices, shattering eardrums, "not everything in view will follow to the vanishing point! What if there's something in my view that's not following my line of perspective?" Well, that is an interesting question. You know what might do that? A billboard. They're made along the road, but they're angled in such a way that they can be viewed by the driver without distracting from the road too much. That means their construction doesn't follow the road, but it isn't exactly flat with horizon either. So what does that mean? It means, that in life and in art, there is never just one perspective. Just as you and I will have different perspectives on different things, you'll find that everything else always follows different perspectives. So what are we going to need to draw that billboard? We're going to need a second vanishing point. Now, to show this billboard at realistic angle, we've placed our second vanishing point off of the page, a little bit to the right. To do this, make sure the paper you are working with is fastened in place, and set a point for the ruler off page. This is much easier with vector program, but it's simple enough with regular paper. Just make sure you're vanishing point doesn't move. If you can't draw it on the table, then use a piece of scotch tape or something. Just something that won't move. As always, with this, follow the rules using the new vanishing point.
As you can see, while this object is on the road and seems to follow it, it's clearly pointing at a different perspective and vanishing point.
Now, let's make this look like a little better.
Then let's clean up our lines and add some color.
Line perspective is very simple on these basic and is essential to creating the illusion of depth in an image. As you get more advanced, you'll find that these same principles apply to everything from landscapes to individual figure study, though it may not always seem that way. Though, you can forget these rules for a lot of images you make, you'll find that it's necessary to keep them handy when creating depth, and they're indispensable for creating illusions. How much you're going to need these rules, I'll leave to your perspective.
"There's no single vanishing point to get sucked into but rather a plane to linger over with different perspectives and focal points." ~ Alexander Gorlizki

