


HOW TO FAKE A FIRST PERSON VIEW FOR YOUR (MAKER NAME HERE) GAMES!
Posts
Pages:
1

This tutorial is geared towards Rm2k(3), but should be feasible for any maker that uses terrain id, or a comparable function. At the end, I’ll suggest a method for porting this ‘system’ into Multimedia Fusion 2, but right now I’m assuming Rm2k3.
Getting the most out of this tutorial requires only a very basic understanding of the Show Picture command, Terrain ID, and a bit of busy work.
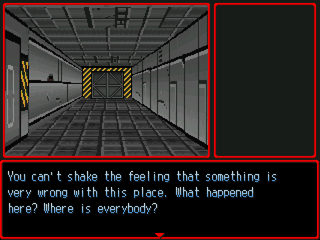
So, you like retro gaming, huh? You’ve got a nagging voice in the back of your head telling you that dungeon crawler of yours might look really interesting if you could put the player’s eyes in the main character’s head.
Ok, so how are you going to go about it? First, I’ll tell you what NOT to do.
Every time I attempted this sort of display for a game, I began with a critical error. I picked up a piece of graph paper and started marking my rooms out. Then, I started putting things together. I’d plan on a depth of three cells, and I’d go about setting up the wall data for each possible direction for each possible cell, based on my lovely graph paper cartography.
Needless to say, I always got about four or so rooms in before deciding I wasn’t quite masochistic enough to continue. I’ve started and given up on this type of project no less than six times.
Enter Terrain Ids, the beam of sunlight breaking through that cloud formation overhead.
A brief word on Terrain Id: In Rm2k(3), you can set Terrain ID values for each tile in your tile set. You can store these values into variables based on your character’s position, take a reading for a specific tile from a set of x and y coordinates, and use them to trigger pretty much any function you need.
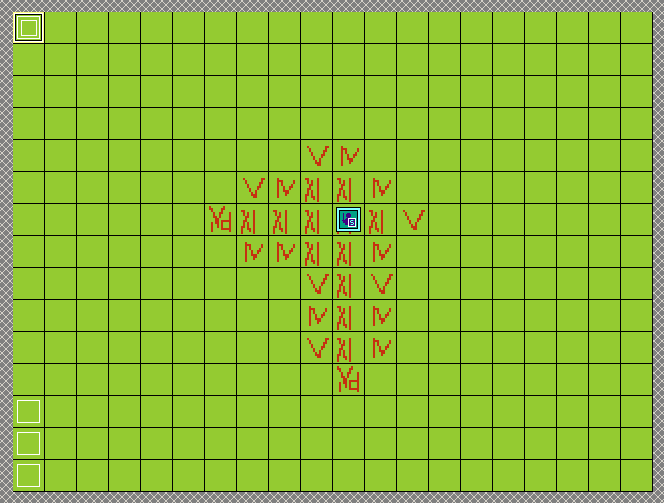
The basic idea here is to make use of the map, taking terrain id values to supply your show picture events with the info they need to place your walls. It is a fast process, and best of all, it literally lets you DRAW YOUR ‘3D’ MAPS IN THE DEFAULT RM MAP EDITOR!
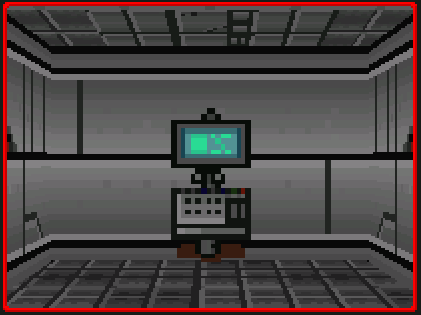
What the hell is going on in that shot? We’re getting to that, so hold onto your hats.
The first step is configuring your terrain ids. Lets start with a basic handful of useful types. Lets use id 1 for blank space, 2 for wall type a, 3 for wall type b, 4 for wall type a with a door, and 5 for the ground. You need at least two variations for each wall type. By placing them next to each other they will cycle as the player moves and this helps to reinforce the illusion of traveling in a first person environment.
Another step that helps sell the movement illusion is using alternating versions of your ceiling and floor pictures. I’m using a quick solution, which just adds to a variable when the character moves forward or backward. If the variable is 0, one set of ceiling/floor show, if it is 1, the other set is displayed. Check for when the variable is greater than 1 and reset it to 0. Congratulations. You now have a cycling floor.
Next, we need a game piece to move around our board, because that cycling floor won’t make much sense if you’re not actually mobile at the time. I don’t use the hero event for this because it isn’t conducive to the control style I’m shooting for. I call this event Blip. I set its function to record its current x and y value in the parallel event I use for tracking player input.
Since we’re sticking with the three cell depth of view, we need some events to act as the player’s visual field. This is one of those busy work segments, unfortunately. There is probably a more streamlined way to do this, but this is what I’m currently using. You derive the x and y coordinates for each section within the player’s sight, and store the terrain id of the corresponding tiles.
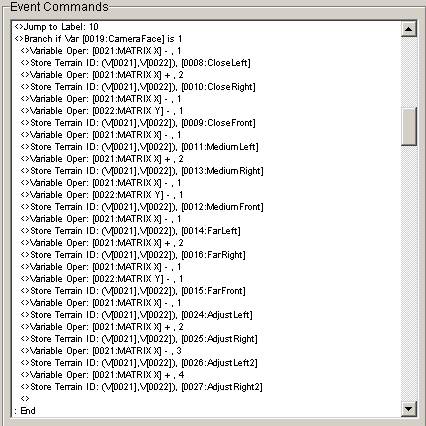
This replicates the player’s cone of vision. You need to set one version up for each of the four directions. It is important that you get the spatial relationships right. (Trust me on this one, I screwed up by trying to copy paste my right and left iterations only to find that my walls flipped positions when I ran the game!)
You now have a bunch of stored terrain ids. What do you do with them?
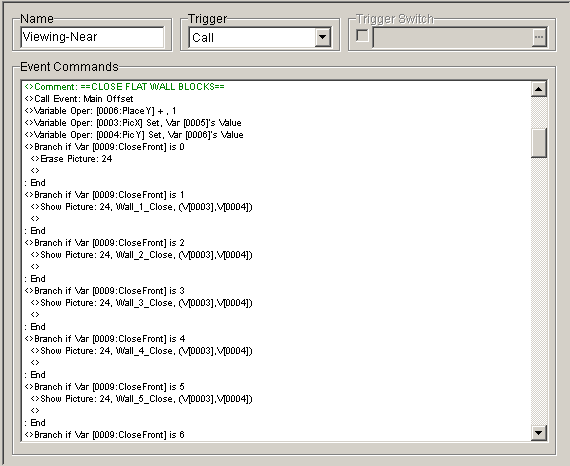
This section is kind of busywork intensive. You need to figure out where you want your images to display on the screen. Once you have the x,y value for the center of your intended display, you’re in business.
I use a single size image for each wall type and position (left angle, center, right angle), and scale it through the show picture commands. Because of the angle I chose, my wall sizes do not scale exactly, so I was required to use an offset system to get them to stitch together properly, giving the illusion of depth.
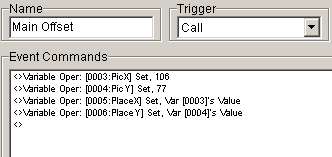
I store my intended x,y for the center of the display into a pair of variables, then I store them in a second pair of variables that I actually use in the picture display commands. This explains the Call Common event Main Offset from the above screen.
A lot of testing goes into getting your objects placed correctly onscreen. I’m using an old stock version of Rm2k3 that has a 40 picture limit. My system uses a maximum of around 32 images at a time.

My system currently finds the ids for every tile in the visual range, even if they are hidden by other objects. At first blush, it might seem like a feat of bad optimization, but it allows me to include things like transparent walls.
Now, lets take a moment to talk about movement. We have to get blip to move around, don’t we? I go with what I guess we can call tank controls. Pressing the directional key up moves “forward.” Pressing left and right pan the view in those directions. Pressing down moves “backwards.”
I set the default view to “North”. I call this 1 in my Camera Facing Variable. Pressing the right arrow increases this number by one, pressing the left arrow decreases it by one. Follow up your “rotation” directional key conditions with one that sets Camera Facing to 1 if it is greater than 4, and 4 if it is less than 1.
In the conditions for when the Inkey variable is equal to 1 or 4 (forward or backward), I have triggers for each possible Camera Facing. You can still use passability settings for your tiles to control where blip is allowed to go.
Okay, now we have the basic shell. We can draw a map in the editor using the terrain id for our empty/floor space. Then, we just have to make sure to set up alternating wall types to make the movement look good.
But, how are we going to handle objects that we need to trigger? I mean, it will be a pretty pointless dungeon if you can’t open chests, hack keypads, go through sliding doors, etc.
For this, I use a separate event called an Object Finder. It checks for when blip is at certain positions and allows for the player to interact with the environment. Since I’m trying to keep the number of parallel events running at any given time as low as I can, I set the condition to either blip’s x or y value being equal to the object’s. In the event page, I set a condition using the remaining position variable. If you’re going to have multiple objects for the player to interact with on a given x or y axis, you can stack them together to save pages.
I use a variable to for the type of object being displayed, and the name for an unused Hero slot to store position information for the objects in regular expressions. FrontCloseCn means Front Close Center, etc.
I have a separate set of show picture events for objects. The object type for the kiosk is 5. Object place is CloseFrontCn. This combination triggers the show picture command for the kiosk in the center of the player’s view.
Now we have an area we can move around in, and some stuff to do in it. This is going pretty good. One problem though… fake first person exploration can get a little disorienting. Sometimes you might spin around an extra time than you meant to, and you might not be able to tell that you’re actually looking down the wrong hallway. Some kind of overhead map would be a godsend at this point, no?
But damn, we’re using close to our picture ceiling. Problem?
Not a problem. We have a built in map function, that is if we planned for it. All you have to do to get a top down view of your environment is to erase all the pictures. Ugh! You’re showing your naked level! Cover that up, man.. or at least put some tiles on there to make it look more mappish.
Wait, so now I have to draw a regular map to have my 3d map? Why not just do the normal Rm2k3 ¾ overhead thing? Can you answer me that, wise guy?
Sure. Go play a game with a 20x15 map. Feels… small doesn’t it? Claustrophobic, almost. Now, check out the tutorial’s visual aide again. That is a tiny damn map… but it feels bigger than it really is, doesn’t it?
Then again, maybe that part is just me. Let’s not dwell, although I would like to point out that you can tint your screen to black and teleport your hero location to blip’s current location to keep the screen centered on your current location if you’re using a map larger than 20x15. Just remember to tint the screen back to normal when you’re ready to show off that map.
I mentioned how I’m trying to keep parallel hell to a minimum earlier. I guess it is time to expand on that. Most of the time the game is running, there is only one parallel event in use by the ‘system’ I’ve outlined here. It makes calls to map events (object finder) and common events (View Near, View Medium, View Far, Object View). During the map option, a couple of parallel events are turned on to block the main routine from calling the show picture series.
Being able to interrupt or bypass the regular translation of terrain id to wall graphics is important if you want to be able to animate a door opening.
Now, for the issues. The way I have it set up right now, I actually separate placing objects and interacting with them into two different events, called from different places within the single main parallel.
The way my events are set up, the object placement and attending show picture commands have to occur before the Show Picture sequence for the level geometry is called in order for it to show up at the same time. The problem is that if you put the interaction call in the same place, there will be ocassions where you’re getting the message for an interaction in a room which hasn’t been displayed yet. The workaround is easy enough.
The other big issue you’ll probably notice is some missing wall geometry in the large central room. This is due to me still not liking the solution I came up with for open spaces yet. It is still a little glitchy, so I cut it out of the example.
I figured instead of just posting reams of event code, I’d give you a brief overview to explain everything that is going on in the example project. Feel free to tinker around with it. Get a feel for drawing maps in the editor and let me know if you find any more disappearing wall bugs (other than the open room fix I mentioned right above here).
Of course, you’re limited to just wall types 4,5,15,and 16 for sample purposes, with walls 15 and 16 being a closed door and an open door, respectively.

This last section will touch briefly on porting of this system over to MMF2.
If you set up a grid of active objects with different values written into one of their onboard variables to represent different wall types, and moved a player object around the grid, you can accomplish pretty much the exact same effect. In all actuality, you could even make things easier for yourself by doing this. You could set the objects to only become visible once you’d passed over them which would be a much easier way of revealing more of the map as you go than how it would have to be done in one of the rms.
Visual Aid

AWESOME!!!Thanx for making this!
I wanted to put a FPS dungeon in my game.
Thnx again!
EDIT:The Visual Aid link you gave is broken.
Try to fix it.:)
I wanted to put a FPS dungeon in my game.
Thnx again!
EDIT:The Visual Aid link you gave is broken.
Try to fix it.:)


http://www.castles-of-britain.com/mmf2examples.htm at the very bottom of the 0-9 examples there's a pretty good MMF2 example posted.
Spellbinder - For my current project, the NPCs don't need to move around too much. I use three "layers" with the current version of this. The walls are the back layer, then there is the object layer (grates/desks/animated doors), and then the actor layer. I did some testing, connected to another project I have in mind, for animated & moving NPCs. The animation and position synch is just busy work, but it would require custom pathfinding for anything beyond a simple pre-baked "follow the route" behavior.
Darken - The open3d dungeon one is pretty close to my mmf tests, but I do a couple of things differently, including the ability to "jump," but that is for a different project entirely (and I'd rather stick with 2k3 for that one anyway, if possible when I get around to it).
Darken - The open3d dungeon one is pretty close to my mmf tests, but I do a couple of things differently, including the ability to "jump," but that is for a different project entirely (and I'd rather stick with 2k3 for that one anyway, if possible when I get around to it).
Very interesting. I'll read this more thoroughly and definitely try my hand at it sometime.
I think we could deliberately leave a corner of the screen void of Pictures to show the regular map as a Super Metroid style mini-map.
I'm also wondering if there would be an efficient way to have the environment (Pictures) actually scroll while the player moves, kind of like in The Dark Spire...
I think we could deliberately leave a corner of the screen void of Pictures to show the regular map as a Super Metroid style mini-map.
I'm also wondering if there would be an efficient way to have the environment (Pictures) actually scroll while the player moves, kind of like in The Dark Spire...
Yes, and I believe the more arduous task would be to simulate 90° turns smoothly.
That might be quite (too?) ambitious for 2k3...
That might be quite (too?) ambitious for 2k3...
Well, if you were using a patched version and had extra pictures to play with, you could get kind of a Shining in the Darkness Main Town style rotation. (The starter area was a panoramic shot of the town, you appear to turn around, but the picture is just scrolling one way or another).
This is just off the top of my head: With extra pictures available, the display system could be re-coded to draw all four directions at the same time. On turning, the move picture command could scroll the current facing off screen to one side, and scroll the new facing in. If they were synched properly, it would approximate a smooth turn, although the floor and ceiling tiles would be a little screwy and it would give the impression that square corners were actually round-ish.
Maybe good for a Lovecraft-ian game, where surfaces that are at once convex and concave wouldn't look out of place!

This is actually incredibly clever. I love how in the editor it is represented as a really simple 2D grid with options for events and whatnot. Brilliant.
Pages:
1

