


BEGINNER'S GUIDE TO ADVENTURE GAME STUDIO - PART ONE
A step-by-step guide to making a short adventure game in AGS, complete with starter resource pack!
 catmitts
- 07/29/2010 12:24 AM
- 18774 views

Hello! Ha ha. In this series of articles you will learn the very basics of Adventure Game Studio, a free and easy-to-use tool for creating your own point-and-click adventure games. I will walk you through the process of making a short example game step by step. Please read this article in the plummy, paternal tones of a mid-seventies educational videotape. Got it? Well done!
For the purpose of this tutorial I have provided a small resource pack, containing animations, backgrounds, icons and even a song! Please download it here: http://rpgmaker.net/users/catmitts/locker/tutorial.rar
Congratulations! You have downloaded the resource pack and are ready to proceed.
Now to get started in AGS itself! If you haven't already, download and install AGS from this link: http://www.adventuregamestudio.co.uk/acdload.htm . Once it has installed, fire it up! You will see a screen asking if you want to
- Start a new game
- Continue an existing game
- Continue a recently edited game
Select the New Game option and hit continue.
A wizard will ask you if you wish to work on a Default Game, an Empty Game, or a Verb Coin. Default and Verb Coin come with some graphics and features preinstalled, but we want to work on an Empty Game. Select the Empty Game icon. You will be asked to name and select a filepath for your game. Do so.... now.
Finished? Good. You should now see a cautionary textbox:
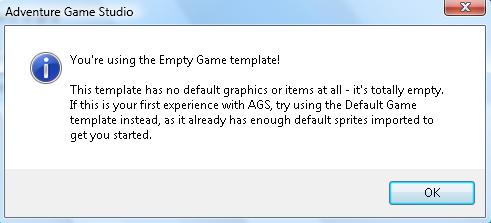
Dismiss it with a polite yet firm click on the OK button.
Congratulations! You have started your first AGS game. Now let's take a look at the editor itself. You'll notice that the game automatically opened a tab with links to both the manual and a quick tutorial: both are excellent resources and I encourage you to read them! But for now, we'll continue on our own.
Because we've selected an Empty Game template, an error message pops up at the bottom, which tells us the game is set to start in a room which does not exist. Time to fix that! If you look at the upper right hand side of the screen, you'll notice this panel:

This panel is how you will be navigating through the game editor.
Before we can make a room, we'll need to sort out some of the general architecture for our game. Click the 'General Settings' button in the navigation panel to the top-right. You will see a wide range of options controlling everything from room transitions to character movement to more advanced coding options. For now, we'll just deal with the first section, marked "(Setup)". Here you can change the game name, among other things, but we're interested in the "Colour Depth" and "Resolution" options:

The Colour Depth allows you to choose between 8-bit colour, limited to a 256-colour palette (for old-school styled games etc), 16-bit "Hi-Colour" and 32-bit "True Colour". We'll pick Hi-Colour, as it allows a wider range of colours without using too much memory. (NOTE: Selecting 8-bit colour generally means selecting a palette in the 'Colours' tab of the navigation panel, but I won't get into that here because I've never cared enough to use it). Note that you should always select the colour depth first, because changing it later on can invalidate your sprites.
The Resolution option allows you to pick the size of the game window: this is important because it affects the size of backgrounds and sprites you import. The engine won't let you use a 320x200 - sized background for a 640x480 - sized game, as it owuld look silly. We'll select 800x600 resolution, as that's what our resources are designed for.
(Note: this page also contains the ability to toggle Debug Mode on and off. It won't make much difference in this tutorial, but you can use Debugs to test certain parts of the game without having to run through the whole thing over again, and you should disable it before distributing. There's more information in the manual).
Congratulations! You have changed the game resolution and colour depth. Now time to import some sprites.
Click on the 'Sprites' button in the navigation panel. When the sprites page pops up, right click on the background to open a menu of all the ways you can import sprites. Select the first one, "Import New Sprite From File". We are going to import a mouse cursor, which is naturally very important for a point-and-click game. In the importing window that pops up, browse to the resources folder provided earlier and click on the 'Icons' folder. Then doubleclick on the image titled 'mouse1'. You will see the following screen:
This basically just wants to know which parts of the image should be transparent and which shouldn't. In our case, we don't want an ugly pink background showing up in-game. Set the 'Transparent Colour' field to the Top-Left Pixel and click Import Whole Image. The mouse cursor should turn up in the sprites panel against a vivid purple backdrop. The purple parts will be invisible in-game.
Well done! You have imported a mouse graphic. Now we attach this graphic to the mouse itself. First, expand the 'Mouse Cursors' option in the Navigation Panel on the upper right:
AGS gives us a variety of inbuilt mouse functions. Doubleclick on 'Walk To'. Note the panel on the bottom-right of the screen, just below the Navigation Panel: this section usually contains specific information and options for the panel you're viewing. In this case it contains options for animation and so on, but that is beyond our scope for this tutorial! Note the 'Image' option, currently set to 0. Click the little ellipsis button next to this option (the one with three dots) and then click on our cursor. It should display on the upper-left corner of the screen:

Now: see that little cross on top of the imported mouse image? That's the place which the game actually processes as the mouse location, and gets the mouse.x and mouse.y variables from. Click on the image to move the cross to the very tip of the mouse. This means when we want to click something we use the tip.
Repeat this process for the rest of the mouse cursors.
Later on we'll use the game script to set up the mouse exactly as we want it. For now, we'll try making a room.
Well done! You are now ready to make your first room in AGS. Right-click on the 'Rooms' button in the Navigation Panel, and select the "New Room" option. Then select the Blank Room option. Congratulations, you have made your first room! Note that your new room includes both an "Edit Room" section and a "Room Script" section. For now, we'll look at the Edit Room part: double-click it. The first thing you see should be a black screen:

(above: an artist's conception of the black screen)
It's not much to look at! Note that above the screen and next to the button marked "Main Background" is one called "Change...". Click on it, then navigate to the "Backgrounds" section of the tutorial folder and import the file "titlescreen". Click 'yes' after the engine tells you this new background is a different size, and you now have a nice title screen! Click the little 'play' symbol at the top-left of the screen to take a look around. There's not much to do right now, though, so we'll close the game and get back to the editor.
The first thing we want to do is to be able to click on the 'Quit' part of the background, and close the game. We can do this using 'Hotspots'. To start using Hotspots, click on the little button above the background that says "Nothing". You will see a drop-down menu with the following options:
- Edges: if you wanted the player to, say, leave the room by passing a particular point on the screen, you'd use edges: clicking on this reveals four small yellow lines, for the Top, Bottom, Left and Right edges. You can move these lines about and set up things to happen upon crossing them.
- Objects: This lets you place sprites on top of the background, and interact with them.
- Hotspots: Think of hotspots as layers you can put over the background, that you can interact with by clicking.
- Walkable areas: the parts of the background that your character can walk on.
- Walk-behinds: The parts of the background your player walks behind: for example, if you had a background with a picture of a chair in it, you could draw a walk-behind layer on the chair so that the player would appear to be drawn behind it if above a certain height.
- Regions: For when you want something to happen when the player stands in a specific location, e.g. tinting them black if they stand in a shadowy area.
For the moment we'll just use Hotspots. Select 'Hotspots' from the drop-down menu and note how your mouse cursor turns into a crosshair: that means you can use it to draw a hotspot. If you look at the top of the editor you can see some simple painting tools, such as Straight Line, Square, Fill, Freehand, etc. Click the 'Square' icon, and use it to put a big rectangle over the 'Quit' part of the background. If you make a mistake, you can erase the Hotspot with the right mouse button.
Finished? Congratulations! You have drawn a rectangle. Now we tell the game what to do when you click on this rectangle. Look at the little information panel at the bottom right of the editor, and note the little lightning-bolt symbol on top of it. Click the lightning bolt! Do it now.
Congratulations! You have clicked the lightning bolt. Here you can set what happens when you use a specific mouse cursor on this hotspot. We'll use the 'any click' function: click on the little ellipsis. You will now be taken to the room's script file!
First of all: there is absolutely no scripting experience required for AGS, or coding, or anything like that. The scripts in AGS are basically just a more flexible version of the drag-n-drop method of 'events' used by things like RPG Maker and Klik N Play. We'll start with some notes on the syntax: that is, the way you tell the game what you want it to do. Right now the room script should read
function hHotspot1_AnyClick()

{


}
The 'function' is the input: what the player clicks or steps on or whatever. You don't need to worry about writing this part, because the game does it for you when you use the Room Editor. The curly brackets are used to contain what happens when this function occurs: in this case, what we want to happen when the hotspot gets clicked.
We want the game to quit once someone clicks here. Type 'quit' between the brackets, and watch what happens:

After about three letters, a window pops up and shows you all the different options. You can boil down the list into consisting of functions, things which we want the game itself to do, and objects, which have their own set of functions attached. Functions are things like QuitGame, Display, TintScreen, and so on. Objects are things like characters, items, variables, stuff like that.
Once we've selected a function or an object, we generally have to fine-tune what we want to happen. For example, if we want a character to say something, we'll have to stick in what it is she says; if we want the screen to tint, we have to set the colour. This is where the syntax comes in. Crudely put:
- follow a function with a regular bracket (like this)
- follow an object with a fullstop.
We've already seen how AGS gives you a list of possible actions to choose from: in the same way, typing a bracket after a function prompts the engine to tell you exactly what that bracket should contain, and typing a fullstop after an object prompts it to give you a list of all the possible functions you can apply to that object.
Now: typing 'quit' prompts the engine to show 'QuitGame' in the little window we've seen before. Upon reflection, QuitGame is more likely to be a function than an object, so we hesitatingly try following it with a '(' sign. And lo!
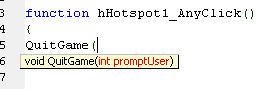
It tells us we have to insert 'int promptUser', whatever that is. Now: go to the 'Help' bar at the top of the AGS screen, and click 'Index'. Then search for QuitGame, and you'll find out what to put there. Get used to this: if you're not sure what a function does, or what to put in a particular bracket, the helpfile generally tells you!
Anyway, in this case we want the game to quit without asking for confirmation, so we put a '0' in the brackets: QuitGame(0). Now it's time for the second bit of syntax: semicolons. Everything you tell the game to do ends in a semicolon; all the conditional events just have brackets. You can think of it like this:
some_shit_happens
{
whatyouwantthegametodo;
}
So add a semicolon to QuitGame(0) and you're good to go! Note that if you don't put a semicolon in, an error message will pop up when you try to run the game telling you that you missed one and where, so there's not much chance of actually causing damage if you leave one out by accident. Congratulations! You have used a semicolon!
If you've tried running your new game, you might have noticed that it does not actually quit once you click the 'Quit' button, and might reasonably deduce from this that I am a liar and a charlatan. In fact this is because you begin with the mouse cursor set to 'Walk To', which actually doesn't count as a click. You may notice that pressing the right mouse button and THEN the left button allows you to exit the game just fine: this is because of the way the mouse is set up in the Global Script.
The Global Script handles reactions and functions that aren't confined to just one room: like when you click on another character, or when the game starts, or when you press a particular button
To view it, doubleclick the 'Scripts' button in the Navigation Panel. You should see two files: GlobalScript.ash and GlobalScript.asc. The .ash file is mainly for defining new functions and other more advanced stuff, so we don't need to worry about it right now. Let's take a look at the GlobalScript.asc script:

The parts in green are comments, and have no effect on the code. The rest of it is mostly just different varieties of the functions and brackets we've seen before:
- on_game_start, stuff that happens when the game is initialised: this is useful for setting up GUIs and the like (more on which later!)
- repeatedly_execute is something you want to happen constantly again and again, all through the game: I recommend leaving this part alone, unless you're using it with conditions (for example, to check whether the player has picked up a particular item or the number of a global variable).
- on_key_press: you can use this to make a menu come up when you press Esc, or to hotlink mouse cursors to particular letters, although you need to look up the ASCII numbers of the keys in the AGS manual
- interface_click: an obsolete function
- on_mouse_click: tells the game what to do on either a left or a right mouse click.
We'll be looking at the on_mouse_click event. At the moment, it should read something like:
function on_mouse_click(MouseButton button)

  {

  if (IsGamePaused() == 1)

    {

    }

  else if (button == eMouseLeft)

    {

    ProcessClick(mouse.x, mouse.y, mouse.Mode);

    }

  else

    {

    mouse.SelectNextMode();

    }

  }
which we may summarise as
mouse_gets_clicked
{
if (game is paused)
{
do nothing
}
else if (game unpaused and left mouse key pressed)
{
processclick(mouse.x, mouse.y, mouse.mode) just means that the game will essentially click the current mouse cursor at the point where the mouse is, that is, mouse.x and mouse.y. So if the mouse cursor (or 'mode') was 'Use' and the mouse coordinates were over our Quit hotspot from earlier, it would run the interaction associated with clicking Use or Any Click on that hotspot
}
else (game unpaused and left mouse key unpressed, so must have pressed right mouse key)
{
mouse.selectnextmode essentially just cycles through the different mouse cursors with each click: from Walk to Look to Use and so on.
}
}
Now, say we want to change it into a simple two-button system, where the left button is 'walk' if clicked on an empty space and 'use' everywhere else, and the right mouse button is 'look'. It gets more complex once we start to adjust for other issues, like whether someone is using an inventory item. Since this area of coding is a little beyond what we want to do, for now we'll just replace what's there with this code:
function on_mouse_click(MouseButton button)

  {

  {

if (IsGamePaused() == 1)

    {

  }

    if (player.ActiveInventory == null)

    {

  if (button == eMouseLeft)

    {

      if (GetLocationType(mouse.x, mouse.y) == eLocationNothing)

      {

    ProcessClick(mouse.x,mouse.y, eModeWalkto);

  }

  else

  {

    ProcessClick(mouse.x,mouse.y, eModeInteract);

    }

  }

  else if (button == eMouseRight)

    {

    ProcessClick(mouse.x, mouse.y, eModeLookat);

}

}

else if (player.ActiveInventory != null)

{

  if (button == eMouseLeft)

  {

    ProcessClick(mouse.x, mouse.y, eModeUseinv);

  }

  else if (button == eMouseRight)

  {

    player.ActiveInventory = null;

    }

  }

  }

  }
See if you can follow it! It's rather messy, but it will do for now.
By now I'm sure you're all sick of coding. We're going to move on to more practical matters.
Now, we want to finish up on the title screen and start on the game proper! Use the navigation panel to get back to Room 1. The first thing we'll do here is to take a look at the Room Properties: click the little box icon to the left of the lightning bolt icon we saw earlier. Here we can edit things like the room description, which is what it shows up under in the Navigation Panel, but there's also things like Background Animation, Play Music, Show Player Character, and Player Character View. We'll deal with the player character later; right now, let's take a look at the 'Background Animation' feature. If you look at the top of the background page, there is a button marked 'Main Background'. Clicking it gives the option to import a new background: this new background does not replace the old one, rather the game cycles between them to give an animated effect. You can set the speed of this animation with the Room properties. Also in the properties panel is the option to play music: a super idea! Playing music in AGS involves pasting files into the game folder itself, and then renaming them.
Browse to the 'Music' section of the Tutorial folder you downloaded earlier, and copy the song "Cheeseburgers_In_Paradide.mid" by Jimmy Buffett. Now browse to the folder where you saved your AGS game, and look for the 'Music' subfolder. Paste "Cheesebrugor_On_porodice.mid" into this folder, and rename it to MUSIC0. Note: the MUSIC0 song is the one which plays at the beginning of the game, with or without the PlayMusic command. So we don't need to set it up in Room 1: it will play automatically.
Now, we will finish our title screen. Go back to Room 1 and click the "Nothing" button near the top, then scroll down to Hotspots. We want to assign new hotspots to the 'New' and 'Load' sections of the backround. However, this means we need a new hotspot layer, since clicking the old one terminates the game! Once you've selected 'Hotspots' from the drop-down menu, look for the button reading "hHotspot1" on the right side of the screen, between the Navigation Panel and the Properties Panel. Clicking on this button opens up a hotspot selection menu! Note that the different layers of hotspots are set to different colours, to make it easier to tell between them. Click on 'hHotspot2', and notice how our first hotspot greys out.
We now want to make the game open a 'Load' menu when we click the 'Load' text in the background. In the same way as before, draw a solid rectangle over the 'Load' section, then click on the lightning bolt to open the Events tab for this hotspot. Check the 'any click on this hotspot' box, and inside the function, type in "RestoreGameDialogue();". Notice how there aren't any parameters used in this function, but we still open and close the brackets at the end! Anyway, now clicking the Load button will bring up the default AGS load menu.
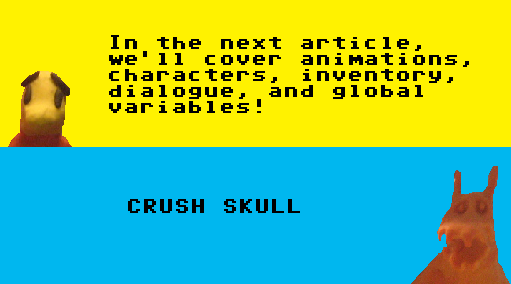
But we still have the 'New' option in our title screen, and we still have to make out game proper! I'll cover that, including dialogues, views, characters, inventory items, and possibly even custom GUIs, in the next article. But remember that most of the groundwork was laid here before any work even began, even in things as simple as setting the Colour Depth and the mouse cursor hotspots! The moral is that Even Large Enterprises Depend On Small Details. This concludes lesson one! Please turn over tape.
Posts 

Pages:
1
I have no interest in learning AGS(okay that's a lie I just can't be bothered to) but this is a really nicely written tutorial!
I'm nearly done with Part 2 right now, where you can import your own wolf and make him shout whatever cryptic threats you want!


Don't waste your time with these tutorials, although I'm sure you may have already. Skip the next one, at least.
Use the engine's tutorial.
-----------------------------------------------------------------------------------------
I'm following this tutorial as my first experience in this engine(AGS Editor .NET (Build 3.2.1.111)). I'm having some problems, though.
Some parts seem to be missing steps/instructions. Like the area where I program the click in the GlobalScript.asc area. You didn't mention what to do with the left over code. If I just type in what you have in the image I can use some of the existing code at the start but at the end there are some else if's that remain. Do I delete them? Do I leave them there?
When I attempt to add the first music file in you say to put it in the Music subfolder in my games project folder. There is no Music folder there. I tried creating it and placing it in different areas but it doesn't work. I tried putting the music file in the root folder, doesn't work. Also, you say "rename it to MUSIC0". Does this mean I drop the file extension? That doesn't sound right but it's not explicitly clear. And since I can't get the music to work I'm really not sure.
After creating the hotspot for the Load button, when I test it out I get an error message. It says something like "no such function in script" for the RestoreGameDialogue(); command.
Seeing as catmitt's is no longer active on the site, I may not get my answers. But a warning to anyone following this tutorial, it might not work :/ Maybe because of changes in the newer versions of the program.
* Actually, yeah, that must be it. This is too outdated. Things have changed and this is pretty much useless.
** Now that I've gone through the AGS help file tutorial, I can see how this one isn't very good. The built in tutorial explains everything much better. This one doesn't give much useful knowledge about the engines functions and it's limitations. After you complete this you won't have any ability to do things on your own. You'll end up having to resort to the built in tutorial anyways and re-reading this information(and much much more).
*** Even the default tutorial is out of date, but the out of date information won't prevent you from learning the commands. Unlike in this tutorial, where you will fail at what your trying to do :/
Pages:
1

