


PATH FINDING
Find the shortest path from one point to another
 Kazesui
- 09/04/2011 01:17 AM
- 18921 views
Hello, here I am again with more complicated stuff for you to enjoy.
This is the second part of the Tactical Battle System tutorial series I'm working on.
You can find the first part here:
Tactical Battle System Movement
This tutorial is going to be split into two parts, with the second part also being of interest for those who want to know how to do path finding in rm2k3 without necessarily having it as part of a TBS. At the end of this tutorial, I will provide a sample project which will demonstrate the end result as well as containing all the event code for you to inspect more closely.
Part 1: Extending the move field from last tutorial
As the title suggests, this is going to be an extension of the system given in the last tutorial. If you haven't read the previous tutorial, I recommend that you do so if you want to understand anything within this part of the tutorial.
In the last tutorial, we had to move the hero around manually after having chosen him. This looks rather odd and also very unlike how a TBS normally work. It would make more sense to pick the hero, and then choose the spot we want him to go. But to actually make him go right to the spot you chose, you need a way of deciding the path to that spot.
Luckily, using the move field which takes into account different terrains, this isn't too hard. Let's take another look at a graph from the previous tutorial.
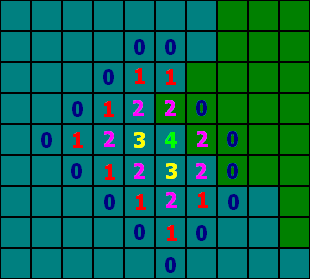
With the move field, we set values containing the remaining steps left into a set of variables from 101 to 200 which each corresponded to an move event ID if you subtract 99 from the value (since the first move event ID was 2).
This means, that if we choose an arbitrary tile within the move field, we can retrieve the amount of steps that are left at that spot. A nice thing with this is that if we look to all adjacent sides, and go to the next tile with the highest amount of steps left, we will always end up back in the middle! This means that if we choose a spot, we can simply look for the next tile with the highest spot to decide the path to our destination in reverse.
So let's take a look at how we can apply this concept to event code:

First off we set a variable Path Best Dir Ptr, which we are going to use to point to a set of variables which will contain the path in terms of steps, i.e. 4 means one step up, and 1 means one step down.
In the sample project I've chosen to use the variables from 61 to 80 for the path, which means we should start by pointing to variable 61. We also reset the variables 61 to 80, just to be sure something weird won't happen.
The Hero has a much higher ID than that of the move cell events, and as we remember Get Event ID only retrieves the event with the highest ID on the selected tile, so we're going to move the selected event to a temporary location to make sure it doesn't disturb the algorithm. Even though we're moving the hero to somewhere completely else, we'll move him back as soon as the algorithm is done executing, which is so fast that the player won't be able to notice that he was moved.
We use the same technique as in the last tutorial, in terms of having event pages take care of moving the event in question around. The Select ID variable is set before the execution of this algorithm, so we can use it to refer to the current player event we want to move, so all we have to do is to add another variable and another page which does the job we want it to do.
After this is done, we set Cell X and Cell Y to the coordinates of the destination.
Once that is done, we can start looping the algorithm until it finds it's way back to the origin. We're going to do this in a similar fashion to that of generating the field. That is, we're going to take one tile, then look above it, then right, then down and finally left. Difference is that this time, we'll be looking at the steps left, and we will store the tile with the most steps left in a "Path Best Value" variable, as well as the event ID on that tile and also the direction. Notice that the best direction is opposite of the direction we're looking at, since we're going in reverse, i.e. from destination to the origin. Just to remind you in case you've forgotten
1 = down, 2 = left, 3 = right and 4 = up
Another thing to notice here is that we only check for range if the event ID we find is higher than 0 (i.e. no event) and lower than MAX Move ID, which is the highest ID of the move cell events. In last tutorial we set this to 90, since we don't need higher to get a maximum of 6 steps, but if we'd suddenly want more steps, then it's practical to have variables like this which we can change, instead of changing a lot of constants at every branch where we'd might use them.
If we have found a move cell event, we take it's ID, add 99 to point to the variable containing the steps left for that specific event. We store the steps left in a variable and check if it's less than the current "Path Best Value" variable. if so, we update the "Best" variables. And we continue doing pretty much the same for the other directions
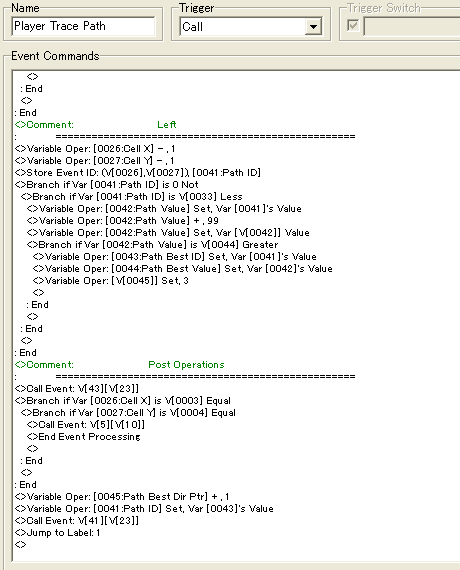
At the end we call the event with ID equal to Path Best ID, and with a variable containing the value equal to the page which sets the coordinates of that event to Cell X and Cell Y, and check if these equal that of Select X and Select Y, i.e. the origin. If this is the case, we return the player we moved earlier, back to it's position, and end the algorithm.
If not, we add 1 to Path Best Dir Ptr so that it can store another step. We also set Path ID to the best ID to get it's coordinates so that we can continue with the next iteration of the algorithm.
Doing this, we will end up with a list of steps needed to take to get to the destination.
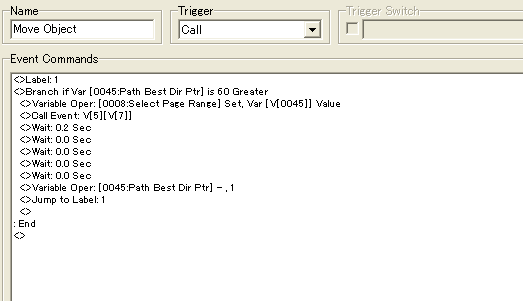
Since we now have the list, we can call an event to move the player automatically. The Path Best Dir will now still be pointing to the last step in the list, which is actually the first step from the origin. We set this value to that of a temporary variable which we'll use to tell which way the player should go by calling it's event on a page which handles movement for the player event. We wait for 0.2 + 4 x 0.0 waits since this is the amount it takes to perform a step with speed 3. If you want to have a higher speed you'll have to reduce the amount of waits. At the end we reduce the Path Best Dir Ptr by 1 to get the next step.
We continue doing this until we reach 60, i.e. one below the first step, meaning that we've taken all the steps.
And voila, our event now moves automatically to the destination without taking any detours. To try it out you can download the sample project at the bottom of this tutorial and paste the hero position into the first map.
Part 2: RM2k3 implementation of Dijkstra's algorithm
Okay, now we're done with the easy stuff, let's move on to something more generic which can be applied to other stuff than a TBS as well, but which we will be using later on for another part of the TBS tutorial. I will also go ahead and tell that I intended for this tutorial series to not become horribly complicated. I'll also go ahead and admit that I failed at that.
For this part of the tutorial you need to know how to use pointers well. You just won't even have the slightest chance of understanding all which is going on without knowing how to use them well. If you're among the ones who still don't know how to use pointers well, take a look at this tutorial Pointer Tutorial and study it well!
Let's move on. The algorithm we're going to use is called Dijkstra's algorithm, and is quite similar to the one we've been using up to now with some few differences. With Dijkstra's algorithm, we don't know how big a range we have, so we keep searching until we find a point of relevance. This also means that this algorithm is able to determine which of two points is closer to the origin.
This does also mean that this isn't the most effective algorithm for finding a path from a single point to another. I will teach this one since it's the one that works best for a TBS like this, so if you want to look at a better alternative, look for A* and get creative in translating it to rm2k3 code.
Dijkstra's algorithm works by adding all the neighbour tiles to a priority queue. We take a tile from the queue, and add it's neighbour tiles as well to the queue, and continue like this. The priority bit means that we will choose tiles with lower step value first.
The reason we need this is because this algorithm only continues until it finds the point it wants to go to, and if we let tiles with higher step value continue adding neighbours before the one of lower step values, we might end up doing impossible moves, like walking through a big forest when it would be more effective to walk around it. Let's illustrate it with a picture
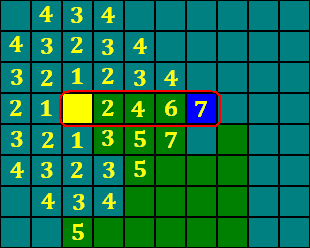
Let's say the yellow spot is the hero, the blue spot the destination and the green spots are woods which take 2 steps. By observing the graph, we can see that the shortest path is 6 steps, by walking around the forest. Using a similar algorithm as in the previous examples however, we'd be walking right through the forest, since the algorithm will find it sooner and terminate as soon as it finds it without regard to it possibly being the shortest. And it would be very ineffective to search all possible tiles first to make sure we've found the shortest way.
By making the tiles with lower step value add neighbours first, we avoid this trouble and can be certain that the shortest path was chosen.
Something worth noticing is that this only applies when you have terrains with different move values. If all terrain is either unpassable or only take 1 step, you don't need to implement a priority queue and can continue like before.
We will take terrain into equation here to not reduce on the feature list, and since Dijkstra's algorithm normally uses a priority queue, so be ready for hell.
The setup
Since this is going to be fairly complicated, I will explain the concept of how we're going to do this in rm2k3 first. With this algorithm, we want to reach a large area, but doing this with events would require very very many of them. It's simply silly to add that many events when we don't need them to represent any graphic, so what we will be using an array of variables representing each tile on the map.
For a map of size 30x30 this will require 900 variables. For a map of size 50x50 we'd need 2500 variables. That might sound like an awful lot of variables, since you don't seem to have more than 5000 available without patching and stuff. But the truth is that you can point to any variable outside of that and still be able to use them. This means that we actually can have as many as 9,999,999 variables.
Since variables isn't a problem we can freely use them to represent the map. The sample project use variables from 100,001 for this purpose. To address a single variable we'll combine the x and y value.
Let's look at this as an example. This is a theoretical map of 4x4 tiles. the horizontal line above represent x coordinates and the vertical one to the left the y coordinates. The values within is the ID of the different variables we'd like to get.
by taking the y coordinate, multiplying it with the width and then adding x we get the variable we want
y * width + x = variable ID
To retrieve the coordinates again afterwards, we simply take the variable ID and divide by the width to get the y value, and take the same ID to modulo of the width to get the x coordinate.
9 % 4 = 1 = X
9 / 4 = 2 = Y (rounded down)
So with this, we can store a step value onto a tile on the map without using events, and we can also get the coordinates of that tile if we have the ID. In the actual implementation we'll have be adding/subtracting an offset as well since the variables we want will have an ID from 100,001 and upwards. I will refer to this set of variables as the grid from now.
Priority Queue with heap structure
Next, we will keep a queue of ID's pointing to tiles of interest, so that we can generate the field in a similar manner like before, only that we let the ones with lower steps add neighbours first. To do this, we're going to be using a "heap structure". I will now give a lightning course in what that is.
This is a heap. Each "parent" node is smaller or equal to it's one or two "children" nodes. Meaning that at the top of the heap, we will always have the node with the smallest number (since we're sorting for small numbers), which means it will also be easily accessible. If we want to add another node to the heap, we don't need to do too many operations either to keep the nodes as a heap structure.
Any new nodes will be added at the bottom of the heap, will then check if it's smaller than it's parent node. If it's smaller, than the parent and child node switch place, and it will now compare itself towards it's new parent node. This goes on until it's bigger than it's parent node, or when it reaches the top, like in the example above.
Once we're done with the top node, we delete it. We then take the last node added at the bottom of the heap and place it on the top. We then check both children nodes to check which is smaller and switch position with it, if it's smaller than the current one. The example above show how we retain the heap structure after having deleted the top node. Notice that we don't make a switch at the last frame, since both are equal.
the last example would be represented like this in an array of numbers:
the top element has index 1. We get it's left child by multiplying it's index by 2, and the right by adding 1 to that. If we go to the left child (i.e. node of index 2), we can get it's left child by multiplying it's index by 2 and it's right by adding 1 to that. Not very difficult.
The advantage of this structure is that deleting and adding nodes to the heap only takes log(n) switches, where n is the amount of nodes in the heap. The disadvantage is that it has more overhead than the alternative, meaning that it is less effective for scenarios with few nodes.
However, if we have few nodes, it's going to be quick anyway, and if we have many nodes, which we very well might get while searching for the shortest path over a large area, this structure is noticeable quicker so this is what we'll be using.
Now for the confusing part. The implementation of it looks something like this
In the sample project we're using variable 300,001 and upwards for storing nodes.
This function is called after having added a new value to the grid. We then take the ID of the heap element and subtract 300,000 to get an index value which is easier to work with. Both a Child Node variable and a Parent Node variable gets this value, and we divide the Parent Node variable by 2 for it to point to the parent node. Then we can start looping until we reach and end criteria.
First we set a Child Ptr and a Parent Ptr to the value of of their indexes, and add 300,000 to that so that we're pointing to the heap elements again. We then take a Child Value and a Parent Value variable to the value of what these heap elements are pointing at. What we then get is a pointer which points to a value in the grid. We then set the value of the same variables to the points they're pointing at, at the grid. We then check if the Child Node is smaller than the Parent Node. If yes, we store what the Child Ptr is pointing at in a Temporary variable, then we store what the Parent Ptr is pointing at what the Child Ptr is pointing at, and finally we store what we stored in the temporary variable into the where the Parent Ptr is pointing at. With this we will successfully have swapped the ID's that the heap elements were pointing at.
Confused yet? You need to keep your head cold to keep track of what's pointing to what, and you might need to reread it a couple of times to get it. Unless you're not too good with pointers and ignored what I wrote further up. Then you can just give up and go read the tutorial on pointers.
If you're head isn't spinning, let's move onto the implementation of deletion of the top node
Dijk New ID is what we're using to point at the next element to be added to the heap, so when we're deleting an item, we have to reduce it by one. This will in turn make it point at the last element of the heap. We start by setting the Parent Node variable to 300,001 which is the first element in the heap, and the Child Node to that of the last element in the heap. We then overwrite that which the first element is pointing at with that which the last element is pointing at.
We then set some initial values. We set Parent and two Child Node indexes, then their Ptr's to the same value + 300,000. We then retrieve the values in grid by taking the value of what their pointer is pointing at. We then check if Child B is smaller than Child A. If yes then we check if Child B is smaller than the Parent Node. If yes, we swap Child and Parent. Then we set Parent and Child A index to that of Child B and multiply Child A index by 2. We store that value in Child B as well and add 1. We now have access to the Node we just swapped and it's Children, like described a bit earlier. We adjust their Ptr and check if they're bigger than that if Dijk New ID, since it contains the ID of the last element. If there's is no Child B, then Child B is simply set to the same values as Child A.
The other part of the code is pretty much the same, just adjusting for Child A rather than Child B. This algorithm will then keep looping until one of the "stop criteria's" occurs, at which point the algorithm will terminate.
And this is what there is to using heap for priority queues. With little modification we could make sort arrays quickly as well, but we'll leave that for some other time.
Implementing the algorithm
Now let's finally look at how we're going to implement the actual algorithm.
But before we get that far, we'll have to notice that we need to initialize some variables
We need to define how big the map is for the variable grid to work correctly. We also want this to be stored in variables, so that we can change the size when we switch maps. Also we store the pages for the object we'll be working on (making the hero do different stuff, like walk in the direction we want), set an offset which tells where our grid variables start and set High and Low variables which tells us which events the algorithm will be looking for to construct a path. With this we can move on to the main implementation
Dijk ID is the variable we're going to be using to point at the top element in our heap, while Dijk New ID will be pointing at the position after the last element, meaning that it's always ready to add a new element to the heap.
We also set variables Dijk X and Dijk Y to the values of the starting point. Once we have these, we can call the common event "Get Grid Ptr" which uses the coordinates to calculate a Pointer to the grid corresponding the current map tile in question. This is done by the same formula as described earlier. In addition to this, we have 2 other common events worth noticing as well. Get Grid Coordinates which translates a Grid Ptr to coordinates and Grid Clear, which sets all variables within the grid to 1,000,000. This is to make searching for the shortest path afterwards easier.
We set the current point in the grid to have value 0, and also a variable Dijk Value, which is containing the current step value for that tile. We then continue in familiar fashion. We start by checking above the current tile, then right, then down, then left, some post operations and repeat until algorithm is done.
It starts by getting both Event and Terrain ID's of the current tile. It checks if any event ID might be between two variable values which should contain the ID's which the algorithm is searching for. In the sample project it searches for events with an ID of 2 or 3. If it finds such an event, it terminates the event.
If not, it checks if the tile is free from events, and then adds the current step value to that of the terrain value. It also retrieves any step value which might already be stored at that position, and if it's higher than that or the terrain value added with step value, they are swapped. If this happens, a new element is also added to the heap.
This is pretty much how it works for the other directions as well
At the end of the algorithm, we delete the current element from the heap, and get the new Grid Ptr from the heap, and get the current step value from the Grid Ptr. We also retrieve the coordinates from the new tile so that we're ready for the next iteration. We do however check if Dijk New ID ever gets the same value as the top element, since this will mean that there's nowhere left to search, meaning that it's impossible to construct a path to the chosen position. This also terminates the algorithm and also sets a switch Path Success off, so that we don't try to trigger other events which rely on a path having been constructed.
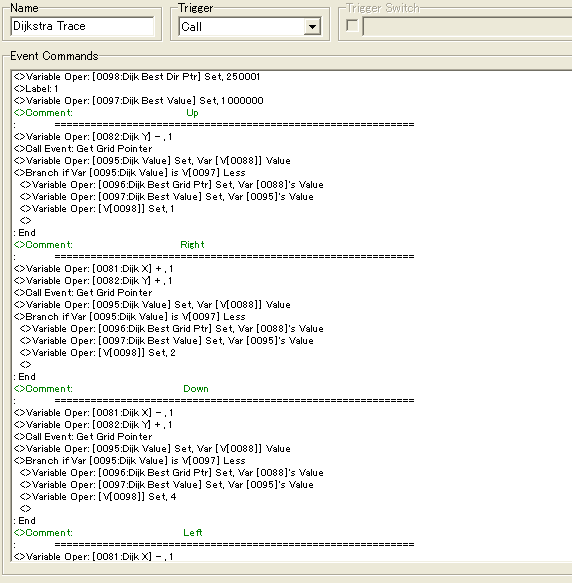
Once we've found what we're looking for, we can trigger this event which is quite similar to the trace event from Part 1 of this tutorial. This time we keep store the Path steps into a slightly bigger set of variables, i.e. from 250,001 to 300,000. We then Check the coordinates up, right, down and left of the current tile, construct their grid ptrs and get their step values, and check for the lowest, which we then store before moving further using that tile as the current one until we reach the origin. Once we reach the coordinates of the origin, the algorithm terminates and we call an event which will move the event in question from it's current point to the closest point of a number of chosen points.
In the sample project you may set two points, and the hero will determine which point is closer and move to it, using the shortest path.
After we're done tracing the path, the Dijk Best Dir Ptr will still be pointing to the last stored step, so we can use it to point to all the steps by subtracting 1 from the pointer until we point to the ID 250,000 which means that all steps has been executed.
To execute the steps, we'll use an event call. Select ID contains the ID of a selected event which we want to move, and Select Page Move is a variable which contain the value corresponding a page number with an event script we want to execute. We're using an event with speed 4 here, so we wait for 0.133 sec for each move, since that's how long it takes to perform one step at that speed.
And this is the event page in question. It makes use of a temporary variable and branches to tell what direction it should go, and also of "this event", which means we can use event calls to control what event to apply commands like move or flash which doesn't support reference by variables. Also it makes it considerably easier to copy these events since you won't have to adjust the event you want to move.
Conclusion
And that's about it. With this you will have a mean of finding the shortest path from one point to another. Mind you that if you want to use Dijkstra's algorithm for something else than a TBS, you shouldn't be calling it repeatedly very fast for finding the shortest path to a dynamic event far away. This is a pretty heavy-weight event and is prone to cause lag for scenarios like that. Also, the bigger the distance the longer you'll have to wait. You might want to consider implementing a counter within the algorithm which cause a tiny "wait" for every 100th iteration or so.
The map in the sample project using the Dijkstra algorithm works in the sense of you selecting Alex, and then selecting 2 tiles, all by hitting the action button. Once the second tile has been set, the algorithm will trigger and it will calculate which tile is closer and also the shortest path to this tile.
Here's the sample project: Sample Project
Good luck trying to figure this all out.
This is the second part of the Tactical Battle System tutorial series I'm working on.
You can find the first part here:
Tactical Battle System Movement
This tutorial is going to be split into two parts, with the second part also being of interest for those who want to know how to do path finding in rm2k3 without necessarily having it as part of a TBS. At the end of this tutorial, I will provide a sample project which will demonstrate the end result as well as containing all the event code for you to inspect more closely.
Part 1: Extending the move field from last tutorial
As the title suggests, this is going to be an extension of the system given in the last tutorial. If you haven't read the previous tutorial, I recommend that you do so if you want to understand anything within this part of the tutorial.
In the last tutorial, we had to move the hero around manually after having chosen him. This looks rather odd and also very unlike how a TBS normally work. It would make more sense to pick the hero, and then choose the spot we want him to go. But to actually make him go right to the spot you chose, you need a way of deciding the path to that spot.
Luckily, using the move field which takes into account different terrains, this isn't too hard. Let's take another look at a graph from the previous tutorial.
With the move field, we set values containing the remaining steps left into a set of variables from 101 to 200 which each corresponded to an move event ID if you subtract 99 from the value (since the first move event ID was 2).
This means, that if we choose an arbitrary tile within the move field, we can retrieve the amount of steps that are left at that spot. A nice thing with this is that if we look to all adjacent sides, and go to the next tile with the highest amount of steps left, we will always end up back in the middle! This means that if we choose a spot, we can simply look for the next tile with the highest spot to decide the path to our destination in reverse.
So let's take a look at how we can apply this concept to event code:
First off we set a variable Path Best Dir Ptr, which we are going to use to point to a set of variables which will contain the path in terms of steps, i.e. 4 means one step up, and 1 means one step down.
In the sample project I've chosen to use the variables from 61 to 80 for the path, which means we should start by pointing to variable 61. We also reset the variables 61 to 80, just to be sure something weird won't happen.
The Hero has a much higher ID than that of the move cell events, and as we remember Get Event ID only retrieves the event with the highest ID on the selected tile, so we're going to move the selected event to a temporary location to make sure it doesn't disturb the algorithm. Even though we're moving the hero to somewhere completely else, we'll move him back as soon as the algorithm is done executing, which is so fast that the player won't be able to notice that he was moved.
We use the same technique as in the last tutorial, in terms of having event pages take care of moving the event in question around. The Select ID variable is set before the execution of this algorithm, so we can use it to refer to the current player event we want to move, so all we have to do is to add another variable and another page which does the job we want it to do.
After this is done, we set Cell X and Cell Y to the coordinates of the destination.
Once that is done, we can start looping the algorithm until it finds it's way back to the origin. We're going to do this in a similar fashion to that of generating the field. That is, we're going to take one tile, then look above it, then right, then down and finally left. Difference is that this time, we'll be looking at the steps left, and we will store the tile with the most steps left in a "Path Best Value" variable, as well as the event ID on that tile and also the direction. Notice that the best direction is opposite of the direction we're looking at, since we're going in reverse, i.e. from destination to the origin. Just to remind you in case you've forgotten
1 = down, 2 = left, 3 = right and 4 = up
Another thing to notice here is that we only check for range if the event ID we find is higher than 0 (i.e. no event) and lower than MAX Move ID, which is the highest ID of the move cell events. In last tutorial we set this to 90, since we don't need higher to get a maximum of 6 steps, but if we'd suddenly want more steps, then it's practical to have variables like this which we can change, instead of changing a lot of constants at every branch where we'd might use them.
If we have found a move cell event, we take it's ID, add 99 to point to the variable containing the steps left for that specific event. We store the steps left in a variable and check if it's less than the current "Path Best Value" variable. if so, we update the "Best" variables. And we continue doing pretty much the same for the other directions
At the end we call the event with ID equal to Path Best ID, and with a variable containing the value equal to the page which sets the coordinates of that event to Cell X and Cell Y, and check if these equal that of Select X and Select Y, i.e. the origin. If this is the case, we return the player we moved earlier, back to it's position, and end the algorithm.
If not, we add 1 to Path Best Dir Ptr so that it can store another step. We also set Path ID to the best ID to get it's coordinates so that we can continue with the next iteration of the algorithm.
Doing this, we will end up with a list of steps needed to take to get to the destination.
Since we now have the list, we can call an event to move the player automatically. The Path Best Dir will now still be pointing to the last step in the list, which is actually the first step from the origin. We set this value to that of a temporary variable which we'll use to tell which way the player should go by calling it's event on a page which handles movement for the player event. We wait for 0.2 + 4 x 0.0 waits since this is the amount it takes to perform a step with speed 3. If you want to have a higher speed you'll have to reduce the amount of waits. At the end we reduce the Path Best Dir Ptr by 1 to get the next step.
We continue doing this until we reach 60, i.e. one below the first step, meaning that we've taken all the steps.
And voila, our event now moves automatically to the destination without taking any detours. To try it out you can download the sample project at the bottom of this tutorial and paste the hero position into the first map.
Part 2: RM2k3 implementation of Dijkstra's algorithm
Okay, now we're done with the easy stuff, let's move on to something more generic which can be applied to other stuff than a TBS as well, but which we will be using later on for another part of the TBS tutorial. I will also go ahead and tell that I intended for this tutorial series to not become horribly complicated. I'll also go ahead and admit that I failed at that.
For this part of the tutorial you need to know how to use pointers well. You just won't even have the slightest chance of understanding all which is going on without knowing how to use them well. If you're among the ones who still don't know how to use pointers well, take a look at this tutorial Pointer Tutorial and study it well!
Let's move on. The algorithm we're going to use is called Dijkstra's algorithm, and is quite similar to the one we've been using up to now with some few differences. With Dijkstra's algorithm, we don't know how big a range we have, so we keep searching until we find a point of relevance. This also means that this algorithm is able to determine which of two points is closer to the origin.
This does also mean that this isn't the most effective algorithm for finding a path from a single point to another. I will teach this one since it's the one that works best for a TBS like this, so if you want to look at a better alternative, look for A* and get creative in translating it to rm2k3 code.
Dijkstra's algorithm works by adding all the neighbour tiles to a priority queue. We take a tile from the queue, and add it's neighbour tiles as well to the queue, and continue like this. The priority bit means that we will choose tiles with lower step value first.
The reason we need this is because this algorithm only continues until it finds the point it wants to go to, and if we let tiles with higher step value continue adding neighbours before the one of lower step values, we might end up doing impossible moves, like walking through a big forest when it would be more effective to walk around it. Let's illustrate it with a picture
Let's say the yellow spot is the hero, the blue spot the destination and the green spots are woods which take 2 steps. By observing the graph, we can see that the shortest path is 6 steps, by walking around the forest. Using a similar algorithm as in the previous examples however, we'd be walking right through the forest, since the algorithm will find it sooner and terminate as soon as it finds it without regard to it possibly being the shortest. And it would be very ineffective to search all possible tiles first to make sure we've found the shortest way.
By making the tiles with lower step value add neighbours first, we avoid this trouble and can be certain that the shortest path was chosen.
Something worth noticing is that this only applies when you have terrains with different move values. If all terrain is either unpassable or only take 1 step, you don't need to implement a priority queue and can continue like before.
We will take terrain into equation here to not reduce on the feature list, and since Dijkstra's algorithm normally uses a priority queue, so be ready for hell.
The setup
Since this is going to be fairly complicated, I will explain the concept of how we're going to do this in rm2k3 first. With this algorithm, we want to reach a large area, but doing this with events would require very very many of them. It's simply silly to add that many events when we don't need them to represent any graphic, so what we will be using an array of variables representing each tile on the map.
For a map of size 30x30 this will require 900 variables. For a map of size 50x50 we'd need 2500 variables. That might sound like an awful lot of variables, since you don't seem to have more than 5000 available without patching and stuff. But the truth is that you can point to any variable outside of that and still be able to use them. This means that we actually can have as many as 9,999,999 variables.
Since variables isn't a problem we can freely use them to represent the map. The sample project use variables from 100,001 for this purpose. To address a single variable we'll combine the x and y value.
     0   1   2   3  x

  -----------------

0 |  0   1   2   3

1 |  4   5   6   7

2 |  8   9  10  11

3 | 12  13  14  15

y
Let's look at this as an example. This is a theoretical map of 4x4 tiles. the horizontal line above represent x coordinates and the vertical one to the left the y coordinates. The values within is the ID of the different variables we'd like to get.
by taking the y coordinate, multiplying it with the width and then adding x we get the variable we want
y * width + x = variable ID
To retrieve the coordinates again afterwards, we simply take the variable ID and divide by the width to get the y value, and take the same ID to modulo of the width to get the x coordinate.
9 % 4 = 1 = X
9 / 4 = 2 = Y (rounded down)
So with this, we can store a step value onto a tile on the map without using events, and we can also get the coordinates of that tile if we have the ID. In the actual implementation we'll have be adding/subtracting an offset as well since the variables we want will have an ID from 100,001 and upwards. I will refer to this set of variables as the grid from now.
Priority Queue with heap structure
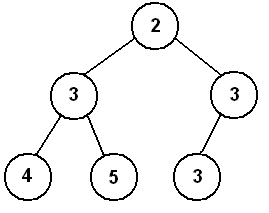
Next, we will keep a queue of ID's pointing to tiles of interest, so that we can generate the field in a similar manner like before, only that we let the ones with lower steps add neighbours first. To do this, we're going to be using a "heap structure". I will now give a lightning course in what that is.
This is a heap. Each "parent" node is smaller or equal to it's one or two "children" nodes. Meaning that at the top of the heap, we will always have the node with the smallest number (since we're sorting for small numbers), which means it will also be easily accessible. If we want to add another node to the heap, we don't need to do too many operations either to keep the nodes as a heap structure.
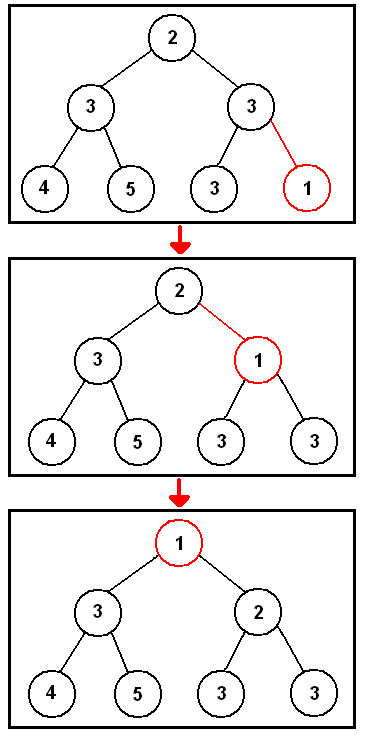
Any new nodes will be added at the bottom of the heap, will then check if it's smaller than it's parent node. If it's smaller, than the parent and child node switch place, and it will now compare itself towards it's new parent node. This goes on until it's bigger than it's parent node, or when it reaches the top, like in the example above.
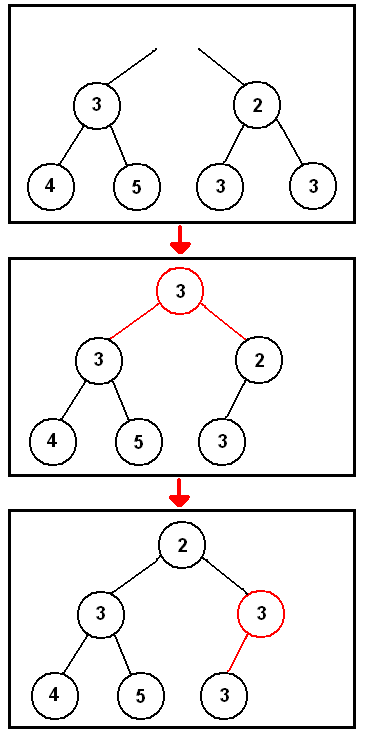
Once we're done with the top node, we delete it. We then take the last node added at the bottom of the heap and place it on the top. We then check both children nodes to check which is smaller and switch position with it, if it's smaller than the current one. The example above show how we retain the heap structure after having deleted the top node. Notice that we don't make a switch at the last frame, since both are equal.
the last example would be represented like this in an array of numbers:
[2, 3, 3, 4, 5, 3]
the top element has index 1. We get it's left child by multiplying it's index by 2, and the right by adding 1 to that. If we go to the left child (i.e. node of index 2), we can get it's left child by multiplying it's index by 2 and it's right by adding 1 to that. Not very difficult.
The advantage of this structure is that deleting and adding nodes to the heap only takes log(n) switches, where n is the amount of nodes in the heap. The disadvantage is that it has more overhead than the alternative, meaning that it is less effective for scenarios with few nodes.
However, if we have few nodes, it's going to be quick anyway, and if we have many nodes, which we very well might get while searching for the shortest path over a large area, this structure is noticeable quicker so this is what we'll be using.
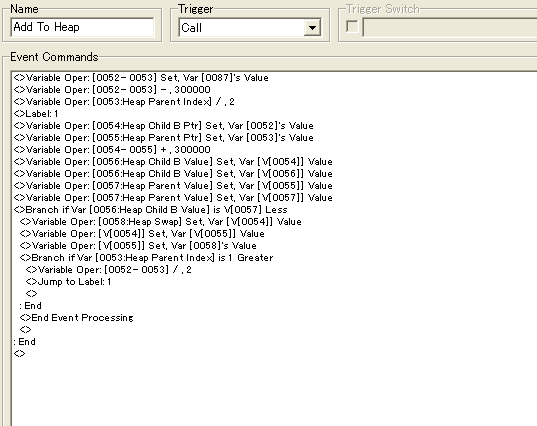
Now for the confusing part. The implementation of it looks something like this
In the sample project we're using variable 300,001 and upwards for storing nodes.
This function is called after having added a new value to the grid. We then take the ID of the heap element and subtract 300,000 to get an index value which is easier to work with. Both a Child Node variable and a Parent Node variable gets this value, and we divide the Parent Node variable by 2 for it to point to the parent node. Then we can start looping until we reach and end criteria.
First we set a Child Ptr and a Parent Ptr to the value of of their indexes, and add 300,000 to that so that we're pointing to the heap elements again. We then take a Child Value and a Parent Value variable to the value of what these heap elements are pointing at. What we then get is a pointer which points to a value in the grid. We then set the value of the same variables to the points they're pointing at, at the grid. We then check if the Child Node is smaller than the Parent Node. If yes, we store what the Child Ptr is pointing at in a Temporary variable, then we store what the Parent Ptr is pointing at what the Child Ptr is pointing at, and finally we store what we stored in the temporary variable into the where the Parent Ptr is pointing at. With this we will successfully have swapped the ID's that the heap elements were pointing at.
Confused yet? You need to keep your head cold to keep track of what's pointing to what, and you might need to reread it a couple of times to get it. Unless you're not too good with pointers and ignored what I wrote further up. Then you can just give up and go read the tutorial on pointers.
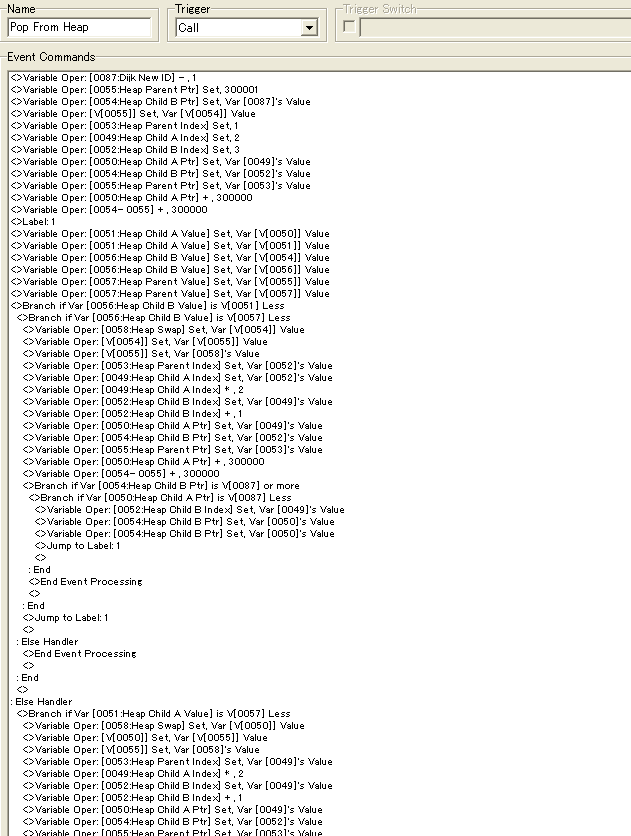
If you're head isn't spinning, let's move onto the implementation of deletion of the top node
Dijk New ID is what we're using to point at the next element to be added to the heap, so when we're deleting an item, we have to reduce it by one. This will in turn make it point at the last element of the heap. We start by setting the Parent Node variable to 300,001 which is the first element in the heap, and the Child Node to that of the last element in the heap. We then overwrite that which the first element is pointing at with that which the last element is pointing at.
We then set some initial values. We set Parent and two Child Node indexes, then their Ptr's to the same value + 300,000. We then retrieve the values in grid by taking the value of what their pointer is pointing at. We then check if Child B is smaller than Child A. If yes then we check if Child B is smaller than the Parent Node. If yes, we swap Child and Parent. Then we set Parent and Child A index to that of Child B and multiply Child A index by 2. We store that value in Child B as well and add 1. We now have access to the Node we just swapped and it's Children, like described a bit earlier. We adjust their Ptr and check if they're bigger than that if Dijk New ID, since it contains the ID of the last element. If there's is no Child B, then Child B is simply set to the same values as Child A.
The other part of the code is pretty much the same, just adjusting for Child A rather than Child B. This algorithm will then keep looping until one of the "stop criteria's" occurs, at which point the algorithm will terminate.
And this is what there is to using heap for priority queues. With little modification we could make sort arrays quickly as well, but we'll leave that for some other time.
Implementing the algorithm
Now let's finally look at how we're going to implement the actual algorithm.
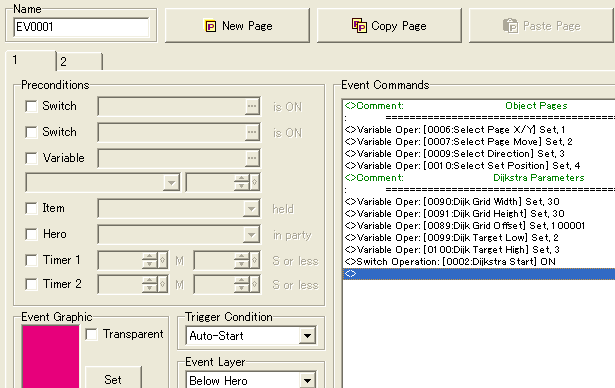
But before we get that far, we'll have to notice that we need to initialize some variables
We need to define how big the map is for the variable grid to work correctly. We also want this to be stored in variables, so that we can change the size when we switch maps. Also we store the pages for the object we'll be working on (making the hero do different stuff, like walk in the direction we want), set an offset which tells where our grid variables start and set High and Low variables which tells us which events the algorithm will be looking for to construct a path. With this we can move on to the main implementation
Dijk ID is the variable we're going to be using to point at the top element in our heap, while Dijk New ID will be pointing at the position after the last element, meaning that it's always ready to add a new element to the heap.
We also set variables Dijk X and Dijk Y to the values of the starting point. Once we have these, we can call the common event "Get Grid Ptr" which uses the coordinates to calculate a Pointer to the grid corresponding the current map tile in question. This is done by the same formula as described earlier. In addition to this, we have 2 other common events worth noticing as well. Get Grid Coordinates which translates a Grid Ptr to coordinates and Grid Clear, which sets all variables within the grid to 1,000,000. This is to make searching for the shortest path afterwards easier.
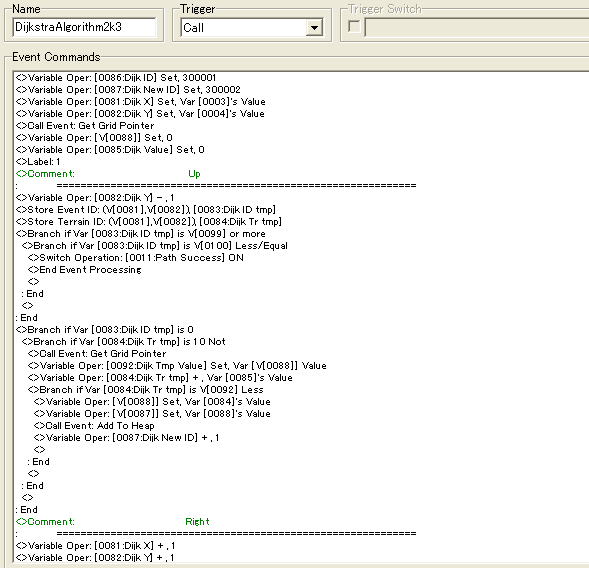
We set the current point in the grid to have value 0, and also a variable Dijk Value, which is containing the current step value for that tile. We then continue in familiar fashion. We start by checking above the current tile, then right, then down, then left, some post operations and repeat until algorithm is done.
It starts by getting both Event and Terrain ID's of the current tile. It checks if any event ID might be between two variable values which should contain the ID's which the algorithm is searching for. In the sample project it searches for events with an ID of 2 or 3. If it finds such an event, it terminates the event.
If not, it checks if the tile is free from events, and then adds the current step value to that of the terrain value. It also retrieves any step value which might already be stored at that position, and if it's higher than that or the terrain value added with step value, they are swapped. If this happens, a new element is also added to the heap.
This is pretty much how it works for the other directions as well
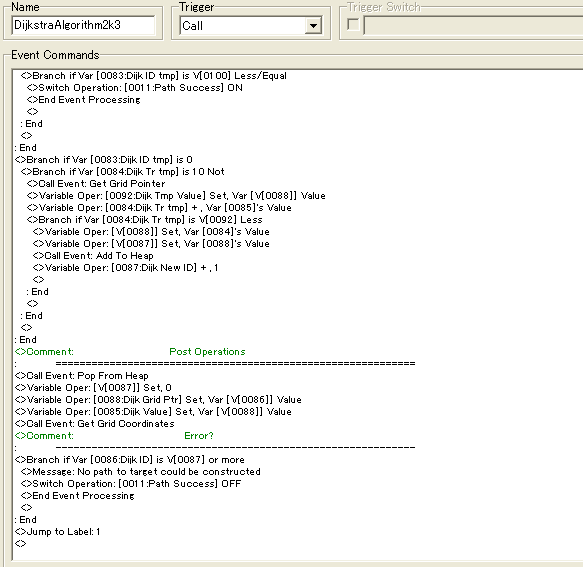
At the end of the algorithm, we delete the current element from the heap, and get the new Grid Ptr from the heap, and get the current step value from the Grid Ptr. We also retrieve the coordinates from the new tile so that we're ready for the next iteration. We do however check if Dijk New ID ever gets the same value as the top element, since this will mean that there's nowhere left to search, meaning that it's impossible to construct a path to the chosen position. This also terminates the algorithm and also sets a switch Path Success off, so that we don't try to trigger other events which rely on a path having been constructed.
Once we've found what we're looking for, we can trigger this event which is quite similar to the trace event from Part 1 of this tutorial. This time we keep store the Path steps into a slightly bigger set of variables, i.e. from 250,001 to 300,000. We then Check the coordinates up, right, down and left of the current tile, construct their grid ptrs and get their step values, and check for the lowest, which we then store before moving further using that tile as the current one until we reach the origin. Once we reach the coordinates of the origin, the algorithm terminates and we call an event which will move the event in question from it's current point to the closest point of a number of chosen points.
In the sample project you may set two points, and the hero will determine which point is closer and move to it, using the shortest path.
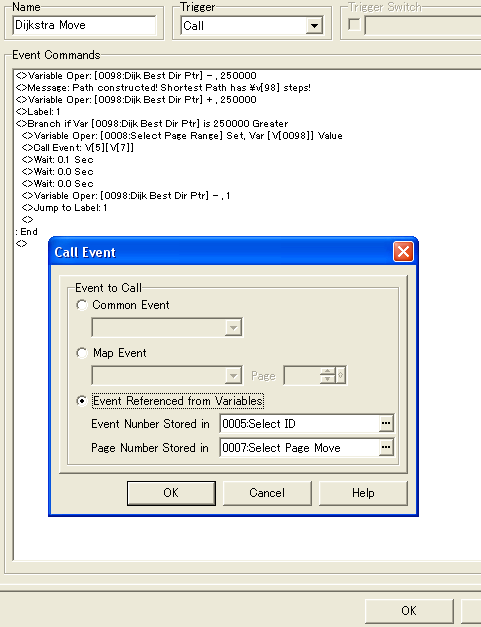
After we're done tracing the path, the Dijk Best Dir Ptr will still be pointing to the last stored step, so we can use it to point to all the steps by subtracting 1 from the pointer until we point to the ID 250,000 which means that all steps has been executed.
To execute the steps, we'll use an event call. Select ID contains the ID of a selected event which we want to move, and Select Page Move is a variable which contain the value corresponding a page number with an event script we want to execute. We're using an event with speed 4 here, so we wait for 0.133 sec for each move, since that's how long it takes to perform one step at that speed.
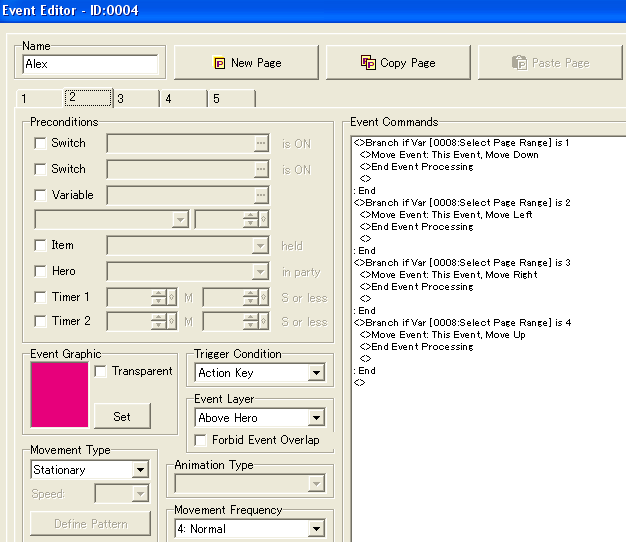
And this is the event page in question. It makes use of a temporary variable and branches to tell what direction it should go, and also of "this event", which means we can use event calls to control what event to apply commands like move or flash which doesn't support reference by variables. Also it makes it considerably easier to copy these events since you won't have to adjust the event you want to move.
Conclusion
And that's about it. With this you will have a mean of finding the shortest path from one point to another. Mind you that if you want to use Dijkstra's algorithm for something else than a TBS, you shouldn't be calling it repeatedly very fast for finding the shortest path to a dynamic event far away. This is a pretty heavy-weight event and is prone to cause lag for scenarios like that. Also, the bigger the distance the longer you'll have to wait. You might want to consider implementing a counter within the algorithm which cause a tiny "wait" for every 100th iteration or so.
The map in the sample project using the Dijkstra algorithm works in the sense of you selecting Alex, and then selecting 2 tiles, all by hitting the action button. Once the second tile has been set, the algorithm will trigger and it will calculate which tile is closer and also the shortest path to this tile.
Here's the sample project: Sample Project
Good luck trying to figure this all out.
Posts 

Pages:
1
Geez, it's definitely interesting to read like all your tutorials but I never actually thought you could go and IMPLEMENT binary search trees and minimum spanning tree algorithms in RPG Maker...
Yes, you can implement binary search trees and minimum spanning tree algorithms as well (which are similar but not the structures used in the tutorial) and also even linked lists of int if needed.
There's a lot you can do with basic variable operations + option of pointing to variables and a little creativity
There's a lot you can do with basic variable operations + option of pointing to variables and a little creativity

Just downloaded the Sample Project, that is absolutely amazing! (didn't read the tutorial, not on that level yet : pointers!).
Hey Kazesui,
great tutorials :)
But i discovered a flaw in Dijkstra's algorithm :/ If there are too many events on the map (at the moment i have ~120 Events, 10 for playable characters, 20 for foes, Rest MoveCells) it starts lagging like hell and the game freezes for 1-2sec.
(Btw this effect occurs also, if i put 120 empty events in your sample project and run the algorithm. Distance is 19 tiles and the map is 30x30)
I put all the events at 0,0, but it doesnt seem to help. Is there a workaround for it? Or might this be the case because of my old laptop (512Mb RAM)? Sadly i can't test it on another system at the moment.
Hope this is the right place and excuse my bad english pls :P
(i'm german :) ) And sorry for this wall of text :/
It's not as much a flaw, but rather a consequence, and not just related to your laptop. Having lot of events on a map will affect the performance, and this algorithm is already pretty heavyweight, so there isn't really that much you can do about it. Even in my video showing this system used (link), there's a very noticable lag spike when the AI tries to decide how to move, so this is pretty much expected I'm afraid.
Just about the only thing you can do to avoid a lag spike in such a situation, is to include a 0.0 wait in the dijkstra algorithm. This will remove most lag, but also means that the algorithm will require significantly more time to finish.
So when you're working with a TBS in rm2k3 and you want AI which is able to walk around obstacles to get to the player units, then this is a limit you're most likely going to have to live with. Since TBS's are turn based I'd say this is an somewhat acceptable cost.
When not making a TBS, there are alternatives which can be better, but depends highly on the exact task required.
Damn, I really hoped to get around this problem :/
Guess I'll remove the 2step-terrain then and simply "draw" a line between actor and target and let the actor move within it's range. Obstacles should be avoided as there are no MoveCells on them. Maybe i'll keep the 2step-terrain and have a somewhat stupid AI :D
Thanks a lot for the help and the really great tutorials. (If you want to improve them you could show the amount of variables needed and how you named them in your introduction. Would have helped me, but with the sample projects it worked out quite well.)
Dijkstra's algorithm isn't and shouldn't be used for moving the player/actor if this one has already generated a move field, since the neccessary information for quick path finding should already be contained within this field.
The only actual need for the Dijkstra's algorithm is for the AI, which can't determine as easily where it should go, especially if the player units are far away. The AI would have to be able to think some moves ahead, meaning a normal move field wouldn't work for the AI.
If the AI being fairly stupid isn't a problem, you could do something fairly simple as just making the event move in the direction of the closest player unit. This will cause the enemies to seem retarded and get stuck every now and then, but it will be quick, and interesting games can still be made, with this being an example: link (it's even in german).
The AI in that game is rather stupid, but the game is still somewhat fun to play.
This is incredible! One of the best guide I've seen. Being an amateur myself, I never thought that such a system could be done in 2k3! I just finished Aurora Wings which is an isometric tactic rpg and now I saw your guides which are awesome! Do you plan to continue your tutorial for the enemies AI to move/attack the player and heal themselves? I really want to try this guide out and make a game out of it once it is complete.....Thanks for your superb tutorials!
The plan has been to still complete, just that I haven't really had the neccessary time to do it yet, since these behemoth tutorials require quite a bit of time.
Also, while AI movement and attacks was part of my plan for the part 4 of this series, I wasn't planning on doing much more than explaining how to make it move and attack directly, and on range.
While it would be very possible to include healing, support and aoe attacks (which my actual version does), alone the basic AI is probably going to be considerably complicated to explain (probably quite more so than this one, part 2, even)
I see. Maybe you could release the short demo of the battle map which you posted on youtube. I tried to check out Aurora Wings system at first and it was really complicated since I am a novice. But after reading your guides,things are getting much better as the logic behind the eventing are more or less the same. I'll have to concentrate and read again the rgpmaker newbie guide to grasp better the different functions of rpgmaker. Is tactical system the most complicated and difficult system to create as from what I see on the website, there are practically no games for this category?
The immense technical aspect of tactical battle systems would be of the reasons why they are that rare, yes. I've seen a few tbs for rm2k3, but they're usually restricted to by step by step movement, and AI who can't walk around obstacles, pretty much because you'd have to implement something like explained in this tutorial to avoid it (for generic situations anyway).
So basically, yeah, this is one of the most complicated systems you can attempt to build if you want to do it "right" (i.e. typical movement selection + an AI which can make some sensible choices, given some complexity to the options available)
Will see at demo. Wanted to have a few skirmishes prepared before doing so, but ended up never happening thus far.
There's a DynRPG plugin that does this now. I haven't got into using it yet and I honestly don't fully understand this one so I don't know how they compare.
Just thought I'd mention it.
Just thought I'd mention it.
It's two different algorithms. Mine is Dijkstra and the one of the plugin is A* (pronounced A star). Basically, A* is faster in finding a path from point a to point b, however Dijkstra is better if you have a bunch of points and you wish to know which is closer to a point a.
Although the C++ will probably give a considerably performance speed even when searching individually (depending on amount of potential targets) I don't think it has an actual way of determining the amounts of steps needed, which is kind of crucial for this kind of system, since accuracy of the actions themselves are more important than performance (i.e. unlike an ABS for example, you can allow yourself some "thinking time" for the AI of a turn based tactical system).
I might make my own pathfinding plugin based on Dijkstra's algorithm sometime in the future (but my plugin list to write is starting to grow, and there's lot of stuff to do aside from that as well).
The enemy AI is probably the toughest part of this system. I've tried to build something but the AI is very difficult to do. Aurora Wings AI is very complicated and confusing to understand, I am still trying to figure out how the author build it.....
author=Streak
The enemy AI is probably the toughest part of this system. I've tried to build something but the AI is very difficult to do. Aurora Wings AI is very complicated and confusing to understand, I am still trying to figure out how the author build it.....
I'm pretty sure mine won't be any less complicated. If anything, it will be even more complicated, just that I'll hopefully have a tutorial up and running beside it at some point, explaining most of the peculiar sides of it.
Great! I shall wait for your upcoming tutorial Kazesui. It's a pity that tactical rpg games are not that popular, these games better than a traditional rpg as they require quite some thinking and strategy plays a great part in a battle.

hey Kazesui, any news on the tactics battle system demo or any tutorials related to your tactics battle system?I know it's been a long time, I just remembered this post and was looking forward to see an update ^_^.
The original plan was to release a total of four tutorials on this. The next would one would be on how to deal with "Actors" on the map before the last one would finally tackle the Enemy AI.
While the I strictly speaking have the demonstration projects done for each of these already, writing the tutorials require quite a bit of time, lot due to the sheer length of them. The AI one could prove to end up twice the length of this one even, because of how complex it is.
At the moment, I don't have time for that, and even when I do, it becomes a question of prioritization. Should I continue the series, make a new DynRPG plugin or enhance/fix bugs of an old plugin? Lately I've often gone more the plugin route, and I can't guarantee that won't remain the same for a while, so it could take quite a while until I finish this tutorial series :/
Pages:
1

