


MAKING THE GRAPHICS FOR FAERY TALE [UPDATED!]
My Technique for turning Photos into Art with Photoshop.
 OokamiKasumi
- 03/06/2012 05:38 AM
- 9158 views
Making the Graphics of Faery Tale
stage 7 Done.jpg
stage 7 Done.jpg
The most common question I get asked about the game Faery Tale, is How did I do the graphics?
The short answer is Photoshop.
-- Every image is a multi-layered photo-manipulation that was heavily filtered multiple times to make them look like fairy tale art.
I'm a big-time art nouveau fan, as in the art of Alphonse Mucha, so that was the style I was aiming for.

While I am not about to give away every single secret to my techniques, mainly because they took months of experimentation to figure out, I am willing to reveal the basic process.
It all begins with Photoshop and quite a few Art Plug-Ins, such as:
~~~~~~~~~~~~~~
Topaz Labs: Clean 3, Adjust 4, and Simplify3
Alien Skin Snap Art 2
Imagenomic
And yes, I used ALL of these plug-ins for each image; background and characters.
The most important part of the process, however, is the Line Art. That was done using the Color Sketch action from 10 Sketch Effects, a Photoshop actions set that is available free on Deviant Art.
How I do it:
-- In Photoshop...
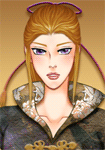
Stage 1: Pick a good image.

Stage 2: Photo-manipulate the image to suit your needs, then duplicate the finished image so that you have two layers. Hide the copy layer.

Stage 3: On the Background layer, make the lines using the Color Sketch action from 10 Sketch Effects. Level the lines to darken them, then Reduce Noise to clean it.

Stage 4: Art Filter the line art to make them look more like a sketch.
~~~~~~~~~~~~~~~~~~~~~~~~~~
Alternative:
-- I use a rather expensive art plug-in to art-filter my lines, but you can make a somewhat rougher version for Free by using Drawing and Threshold Actions 1 by eGulumse, specifically, the first action: 1- Çizim+path. (Experiment with the different styles. You might find one that works better for you.)
The trick is to make your line art with the 1 Color Sketch action, SAVE A JPG COPY in your files, (but don't close it!!!) Run the 1- Çizim+path on the color sketch line art. This will give you this result:

Flatten Image, then Retrieve your saved jpg. Set the color jpg UNDER the black and white lines then set the black and white lines to Overlay. Merge the two layers.

The results are not as refined as what I use, but then I paid serious money for my plug-in where this is Free. :)
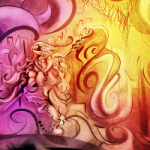
Stage 5: Hide the line art layer. Turn on the copy layer and Art Filter the untouched layer to make it look like a painting or drawing, or both.

~~~~~~~~~~~~~~~~~~~~~~~~~~~
Alternative:
-- I use another rather expensive plug in for this process, but Photo to Watercolour Action by cazcastalla is a fairly reasonable and Free substitute.

Stage 6: Turn on the Lines layer and set it on top of the Art layer. Set the Lines to Multiply at 50% Opacity, then Merge the layers.

Stage 7: Overlay and Soft Light artistic textures over top of the whole thing to make the image look even more like art.
I overlay a personally created scribble texture to break up the flatness of the colors then softlight two different splotchy watercolor-style textures, but a sketch type screentone texture can work for the scribble texture, and watercolor textures are easy to find on DeviantArt.

All done!
The Secret to Clean Character PNGs.
-- One of the most common problems with using an image that was originally a photo for something like a character or free-floating object, is that damned White Outline that tends to show up no matter how closely you clean it.
I got around that issue by first cleaning each image at 300 magnification, and using the Eraser tool -- NOT the Outline tool then hitting Clear. Yes, it's a pain because it takes a while to do it that way, but it's the cleanest you will get it, and you won't get a ragged, pixelated edge.

Photo-manipulate as needed...
Next you add Inner Glow set to a Dark Color. I like to use a dark red or brown on character images because it blends well against skin tones.


The Dark Inner Glow effectively erases any white that might have snuck in despite your cleaning efforts.
THEN art filter your PNGs to your heart's content. Just be aware that many art filters will ADD a white outline that will need to be cleaned off again.

Once you have finished Art Filtering your images, add Inner Glow again, set to Black this time at at 2 px or less to cover any white that might have slipped in during the Art Filtering process.

The best way to check for any white edging that might have slipped into your image is by putting your character against a Black Background.

And there you have it, characters that actually blend in with their backgrounds.

Enjoy!
Posts 

Pages:
1
Yeah, great job! and an interesting way to have good pictures other than (the very laborious) pixelling.
author=sbester
This is incredible stuff!
I'm glad you liked it. :)
author=chana
Yeah, great job! and an interesting way to have good pictures other than (the very laborious) pixelling.
Thank you! I'm far too lazy to do pixel art, and when you're only making visual novels, or small choose your own adventure type games, you don't need to. :)
Really really good, man! Great job!
Although the dog-guy isn't as good as the room, the game would be a lot more artistic and visualy nice.
Kind Regards,
Victor
Although the dog-guy isn't as good as the room, the game would be a lot more artistic and visualy nice.
Kind Regards,
Victor
author=Clareain_ChristopherThank you!
In my opinion, It's a very respectable art choice,
Me likes a lots 8-)
author=VictorThank you, Richard.
Really really good, man! Great job!
-- Some of the graphics I used in the game took days to make. (Cutting images out of their background is seriously time-consuming.)
author=Victor~wince~ Yeah, I didn't take the time to polish him up for the tutorial. Transparencies take a lot more work (mainly cleaning,) than a background.
Although the dog-guy isn't as good as the room, the game would be a lot more artistic and visually nice.
Kind Regards, Victor
I came up with technique because I'm horrible at drawing on the computer, and I couldn't afford the artists I liked to do the work for me. I went with what I could do: Photoshop. Now all I need to do is learn more coding. :) Unfortunately, I'm still very much a beginner at game-making.
Pages:
1

