


ACTION BATTLE SYSTEM IN RPG MAKER 2003
A tutorial guiding you through the first steps of making a simple ABS
 Kazesui
- 08/29/2013 07:09 PM
- 25827 views
This tutorial will introduce you to the first parts of making an ABS in rm2k3.
What will be covered in specific is how to create a basic attack, which can hit a monster on the map, given by an event, as well as how to make a simple AI for this monster. The tutorial might look a bit lengthy, but it's not too tricky. Most of the text comes from explaining stuff at great detail.
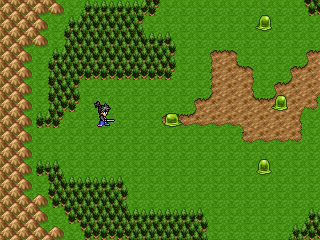
At the end of this tutorial, there will be a downloadable demonstration project where you can find this system in action. it borrows some sprites from Kamau's game "Curse of Silence". Now, let's begin:
The first and a rather important part of an ABS is to be able to attack on a map.
To do this you need to detect when the player is hitting the attack button, as well as doing calculation with coordinates to be able to find out if an enemy was hit.
So the first thing we should do is to create a common event which will do exactly this. We use a common event on parallel process for this, as we want to use this event for a large range of maps. It should however be triggered by a switch, so that you can turn off the ability to attack for certain situations, like if you're inside a town or similar.
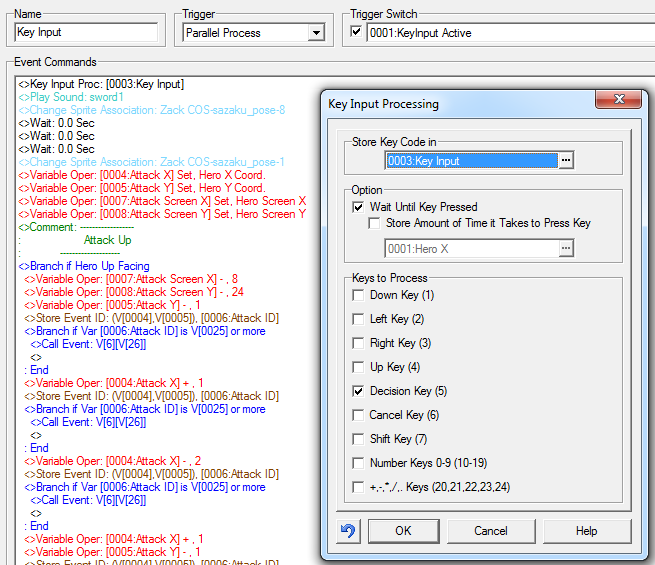
So the first thing we want to do with our event is to put a key input process there. We put check the "wait until pressed" box, making sure that the rest of the event will not be executed before the player has pressed any of the keys checked.
In this simple example we will only use one key, the confirmation key, as the attack button. Notice that the value of this key, which is 5, will be stored inside the variable chosen, but since we only use one button anyway, we don't need to do anything with this value. If you want to use more keys however, it's important that you check the value of the key input after each key inputting process, so that you can trigger the correct event code.
Moving on. For the rest of the code, we now know that the player has hit the attack button, so we now want to make an animation showing that we are attacking, and then also checking if we actually hit something. However, the checking of this, is dependent on the direction of the hero, so we need to handle each case separately.
This means we will have to make 4 different branches, handling each of the scenarios.
Advice: When you end up in a situation like this where you need to handle some stuff in a list of branches, try to make the code inside of them as small as possible by putting everything all "paths" have in common outside the branches.
For example, here changing the hero sprite to the attack pose is something which is equal for all branches, so you can leave it outside. This might sound obvious, but it's easy to put unnecessary things in these branches which could have been put outside. Doing this will make the code more readable afterwards, and it will also execute more quickly, meaning it's less likely to contribute to lag, a fierce enemy of people wanting to create ABS on rm2k3.
Another thing to notice here, is the importance of where to place your wait commands. It's critical that waits used for animations or whatever does not come in between variable operations dealing with coordinates! This is because you want the coordinates to be as "fresh" as possible.
An example again, let's say we stored the coordinates of the hero before we did the attack animation. It would store the coordinates there, then do the animation, then continue on with the calculations, only problem: the hero might have moved during that animation, meaning that these coordinates are not valid anymore leading to missing an enemy you're not next to, or hitting on from far away when you're not supposed to be able to do that. Misplaced waits is a common source of errors in ABS, so make sure to place them wisely.
Now I will go through how to perform the attack in upwards direction. How to do it in the other 3 directions is analogues to this one, so I will only go through this one direction. This means we will have to touch one of the core elements of ABS games:
coordinates and the use of them in variables.
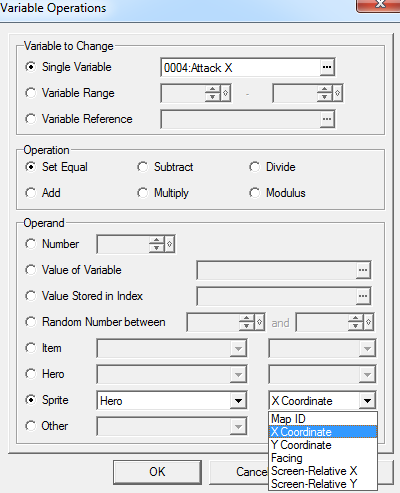
There are two types of coordinates, tile coordinates and screen relative coordinates. They tell us where stuff like events are in the game.
The two upper options in the picture above are the tile coordinates.
In case of the hero, it these coordinates tell us on which tile the hero is standing. You see these coordinates in the lower right corner of the map editor whilst making a game
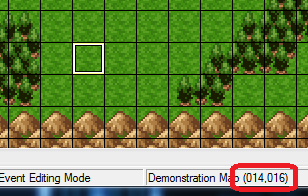
These coordinates follow typical computer style, which might be a bit different from what you've learned in elementary math. The top left tile has the coordinates (0,0) and from there, the y coordinate increases downwards. The x coordinate increases towards right. This means, if you stand on entirely in the top left corner of a map, you walk 2 steps down and 3 steps to the right, you will be at tile coordinates (3,2). First number is always x coordinate, second y coordinate.
The second set of coordinates, the screen relative coordinates, are coordinates which tells you where an event or hero is relative to what's on you're screen at that exact moment. The top left of your screen is always (0,0), regardless of where you might be on the map. These coordinates are given in pixels rather than tiles, meaning you can be a lot more accurate with these than with the tiles, which each is composed of 16 pixels in both directions.
In this tutorial, we will use both to create an efficient and accurate way of checking if the enemy is in hit range.
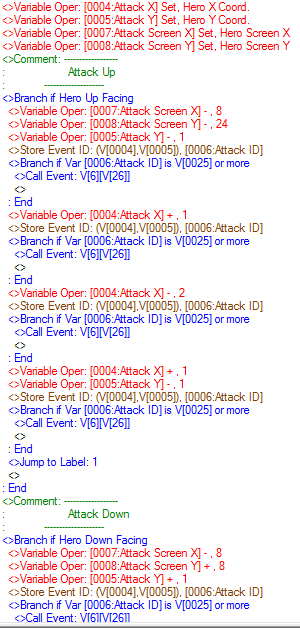
We start by loading the hero coordinates of both coordinate types into some variables. We then check if the hero is facing up while attacking. Inside this branch we now subtract 1 from the y tile coordinate. This is because this will be exactly one step above the hero, which is where we are attacking. Additionally we subtract some seemingly arbitrary numbers from the screen relative coordinates. This will be used to more accurately detect if we hit the enemy, but I will leave the details for later.
The next step now is that we use the tile coordinates in a store event ID command.
The store event ID command works like this: You either set it to a specific position, or you give it some variables for the coordinates. In return it will save a number into a variable you chose. If there was no event on the tile you chose, this value will be 0. If there are one or more events on this tile, it will return the ID of the event with the highest event ID. The event ID is created once you create an event, and when you open the event menu, you can see it in the top left corner. Because only the highest value is stored, it's important that the enemies on your map always has the highest ID's, and for this tutorial, they should also make a consecutive set of numbers.
Ok, so good, we have a way of detecting if there's an enemy right infront of us... but why are there more store event id commands below it?
This is has to do with how rpg maker 2003 works. A lot of people complain in ABS games that the hit detection is awful, and the reason for this, is that once an event starts to move, it's coordinates is immediately set to the tile it's moving too, eventhough it might be a full 15 pixels away from standing on the middle of the tile. This means, if an enemy is standing still right above us, and then suddenly moves to the right, the attack will miss even though the enemy is practically still standing right infront of you. We remedy this by checking to the left, right and above the tile right above the hero, as these are the 3 possible directions the enemy can move. To make sure we don't hit the enemy when it's actually out of range though, we will use the screen relative coordinates.
For this to work, we make use of the call event command, and the ID we retrieved from the store event id command.
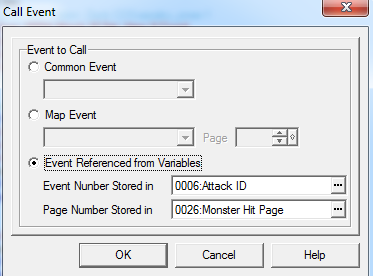
As one can see here, we can conveniently use this id to decide which event to call for, and we use another variable with a constant number to decide the page. This variable should have a meaningful name, telling what kind of page it might be used for, as using call event in this way is a very powerful tool which can come of good use later on.
A note here is that all enemies will need to have an event page which handles this situation though, so in the demonstration project, every enemy must use page 1 to determine if a hit was made.
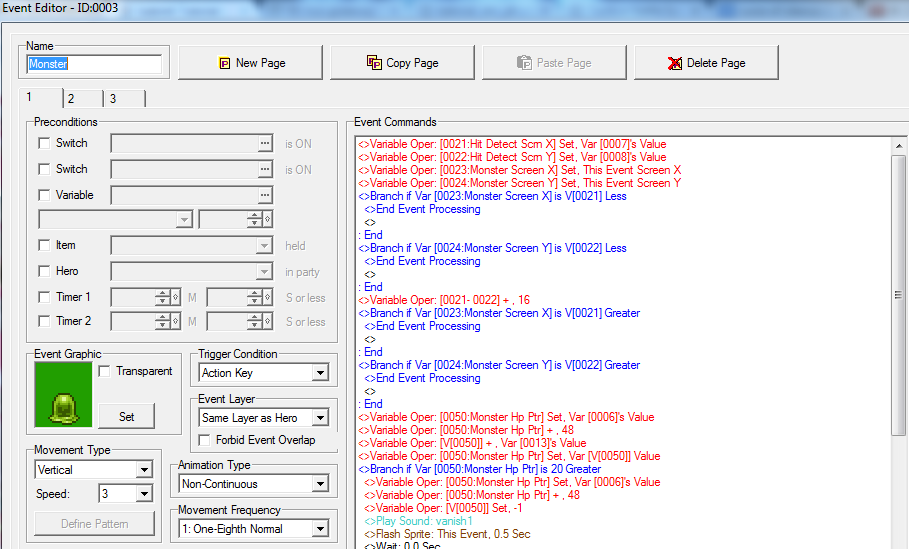
Here we see an example of such an enemy. Notice the event id mentioned earlier.
The monsters in the demonstration has 3 pages.
page 1 is used for determining a hit from the hero
page 2 is at the moment unused, and
page 3 is used for the enemy AI.
The event code we see on the picture is what will be triggered if an event is found by the store event id command. Now, we want to use screen relative coordinates to check if we hit the enemy. But there's a problem: the enemy is a lot bigger than 1 pixel. For this reason, we need to make a "hitbox". This means, to check if the center pixel of the enemy is inside the area of the attack.
Remember the screen relative coordinates which got an arbitrary number subtracted from them back in the common event for attacking? This was to get the pixel of the upper left corner of this box. We store these coordinates into some new ones, because we will change them, but we don't want to overwrite the old variables, since we might call for some more events for hit detection.
Once we have these check if the enemy is either above or west of this point.
If the enemy is, it's obviously not inside are attack range, so we stop the event from executing further by using the End Event Processing command. Once this command is used, it stops the current event, and you will continue where you left in the common event.
if the enemy is below or east of the upper left point, we add 16 to both x and y screen relative coordinates to get the lower right corner (16, because tiles are 16 pixels long and wide). Now we check if the monster is still below or east of this point. If it is, it's obviously outside the attacking range again, but if it's not, then boom, the enemy is going to get smacked!
We now know that the enemy was hit, so now we want to make sure the player knows it got hit as well, and we'll make it lose some hp, so that the monster will eventually die. The first one, we will do by a sound effect and a quick flash. Important for the flash command: use "this event"!
By clever use of "this event" you will be able to simply copy paste enemies without having to change any variables in any of them (for the same enemy type at least).
The hp deduction is done a bit differently, and is infact, not a deduction at all.
We add rather than subtract. This is because the amount of hits an enemy take is individual for the monster type, but we still want to reuse the same variables for the hp of the monsters from map to map. It's simply easier to just reset these variables to 0, and let the monster events themselves tell when they're dead.
Here you can see a branch checking if the hp is greater than 20. This means that this enemy has 20 hp.
You're confused about how we actually add damage to the enemy? This is because here, pointers are used for dynamically storing the damage into the right variable. Pointers are important, and you can find a tutorial on them on this website. You should check it out if you don't already know about them. Here I will only explain how to make them work for this particular scenario.
Basically, I have decided that the hp of the enemies shall be stored in variables 51 to 60. Given that I have the id of the enemy, I have to add or subtract an amount to this value to make sure it becomes a value between 51 and 60.
This is easily done by taking the value 51 and then subtracting the value of the enemy with the lowest event ID. Here it's 3, so the resulting value is 48, meaning that I need to add 48 to the current id to get access to one of the variables from 51 to 60.
Notice that this means you can have a maximum of 10 enemies on the map, and that they're event id's have to form a consecutive set of numbers, as mentioned before.
Once you have this value, you add damage this way either constant, or as here, given by a variable "hero atk", saying how strong its attacks are.
Then, the value of the variable being pointed at is stored in the same variable, so that we can determine how much damage it has taken. If it's above the maximum hp, we execute a death animation.
Here, the player won't be able to attack again before the death animation is done, because the key input event is waiting for this event call to finish first. For this reason, a parallel process should normally be triggered, running the death animation seperately. For simplicity though, this is not done here, but if it was done, you would need to prevent the player from being able to hit it again, making it die many deaths. A way to do this, would be to set the hp to -1, and have another branch making sure the enemy can only be hit if its hp is equal or above 0.
Another reason for is to keep the property of being able to copy paste monsters in a very simple way (hence why switches have been avoided). Feel free to use them though, as it might not be that expensive a price to pay when most of the other stuff is still constant for all enemies.
This almost concludes the hero attacking part. As mentioned, dealing with the other directions is analogues to the up direction, is anyway given in the demonstration project in its full form. One more thing to notice there though is how there's a jump to label 1 at the end of each branch.
jump to label 1 is a command which will make the code continue to execute at the place where it can find a command called label 1. If this was not done, the code would go through the rest of the branches as well, despite already having made an attack. If there's a wait inside any of these branches, this even makes it possible to execute to attack at once by quickly turning to another direction after the first attack. For this reason, and since it's pointless to check the other directions anyway, a jump to label is better placed at the end of this branches.
Next problem to tackle is how to make the enemy do something more than just stand there and look stupid. A lot of rm2k3 ABS games out there simply use an "on event collision approach", which often comes at the expense of potentially creating a scenario where the hero is instantly killed from an infinite set of touches when stuck in a corner, so let's try to do something else.
What we will do, is to create an AI which will move around randomly when the hero is far away, and which will chase down the hero when it comes close. The enemy will then detect itself if its standing next to the hero and attack it by event script rather than on touch.
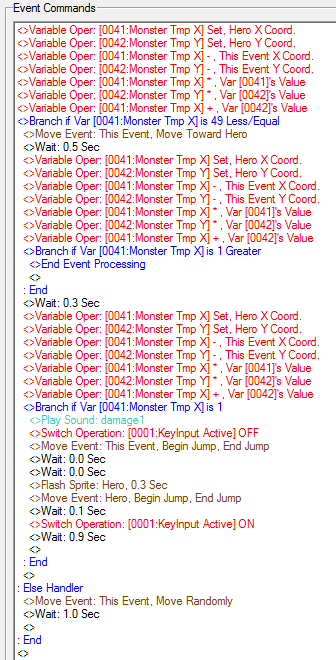
What we do here is that take the tile coordinates of the hero and then subtract the coordinates of the enemy to those of the hero. Doing this will give the values corresponding to how far away they are from each other.
If the monster is at (5,4) and the hero at (1,1) the hero would would 4 steps to the left and 3 steps up away from the monster, meaning the result would be (-4,3).
The shortest way between the two would still be a straight line though, despite not being able to move that way, so this would be a more accurate way of finding out how far away the hero is from the enemy (and algorithmically more convenient as well).
To decide this length, we can make use of what you might already know as the Pythagoras theorem. The hero and the enemy gives 2 points of the triangle, and you get the last one by either moving 4 steps to the left or 3 steps up. In both cases, you would get the same triangle, and by the theorem, you can get the square of the hypotenuse, which has the actual distance between hero and enemy, by summing up the square of each x and y component, i.e. here this would be 4² + 3² = 5², meaning that the hero is actually 5 units away from the enemy.
Since we only need the length for comparison, we dont care to take the squareroot of them (would have gotten difficult as well). We simply take the square of a distance we want to use in a branch. So if we want to make the enemy chase the hero when its inside a radius of 7 units, we will check if the sum is equal or below 49.
This is whats done here. If the hero is inside the range, it will move towards the hero and afterwards check if the hero is next to it (only possible if the sum = 1), wait a little and do the same calculation again, and if yes, attack.
The wait is there to give the hero time to run away, and not get attacked the second its next to the enemy, which would feel pretty unfair, and not fun.
This concludes the simple AI for this tutorial. It's pretty simple though. There are many way it can be extended on to make it better. You might want to make its field of vision being limited to the direction its looking while still not looking through walls. A tutorial on this page called "Trigonometry Script for rm2k3" on this website explains how you can add this create such a line of sight. Alternatively you could also patch it with dynRPG and make use of the plugin which does more or less the same thing.
Or you could also make the enemy do choose between a set of moves for attacking the hero, or maybe even using a long distance attack if the hero is within a certain range.
The options are almost endless.
Anyway, here's the download to the demonstration project
Have fun with it, and hope there's still someone out there who found something in here useful
What will be covered in specific is how to create a basic attack, which can hit a monster on the map, given by an event, as well as how to make a simple AI for this monster. The tutorial might look a bit lengthy, but it's not too tricky. Most of the text comes from explaining stuff at great detail.
At the end of this tutorial, there will be a downloadable demonstration project where you can find this system in action. it borrows some sprites from Kamau's game "Curse of Silence". Now, let's begin:
The first and a rather important part of an ABS is to be able to attack on a map.
To do this you need to detect when the player is hitting the attack button, as well as doing calculation with coordinates to be able to find out if an enemy was hit.
So the first thing we should do is to create a common event which will do exactly this. We use a common event on parallel process for this, as we want to use this event for a large range of maps. It should however be triggered by a switch, so that you can turn off the ability to attack for certain situations, like if you're inside a town or similar.
So the first thing we want to do with our event is to put a key input process there. We put check the "wait until pressed" box, making sure that the rest of the event will not be executed before the player has pressed any of the keys checked.
In this simple example we will only use one key, the confirmation key, as the attack button. Notice that the value of this key, which is 5, will be stored inside the variable chosen, but since we only use one button anyway, we don't need to do anything with this value. If you want to use more keys however, it's important that you check the value of the key input after each key inputting process, so that you can trigger the correct event code.
Moving on. For the rest of the code, we now know that the player has hit the attack button, so we now want to make an animation showing that we are attacking, and then also checking if we actually hit something. However, the checking of this, is dependent on the direction of the hero, so we need to handle each case separately.
This means we will have to make 4 different branches, handling each of the scenarios.
Advice: When you end up in a situation like this where you need to handle some stuff in a list of branches, try to make the code inside of them as small as possible by putting everything all "paths" have in common outside the branches.
For example, here changing the hero sprite to the attack pose is something which is equal for all branches, so you can leave it outside. This might sound obvious, but it's easy to put unnecessary things in these branches which could have been put outside. Doing this will make the code more readable afterwards, and it will also execute more quickly, meaning it's less likely to contribute to lag, a fierce enemy of people wanting to create ABS on rm2k3.
Another thing to notice here, is the importance of where to place your wait commands. It's critical that waits used for animations or whatever does not come in between variable operations dealing with coordinates! This is because you want the coordinates to be as "fresh" as possible.
An example again, let's say we stored the coordinates of the hero before we did the attack animation. It would store the coordinates there, then do the animation, then continue on with the calculations, only problem: the hero might have moved during that animation, meaning that these coordinates are not valid anymore leading to missing an enemy you're not next to, or hitting on from far away when you're not supposed to be able to do that. Misplaced waits is a common source of errors in ABS, so make sure to place them wisely.
Now I will go through how to perform the attack in upwards direction. How to do it in the other 3 directions is analogues to this one, so I will only go through this one direction. This means we will have to touch one of the core elements of ABS games:
coordinates and the use of them in variables.
There are two types of coordinates, tile coordinates and screen relative coordinates. They tell us where stuff like events are in the game.
The two upper options in the picture above are the tile coordinates.
In case of the hero, it these coordinates tell us on which tile the hero is standing. You see these coordinates in the lower right corner of the map editor whilst making a game
These coordinates follow typical computer style, which might be a bit different from what you've learned in elementary math. The top left tile has the coordinates (0,0) and from there, the y coordinate increases downwards. The x coordinate increases towards right. This means, if you stand on entirely in the top left corner of a map, you walk 2 steps down and 3 steps to the right, you will be at tile coordinates (3,2). First number is always x coordinate, second y coordinate.
The second set of coordinates, the screen relative coordinates, are coordinates which tells you where an event or hero is relative to what's on you're screen at that exact moment. The top left of your screen is always (0,0), regardless of where you might be on the map. These coordinates are given in pixels rather than tiles, meaning you can be a lot more accurate with these than with the tiles, which each is composed of 16 pixels in both directions.
In this tutorial, we will use both to create an efficient and accurate way of checking if the enemy is in hit range.
We start by loading the hero coordinates of both coordinate types into some variables. We then check if the hero is facing up while attacking. Inside this branch we now subtract 1 from the y tile coordinate. This is because this will be exactly one step above the hero, which is where we are attacking. Additionally we subtract some seemingly arbitrary numbers from the screen relative coordinates. This will be used to more accurately detect if we hit the enemy, but I will leave the details for later.
The next step now is that we use the tile coordinates in a store event ID command.
The store event ID command works like this: You either set it to a specific position, or you give it some variables for the coordinates. In return it will save a number into a variable you chose. If there was no event on the tile you chose, this value will be 0. If there are one or more events on this tile, it will return the ID of the event with the highest event ID. The event ID is created once you create an event, and when you open the event menu, you can see it in the top left corner. Because only the highest value is stored, it's important that the enemies on your map always has the highest ID's, and for this tutorial, they should also make a consecutive set of numbers.
Ok, so good, we have a way of detecting if there's an enemy right infront of us... but why are there more store event id commands below it?
This is has to do with how rpg maker 2003 works. A lot of people complain in ABS games that the hit detection is awful, and the reason for this, is that once an event starts to move, it's coordinates is immediately set to the tile it's moving too, eventhough it might be a full 15 pixels away from standing on the middle of the tile. This means, if an enemy is standing still right above us, and then suddenly moves to the right, the attack will miss even though the enemy is practically still standing right infront of you. We remedy this by checking to the left, right and above the tile right above the hero, as these are the 3 possible directions the enemy can move. To make sure we don't hit the enemy when it's actually out of range though, we will use the screen relative coordinates.
For this to work, we make use of the call event command, and the ID we retrieved from the store event id command.
As one can see here, we can conveniently use this id to decide which event to call for, and we use another variable with a constant number to decide the page. This variable should have a meaningful name, telling what kind of page it might be used for, as using call event in this way is a very powerful tool which can come of good use later on.
A note here is that all enemies will need to have an event page which handles this situation though, so in the demonstration project, every enemy must use page 1 to determine if a hit was made.
Here we see an example of such an enemy. Notice the event id mentioned earlier.
The monsters in the demonstration has 3 pages.
page 1 is used for determining a hit from the hero
page 2 is at the moment unused, and
page 3 is used for the enemy AI.
The event code we see on the picture is what will be triggered if an event is found by the store event id command. Now, we want to use screen relative coordinates to check if we hit the enemy. But there's a problem: the enemy is a lot bigger than 1 pixel. For this reason, we need to make a "hitbox". This means, to check if the center pixel of the enemy is inside the area of the attack.
Remember the screen relative coordinates which got an arbitrary number subtracted from them back in the common event for attacking? This was to get the pixel of the upper left corner of this box. We store these coordinates into some new ones, because we will change them, but we don't want to overwrite the old variables, since we might call for some more events for hit detection.
Once we have these check if the enemy is either above or west of this point.
If the enemy is, it's obviously not inside are attack range, so we stop the event from executing further by using the End Event Processing command. Once this command is used, it stops the current event, and you will continue where you left in the common event.
if the enemy is below or east of the upper left point, we add 16 to both x and y screen relative coordinates to get the lower right corner (16, because tiles are 16 pixels long and wide). Now we check if the monster is still below or east of this point. If it is, it's obviously outside the attacking range again, but if it's not, then boom, the enemy is going to get smacked!
We now know that the enemy was hit, so now we want to make sure the player knows it got hit as well, and we'll make it lose some hp, so that the monster will eventually die. The first one, we will do by a sound effect and a quick flash. Important for the flash command: use "this event"!
By clever use of "this event" you will be able to simply copy paste enemies without having to change any variables in any of them (for the same enemy type at least).
The hp deduction is done a bit differently, and is infact, not a deduction at all.
We add rather than subtract. This is because the amount of hits an enemy take is individual for the monster type, but we still want to reuse the same variables for the hp of the monsters from map to map. It's simply easier to just reset these variables to 0, and let the monster events themselves tell when they're dead.
Here you can see a branch checking if the hp is greater than 20. This means that this enemy has 20 hp.
You're confused about how we actually add damage to the enemy? This is because here, pointers are used for dynamically storing the damage into the right variable. Pointers are important, and you can find a tutorial on them on this website. You should check it out if you don't already know about them. Here I will only explain how to make them work for this particular scenario.
Basically, I have decided that the hp of the enemies shall be stored in variables 51 to 60. Given that I have the id of the enemy, I have to add or subtract an amount to this value to make sure it becomes a value between 51 and 60.
This is easily done by taking the value 51 and then subtracting the value of the enemy with the lowest event ID. Here it's 3, so the resulting value is 48, meaning that I need to add 48 to the current id to get access to one of the variables from 51 to 60.
Notice that this means you can have a maximum of 10 enemies on the map, and that they're event id's have to form a consecutive set of numbers, as mentioned before.
Once you have this value, you add damage this way either constant, or as here, given by a variable "hero atk", saying how strong its attacks are.
Then, the value of the variable being pointed at is stored in the same variable, so that we can determine how much damage it has taken. If it's above the maximum hp, we execute a death animation.
Here, the player won't be able to attack again before the death animation is done, because the key input event is waiting for this event call to finish first. For this reason, a parallel process should normally be triggered, running the death animation seperately. For simplicity though, this is not done here, but if it was done, you would need to prevent the player from being able to hit it again, making it die many deaths. A way to do this, would be to set the hp to -1, and have another branch making sure the enemy can only be hit if its hp is equal or above 0.
Another reason for is to keep the property of being able to copy paste monsters in a very simple way (hence why switches have been avoided). Feel free to use them though, as it might not be that expensive a price to pay when most of the other stuff is still constant for all enemies.
This almost concludes the hero attacking part. As mentioned, dealing with the other directions is analogues to the up direction, is anyway given in the demonstration project in its full form. One more thing to notice there though is how there's a jump to label 1 at the end of each branch.
jump to label 1 is a command which will make the code continue to execute at the place where it can find a command called label 1. If this was not done, the code would go through the rest of the branches as well, despite already having made an attack. If there's a wait inside any of these branches, this even makes it possible to execute to attack at once by quickly turning to another direction after the first attack. For this reason, and since it's pointless to check the other directions anyway, a jump to label is better placed at the end of this branches.
Next problem to tackle is how to make the enemy do something more than just stand there and look stupid. A lot of rm2k3 ABS games out there simply use an "on event collision approach", which often comes at the expense of potentially creating a scenario where the hero is instantly killed from an infinite set of touches when stuck in a corner, so let's try to do something else.
What we will do, is to create an AI which will move around randomly when the hero is far away, and which will chase down the hero when it comes close. The enemy will then detect itself if its standing next to the hero and attack it by event script rather than on touch.
What we do here is that take the tile coordinates of the hero and then subtract the coordinates of the enemy to those of the hero. Doing this will give the values corresponding to how far away they are from each other.
If the monster is at (5,4) and the hero at (1,1) the hero would would 4 steps to the left and 3 steps up away from the monster, meaning the result would be (-4,3).
The shortest way between the two would still be a straight line though, despite not being able to move that way, so this would be a more accurate way of finding out how far away the hero is from the enemy (and algorithmically more convenient as well).
To decide this length, we can make use of what you might already know as the Pythagoras theorem. The hero and the enemy gives 2 points of the triangle, and you get the last one by either moving 4 steps to the left or 3 steps up. In both cases, you would get the same triangle, and by the theorem, you can get the square of the hypotenuse, which has the actual distance between hero and enemy, by summing up the square of each x and y component, i.e. here this would be 4² + 3² = 5², meaning that the hero is actually 5 units away from the enemy.
Since we only need the length for comparison, we dont care to take the squareroot of them (would have gotten difficult as well). We simply take the square of a distance we want to use in a branch. So if we want to make the enemy chase the hero when its inside a radius of 7 units, we will check if the sum is equal or below 49.
This is whats done here. If the hero is inside the range, it will move towards the hero and afterwards check if the hero is next to it (only possible if the sum = 1), wait a little and do the same calculation again, and if yes, attack.
The wait is there to give the hero time to run away, and not get attacked the second its next to the enemy, which would feel pretty unfair, and not fun.
This concludes the simple AI for this tutorial. It's pretty simple though. There are many way it can be extended on to make it better. You might want to make its field of vision being limited to the direction its looking while still not looking through walls. A tutorial on this page called "Trigonometry Script for rm2k3" on this website explains how you can add this create such a line of sight. Alternatively you could also patch it with dynRPG and make use of the plugin which does more or less the same thing.
Or you could also make the enemy do choose between a set of moves for attacking the hero, or maybe even using a long distance attack if the hero is within a certain range.
The options are almost endless.
Anyway, here's the download to the demonstration project
Have fun with it, and hope there's still someone out there who found something in here useful
Posts 

Pages:
1

There are two types of coordinate systems in rm2k3, tile based and screen relative.
Tile based are relative to the map you see in the editor, with the coordinates of the upper left tile being 0,0
Screen relative coordinates are the coordinates of the pixels on your screen. The upper left pixel of your screen has screen relative coordinates 0,0
A typical complaint about rm2k3 ABS are exactly they are generally quite imprecise. Using pixel based coordinates is a way to improve on that, as it allows for better hit detection.
Kazesui! I am so interested in trying to test and and learn from your coding. I know very little about it but am very excited and happy that you posted such an awesome battle system for everyone.
However I am sadly unable to test your tutorial to try and make changes as I am getting a message that says 'Cannot open system4 file'
I wouldn't be asking for your help if I didn't already try to figure this out for a few hours to no avail. Also I think others who may try and download your tutorial may be having a similar problem and solving this would be helpful!
Please if you know why I am having this problem get back with me.
Thank you!
I take it you have the official version of rm2k3.
This could cause some RTP file name mismatch which is most likely why you're getting this error.
The easiest way to deal with this, would probably be to make copies of the files in question and just give them the names of whatever file name pops up.
Unfortunately I don't yet know which files has gotten which new names yet, so I can't tell you specifically which files you need to change.
Alternatively you can try to open the project and try to set the graphics to the official rtp manually.
Hey this ABS is really cool, it works just fine.
But I'm wondering if you could make that a shoot ABS.
I'm searching for the coordinates to change to let the character attack on an X-coordinate line or a Y-coordinate line.
Can you help me out?
Thanks in advance.
But I'm wondering if you could make that a shoot ABS.
I'm searching for the coordinates to change to let the character attack on an X-coordinate line or a Y-coordinate line.
Can you help me out?
Thanks in advance.
Or more simple:
What variable I must change to hit one or more enemies 100 pixels above the player, while the player is facing up?
What variable I must change to hit one or more enemies 100 pixels above the player, while the player is facing up?
Pages:
1

