


CUSTOM NPC GRAPHICS
The do's and don'ts of custom NPCs visuals.
 halibabica
- 11/28/2013 02:15 PM
- 6259 views
One of SMBX's most versatile features is the ability to replace an NPC's sprites with your own. This allows you to add "new" enemies and such to the engine, but it has many limitations and caveats to beware of. This guide focuses on the graphical aspect of them. There's a separate guide for NPC flagging that you should also look over.
-----
Before we begin, it's best to note that SMBX only uses .gif image files for its graphics. This means that custom sprites or edits may appear grainy if saved in certain programs. MS Paint is the worst thing you could use. There are plenty of free alternatives, and learning how to use them will work to your advantage here.
-----
Replacing an NPC's graphics is simple enough. All you have to do is put the new graphics in a folder with the same name as the level it affects. So, to change the appearance of a Goomba in a stage called 'Plain Plains', you'd make a folder called 'Plain Plains' and put the graphic inside. The Goomba NPC's file name is npc-1, so that's what you would name its replacement graphics. There's more to it than this, but that's the gist of it. For the record, putting the new graphic outside of any level folder will use it for that entire game.
What you'll need for every custom graphic is the following:
1. The sprite sheet
2. The sprite mask


sheet & mask
The sprite sheet is just the images you're using in place of the program's defaults. The sprite mask is the black and white version of the sprite sheet. It defines what parts of the sprite are normally visible. Without it, sprites will appear semi-transparent. Even worse, the mask of the original sprite will show behind it, creating very bad visuals. They are vital for this reason. However, if you wanted the sprite to be transparent, you could include an all-white version to override the original mask. Masks have the same name as their related sprites, but with the addition of an 'm' at the end. So, since the Goomba's sprite is npc-1, the sprite mask is npc-1m.
First, you need the sprites for your new enemy and to decide what you'll be replacing. It's best to choose an enemy with similar properties to the one you're making. You can't change movement patterns, AI, or certain resistances, so what you pick is important for how your NPC will behave.
Next, you need to find the original sprites for the NPC you're replacing in the program's graphics folders. The NPCs are listed in the order they were created, so finding the one you need isn't always easy. Once you've located it, make a copy and take it with you. Replacing the originals is not a good idea!
Finally, to make your new sprites work, you must have the exact same number of frames as the original. Stack the new enemy sprites vertically and make sure EVERY FRAME IS THE SAME SIZE. Even if some sprites are a little smaller than others, the frames must be the same length and width. Don't be afraid to leave some small gaps on the sprites' edges.
If you did this right, you should be able to straight-up replace the graphics. If the new sprite's proportions are the same as the original NPC's, you won't even need to do anything else. However, if the sprite size doesn't match, there's plenty you can do to make it work.
NPC Sprite Flags
Using the following flags in a custom NPC text document will allow you to use virtually any sprite for any NPC with little difficulty. These flags are: frames, framespeed, framestyle, width, height, gfxwidth, gfxheight, gfxoffsetx, and gfxoffsety.


Goomba, Koopa, and Shy Guy
frames, framespeed, and framestyle
These three are all related to the number of sprites an NPC uses. They are interrelated to a certain degree.
frames: Literally, the number of frames an NPC has for its animation. The Goomba has the same animation for walking left and right, and its frame count is 2. So, for Goomba, frames=2. Koopa has a different animation for left and right, but still only two frames for each. Thus, Koopa has frames=2 as well.
framespeed: This value affects the speed at which the NPC animation plays. Lower numbers are faster; higher numbers get slower and slower. Mind you, this is only the speed of the animation; NOT the speed at which the NPC moves! If you want to change this flag, you MUST ALSO set frames. The game won't accept this change alone.
framestyle: This is the only flag you can use to alter an NPC's behavior visually. Many NPCs have custom frame styles, but this flag offers three basic ones. When framestyle=0, the NPC behaves like a Goomba; ie they have the same animation for walking left and right. If set to 1, the NPC will be like a Koopa and have separate animations for left and right. If set to 2, the NPC will be like a Shy Guy and have an extra set of sprites for how it looks while being carried. You should only change the framestyle if absolutely necessary, since it will override sprite-specific behaviors like the Hammer Bros.' throwing frame. If you want to change this flag, you MUST ALSO set frames. The game won't accept this change alone.
width, height, gfxwidth, and gfxheight
These four flags determine the proportions of the sprite and hit box of the NPC. Knowing how they work is key to making proper custom NPCs.
width and height: These two primarily control hit box proportion, but may also suffice for sprite size depending on the circumstances. For example, if you had a custom sprite that was 108x82...
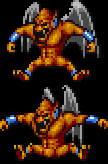
...like our buddy Firebrand here...
you'd set width=108 and height=82. This would make SMBX show the sprite at the correct size, even if the original NPC was smaller than this. More often than not, these are the only size flags you need.
gfxwidth and gfxheight: These flags are necessary when the NPC's hit box needs to be a different size than its actual sprites. Looking back at Firebrand, his arms and legs stick out far from his body, bloating his hit box. In this case, you could set width=64, height=64, gfxwidth=108, and gfxheight=82. The former two set the hit box appropriately, and the latter two set the actual size of the sprite. This way, you can control the hit box and keep it from being too large.
It's important to note just how SMBX determines where the hit box is. It's drawn from the bottom center of the sprite. So, for our Firebrand example, only the middle 64 pixels are part of the hit box.

22 pixels off the left and right would not register collisions. However, the same is not true vertically. All 18 pixels over the hit box height would come off the top of the sprite. If this is a problem, setting these next flags may help.
gfxoffsetx and gfxoffsety: These flags adjust the position of the sprite relative to their NPC. They can have negative or positive values. Their uses are few, and you must always be careful when doing so. Remember, these only move the NPC's sprite, NOT its hit box!
For example, if you had gfxoffsetx=-16 and gfxoffsety=32, the NPC's sprite would appear 16 pixels to the left and 32 pixels below where it normally would appear. Since the sprite is moved and the hit box isn't, this can create visually faulty hit detection.
In the previous example, you can see a large gap underneath Firebrand's body in the first frame. Since the hit box is drawn from the bottom, the player would take damage from bumping that empty space.
This is where the offset flags would come in handy. Setting gfxoffsety=12 would draw the sprite 12 pixels lower than normal, so the bottom of the NPCs body is lined up properly with its hit box. However, the second frame would also be affected, so Mario could safely headbutt Firebrand's crotch. Furthermore, Firebrand's hit box height would need adjusted so the air space above him isn't affected. For an NPC on the ground, this would make them appear to be stuck in the floor. This is why these flags must be used judiciously.
Of further note regarding hit boxes, enemies with projectiles have the position of their missile determined by their hit box. For example, Birdo's eggs are generated based on the location of the top of its hit box. If you were to resprite Birdo, you may have to adjust the hit box so the eggs are shot at the correct height.
Which Flags Are Needed?
Determining what graphic flags need changed can be trickier than you might think. In general, width and height are enough to get you by, but there are times when gfxwidth and gfxheight are necessary, and being able to recognize when isn't obvious.
For most NPCs, their width and height are equal to their gfxwidth and gfxheight. However, there are some NPCs where the sprite is larger than the hit box. One example is the common Koopa. Its head is not part of its hit box; only the shell is. For this sprite, its default flags are width=32, height=32, gfxwidth=32, gfxheight=54. Since the gfx flags are different, you would need to set them specifically if you were replacing Koopa.
Curse your oddly-shaped head!
If that's not confusing and aggravating enough, like other NPC flags, some NPCs have theirs hard-coded in SMBX. Even if you set the graphics flags correctly, they will STILL not work in the game. There are only a few cases like this, but they do exist.
NPC Effect Graphics
Replacing the NPC's sprites is only half the battle. For enemy NPCs, you must also replace their death effect graphics. Otherwise, they turn back into whatever they were previously when killed!
Effect graphics have a separate folder and separate numbers from their respective NPCs. Some NPCs even have more than one death effect! For example, the Goomba has separate effects for when it's squashed vs. hit with a projectile. You must make sure you replace all of an NPCs death effects lest your ruse be exposed.


+100 pts.
Unlike NPCs, effects have one enormous drawback. They are UNAFFECTED BY NPC FLAGS. You CANNOT make a text document and use it to alter an effect's proportions. Given that your enemy sprites may be larger than the original, this can be a big problem.
It's not hopeless, though. In most cases, death effects get resized automatically based on the NPC. If Firebrand were used in place of a Goomba, its death effect size would change from 32x32 to 108x82 as you specified in the text file. This is one of SMBX's rare cases of being helpfully intuitive.
There are times when this is not true, though. There are some NPCs whose death effects are a different size than their counterpart. In these cases, you are completely stuck. You'll have to make your enemy's death effect fit within the effect graphic's frame.
The other important limitation to remember about effects is that they cannot have their frame count altered. Unlike NPCs where you can set the number of its animation frames, effects are stuck with the exact number they have. As a result, to make your effect graphics work properly, you need EXACTLY THE SAME NUMBER OF FRAMES. Mimicry is absolutely vital here. If you set up your custom effect sheet with the same number of frames as the original, you should be just fine.
-----
Designing custom NPCs is not the simple task an outward glance may suggest. There are many factors to consider, and blindly copy/pasting can lead to terrible things. Understanding how they work and how to fix them isn't easy, but the end result is worth the effort.
-----
Before we begin, it's best to note that SMBX only uses .gif image files for its graphics. This means that custom sprites or edits may appear grainy if saved in certain programs. MS Paint is the worst thing you could use. There are plenty of free alternatives, and learning how to use them will work to your advantage here.
-----
Replacing an NPC's graphics is simple enough. All you have to do is put the new graphics in a folder with the same name as the level it affects. So, to change the appearance of a Goomba in a stage called 'Plain Plains', you'd make a folder called 'Plain Plains' and put the graphic inside. The Goomba NPC's file name is npc-1, so that's what you would name its replacement graphics. There's more to it than this, but that's the gist of it. For the record, putting the new graphic outside of any level folder will use it for that entire game.
What you'll need for every custom graphic is the following:
1. The sprite sheet
2. The sprite mask
sheet & mask
The sprite sheet is just the images you're using in place of the program's defaults. The sprite mask is the black and white version of the sprite sheet. It defines what parts of the sprite are normally visible. Without it, sprites will appear semi-transparent. Even worse, the mask of the original sprite will show behind it, creating very bad visuals. They are vital for this reason. However, if you wanted the sprite to be transparent, you could include an all-white version to override the original mask. Masks have the same name as their related sprites, but with the addition of an 'm' at the end. So, since the Goomba's sprite is npc-1, the sprite mask is npc-1m.
First, you need the sprites for your new enemy and to decide what you'll be replacing. It's best to choose an enemy with similar properties to the one you're making. You can't change movement patterns, AI, or certain resistances, so what you pick is important for how your NPC will behave.
Next, you need to find the original sprites for the NPC you're replacing in the program's graphics folders. The NPCs are listed in the order they were created, so finding the one you need isn't always easy. Once you've located it, make a copy and take it with you. Replacing the originals is not a good idea!
Finally, to make your new sprites work, you must have the exact same number of frames as the original. Stack the new enemy sprites vertically and make sure EVERY FRAME IS THE SAME SIZE. Even if some sprites are a little smaller than others, the frames must be the same length and width. Don't be afraid to leave some small gaps on the sprites' edges.
If you did this right, you should be able to straight-up replace the graphics. If the new sprite's proportions are the same as the original NPC's, you won't even need to do anything else. However, if the sprite size doesn't match, there's plenty you can do to make it work.
NPC Sprite Flags
Using the following flags in a custom NPC text document will allow you to use virtually any sprite for any NPC with little difficulty. These flags are: frames, framespeed, framestyle, width, height, gfxwidth, gfxheight, gfxoffsetx, and gfxoffsety.
Goomba, Koopa, and Shy Guy
frames, framespeed, and framestyle
These three are all related to the number of sprites an NPC uses. They are interrelated to a certain degree.
frames: Literally, the number of frames an NPC has for its animation. The Goomba has the same animation for walking left and right, and its frame count is 2. So, for Goomba, frames=2. Koopa has a different animation for left and right, but still only two frames for each. Thus, Koopa has frames=2 as well.
framespeed: This value affects the speed at which the NPC animation plays. Lower numbers are faster; higher numbers get slower and slower. Mind you, this is only the speed of the animation; NOT the speed at which the NPC moves! If you want to change this flag, you MUST ALSO set frames. The game won't accept this change alone.
framestyle: This is the only flag you can use to alter an NPC's behavior visually. Many NPCs have custom frame styles, but this flag offers three basic ones. When framestyle=0, the NPC behaves like a Goomba; ie they have the same animation for walking left and right. If set to 1, the NPC will be like a Koopa and have separate animations for left and right. If set to 2, the NPC will be like a Shy Guy and have an extra set of sprites for how it looks while being carried. You should only change the framestyle if absolutely necessary, since it will override sprite-specific behaviors like the Hammer Bros.' throwing frame. If you want to change this flag, you MUST ALSO set frames. The game won't accept this change alone.
width, height, gfxwidth, and gfxheight
These four flags determine the proportions of the sprite and hit box of the NPC. Knowing how they work is key to making proper custom NPCs.
width and height: These two primarily control hit box proportion, but may also suffice for sprite size depending on the circumstances. For example, if you had a custom sprite that was 108x82...
...like our buddy Firebrand here...
you'd set width=108 and height=82. This would make SMBX show the sprite at the correct size, even if the original NPC was smaller than this. More often than not, these are the only size flags you need.
gfxwidth and gfxheight: These flags are necessary when the NPC's hit box needs to be a different size than its actual sprites. Looking back at Firebrand, his arms and legs stick out far from his body, bloating his hit box. In this case, you could set width=64, height=64, gfxwidth=108, and gfxheight=82. The former two set the hit box appropriately, and the latter two set the actual size of the sprite. This way, you can control the hit box and keep it from being too large.
It's important to note just how SMBX determines where the hit box is. It's drawn from the bottom center of the sprite. So, for our Firebrand example, only the middle 64 pixels are part of the hit box.
22 pixels off the left and right would not register collisions. However, the same is not true vertically. All 18 pixels over the hit box height would come off the top of the sprite. If this is a problem, setting these next flags may help.
gfxoffsetx and gfxoffsety: These flags adjust the position of the sprite relative to their NPC. They can have negative or positive values. Their uses are few, and you must always be careful when doing so. Remember, these only move the NPC's sprite, NOT its hit box!
For example, if you had gfxoffsetx=-16 and gfxoffsety=32, the NPC's sprite would appear 16 pixels to the left and 32 pixels below where it normally would appear. Since the sprite is moved and the hit box isn't, this can create visually faulty hit detection.
In the previous example, you can see a large gap underneath Firebrand's body in the first frame. Since the hit box is drawn from the bottom, the player would take damage from bumping that empty space.
This is where the offset flags would come in handy. Setting gfxoffsety=12 would draw the sprite 12 pixels lower than normal, so the bottom of the NPCs body is lined up properly with its hit box. However, the second frame would also be affected, so Mario could safely headbutt Firebrand's crotch. Furthermore, Firebrand's hit box height would need adjusted so the air space above him isn't affected. For an NPC on the ground, this would make them appear to be stuck in the floor. This is why these flags must be used judiciously.
Of further note regarding hit boxes, enemies with projectiles have the position of their missile determined by their hit box. For example, Birdo's eggs are generated based on the location of the top of its hit box. If you were to resprite Birdo, you may have to adjust the hit box so the eggs are shot at the correct height.
Which Flags Are Needed?
Determining what graphic flags need changed can be trickier than you might think. In general, width and height are enough to get you by, but there are times when gfxwidth and gfxheight are necessary, and being able to recognize when isn't obvious.
For most NPCs, their width and height are equal to their gfxwidth and gfxheight. However, there are some NPCs where the sprite is larger than the hit box. One example is the common Koopa. Its head is not part of its hit box; only the shell is. For this sprite, its default flags are width=32, height=32, gfxwidth=32, gfxheight=54. Since the gfx flags are different, you would need to set them specifically if you were replacing Koopa.
Curse your oddly-shaped head!
If that's not confusing and aggravating enough, like other NPC flags, some NPCs have theirs hard-coded in SMBX. Even if you set the graphics flags correctly, they will STILL not work in the game. There are only a few cases like this, but they do exist.
NPC Effect Graphics
Replacing the NPC's sprites is only half the battle. For enemy NPCs, you must also replace their death effect graphics. Otherwise, they turn back into whatever they were previously when killed!
Effect graphics have a separate folder and separate numbers from their respective NPCs. Some NPCs even have more than one death effect! For example, the Goomba has separate effects for when it's squashed vs. hit with a projectile. You must make sure you replace all of an NPCs death effects lest your ruse be exposed.
+100 pts.
Unlike NPCs, effects have one enormous drawback. They are UNAFFECTED BY NPC FLAGS. You CANNOT make a text document and use it to alter an effect's proportions. Given that your enemy sprites may be larger than the original, this can be a big problem.
It's not hopeless, though. In most cases, death effects get resized automatically based on the NPC. If Firebrand were used in place of a Goomba, its death effect size would change from 32x32 to 108x82 as you specified in the text file. This is one of SMBX's rare cases of being helpfully intuitive.
There are times when this is not true, though. There are some NPCs whose death effects are a different size than their counterpart. In these cases, you are completely stuck. You'll have to make your enemy's death effect fit within the effect graphic's frame.
The other important limitation to remember about effects is that they cannot have their frame count altered. Unlike NPCs where you can set the number of its animation frames, effects are stuck with the exact number they have. As a result, to make your effect graphics work properly, you need EXACTLY THE SAME NUMBER OF FRAMES. Mimicry is absolutely vital here. If you set up your custom effect sheet with the same number of frames as the original, you should be just fine.
-----
Designing custom NPCs is not the simple task an outward glance may suggest. There are many factors to consider, and blindly copy/pasting can lead to terrible things. Understanding how they work and how to fix them isn't easy, but the end result is worth the effort.

