


VX FOR DUMMIES: TILES&TILESETS
Basic information on tileset's in RPGVX
 Ben_Random
- 02/15/2011 11:55 PM
- 17966 views
I am surprised that many people don't know how to import tiles into "Tile E" in Rpg maker VX. So let me explain how.
Before we get started, let's talk about the tile system in VX.
Unlike previous RM software, RMVX (Rpg Maker Vista&XP edition) only allows you to use one tileset. A tileset is a group of "tiles" (or drag-on squares) that an RM software can work with. There are two different types of tiles in a tileset, Below, and Character level. These are often referred to as "A" and "B" levels. B level tiles will overlap A level. For and example, a B level tile might be a cupboard, that would sit on top of an A level tile, like a floor.
When I say "previous RM software can use multiple tilesets." I mean that they have several groups of tiles that go together, and you can use one at a time. For example, in RM03 (Rpg Maker 2003 edition) there is a "Town" tileset, and a "Dungeon" tileset. You can only use one of these at a time. So, you couldn't use some tiles from the "Dungeon" tileset, and some from the "Town" tileset on a single map.
VX is a whole 'nother deal.
RMVX only allows one tileset. However, it's a fairly big tileset. It contains one "Ground" Level, referred to as page A. And four "Character" levels, referred to as B, C, D, and E, pages. However, E, is blank. The purpose of this blank page is to allow people to add their own collection of tiles to the tileset. The way to do it is rather simple:
1. Find the tileset that you want to import, they can be found online or can be made.
2. Save the tileset somewhere that you can find it and name it "Tile E."
3. Open your VX project, and open the resource manager. (The icon with the multi-colored shapes on the top bar).

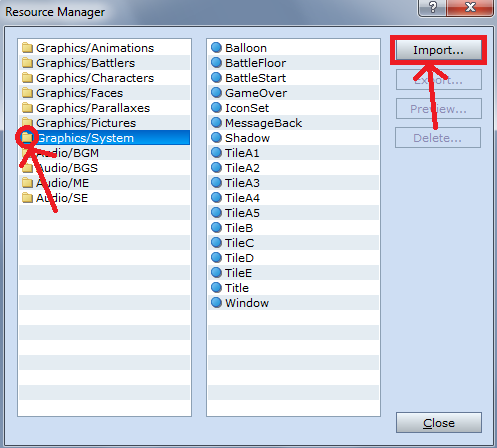
4. In the resource manager, click the "Graphics/System" folder button, click on "Import", and find your Tile E file. (Make sure it has the exact same spacing and capitalization as the "Tile E" which is already in your resource manager.)
5. Enjoy.
In theory, you could do this with pages A-D as well, and have your very own tileset, but to replace Tile A you need an understanding of Auto tiling which I do not have, therefor cannot explain.
However, if you press F1 while in the engine, you will open the help file. Here there is an extensive description of auto-tiling.
I hope this helps. :)
Before we get started, let's talk about the tile system in VX.
Unlike previous RM software, RMVX (Rpg Maker Vista&XP edition) only allows you to use one tileset. A tileset is a group of "tiles" (or drag-on squares) that an RM software can work with. There are two different types of tiles in a tileset, Below, and Character level. These are often referred to as "A" and "B" levels. B level tiles will overlap A level. For and example, a B level tile might be a cupboard, that would sit on top of an A level tile, like a floor.
When I say "previous RM software can use multiple tilesets." I mean that they have several groups of tiles that go together, and you can use one at a time. For example, in RM03 (Rpg Maker 2003 edition) there is a "Town" tileset, and a "Dungeon" tileset. You can only use one of these at a time. So, you couldn't use some tiles from the "Dungeon" tileset, and some from the "Town" tileset on a single map.
VX is a whole 'nother deal.
RMVX only allows one tileset. However, it's a fairly big tileset. It contains one "Ground" Level, referred to as page A. And four "Character" levels, referred to as B, C, D, and E, pages. However, E, is blank. The purpose of this blank page is to allow people to add their own collection of tiles to the tileset. The way to do it is rather simple:
1. Find the tileset that you want to import, they can be found online or can be made.
2. Save the tileset somewhere that you can find it and name it "Tile E."
3. Open your VX project, and open the resource manager. (The icon with the multi-colored shapes on the top bar).
4. In the resource manager, click the "Graphics/System" folder button, click on "Import", and find your Tile E file. (Make sure it has the exact same spacing and capitalization as the "Tile E" which is already in your resource manager.)
5. Enjoy.
In theory, you could do this with pages A-D as well, and have your very own tileset, but to replace Tile A you need an understanding of Auto tiling which I do not have, therefor cannot explain.
However, if you press F1 while in the engine, you will open the help file. Here there is an extensive description of auto-tiling.
I hope this helps. :)
Posts 

Pages:
1


Very good, now the is left just one thing to be perfect :P... Having the dimensions ! Ex: 100 px by 150 px. :P
Pages:
1

